Wingdings Characters are a symbolic font that a lot of us use for fun. I do that a lot too! But what if we wanted those cool symbols to be of good use in Excel?Whenever I tried typing using the Wingdings font, I was not sure which symbol I would get! I will show you how easy it is to pick cool Wingdings Characters and use them in your Excel worksheet!
Key Takeaways
- To insert Wingdings characters into Excel, first change the font of the target cell to Wingdings or Wingdings 2. Then use the corresponding keyboard shortcut to enter the desired symbol. For example, with Wingdings 2 selected, pressing Shift+P will insert a check mark.
- Personalized symbols can be added to an Excel spreadsheet by going to the ‘Insert’ tab, clicking ‘Symbols’, selecting the Wingdings 2 font, choosing the desired symbol, and clicking ‘Insert’. Remember that the symbol inserted is actually a character (like “P” for a check mark) and will revert to its standard character if the font is changed back from Wingdings.
- For automating symbol insertion or for creating custom indicators, use the CHAR function in Excel with the symbol’s character code. The character code for a symbol can be found in the ‘Insert Symbol’ window. For instance, using ‘=CHAR(80)’ with the Wingdings 2 font selected will insert a check mark since “80” is the character code for this symbol within Wingdings 2.
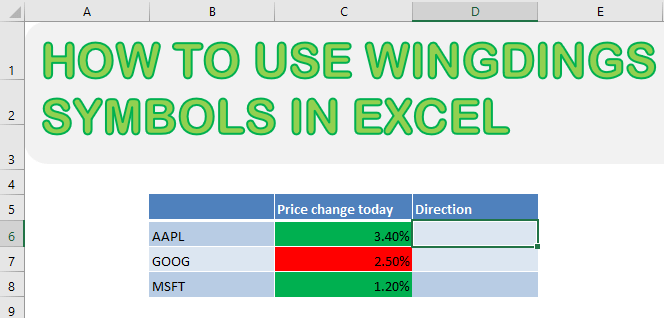
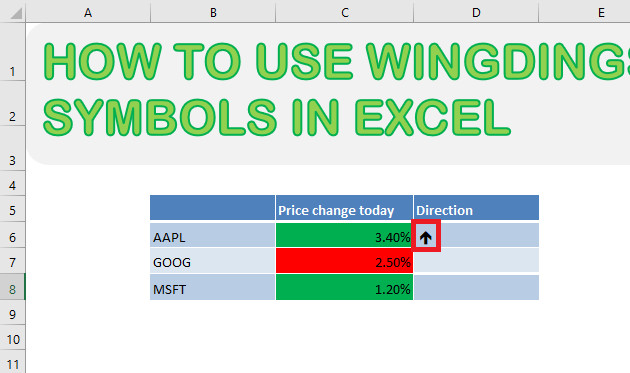
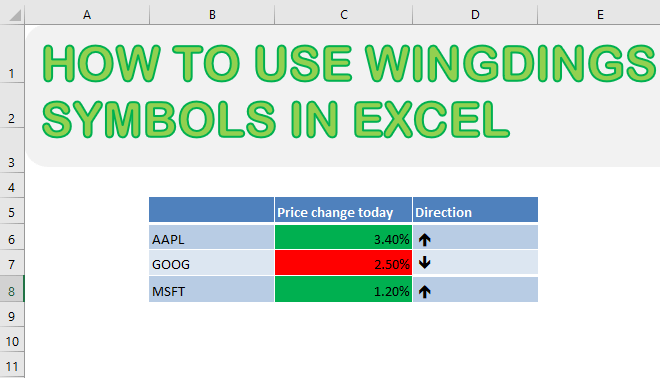
Here is a sample usage of Wingdings characters for stock prices:
Table of Contents
Using Character Map
STEP 1: Select the cells that you want to place the symbols in:
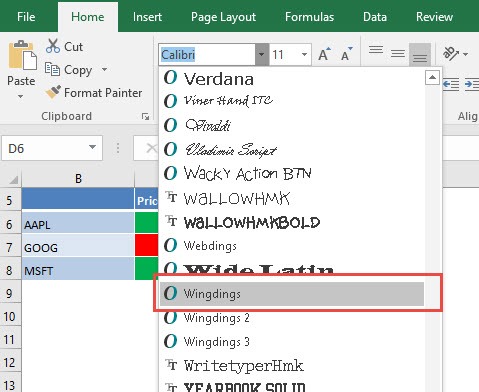
STEP 2: Go to Home Tab > Font dropdown > Select Wingdings.
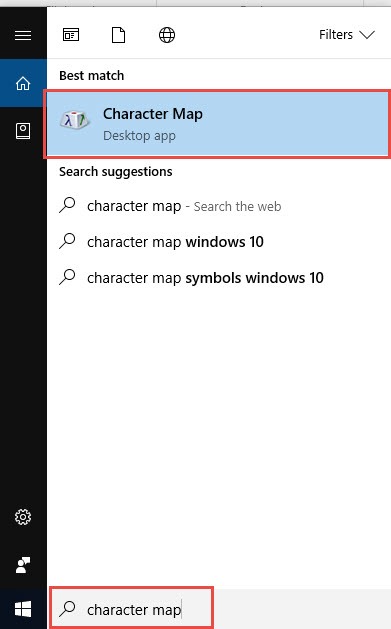
STEP 3: Now that our cells are able to accept Wingdings characters, go to Windows Start (Windows 10) > Search Bar > Character Map
If you have an older version of Windows, go to Start > All Programs > Accessories > System Tools > Character Map
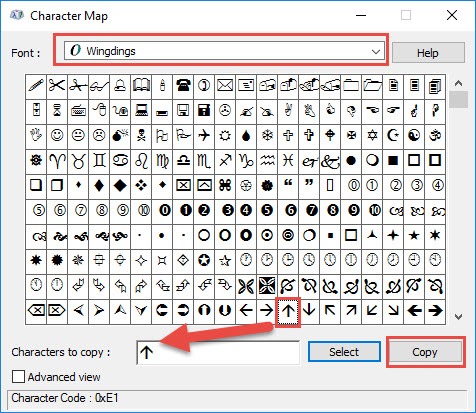
STEP 4: You will now see all the characters in the wingdings chart! Ensure the Font is Wingdings.
Double click on the symbol you want to use. Click Copy.
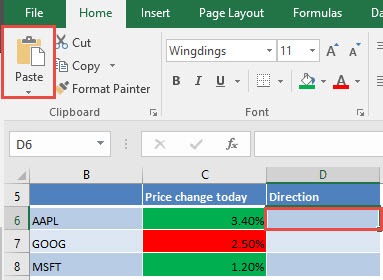
STEP 5: Go to your Excel Spreadsheet and click Paste.
Do the rest for the other cells, and you have used Wingdings Symbols!
Using Symbol Menu
You can use the insert symbols option to use Windings characters in Excel.
STEP 1: Select the cells where you want to insert symbols.
STEP 2: Go to Insert Tab> Symbols dropdown > Select Symbol.
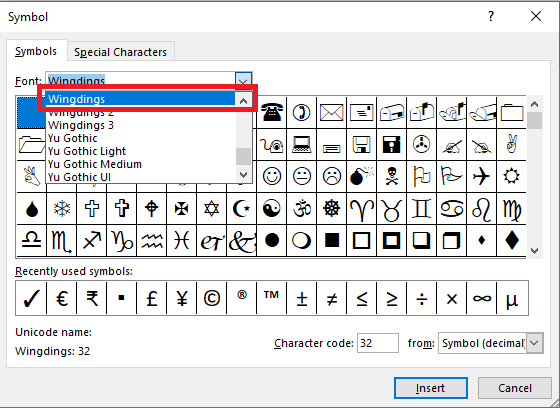
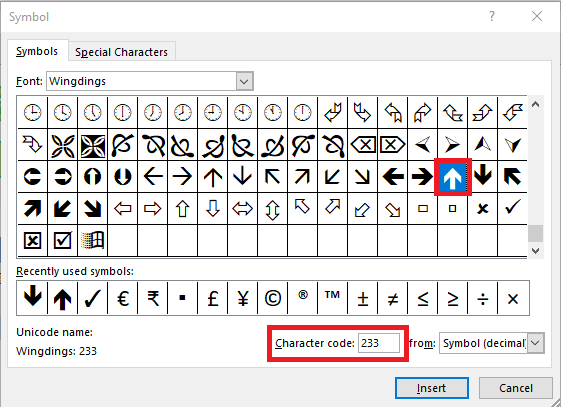
STEP 3: In the Symbols dialog box, select Windings from the font dropdown.
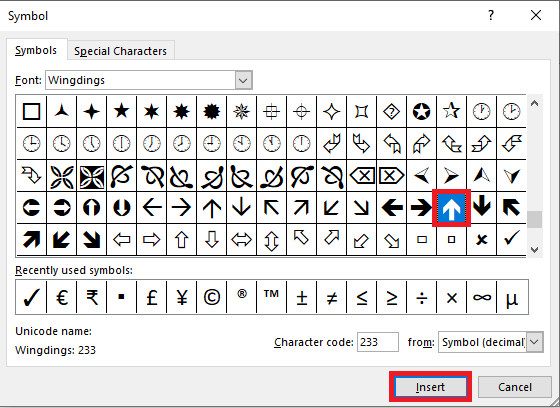
STEP 4: Select the arrow up symbol from the wingdings font chart and press Insert.
The arrow symbol will now be inserted in the cell.
STEP 5: Repeat the same steps for inserting the symbols in cell D7 and D8.
Using CHAR Function
In the previous method, you might have noticed that for every wingdings symbols there is a character code mentioned in the bottom right corner of the Symbol dialog box.
For example – The character code for the upwards arrow is 233.
You can use the CHAR Function in Excel to insert the character code and return the corresponding symbol.
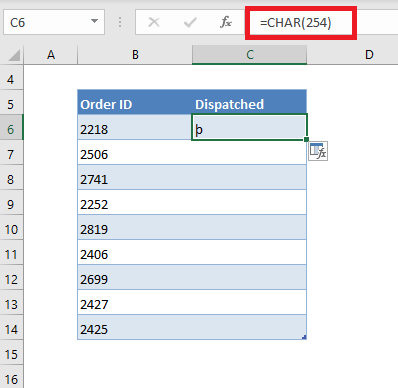
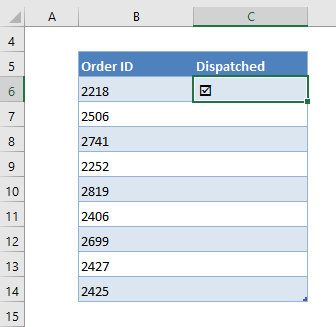
CHAR function returns a character specified by a number from 1 to 255. For example, CHAR(254) returns a tick box (☑), CHAR(34) returns a ” (double quote), CHAR(233) returns ↑(arrow upwards), etc.
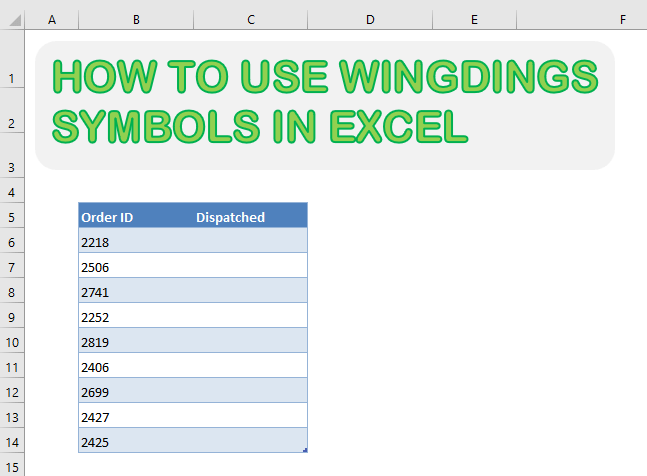
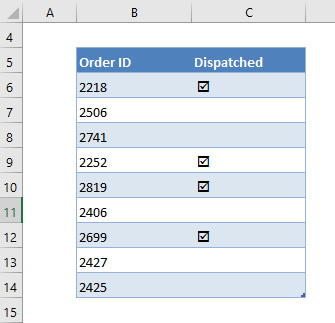
In the example below, there is a list of Order IDs and you want to add a tick box for the orders that have been dispatched.
Let’s use this CHAR function to insert a tick box in Excel!
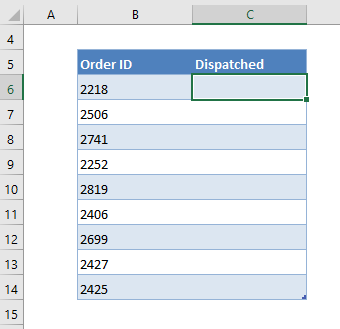
STEP 1: Select the cell where you want to insert a tick box.
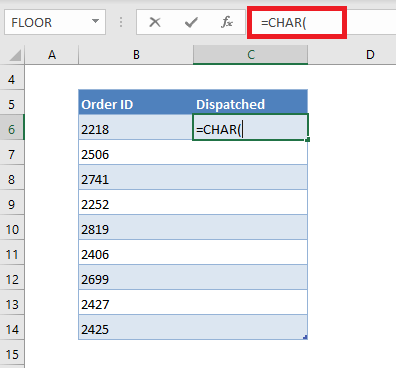
STEP 2: Enter the CHAR Function.
=CHAR(
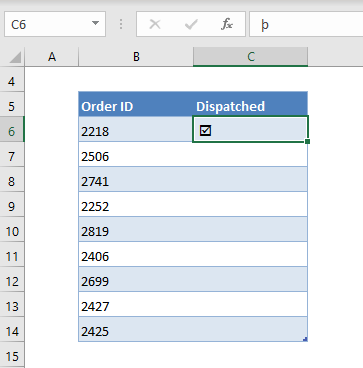
STEP 3: Enter the character code of the tick box and press Enter.
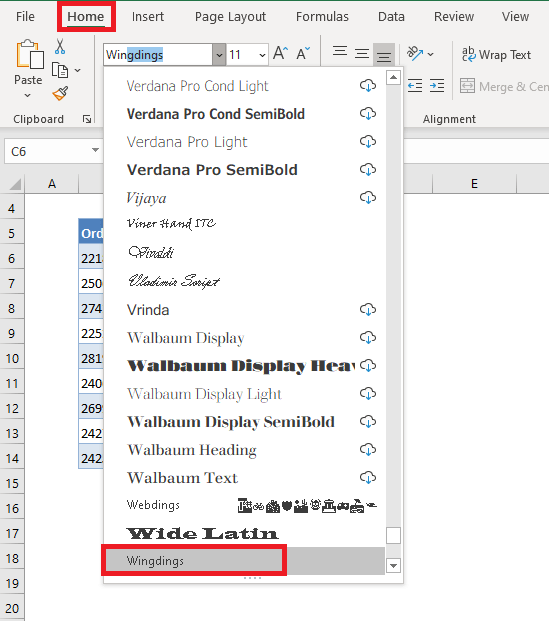
STEP 4: Go to Home > Font Dropdown > Select Wingdings.
This will insert the tick box symbol in the selected cell!
STEP 5: Copy-paste the formula in the cells where you want a tick box.
Using Alt Codes
An easier way to insert character in Excel is to use the Alt button in a combination with the character code.
STEP 1: Select the cell where you want to insert a symbol.
STEP 2: Go to Home > Font Dropdown > Select Wingdings.
STEP 3: Press and hold the Alt button and then type the character code (0254) on your keypad.
This is how you can easily use the Alt button to insert windings characters in Excel. But, you need to keep the following points in mind while using this method:
- You have to add a leading zero in front of the character code i.e. you need to type 0254, not 254.
- You need to use the numerical keypad, not the numbers at the top of the keyboard.
Practical Applications for Wingdings in Excel
Visually Effective Excel Dashboards with Wingdings
If you’re aiming to give your Excel dashboards a visual lift-off, Wingdings can be your secret ingredient. This iconic font transfers a boring data sheet into a compelling visual story. By adding symbols like ticks, crosses, or arrows, you’re not only enhancing the aesthetic but also making information digestible at a glance. Imagine a dashboard where performance indicators light up with eye-catching symbols—efficiency and clarity served on a silver platter.
Project Planning Enhanced by Wingding Symbols
For those of you tirelessly planning projects, Wingdings can slide into your toolkit like a charm. They can transform a maze of deadlines and milestones into a neatly organized roadmap. By using symbols like clocks for pending tasks and phones for delayed actions, you instantly convey status with universal icons. It’s all about maximizing instant recognition and minimizing text overload. Visual cues like these can turn a daunting project schedule into an easily navigable, interactive planner.
Formatting Matters: Making Wingdings Work for You
Adjusting Size and Color for Readability
Getting the size and color right with Wingdings is crucial for them to be effective. You’ll want those symbols to pop just enough to draw attention without overpowering your text. All you have to do is select your Wingding icons, then play with the font size and color settings until you strike the perfect balance. Enlarging a checkmark next to a completed task, or coloring a warning symbol in red, can convey priority and status incredibly quickly. Remember, the goal is enhancing comprehension, not distracting from the core data.
Conditionally Format Cells with Wingding Icons
Conditionally formatting cells with Wingding icons turns your spreadsheet into a dynamic canvas that reflects data changes in real-time. It involves setting rules that automatically update the cells’ appearance based on their content. For instance, imagine a to-do list that marks tasks with a green check or a red cross, depending on completion status. This magic is achieved by inserting conditional formulas that use the CHAR function with the appropriate Wingdings character codes. The result? A self-updating, visually impactful spreadsheet that communicates data status with just a quick glance.
Tips and Tricks for Wingdings Mastery
Quick Selections Using the Symbols Dialog Box
Swiftly navigating through the Symbols dialog box is a smooth move for any Excel user dabbling with Wingdings. Once you click ‘Insert’ and select ‘Symbol,’ a world of icons opens up for your perusal. Scrolling might seem endless, but here’s the trick: if you already know the symbol you want, keying in the character code gets you there in a jiffy. If you’re more of a browse-and-select person, sorting symbols by subset can simplify your search. Either way, once you find your symbol, a double click instantly places it into your cell, and voilà! Your data now speaks in pictures as well as words.
Creative Uses of Wingdings for Interactive Spreadsheets
Infuse life into your spreadsheets by getting creative with Wingdings. You can design interactive checklists where a simple click toggles between different Wingdings symbols, signifying task status. Or, create a rating system with star symbols to rank items. Even more interactively, you could set up a feedback form within Excel where users select smiley or sad faces from the Wingdings set. With a dash of creativity, these quirky symbols not only make your spreadsheets more engaging but also elevate the user’s experience to a whole new level of interactivity.
FAQs About Utilizing Wingdings in Excel
How can I convert regular text to Wingdings in Excel?
To convert regular text to Wingdings in Excel, first select the cell with the text. Then, go to the Home tab, and in the Font group, choose Wingdings from the dropdown menu. Your text will transform into corresponding Wingding symbols instantly. Remember, each letter or number is linked to a unique Wingding character, so your original text will look quite different once converted.
Is it possible to count Wingdings symbols in my spreadsheet?
Yes, you can count Wingdings symbols in your spreadsheet by using the COUNTIF function combined with the CHAR function. You’ll need to know the character code for the Wingdings symbol you want to count. Then, apply the COUNTIF function to the range with the formula =COUNTIF(range, CHAR(character code)), which will tally up the occurrences of that specific symbol.
How do I use Wingdings characters dynamically with formulas?
You can display Wingdings symbols using formulas. For instance, set the font of the target cell to “Wingdings” and use a formula like =IF(A1="Yes", "ü", "û"). In this example, the Wingdings characters display a checkmark (ü) for “Yes” and a cross (û) for anything else.
Can I copy and use Wingdings symbols in other applications?
Yes, you can copy Wingdings symbols from Excel and paste them into other applications like Word or PowerPoint. Ensure the destination app supports the Wingdings font, or the symbols might appear as their original keyboard characters instead.

Bryan
Bryan Hong is an IT Software Developer for more than 10 years and has the following certifications: Microsoft Certified Professional Developer (MCPD): Web Developer, Microsoft Certified Technology Specialist (MCTS): Windows Applications, Microsoft Certified Systems Engineer (MCSE) and Microsoft Certified Systems Administrator (MCSA).
He is also an Amazon #1 bestselling author of 4 Microsoft Excel books and a teacher of Microsoft Excel & Office at the MyExecelOnline Academy Online Course.

