When working with Excel, there are times when I need to evaluate multiple conditions before arriving at a result. One of the most effective ways to do this is by using the IF formula with multiple conditions. Excel’s IF function can be a lifesaver if you’re trying to categorize data, run complex financial calculations, or simply display different results based on varying inputs.
In this article, I’ll walk you through how to use the IF formula in Excel with 3 conditions, focusing on both the AND and OR logic, as well as some advanced techniques like nested IF statements. I’ll also show you how to avoid common pitfalls and ensure your formulas run smoothly. Let’s dive into it!
Key Takeaways:
- The IF function in Excel is fundamental for decision-making, enabling different results based on conditions.
- Use AND and OR within IF formulas to handle multiple conditions, providing flexibility in evaluations.
- Nested IF statements allow for tiered decision-making, perfect for categorizing data in stages.
- Array formulas streamline multiple conditions across ranges, especially powerful with Excel 365’s dynamic arrays.
Table of Contents
Unlocking the Power of IF Formula with Multiple Conditions in Excel
IF Function Basics and When to Use it
It’s essential to understand that the IF function is a mainstay when it comes to decision-making in Excel. At its core, this function performs a conditional test on a specific value or formula—handy when one’s decision hinges on whether a particular condition is met.
I recommend employing the IF function when you need to categorize data, perform calculations based on criteria, or simply display results that pivot on certain conditions being true or false.
Essential Elements of an IF Statement
An IF statement is built on three key elements, which work in tandem to produce the resulting output.
=IF(logical_test, value_if_true, value_if_false)
The logical test is your condition; think of it as the question you’re posing to your data. The value_if_true is the response if your data affirmatively answers the question, akin to a “yes” in a decision-making process. Conversely, the value_if_false is the outcome if your data negates the query, comparable to a “no.”
When crafting an IF statement in Excel, these elements must be clearly defined and articulated in the right order to ensure accurate results. What’s beautiful about the IF formula is its blend of simplicity and precision—asking straightforward questions and yielding clear-cut answers that drive data interpretation and decision-making.
Mastering the 3 Conditions Format in Excel’s IF Statement
Combining Logical Tests using AND and OR Functions
Combining logical tests using AND and OR functions with the IF formula elevates its versatility to cater to complex scenarios. When you deploy the AND function within an IF statement, you command Excel to return a specific result only if all conditions are met. It’s like saying that every criterion you’ve listed is a must-have for the outcome you desire.
Contrarily, the OR function within an IF statement requires that any single condition satisfies the criteria, making it more flexible. This function operates on a ‘one and done’ principle—once a single condition is true, the test is passed. When I encounter tasks that necessitate multiple layers of criteria, I often merge both the AND & OR functions, effectively setting up a multi-tiered, conditional logic within a single IF statement.
Here we have utilized both AND and OR Functions:
- AND(A2 >= 90, B2 >= 0.95): Checks if the score is 90 or above and attendance is 95% or above.
- OR Function: OR(AND(A2 >= 80, A2 < 90), AND(B2 >= 0.85, B2 < 0.95)): Checks if the score is between 80 and 89 or attendance is between 85% and 94%.
Practical Scenarios for Using Three Conditions
In real-world applications, using three conditions within an IF statement translates into enhanced decision-making capacity within a spreadsheet.
For instance, suppose you’re managing payroll and need to calculate bonuses based on several factors, such as sales performance, attendance, and customer feedback scores. You would set up an IF statement with three conditions to ensure an employee must meet all specified criteria before receiving a bonus.
Another scenario might involve inventory management, where you need to reorder items only if they fall below a certain threshold, have been marked as high priority, and if it’s within certain fiscal dates. This threefold conditional check ensures precise inventory control and financial compliance.
These examples showcase just how robust and tailored IF statements with multiple conditions can be, turning Excel into a powerful tool for rationalizing and automating myriad data-driven tasks.
Step-by-Step Examples: Building Complex IF Formulas
Example 1. Nested IF Functions for Granular Control
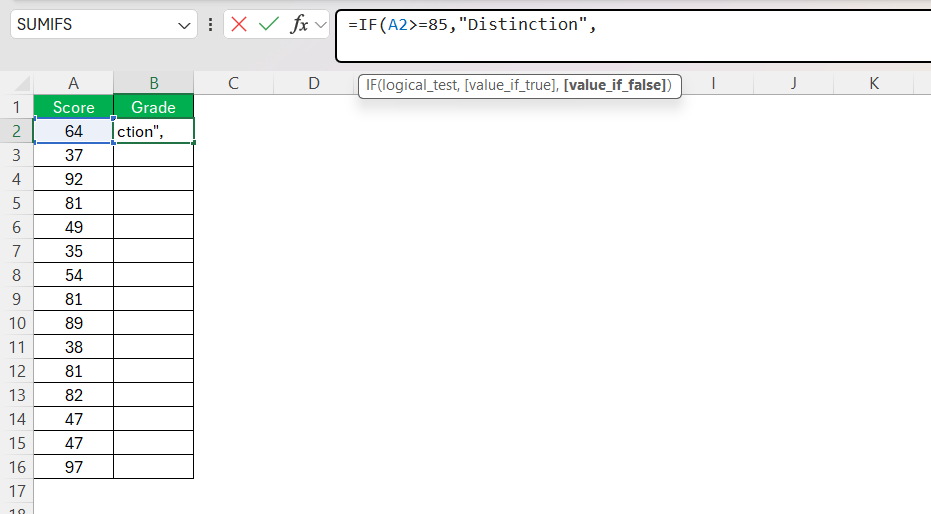
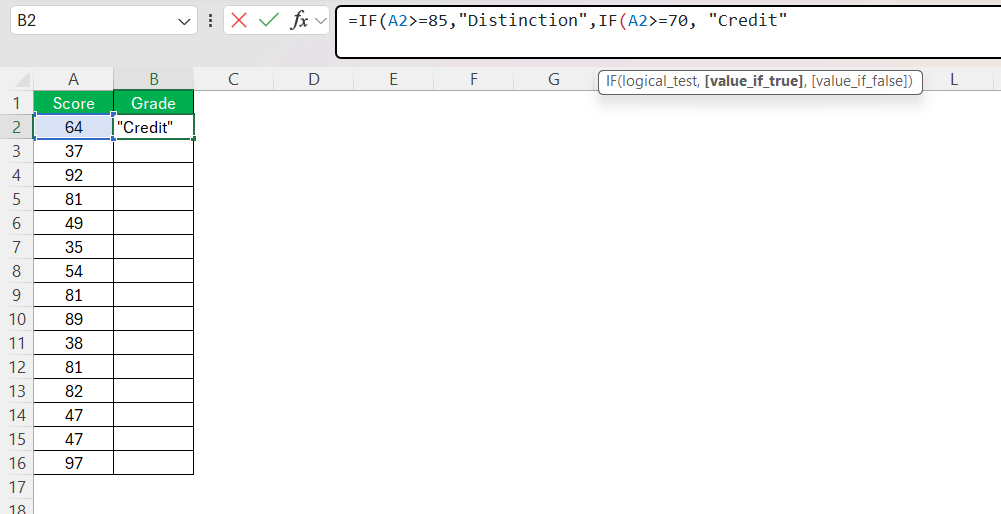
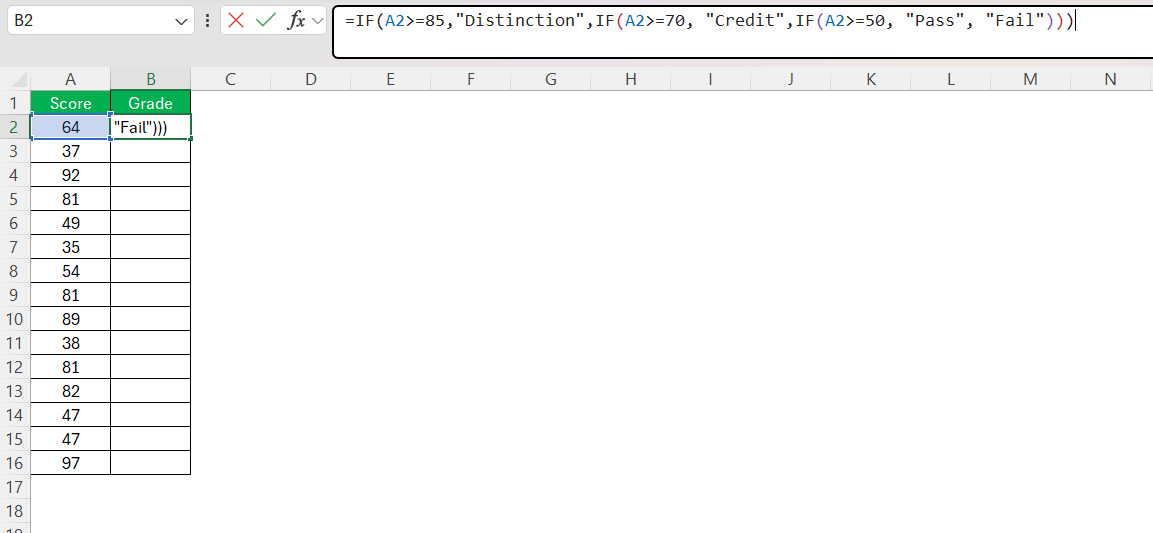
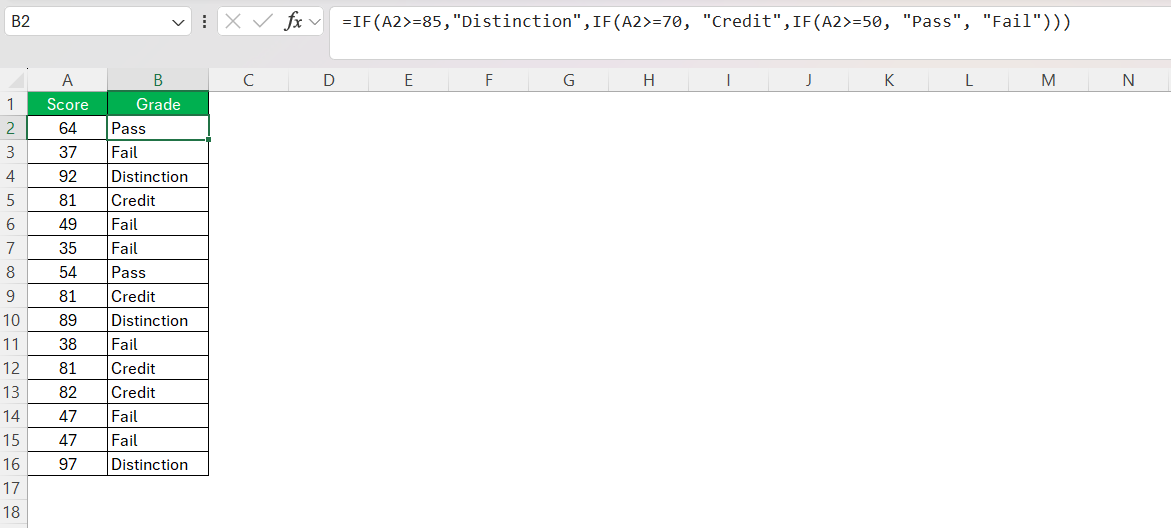
To illustrate how nested IF functions can provide granular control, let’s dive into an example. Imagine you’re assessing student performances with grades. You’d like to allocate a particular qualification (Distinction, Credit, Pass, or Fail) based on the score range. To achieve this, you can create a nested IF statement that checks for each range sequentially:
STEP 1: Begin with the outermost IF function to check if the score is above the Distinction threshold.
STEP 2: Use a subsequent nested IF function to determine if it’s within the Credit range if the first condition is false.
STEP 3: Continue nesting IF functions to test for a Pass. Finally, if all other conditions are false, label it as a Fail.
The formula could look something like this: =IF(score>=85, "Distinction", IF(score>=70, "Credit", IF(score>=50, "Pass", "Fail"))).
Using this nested approach ensures that the scores are checked against each condition in a sequential order, providing precise, level-by-level analysis of the data.
Example 2. Integrating AND & OR Logic for Broader Evaluations
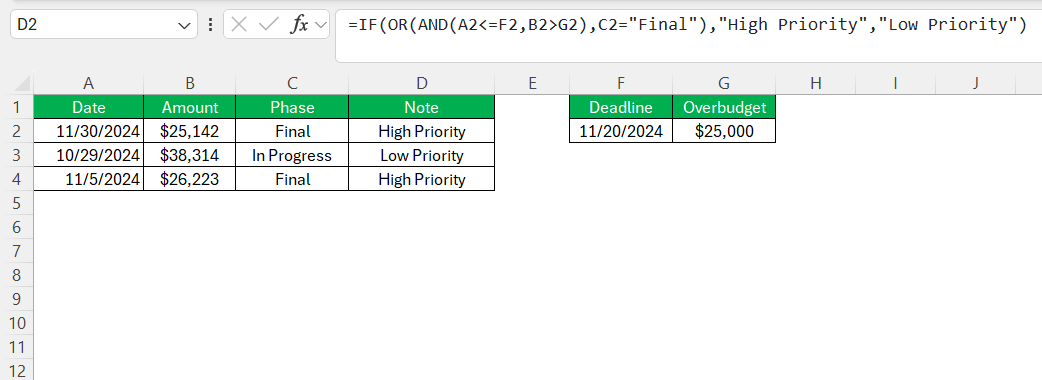
When we want our IF formula to pass a broader range of evaluations, integrating AND & OR logic is a game-changer. Suppose we’re managing project tasks and need to determine priorities based on deadlines, project phase, and allocated budget. Here’s how to use AND & OR in conjunction with an IF statement to create such evaluations:
STEP 1: Use AND to ensure certain tasks only get marked as “High Priority” if they are near the deadline (less than 5 days away) and over budget.
STEP 2: Employ OR so that tasks also get marked the same priority if they are in the final phase, regardless of the other criteria.
So, the formula would look somewhat like this: =IF(OR(AND(deadline<=5, overBudget=TRUE), phase="Final"), "High Priority", "Low Priority").
This structure allows for a sophisticated conditional check, where multiple layers of criteria can determine the prioritization of tasks, saving time, and optimizing workflow management.
Troubleshooting Common Issues with Multi-Condition IF Formulas
Avoiding Errors When Working with Multiple Arguments
Avoiding errors when juggling multiple arguments in an IF formula is critical for accurate data analysis. One key strategy is to ensure that each argument is properly structured and that the syntax is correct, avoiding mismatched parentheses, incorrect cell references, or logical inconsistencies. We also need to be mindful of data types: numerical arguments should not be confused with text, and vice versa.
Another common error to watch out for is an argument limit. In Excel 2007 and later, while we can use up to 255 arguments in a formula, we must remember that the total length of the formula should not exceed 8192 characters. In earlier versions like Excel 2003, the limitations are stricter, allowing no more than 30 arguments.
By methodically checking our formulas and respecting Excel’s constraints, we lessen the risk of errors and the frustration that often accompanies troubleshooting complex IF statements.
Tips for Ensuring Clean and Efficient Multiple Condition Formulas
To keep multiple condition formulas in Excel both clean and efficient, I’ve found the following tips particularly useful:
- Clarity is King: Break down complex formulas into smaller, more manageable pieces. If a formula gets too unwieldy, consider using helper columns to simplify the logic step by step.
- Named Ranges: Use named ranges to replace cell references. This not only makes the formula easier to understand but also reduces errors when copying or modifying the formula.
- Use Comments: Insert comments in your formulas to explain the logic, especially when working with nested IFs or composite AND/OR functions. This practice is a godsend for those who may inherit your workbook.
- Stay Updated: Excel versions evolve, and with them, the functions at your disposal. Familiarize yourself with newer functions, like IFS, which can streamline complex conditional statements.
- Test Incrementally: When building a formula, test it at every stage of complexity. This way, you’ll instantly know where an error creeps in, making troubleshooting far less daunting.
By adopting these strategies, we can produce robust IF statements devoid of clutter and confusion—a crucial step towards seamless data management and analysis.
FAQ – Excel IF Function Queries Answered
Can I write 2 conditions in an IF statement?
Yes, I can write two conditions within an IF statement by utilizing the AND or OR functions. With AND, both conditions must be true for the statement to pass, while with OR, only one of the conditions must be true. The generic formula looks like =IF(AND(condition1, condition2), value_if_true, value_if_false) for an AND logic and similarly, =IF(OR(condition1, condition2), value_if_true, value_if_false) for OR logic. This functionality is crucial for creating more nuanced data analyses and actions within an Excel spreadsheet.
How do you put 3 conditions in an IF formula?
To include three conditions in an IF formula, I’ll often use nested IF statements or the streamlined IFS function. A nested IF formula would look something like this: =IF(condition1, value_if_true1, IF(condition2, value_if_true2, IF(condition3, value_if_true3, value_if_false3))). Alternatively, the IFS formula, which is more concise and easy to read, looks like =IFS(condition1, value_if_true1, condition2, value_if_true2, condition3, value_if_true3), directly linking each condition to its corresponding outcome. This addition allows for complex decision-making within data sets.
Can you have 3 if statements in Excel?
Certainly, you can have three IF statements in Excel, and it’s a common practice for complex conditional logic. This is done by nesting one IF function inside another. The technique is to position the second IF function as the “value_if_false” part of the first, and the third IF as the “value_if_false” of the second. It allows for sequential checks against multiple conditions, making it a powerful tool for data analysis and managing intricate scenarios within Excel spreadsheets.
How to use multiple if formula in Excel?
Using multiple IF formulas in Excel requires nesting them within each other or utilizing the IFS function for a more streamlined approach. With nested IFs, each subsequent IF statement is placed inside the false argument of the previous one, allowing for a sequence of conditions to be checked. The formula structure resembles a decision tree and grows increasingly complex with each level. The IFS function simplifies this by performing evaluations without the need for nesting, checking each condition in the order presented until a true result is found. Both methods enable multi-condition checks critical for detailed data analysis.
What is an if formula in Excel?
An IF formula in Excel is a function designed to execute conditional tests on values and expressions. It assesses a given condition and returns one outcome if the condition is true and a different outcome if it’s false. The formula’s anatomy includes three parts: a condition to check (logical_test), a result for when the condition is true (value_if_true), and a result for when it is false (value_if_false). Its straightforward logic makes it a versatile tool for data-driven decision-making within Excel spreadsheets.
John Michaloudis is a former accountant and finance analyst at General Electric, a Microsoft MVP since 2020, an Amazon #1 bestselling author of 4 Microsoft Excel books and teacher of Microsoft Excel & Office over at his flagship MyExcelOnline Academy Online Course.


