When working with data in Excel, you may encounter situations where negative numbers in your dataset are not meaningful or need to be replaced with zeros. I’ve faced this challenge numerous times and found Excel’s features incredibly handy for resolving it. Let me guide you through a few simple methods to transform if negative then zero in Excel.
Key Takeaways:
- Negative Numbers Matter: Managing negative values in Excel is essential for accurate financial or statistical analysis.
- Use the MAX Function: The formula =MAX(0, cell_reference) efficiently replaces negatives with zero.
- Leverage the IF Function: The formula =IF(A1<0, 0, A1) checks for negatives and replaces them with zero while retaining positives.
- Combine Functions for Complex Needs: You can combine IF with other operations to handle nuanced scenarios, like inflation adjustments.
- Avoid Common Mistakes: Ensure proper formula application, consistent dataset adjustments, and correct formatting for reliable results.
Getting Started with Excel’s Number Transformations
The Importance of Managing Negative Numbers
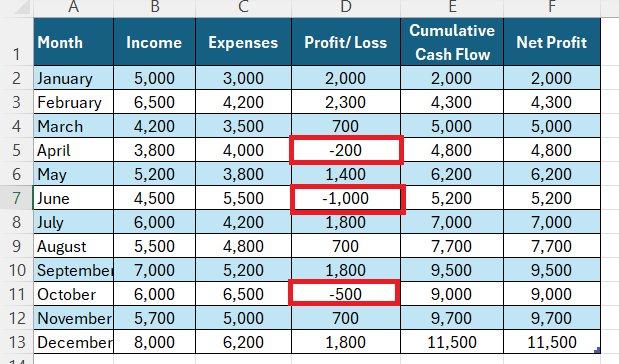
In my experience as an Excel user, I’ve found that handling negative numbers is not just important but essential, especially when it pertains to financial analysis or statistical data. Negatives can significantly affect the outcome of calculations such as the sum, average, or cash flow analyses. By skillfully managing negative values, we ensure the integrity and clarity of the data, which is paramount for accurate reporting and decision-making.
Grasping the fundamental formula structure in Excel is like learning to read the alphabet before constructing sentences. At the heart of every Excel formula is the equal sign (=), which signals the start of a computation. After this sign, I add the desired operations involving cell references or numbers. For example, to add two cells, A1 and B1, I write =A1+B1. This adherence to a basic structure ensures consistency and predictability in crafting formulas across all Excel spreadsheets and scenarios.
If Negative then Zero
Utilizing the MAX Function
I find the MAX function in Excel particularly adept at converting negative numbers to zero. If you’re unfamiliar, the syntax is delightfully simple: =MAX(0, cell_reference). What happens here is direct – Excel compares the value 0 with the value in the referenced cell, returning the greater of the two. This is especially practical when I encounter a cell, say B1, with a value of -3.
Entering =MAX(0, B2) would result in Excel presenting 0, effectively neutralizing the negative. The merit of using the MAX function shines in its simplicity and efficiency, something I definitely appreciate when working with extensive datasets. It’s a method that preserves positive values while effortlessly converting negative ones to zero. Follow these steps:
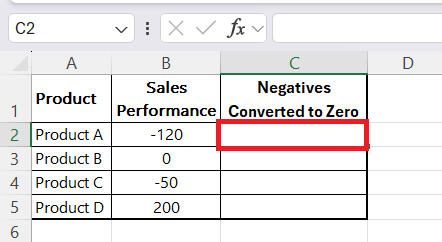
STEP 1: Selected a cell where I wanted to enter the MAX function to counter the negatives and make them zero instantly.
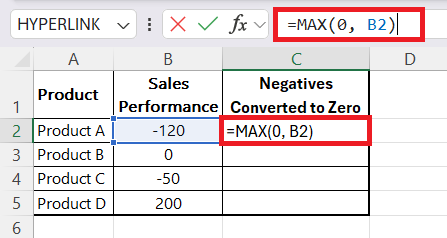
STEP 2: I used the formula “=MAX(0, B2)” in cell C2 to limit the outcome to 0 instead of a Negative output.
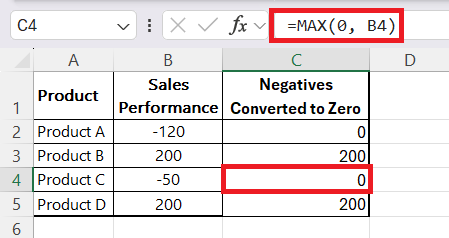
STEP 3: Press enter and find the result to be 0 instead of Negative. Copy or draft the same formula for the outcome of converting negative numbers to zero.
Harnessing the Power of IF Statements
When I’m working with data, I often encounter negative numbers that can skew my analysis or reports. Thankfully, Excel makes it easy to handle this issue with the IF function. This function allows me to set negative values to zero, ensuring my analysis remains clean and accurate.
The beauty of the IF function lies in its simplicity:
- If a condition is true, return one value.
- If the condition is false, return another value.
The structure of the formula looks like this:
=IF(condition, value_if_true, value_if_false)
For example, if I have a cell, say C1, that stores a value like -4, I can use the formula =IF(C1<0, 0, C1) to check if the value is negative. If it is, Excel will return 0 instead. If the value is not negative, Excel will leave the original value unchanged.
Let me walk you through how I use this function to clean up my data when negative numbers are present.
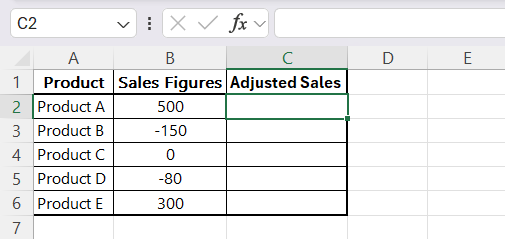
STEP 1: Before applying the IF function, I make sure my dataset is ready. For instance, I might be working with sales figures for different products, and some of these numbers are negative due to returns or refunds.
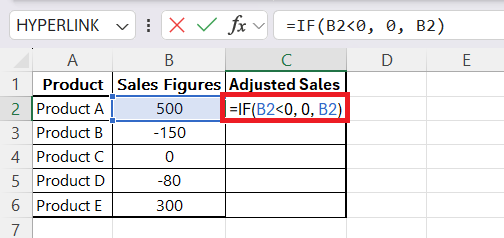
STEP 2: In the next column (Column C, for “Adjusted Sales”), I’ll apply the IF function to convert any negative values to 0 while leaving positive numbers as they are. I click on the first empty cell in Column C (e.g., C2). I enter the following formula: “=IF(B2<0, 0, B2)”
Here’s how the formula works:
- B2 refers to the sales figure for Product A.
- The condition checks if the value in B2 is less than 0.
- If true (i.e., if the value is negative), the formula returns 0.
- If false (i.e., if the value is positive or zero), the formula returns the original value from B2.
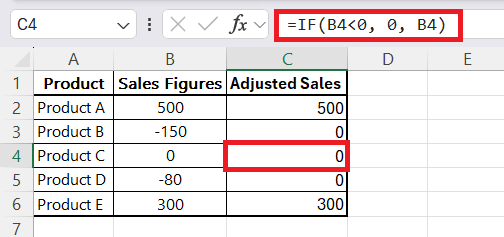
STEP 3: Once I’ve entered the formula for the first row, I can copy it down the entire Adjusted Sales column to apply it to all the products.
Troubleshooting Common Issues
Dealing with Errors in Formulas
We’re all familiar with the occasional hiccup when dealing with complex Excel sheets—errors in formulas can crop up even for the savviest users. I’ve learned to be particularly vigilant about them, as they can cascade and affect large portions of my work.
A regular practice I follow is to lean on Excel’s Error Checking feature, accessible from the Formulas tab.
This tool scans for errors like #DIV/0! or #NAME?, flagging them for review so I can quickly troubleshoot and correct the miscalculation or reference issue at hand.
Additionally, I keep an eye on the error messages that appear in cells; understanding what each message signifies helps me pinpoint and resolve issues in real-time, ensuring that my data not only stays accurate but remains reliable for any sort of analysis or reporting.
Combining Functions for Complex Fixes
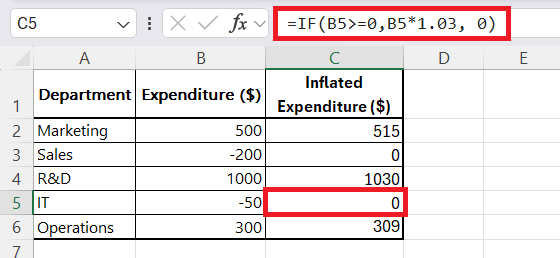
Often, converting if negative then zero is just one piece of a more intricate puzzle. For those nuanced scenarios, I find that combining functions is a very powerful strategy. Suppose you need to adjust for inflation only non-negative expenditures in your dataset; I might use something like =IF(A2>=0, A2*1.03, 0). Here, the IF function assesses whether a number is non-negative, the multiplication applies the inflation adjustment, and any negatives are turned to zero.
FAQ: Excel Solutions at Your Fingertips
How to do if negative then zero in Excel?
To replace negative numbers with zeros in Excel, use the IF function. Enter the formula =IF(A1<0, 0, A1) into a cell, replacing A1 with the relevant cell reference you’re checking. If the value is negative, the function returns 0; if not, it returns the number from the cell. This is a straightforward yet powerful way to ensure only non-negative numbers are displayed.
How can I prevent negative numbers when calculating in Excel?
To prevent negative numbers during calculations in Excel, you can use the MAX function. Just include your calculation inside the MAX function like so: =MAX(0, your_calculation_here). This will return the result of your calculation if it’s positive, and 0 if it’s negative, thereby ensuring that all results remain non-negative.
What are some mistakes to avoid when manipulating number signs in Excel?
When manipulating number signs in Excel, it’s critical to avoid the following mistakes: First, incorrectly using the minus sign, which can lead to the wrong calculation results. Second, failing to apply changes to the entire dataset, which can skew data consistency. Lastly, overlooking the impact of formatting on actual values—one must ensure the data reflects what’s needed analytically, not just visually. These common oversights can compromise the accuracy of your financial or statistical analysis.
How do you write an IF-THEN function in Excel?
In Excel, to write an IF-THEN function, enter =IF(logical_test, value_if_true, value_if_false) into a cell. Replace ‘logical_test’ with your condition, ‘value_if_true’ with the outcome if the condition is met, and ‘value_if_false’ with the outcome if it isn’t. Excel will execute the ‘THEN’ part—the action—based on whether the ‘IF’ condition is true or false. This function is fundamental for creating decision-based formulas.
John Michaloudis is a former accountant and finance analyst at General Electric, a Microsoft MVP since 2020, an Amazon #1 bestselling author of 4 Microsoft Excel books and teacher of Microsoft Excel & Office over at his flagship MyExcelOnline Academy Online Course.

