Download our 141 Free Excel Templates and Spreadsheets!
Understanding the Impact on Presentation Quality
When you’re looking to compress images, it’s important to understand how this action may affect the overall quality of your presentation. Quality here operates on a sliding scale – higher resolution images offer stunning visuals but can take a toll on your file’s size and, subsequently, its performance. Compress an image too much, and you might find your once-crisp photo looking pixelated or blurry on the big screen. Consider striking a balance between image quality and file size to keep your presentation running smoothly while still impressing your audience with sharp, clear visuals. Remember to test your presentation on the intended display medium, whether it’s a projector or a screen, to ensure your images remain clear and effective.
Key Takeaways
- Compress pictures before adding them to your PowerPoint by using external photo editing software or PowerPoint’s built-in tools to minimize file size while maintaining image quality.
- Utilize the ‘Compress Pictures’ feature in PowerPoint by selecting your images and choosing appropriate compression settings under the Picture Format tab to optimize your presentation.
- Follow the step-by-step process: opening your presentation, selecting images, using the ‘Compress Pictures’ option, and applying the changes with the “OK” button to efficiently reduce image file sizes without losing visual appeal.
Table of Contents
Step-by-Step Picture Compression Techniques
Compress Individual Pictures for Targeted Reduction
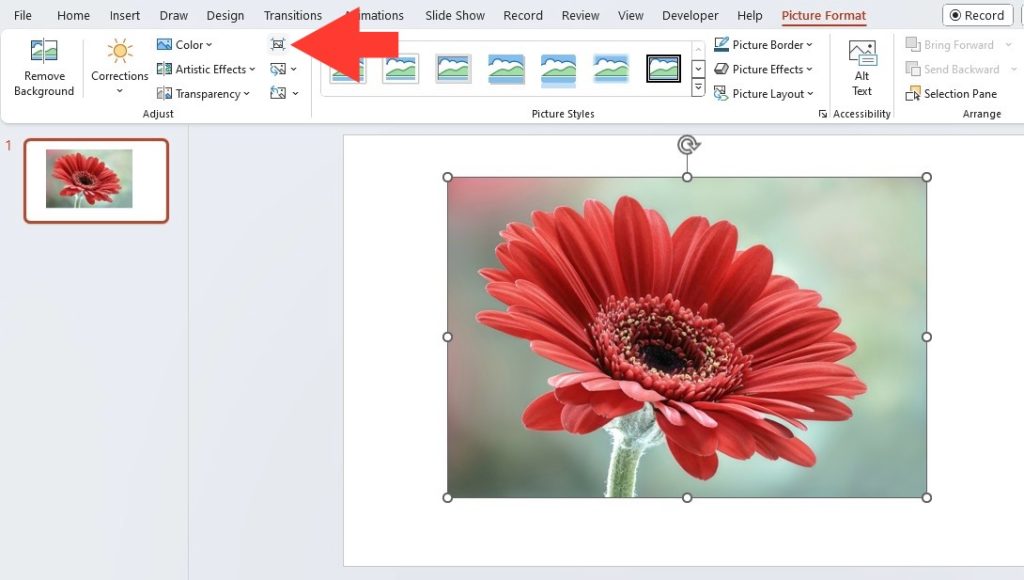
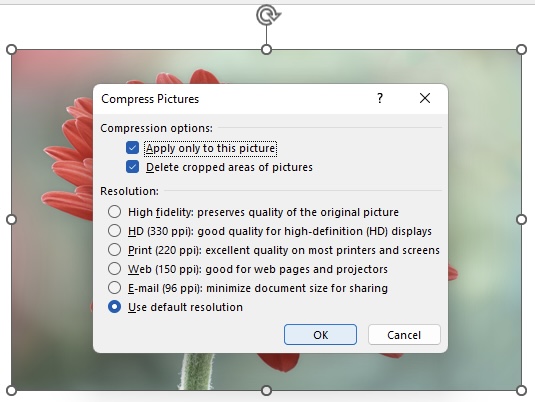
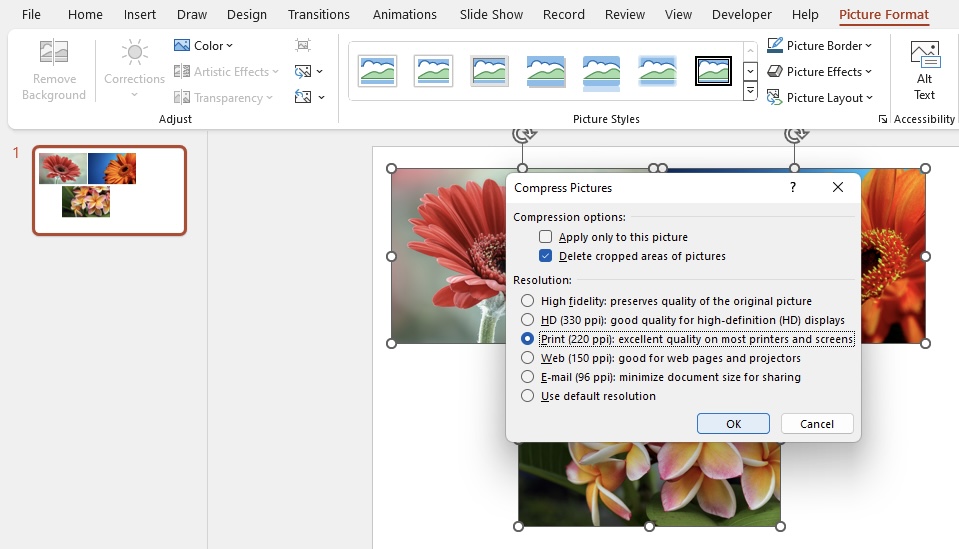
When you have specific images in your PowerPoint that are way too large, individually compressing these pictures can be the key to shrinking your file size selectively without affecting other images. To do this, simply select the image you want to compress, navigate to the ‘Picture Format’ tab, and choose ‘Compress Pictures.’ From there, you’ll get to pick how much to compress and whether or not to delete cropped areas, which can help to reduce the file size even further. This targeted approach allows you to maintain high-quality images where necessary and shrink only those that are excessively large.
Batch Compression: Reducing Size for All Images
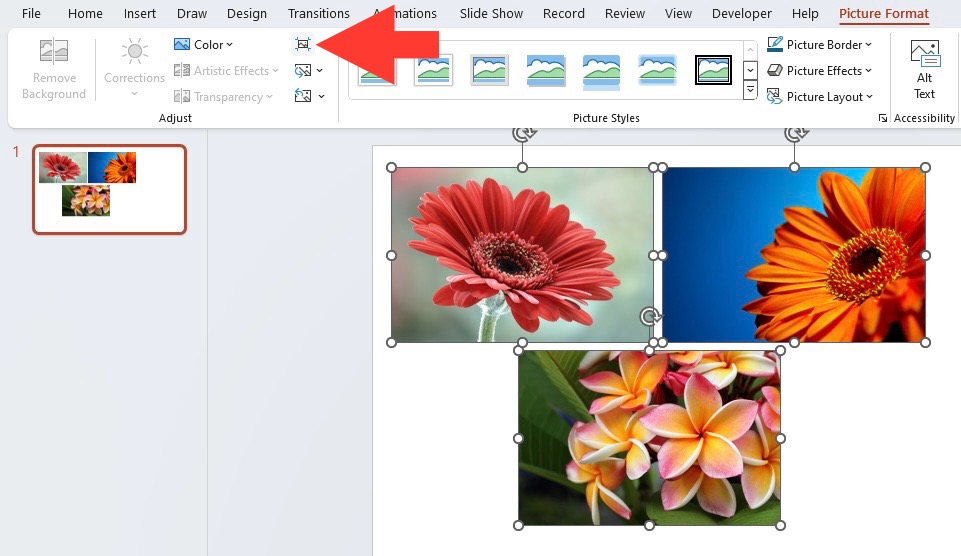
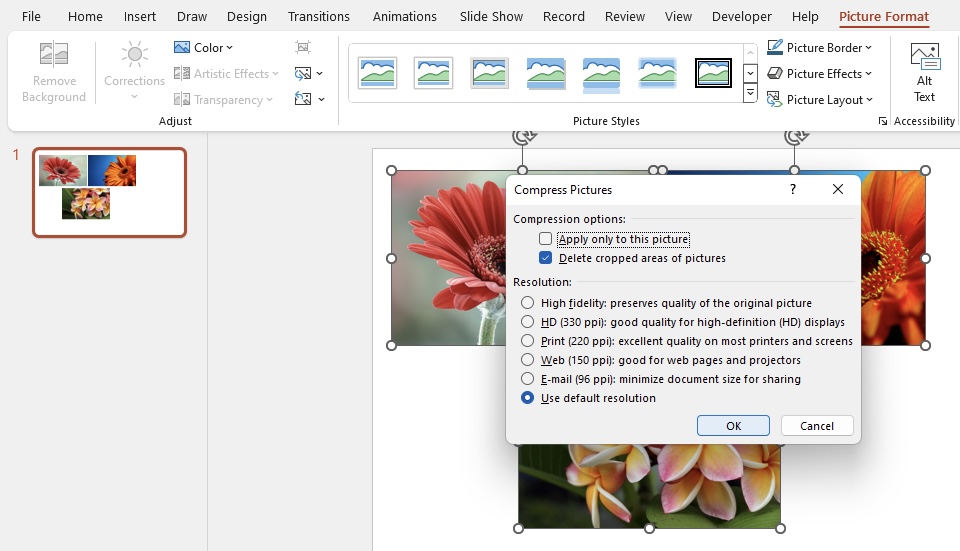
If you find yourself with a presentation full of heavy-weight images, opting for batch compression can be a massive time-saver. You don’t need to go through each image one by one – instead, PowerPoint allows you to compress all pictures in your document simultaneously. Select the images you want to compress by holding down the CTRL key > go to the ‘Picture Format’ tab > select ‘Compress Pictures’ (or ‘Reduce File Size’) > decide on an overall resolution for all images. This method ensures that all pictures in your presentation are consistently optimized, providing a uniform visual quality and a significant reduction in your PowerPoint file size in a few clicks.
Maintaining Visual Fidelity
Balancing Compression and Quality
Finding the sweet spot between preserving the quality of your images and reducing file size is essential. When compressing pictures in PowerPoint, choose ‘Compress Pictures’ and select an appropriate resolution setting. ‘Print’ gives you high quality suitable for printing, while ‘Web/E-mail’ provides lower resolution suitable for screens and fast loads. Always preview the compressed images to ensure they still meet your aesthetic standards. If you notice a visible downgrade in quality that’s unacceptable for your purpose, you may need to opt for a less aggressive compression setting. Remember, the audience’s engagement often hinges on the balance of visual appeal and smooth performance.
Alternative Image Compression Methods
Leveraging Third-Party Image Compressor Tools
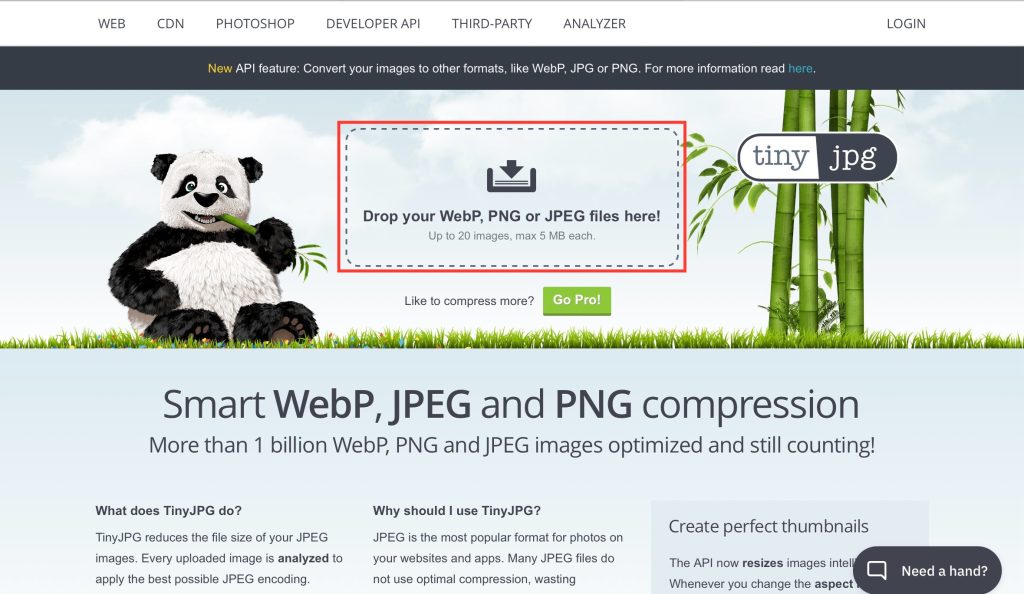
While PowerPoint’s own tools can be quite effective, sometimes external image compressor tools offer additional flexibility and compression options that can be more suited to your needs. Programs like Adobe Photoshop provide robust image editing and compression capabilities with advanced options. But for simplicity and convenience, you might prefer using web-based tools like TinyJPG. They specialize in maintaining image quality while significantly reducing file sizes. Just upload your image, let the tool compress it, and download the result for use in your presentations. It’s a straightforward process that can yield impressive results, especially when dealing with bulk image compression tasks.
Best Practices for Efficient PowerPoint File Management
Avoiding Common Mistakes in Image Insertion
When inserting images into PowerPoint, it’s not just what you do but how you do it that can affect file size. A common mistake is simply copying and pasting images directly, which can lead to large BMP or PNG files being created instead of more size-efficient JPGs. This habit can drastically increase your overall file size. Instead, save images to your hard drive first, and then use the insert function to ensure they’re added in a size-friendly format. Furthermore, avoid editing images in PowerPoint if possible. If edits are a must, ensure to discard editing data, so PowerPoint doesn’t retain unnecessary information, bloating your file size.
Deleting Unnecessary Editing Data to Slim Down Files
Diving deeper into your PowerPoint files, you might be surprised to find hidden weight in the form of editing data. Not only the visible elements of your presentation but also the behind-the-scenes tweaks contribute to the overall file size. To streamline your presentation, consider deleting the unnecessary editing data. This data includes previous versions of images that PowerPoint holds on to, just in case you wish to revert to an earlier state. By checking the ‘Delete cropped areas of pictures’ option, you ensure that the parts of images you’ve cut away don’t linger invisibly, hogging space. It’s a smart tidying up that can significantly slim down your files, leaving you with a lean, performance-ready presentation.
When to Consider Other File Formats or Archiving Methods
Converting to PDF for Smaller File Sizes
Sometimes, the best solution to a bloated PowerPoint file is to convert it to a PDF, especially when the primary purpose is distribution rather than a presentation. PDFs are inherently smaller in size and ensure your content is easily shareable while being true to the original design. They’re also universally viewable without the need for PowerPoint software. Conversion is straightforward: save your PowerPoint as a PDF directly within the application or use online tools like Adobe Acrobat for a potentially even smaller file. This ensures you keep the visual integrity intact but in a more compact, share-friendly format.
Using ZIP Files to Manage Large Presentations
If your PowerPoint presentation is still too large after optimizing images, a ZIP file can come to the rescue. Compressing your presentation into a ZIP file reduces its size by packaging it into a neatly compressed folder. This preserves all the contents and the structure of your original file. To zip a PowerPoint, simply right-click the file and select ‘Send to’ followed by ‘Compressed (zipped) folder’. This method is particularly beneficial if your presentation includes essential media or other elements that you don’t want to compress further. ZIP files are also widely accepted for file transfers, making them a convenient option for managing and sharing large presentations.
FAQs
How Does Image Compression Affect Presentation Performance?
Compressing images can significantly improve presentation performance by reducing the overall file size. This minimizes the time it takes to load slides and makes transitions smoother. Smaller files also require less system memory and processor power, providing a better experience for both the presenter and the audience. However, it’s important to use compression wisely to maintain image clarity while achieving these performance enhancements.
Can I Reverse Image Compression If Needed?
Absolutely, image compression in PowerPoint can be reversed. When you compress an image in PowerPoint, the application actually creates a lower file size copy of the original and retains the uncompressed version. If you wish to go back to the original quality, you can always replace the compressed image with the original one, ensuring you haven’t lost any data permanently. This wonderful feature gives you the flexibility to experiment with different compression rates without the fear of losing image quality forever.
How to compress media in PowerPoint?
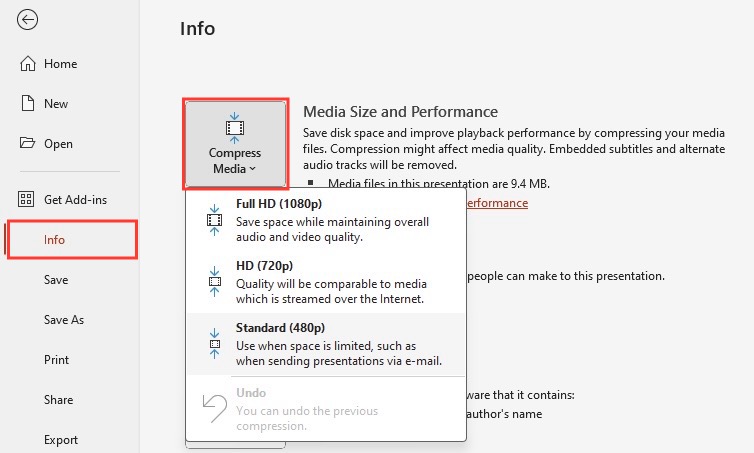
Compressing media in PowerPoint is straightforward. To shrink the size of audio and video files, click on the ‘File’ tab, then select ‘Info’. Here, you will see ‘Compress Media’. Choose from the options—Full HD (1080p), HD (720p), or Standard (480p). PowerPoint then compresses the media files to your chosen quality. Once compression is complete, the dialog box will display the amount of space you’ve saved. It’s a quick fix to ensure your presentation isn’t bogged down by large media files while keeping visual and audio quality intact.
John Michaloudis is a former accountant and finance analyst at General Electric, a Microsoft MVP since 2020, an Amazon #1 bestselling author of 4 Microsoft Excel books and teacher of Microsoft Excel & Office over at his flagship MyExcelOnline Academy Online Course.

