As someone who regularly manages a lot of contacts, I know the importance of having an organized address book. Whether you’re migrating from another email client or just consolidating your contacts, importing them into Outlook from a CSV file is a straightforward process that can save you time. Here’s a step-by-step guide on how I import CSV contacts into Outlook.
Key Takeaways:
- Efficient Import Process: Importing contacts via CSV into Outlook is a time-saving method for consolidating contact information from various sources, reducing the need for manual entry.
- Understanding CSV Files: A clear understanding of CSV files is essential, as they serve as a data bridge for importing contacts into Outlook, requiring specific fields for proper mapping.
- Preparing for Import: Ensure your CSV file includes essential fields like names and email addresses, formatted correctly with headers to facilitate a smooth import into Outlook.
- Mapping Fields: During the import process, carefully map CSV columns to Outlook contact fields to ensure that all relevant data is imported correctly.
- Post-Import Review: After importing, it’s crucial to review the contacts for duplications and inaccuracies, allowing for corrections to maintain a clean and accurate address book.
Table of Contents
Introduction to Importing Contacts into Outlook
Why Import Contacts via CSV?
Importing contacts into Outlook via CSV is a streamlined way to update and consolidate contact information from various sources. I find it particularly efficient when I acquire contacts from multiple platforms, like social media, email campaigns, or business events, which often provide data in CSV format.
It ensures I don’t have to enter information manually – a lifesaver when dealing with large volumes. Also, if I’m moving to a new computer or simply switching email solutions within my organization, a CSV import makes the transition seamless and secure.
Understanding the Basics
Before diving into the import process, I make sure I have a clear understanding of what a CSV (Comma-Separated Values) file is. Essentially, it’s a plain text file that stores tabular data, such as numbers and text, in a simple format.
Outlook uses the CSV file as a data bridge, allowing me to import a list of contacts in one go. Recognizing the format and structure of the CSV file is crucial, as Outlook will need specific fields to match up with its internal structure to import contacts correctly.
Preparing Your CSV File for Import
Essential Fields in a CSV File for Outlook Import
For a smooth import into Outlook, my CSV file must include certain essential fields. The fields Name, First Name, and Last Name are standard Outlook contact fields. If my contact information in the CSV has these names, that’s a great start.
Email addresses, phone numbers, and physical addresses are also frequently imported fields. It helps to double-check that my CSV includes headers for these fields to ensure no critical information is missed during the import process.
Tips for Formatting Your CSV File Correctly
To ensure the import goes smoothly, I follow a few formatting tips:
- Use a header row in the CSV file, with names matching Outlook’s expected fields.
- Ensure all data is separated by commas with each contact on a new line.
- Avoid special characters in the headers; stick to letters and underscores.
- Check for any cells that include commas or line breaks and encapsulate them in double quotes.
- Finally, the CSV can be saved using UTF-8 encoding if it contains international characters, which prevents misinterpretation of data.
Step-by-Step Guide to Import CSV Contacts into Outlook
Accessing the Import Function in Outlook
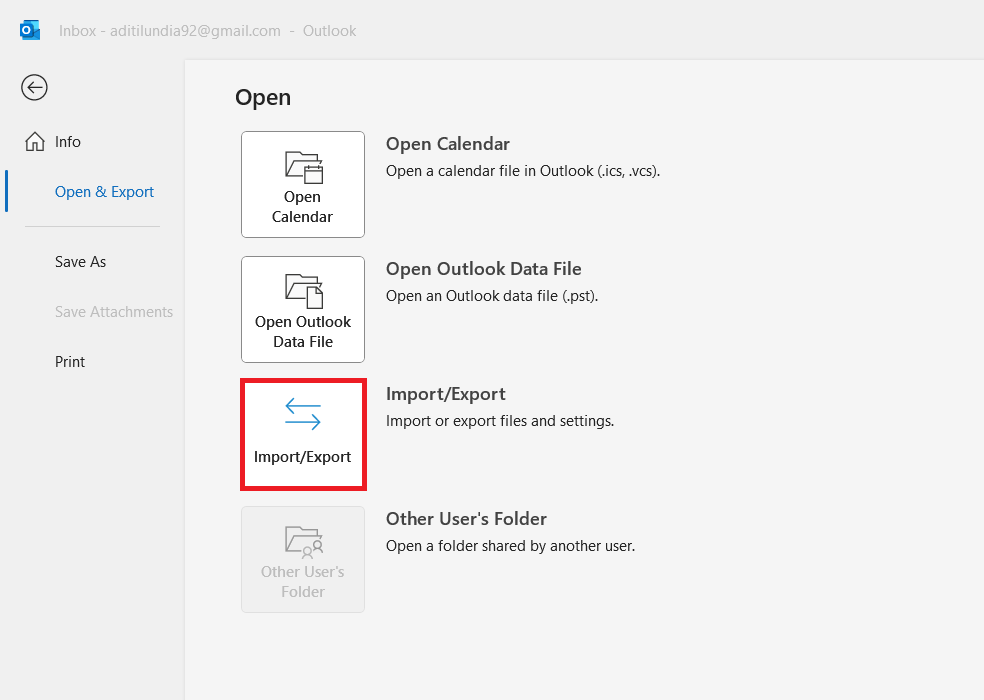
STEP 1: To start importing contacts, I open Outlook, click on ‘File’ to access the backstage view, and then select ‘Open & Export’ followed by ‘Import/Export.’
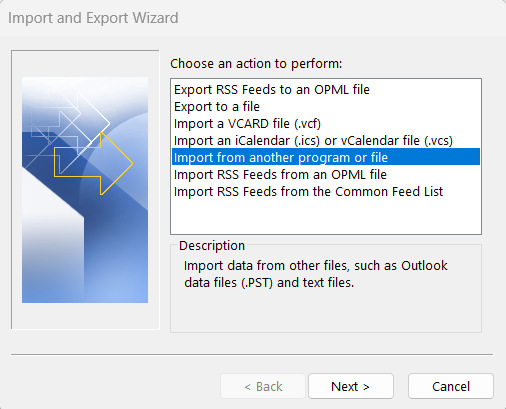
STEP 2: In the wizard, I select the option that says Import from another program or file and click Next. This option allows me to import data from different file types, including CSV.
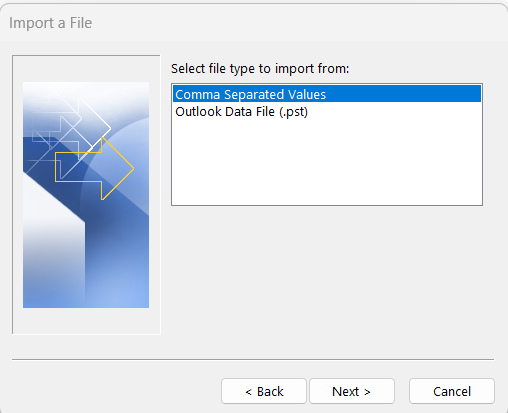
STEP 3: Now, I choose Comma Separated Values from the list of file types and hit Next. This is where I will specify the CSV file I want to import.
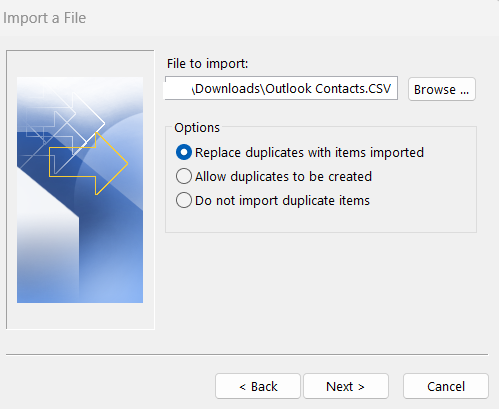
STEP 4: I click the Browse button to find my CSV file on my computer. Once I select the file, I can choose how I want Outlook to handle duplicates. I usually select the option that suits my needs best, often opting to replace duplicates with items imported. After that, I click Next.
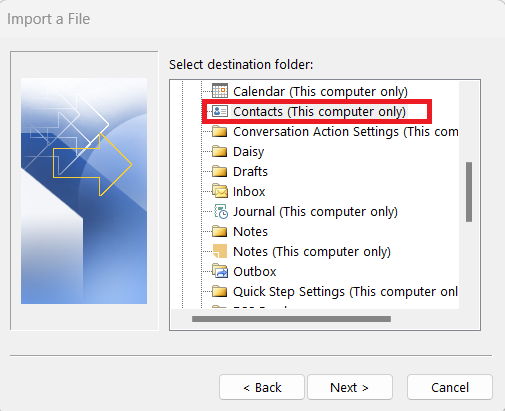
STEP 5: At this point, I need to specify where I want to import my contacts. I select Contacts from the list of folders, as I want all my imported contacts to go there.
Mapping Your CSV File Columns to Outlook Contact Fields
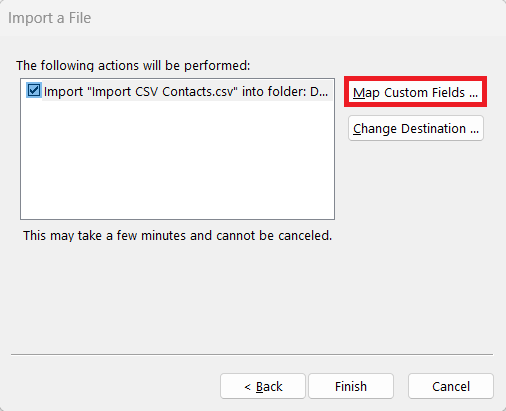
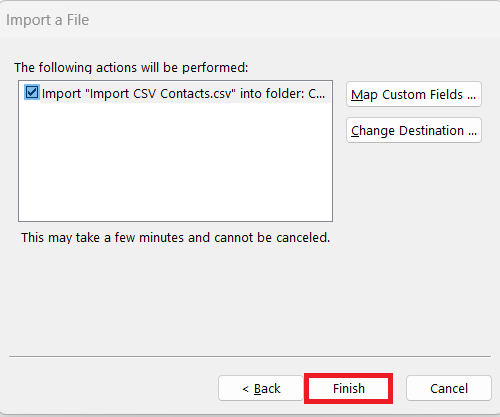
STEP 1: The mapping process aligns the CSV columns with the respective Outlook contact fields. I start by selecting ‘Map Custom Fields’ in the wizard.
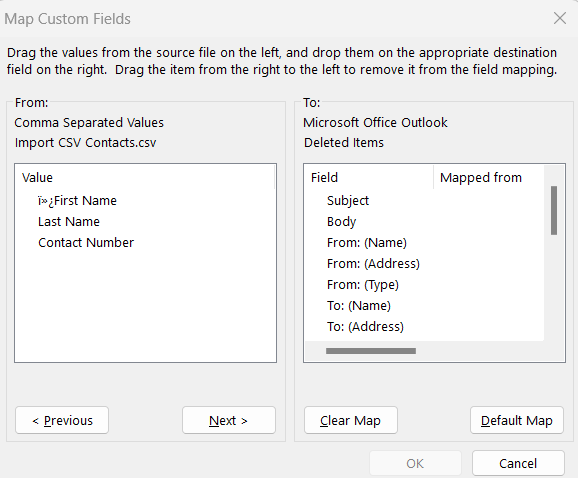
STEP 2: On the left, I see my CSV column names, and on the right are Outlook’s standard fields.
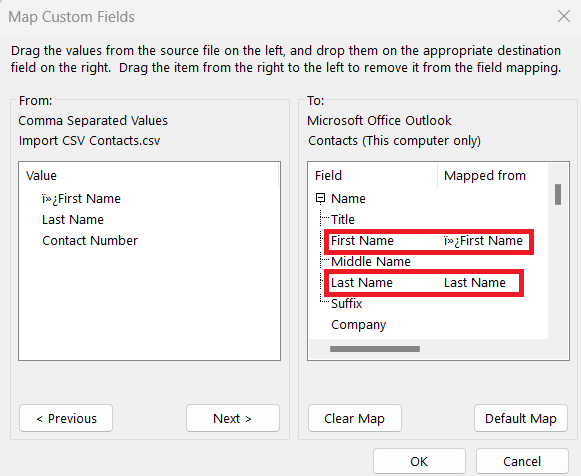
STEP 3: If a column in my file matches an Outlook field, like ‘First Name,’ it auto-maps. Otherwise, I manually drag a field, like ‘Cell Ph,’ from the left pane to a suitable Outlook field such as ‘Mobile Phone’ on the right.
STEP 4: I make sure each relevant piece of data has its place in Outlook before finishing the import.
Troubleshooting Common Import Issues
Handling Errors During the Import Process
When I encounter errors during the import process, the first step is to scrutinize the CSV file for formatting issues. This includes checking for incorrect delimiters, ensuring that text qualifiers are properly applied, and verifying that the header row contains Outlook-recognizable field names.
If Outlook displays specific error messages, I take note and correct the corresponding issues. Redundant or conflicting contact entries often need special attention. I repeat the import process after making the necessary adjustments to the CSV file, ensuring smoother data transfer.
Ensuring Data Integrity Post-Import
After the contacts are imported, I immediately review them to safeguard data integrity. I look out for duplications, incomplete entries, or misplaced information. Sometimes, I might perform a spot-check on random entries or sort data in different ways to uncover inconsistencies.
If adjustments are needed, I can edit contacts directly in Outlook or revert to the CSV file for major corrections and re-import. Additionally, I often utilize the ‘Duplicate Items’ feature to help locate and merge redundancies, maintaining a clean and accurate contacts list.
Tips for Successful Imports
To ensure a smooth import process, here are some additional tips:
- Backup Your Contacts: Before importing, it’s a good idea to back up your existing contacts in case something goes wrong. You can do this by exporting your current contacts to a CSV file.
- Test with a Small Sample: If you’re unsure about the format, try importing a small sample of your contacts first. This will help you identify any potential issues before importing the entire list.
- Use Clean Data: Ensure your data is free from errors. Check for empty fields or incorrect formatting, as these can cause problems during import.
- Be Mindful of Duplicates: If you’re importing contacts that may already exist in your Outlook, be careful with how you handle duplicates to avoid unnecessary clutter in your address book.
FAQs
How Do I Export Contacts to a CSV File?
To export contacts to a CSV file, I open Outlook and navigate to ‘File’ > ‘Open & Export’ > ‘Import/Export’. I select ‘Export to a file’, choose ‘Comma Separated Values’, and then select the contacts folder to export. After naming the file and selecting the save location, I click ‘Finish’. The contacts then save into a CSV file ready for import or backup.
What Should I Do If My Contacts Are Not Showing Up After Import?
If contacts aren’t visible after import, I ensure Outlook is configured to display the correct contact folder. Sometimes, I may need to refresh the view or restart Outlook. It’s also wise to recheck the CSV file for any formatting issues that might have caused the import to fail partially or entirely, and possibly re-import after correcting these issues.
Can I Import Contacts to Both Outlook Online and the Desktop App?
Yes, I can import contacts to Outlook Online and the desktop app, ensuring a seamless experience across devices and platforms. The process varies slightly, but in both cases, I use a CSV file. For Outlook Online, I use the web interface to upload the file, while for the desktop app, I import the file using the built-in wizard.
How do I sync my contacts to Outlook?
To sync contacts to Outlook, I ensure any account with the contacts I wish to sync is added to Outlook, such as Google or iCloud. Under the account settings, I select the option to sync contacts. It automatically updates my Outlook contacts list with the latest entries from the connected accounts.
Is It Possible to Automate the Contact Import Process?
Yes, it’s possible to automate the contact import process, particularly when using PowerShell for bulk imports. By creating a script that includes the necessary import commands, I can set up a scheduled task to run the script at regular intervals, ensuring that my contacts remain up to date without manual intervention.
John Michaloudis is a former accountant and finance analyst at General Electric, a Microsoft MVP since 2020, an Amazon #1 bestselling author of 4 Microsoft Excel books and teacher of Microsoft Excel & Office over at his flagship MyExcelOnline Academy Online Course.

