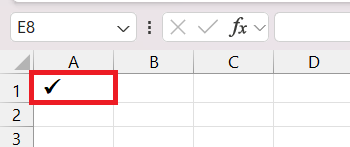
Embark on a journey through Microsoft Excel‘s check mark features, exploring their significance and diverse applications. Checkmark isn’t just symbols; it is a vital tool for clarity and organization in spreadsheets, offering a concise way to communicate completion and progress.
Key Takeaways:
- Check marks in spreadsheets serve as more than just symbols; they offer a clear and concise way to convey completion and organization in data.
- Understanding the difference between check marks and checkboxes helps optimize their usage for different purposes, with check marks serving as stable visual cues and checkboxes offering dynamic interaction.
- Employing native methods like CHAR and UNICHAR functions, symbol commands, and keyboard shortcuts enhances efficiency in inserting and customizing check marks in Excel.
- Stylistic tweaks such as bolding, coloring, and adjusting font size allow users to make check marks stand out and align with the data’s narrative.
- Utilizing techniques like copy-paste, double-click autofill, and troubleshooting common issues ensures smooth integration and effective utilization of check marks within Excel spreadsheets.
Table of Contents
All About Check Marks in Excel
The Significance of Check Marks in Spreadsheets
Check marks in spreadsheets are not merely symbols; they’re powerful tools for communication and organization. They often serve as virtual bullet points, carving a clear path through your data, making it more digestible and aesthetically consistent.
Imagine having a list of clients with paid invoices; appending a check mark by their names instantly conveys completion without cluttering your cell with text.
Comparing Check Marks and Checkboxes
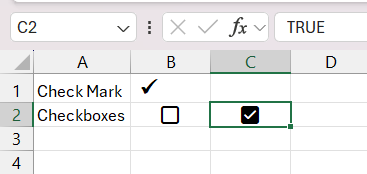
As you peruse your Excel spreadsheet, you might notice the subtle charm of check marks and the interactive flair of checkboxes. They might resemble each other, but in practice, they’re quite different. Check marks are like the stable landmarks in your document – insert them as symbols, and they’ll happily sit still, unaffected by what goes on in neighboring cells.
You can copy, move, or change them similar to how you’d treat any text. They’re the perfect fit when you just need a visual cue that doesn’t change.
On the other hand, checkboxes are the movers and shakers. They bring the element of interaction, waiting for your click to swing from unchecked to checked, generating a TRUE or FALSE output. This dynamic nature makes them buddies with formulas and conditional formatting, paving the way for dashboards or lists that respond to user input. If you want a worksheet that reacts and changes with each click, checkboxes are your go-to feature.
Native Methods for Inserting Checkmarks
CHAR and UNICHAR Functions
Ready to give your Excel sheet that extra polish with check marks? The CHAR and UNICHAR functions stand ready to assist. These helpers are like secret spellbooks that help you conjure up almost any character—including your soon-to-be-favorite, the check mark!
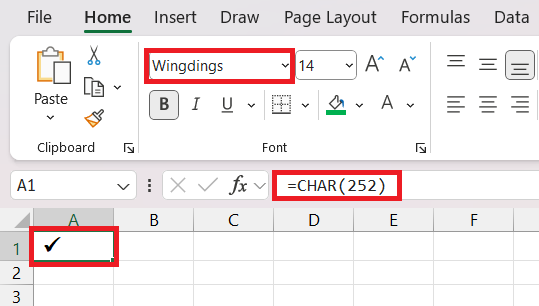
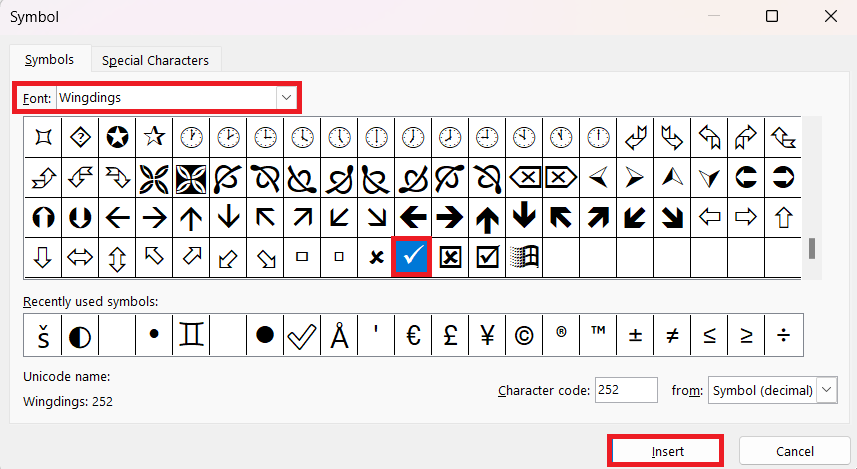
Let’s dive into the CHAR function first. Packed within that parenthesis, you’ll enter a numero-magical code between 1 to 255. So, to get that tick just right, use =CHAR(252) with the Wingdings font and voilà, there it is in the cell!
Now, for the UNICHAR function. It’s your globally understood language of symbols, regardless of the font. Throwing in =UNICHAR(10003) scribes a classic check mark, while =UNICHAR(10004) gives you a heavier version, all with no font fiddling needed.
Add these spells within a cell, and they will transform numbers into check marks as if by magic. Need an X for ‘task not done’? No worries, =UNICHAR(10008) has got you covered.
Symbol Command and Keyboard Shortcuts
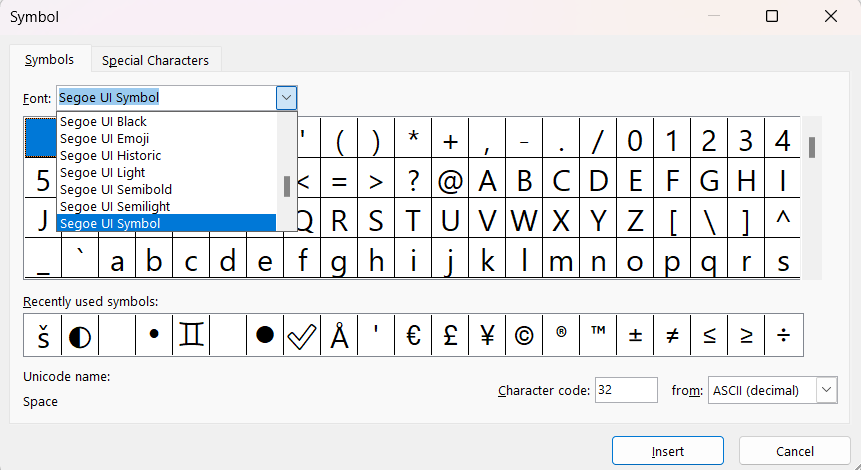
Think of the Symbol command as your trusty sidekick for inserting check marks—it’s user-friendly and accessible right from the Excel ribbon. To summon your check mark, do the following steps:
STEP 1: Simply head to the Insert tab, and call upon the Symbol dropdown.
STEP 2: Scroll through a treasure trove of characters.
STEP 3: Choose Wingdings or other such font adventures, find the check mark, and with a click, your spreadsheet gains a new ally.
If you have a set of favorites, Excel smartly keeps them ready for you in a recently used symbols area, saving you precious scrolls and clicks.
But there’s more! Got the need for speed? Keyboard shortcuts are your go-to racer on the track to efficiency.
Put these tricks in your bag, and you’ll have a ticker’s parade of check marks without disturbing your mouse’s well-deserved nap.
Keyboard Tips: Typing Character Codes Like a Pro
Mastering character codes on your keyboard isn’t just about saving time—it’s about becoming an Excel ninja, a spreadsheet samurai who can summon symbols with a few keystrokes. Here’s your secret scroll on becoming a character code blackbelt:
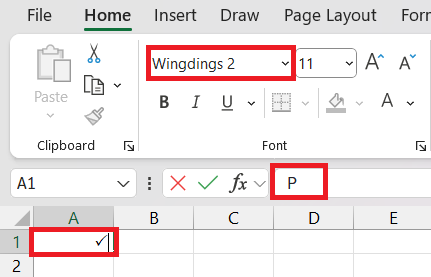
For starters, make the leap to Wingdings, where a land of symbols, including check marks, awaits. Once you’ve changed your font to Wingdings 2, press the combo SHIFT+P to become your katana slash for check marks.
Mistyped the code, or forgot the font switch? You might see an unintended character — but fear not. An Excel warrior adapts; change the font to the trusty Wingdings, and your symbol comes to life as intended.
Be heedful though, as these keyboard incantations work just on Windows realms, with Mac devices carrying different scrolls of knowledge.
Stylistic Tweaks: Bolden, Colorize, and More
Excel isn’t just about crunching numbers; it’s also a platform where you can infuse your spreadsheets with a touch of style. When it comes to check marks, why settle for plain when you can dress them up with some formatting flair?
Imagine each check mark as a character in your data’s story. You want them to stand out—be bold, be colorful—so they’re not lost in the sea of cells. Let’s explore how to set the stage for these symbols to shine.
To make your check marks pop, you don’t need a wand—just your trusty ‘Ctrl + B’ shortcut. Highlight your cell or pick the check mark you want to emphasize and toggle bold with this keyboard brisk.
But why stop there? Give your check marks a coat of color by navigating to the ‘Home’ tab and choosing from the kaleidoscope of colors available. Select one that complements your data’s mood — perhaps a serene blue for tasks in progress, or maybe a vibrant red for immediate action items.
You can also change their size by adjusting the font size, letting them grow to reflect their importance or shrink to a subtle hint. Remember, while a spreadsheet’s charm lies in its numbers, it’s these stylistic touches that make it human-friendly, guiding viewers to what matters most.
Copy-Paste and Double-Click Methods: Saving Time and Effort
When you’ve got a vast expanse of cells awaiting your tick of approval, the classic copy-paste method is like discovering a hidden shortcut through the wilderness. After that initial insert of a check mark, simply replicate it with the familiar ‘Ctrl + C’ and ‘Ctrl + V’. Navigate your spreadsheet’s topology, pasting with precision wherever those ticks need to take root.
But for the power users, there’s an even more efficient trail to blaze. The double-click trick is pure, time-saving gold. Copy your check mark, then double-click the bottom right corner of the cell (the fill handle). Watch in awe as Excel auto-fills the cells below or to the right, mirroring your action down the column or across the row, faster than a sprinting cheetah.
Keep in mind, that this method works best when you have contiguous cells to fill. It’s ideal when dealing with sequential lists or data entries that follow a pattern. So next time you have rows on rows of checkboxes to check, remember the double-click wizardry and cast away the drudgery of repetitive tasks.
Facing Technical Troubles Head-On
When Good Check Marks Go Bad: Troubleshooting Common Issues
Even the most seasoned Excel explorers can encounter turbulent seas when their trusty check marks start misbehaving. But don’t let it steer you off course; troubleshooting these common issues can be simpler than you think.
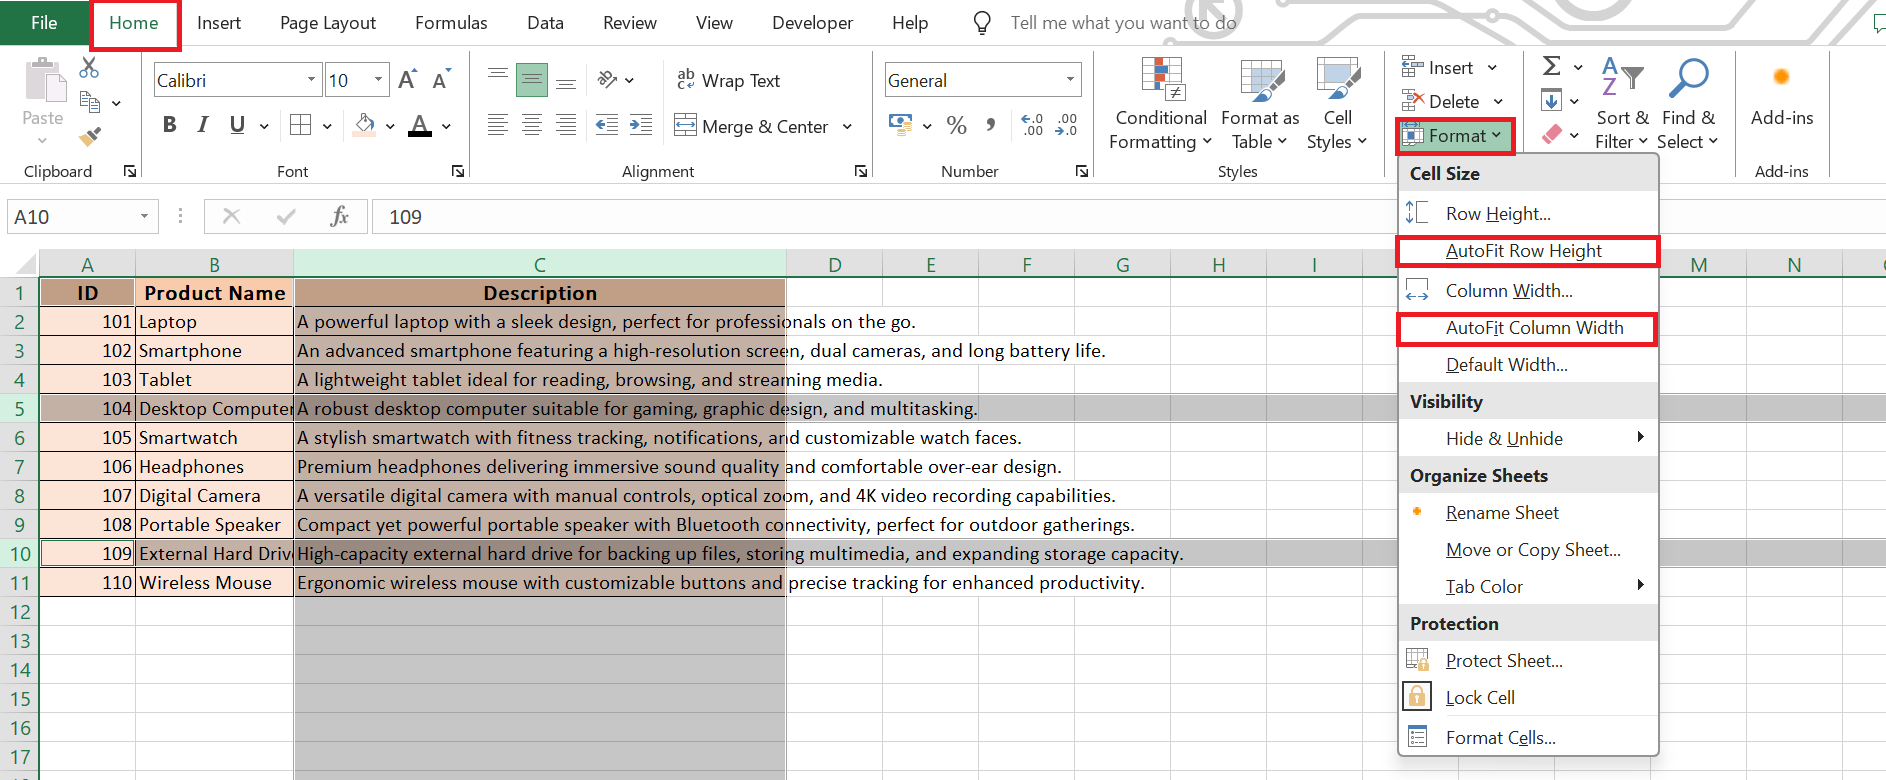
If your check marks shy away from view and seem invisible, ensure your cell isn’t too small — it could be that they’re just cramped for space. Adjust those row heights and column widths and give your check marks the room they deserve to be seen.
Sometimes, the font might be playing tricks; not every character is understood within every font family. If your check mark looks like an unknown hieroglyph, check if Wingdings or a similar font is selected. If not, a quick font swap could unveil your check mark.
And if Excel ponders for a moment and then replaces your check mark with a cryptic ‘?’, it’s likely lost in translation. Ensure you’re set up for Unicode if you’re using the UNICHAR function.
Being vigilant about such quirks keeps your voyage smooth. Don’t let a hiccup obscure your data’s story — where every symbol has its role to play.
Vacant Cells and Inappropriate Fonts: Navigating Pitfalls
In your quest to perfect your spreadsheet, you might come across the mysterious case of the vacant cells — those where you expected check marks but found emptiness instead. This common pitfall occurs when cells are left unmarked, possibly due to a skipped entry or a formula mishap. It’s crucial to maintain vigilance, ensuring that no cell meant to carry a check mark is left behind, neglected in the sea of data.
Another frequenter of pitfall alley is the dreaded inappropriate font trap. When your cells are dressed in a font that doesn’t recognize the character code for a check mark, you’ll end up with an impostor symbol. To navigate this, make sure your font is set to one that harbors the check mark symbol, like the reliable Wingdings family.
Avoid these pitfalls by ensuring that your fonts are consistent where they need to be and by regularly sweeping your data for any cells that may have slipped through the cracks. Remember — vigilance in these areas is the guardian of a trustworthy spreadsheet.
Customizing and Formatting Check Marks
Resizing and Coloring Symbols for Visibility
Making your check marks easy to spot with a splash of color or a size increase can truly make a difference in your Excel spreadsheets. If they are blending into the background, simply select the cells containing the check marks and spice things up! Increase the font size to give them more prominence, or color them in a way that they leap off the page at anyone who glances at your data. To do this, dive into the formatting options like font size, color, and boldness to make them stand out.
For example, a red check mark could signify an urgent task, while a green one might indicate completion. To adjust these settings, select the cell with the check mark and head over to the Home tab to experiment with different styles. Your check marks will not only become more visible but will also convey additional information at a glance.
Combining Check Marks with Excel Functions for Enhanced Utility
Excel’s true power shines when you combine check marks with its robust functions. Imagine incorporating them into conditional formatting rules where they automatically appear once certain criteria you’ve set are met. For instance, use the IF function to instruct Excel to display a check mark in cells that meet specific targets or deadlines. This can revolutionize how you manage tasks, making your spreadsheets not only informative but also interactive and responsive to your data.
To create such a functionality, you could write a formula that says =IF(A1>100, CHAR(252), “”), indicating that a check mark should appear for any value over 100. Don’t forget to set the font to Wingdings to ensure the check mark appears correctly. This utilization of Excel functions adds a dynamic layer to your spreadsheets, turning them into smart data management tools that respond and adapt to the input they receive.
Practical Uses of Check Marks in Excel Sheets
Creating Interactive Checklists and To-do Lists
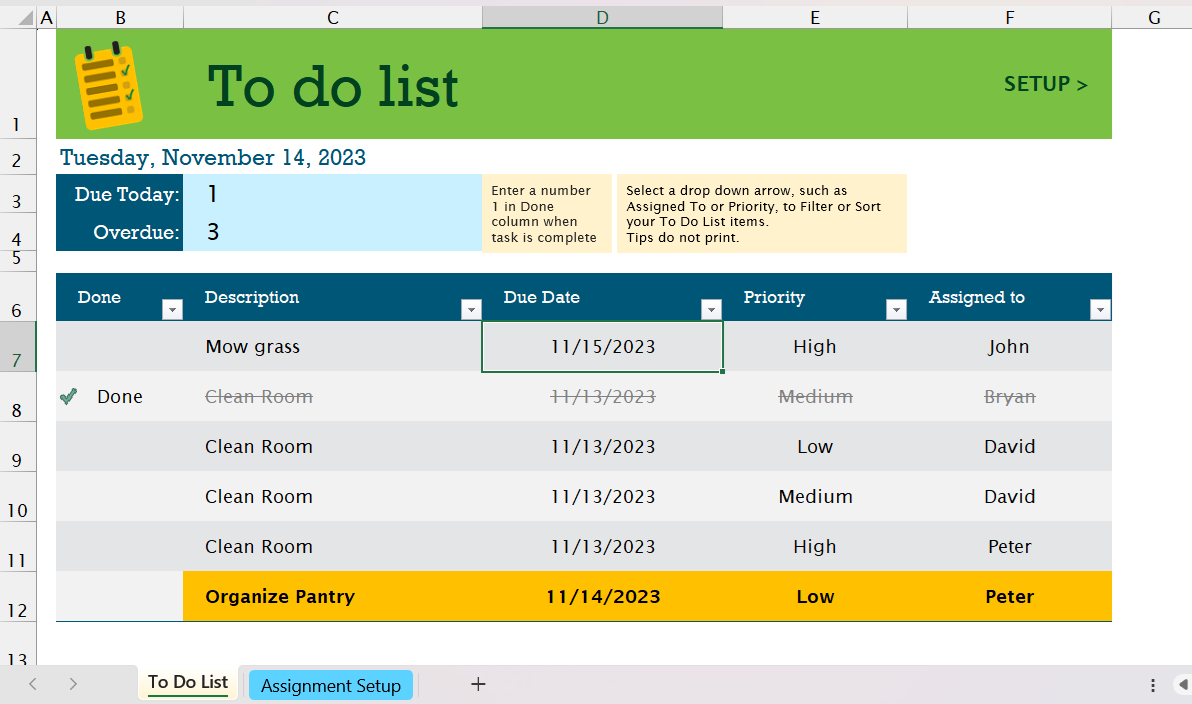
Interactive checklists and to-do lists in Excel not only help you stay organized but also amplify your productivity. Integrating check marks into your lists transforms them into dynamic visual tools. As you tick off tasks, it provides that satisfying sense of accomplishment. Set up your task in one column and insert a check mark next to it once completed. You can even link check marks to specific actions, such as hiding a row when a task is done, keeping your list neat and focused on what’s left to do.
Furthermore, adding a dropdown list with options like “In Progress” and “Completed”, where selecting “Completed” automatically inserts a check mark, can enhance your list interactivity. This method not only keeps your activities tracked but also creates an engaging, user-friendly experience. Consider using data validation features to create these dropdown lists and watch your to-do list evolve into a productivity powerhouse.
Visual Data Representation with Check Marks
Check marks are more than mere ticks on a page; they can transform how you visualize data in Excel. When you intersperse these simple symbols across your spreadsheets, they speak volumes, turning bland rows and columns into informative visual cues. Chart your progress on projects with rows of check marks to quickly communicate which milestones are hit. Or use them in a grid to highlight achieved competencies in educational settings or employee training programs.
You can even get creative with check marks and build a unique visual scale, where the number of check marks denotes levels of proficiency or stages of product development. It’s a visually intuitive method that can make complex data more comprehensible at a glance, making it an ideal choice for dashboards or presentations where you need to convey information quickly and clearly.
By customizing their look and pairing them with cell-shading or other graphical elements, your check marks evolve into a sophisticated data representation tool.
FAQs: Unraveling Mysteries of Excel’s Check Marks
What are the quickest ways to insert check marks in Excel?
The quickest ways to insert check marks in Excel include using keyboard shortcuts, like Alt+0252 for Wingdings or the character code Alt+10003 for a standard font. Alternatively, set up an AutoCorrect rule to replace a specific text string with a check mark, or use the Symbol command from the Insert tab to manually select and insert. For even faster results, copy and paste the check mark or drag it across cells using the fill handle. Keep your Num Lock on for shortcuts and ensure you’re using the correct font.
How do I format a checkmark symbol to stand out?
To make a checkmark symbol stand out, adjust its formatting. Select the cell and then change the font size, and color, or apply bold styling through the Home tab. Conditional formatting can also help by automatically changing the check mark’s appearance based on pre-set rules, such as turning green when a task is completed. Remember, a visually distinct check mark draws attention to key data points or milestones.
How do you type ✔ on a keyboard?
To type a check mark (✔) on a keyboard, first ensure that the Num Lock is turned on. For Windows users, hold down the Alt key and type 10003 on the numeric keypad. Release the Alt key, and a check mark will appear. For Mac users, use the Character Viewer or Copy & Paste from a source like a web page since there’s no direct keyboard shortcut.
How do you enter unicode symbol checkmark in excel formula bar?
To enter a Unicode check mark symbol in the Excel formula bar, use the UNICHAR function with the appropriate code for the check mark. For example, enter =UNICHAR(10003) in the formula bar and press Enter; this will insert a standard check mark. Make sure the cell is formatted in a font that can display Unicode characters, like Arial or Calibri, to properly show the symbol.
Are there any pitfalls to avoid when working with Excel check marks?
When working with Excel check marks, watch out for pitfalls such as using the wrong font, which can thwart your symbols from appearing correctly. Ensure you’re using a font that supports check marks like Wingdings. Also, avoid inserting check marks in cells that are too small or already contain data, as it may not display properly. Another pitfall is forgetting to switch back from a symbol font like Wingdings to a standard font, which can cause subsequent data entry to look like symbols instead of text.
John Michaloudis is a former accountant and finance analyst at General Electric, a Microsoft MVP since 2020, an Amazon #1 bestselling author of 4 Microsoft Excel books and teacher of Microsoft Excel & Office over at his flagship MyExcelOnline Academy Online Course.

