Inserting an image into a cell in Excel can be a great way to enhance your data, making it visually informative. I’ve found it useful when working on reports or presentations that need a little more than just numbers or text. Let me show you how to insert images into cells seamlessly.
Key Takeaways:
- Insert images directly into cells for better data presentation.
- Excel offers several options, including local and online images.
- Embedded images move, filter, and sort with the cell data.
- Use the IMAGE function to insert images via a URL for streamlined workflows.
Table of Contents
Introduction to Excel Imaging Techniques
Overview of Image Insertion Options in Excel
When I dive into Excel, I find that it offers a variety of ways to insert images, ensuring that images can be integrated seamlessly within data sets. You can choose to place an image over the cells, or if precision is key, embed an image directly into a cell. Excel allows us to insert not just static images but also those sourced from the web and provides the flexibility to link them to cell content dynamically.
It’s important to know that Excel images are not confined to mere decoration. They can move and size with cells, be used in comments, and even as part of conditional formatting setups. Say, for instance, you’re working with a sales report; you could insert product images for better visual references or add logos for a professional touch.
Step-by-Step Guide to Image Insertion
Inserting Images Directly into Cells
Excel has really streamlined the process of embedding images into cells, particularly with their latest updates. Here’s how you can directly insert an image into a specific cell:
STEP 1: Select an empty cell when you want to insert the image.
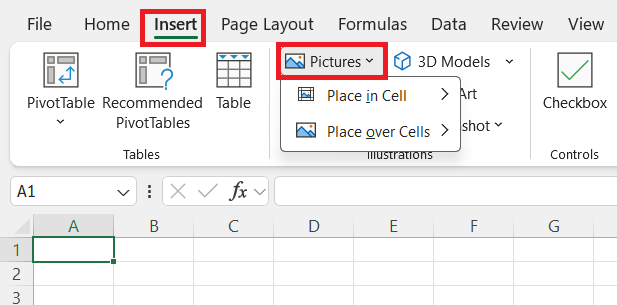
STEP 2: Navigate to the ‘Insert’ tab and click on then choose ‘Pictures’ under “Illustrations” group.
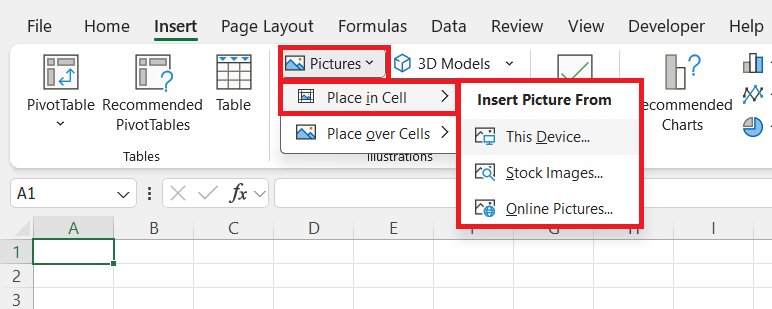
STEP 3: Then click on ‘Place in Cell’ and choose from options to insert an image from “This Device”, “Stock Images” or “Online Pictures”.
STEP 4: Then for this example let’s choose an image from “This Device”. After selecting the image click on “Insert”.
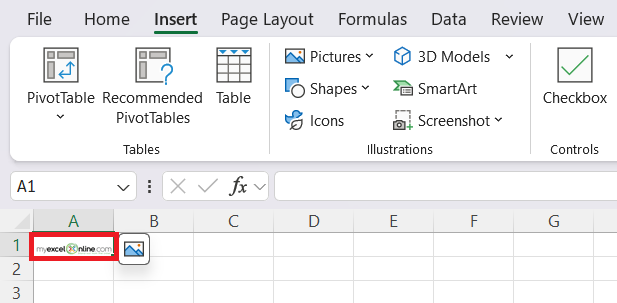
STEP 5: Check the result.
Inserting your image this way means that it becomes part of the cell. This is incredibly useful as your image will now move, filter, and sort right along with your data. It’s quite the game-changer for keeping everything in line, literally. For those of us who need to ensure our reports look immaculate and our data is easily navigable, this is a top-tier functionality.
Resizing and Adjusting Images for Optimal Cell Fit
Once you’ve inserted your image using the ‘insert image Excel’ feature, resizing it is a walk in the park. Resizing the cell will resize the image inside the cell.
Integrating Images with Excel’s Newest Features
Leveraging the IMAGE Function to Streamline Workflows
The IMAGE function in Excel truly streamlines the way we include visuals in our spreadsheets. Imagine entering a simple formula like =IMAGE("URL") and having a picture pop up in a cell within seconds. This function supports the automatic adjustment of the image size to fit the cell or you can specify the dimensions yourself.
Plus, the tooltip functionality allows you to view the image in a larger size when you hover over it – so no more squinting or resizing necessary unless you need to.
Incorporating the IMAGE function into your workflow can drastically cut down the time spent on managing images manually. It enables rapid insertion, easy updating, and the ability to link images to cell content dynamically.
Whether you manage inventory, real estate listings, or an extensive product database, the IMAGE function is designed to enhance efficiency and add visual flair.
FAQs on Excel Image Insertion
Can I insert an image directly into a cell in Excel?
Yes, you can insert an image directly into a cell by using the “Insert” tab, selecting “Pictures,” and then choosing the “Place in Cell” option. This ensures the image moves and resizes with the cell, allowing it to integrate seamlessly into your data.
Can I Link an Image in a Cell to External Data?
Yes, you can link an image in a cell to external data using Excel’s dynamic capabilities. For instance, employ the IMAGE function to insert an image via URL, which updates when the external source changes. Alternatively, employ a macro to update images based on changes to external database connections. This keeps your data and associated visuals expeditiously synchronized.
What Should I Know About Picture Formats and Compatibility?
It’s key to understand that Excel works best with common image formats like JPEG, PNG, and GIF. These are broadly compatible and suit most purposes, including print and on-screen viewing. Excel may encounter difficulties with less standard formats, such as TIFF or BMP, resulting in increased file size or rendering issues. Always prioritize formats that strike a balance between quality and compatibility for hassle-free use.
Are There Ways to Automate Image Insertion Across Large Datasets?
For automating image insertion across large datasets in Excel, VBA macros are your go-to solution. You can script macros to loop through rows and insert corresponding images based on cell values, saving immense time. Although Excel doesn’t natively support formula-based image insertion that replicates across sets, custom VBA code fills this gap effectively.
How do I insert an image link in an Excel cell?
To insert an image link in an Excel cell, you just need to add a hyperlink to the cell. Right-click the cell, select ‘Hyperlink’, then choose ‘Existing File or Web Page’. Type the image’s web address or navigate to the file location on your system. The cell will now hold a clickable link that leads to the image you have linked.
John Michaloudis is a former accountant and finance analyst at General Electric, a Microsoft MVP since 2020, an Amazon #1 bestselling author of 4 Microsoft Excel books and teacher of Microsoft Excel & Office over at his flagship MyExcelOnline Academy Online Course.

