Images can turn a drab email into something pleasing to the eye and keep your recipients engaged. Think about it: how much more enjoyable is it to see visuals that compliment the message you’re trying to convey? Not only do images add personality, but they also facilitate better understanding and retention of information.
Learn about Excel with our Free Microsoft Excel Online Course!
Why Quick Methods Matter
In the hustle and bustle of daily work life, efficiency isn’t just a buzzword—it’s a necessity. Quick methods for how to insert images in Outlook emails will save you time and frustration, allowing you to focus on the content of your message rather than fiddling with formatting. When you can insert images into your Outlook emails swiftly, it means you’re communicating more effectively and leaving a polished impression without slowing down your workflow.
Key Takeaways
- To add images to an Outlook email, you can click the “Insert Picture” button for inline images or use the paperclip icon for attachments. After initiating either of these options, navigate to the image file, select it, and confirm by clicking “Open” or double-clicking the file.
- Outlook users should be mindful of the size and number of images they include in emails, as excessive graphics can significantly increase the email size, potentially leading to slow loading times or issues with send/receive limits.
- For Outlook for PC, users can access a variety of graphic types via the Insert menu, including pictures from local storage, online images through Bing search, animated GIFs (for Microsoft 365 subscribers), shapes, SmartArt, and charts. They can also edit these graphics by right-clicking and selecting the desired command for customization.
Table of Contents
Preparing Images for Outlook Emails
Understanding File Formats and Sizes
Before you rush to include that stunning photo or graphic, pause to consider file formats and sizes. Large images can make emails sluggish to send and receive, and not all formats display consistently across different devices and email clients. Formats like JPEG, PNG, and GIF are universally accepted and can be good choices depending on your needs. JPEGs are great for photos with lots of colors, PNGs preserve transparency, and GIFs allow for animation. Keeping file sizes under a few hundred kilobytes can prevent bounces and ensure that your email is recipient-friendly.
Choosing the Right Image for Your Message
Selecting the ideal image for your email is like pairing the perfect wine with a meal—it enhances the experience. You want an image that encapsulates the essence of your message, aligns with your branding, and resonates with your audience. It’s not just about aesthetics; it’s about relevance and context. If you’re announcing a corporate milestone, a professional infographic could be the way to go. For a community newsletter, photographs of recent events add a personal touch. Remember, the right image not only captures attention but also reinforces your message, making it more memorable.
Simple Steps to Insert Images Quickly
Using the Insert Menu for Immediate Results
The Insert menu in Outlook is your go-to for adding images with just a few clicks. Here’s how easy it is:
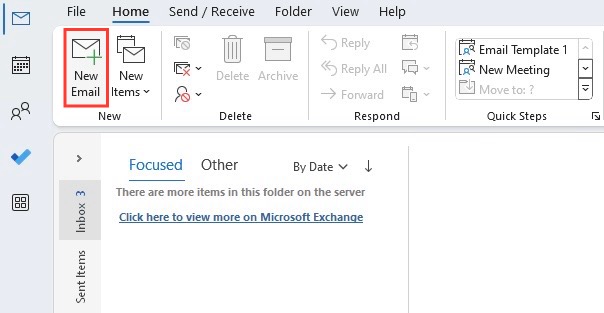
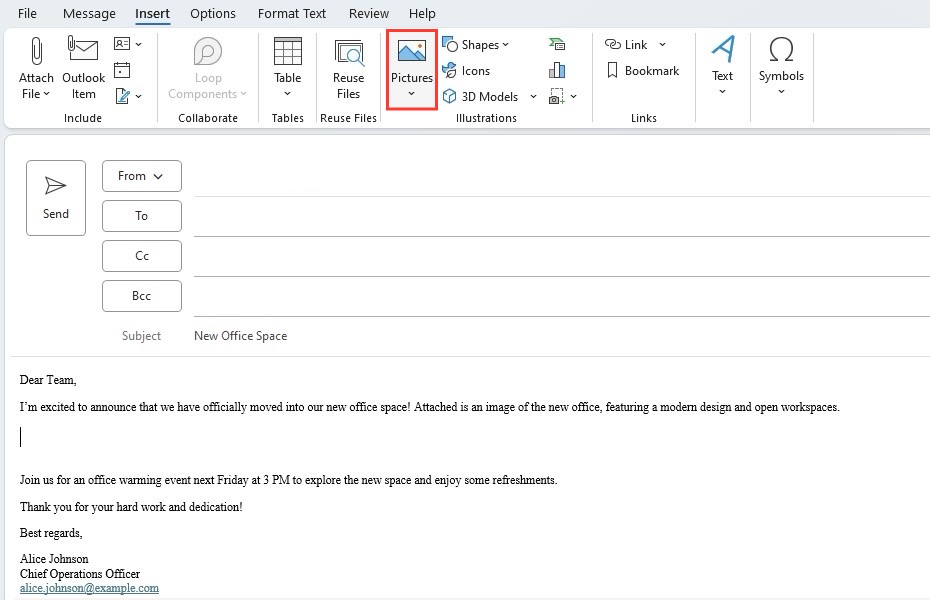
STEP 1: Compose a New Email, then click ‘Insert’ on the ribbon.
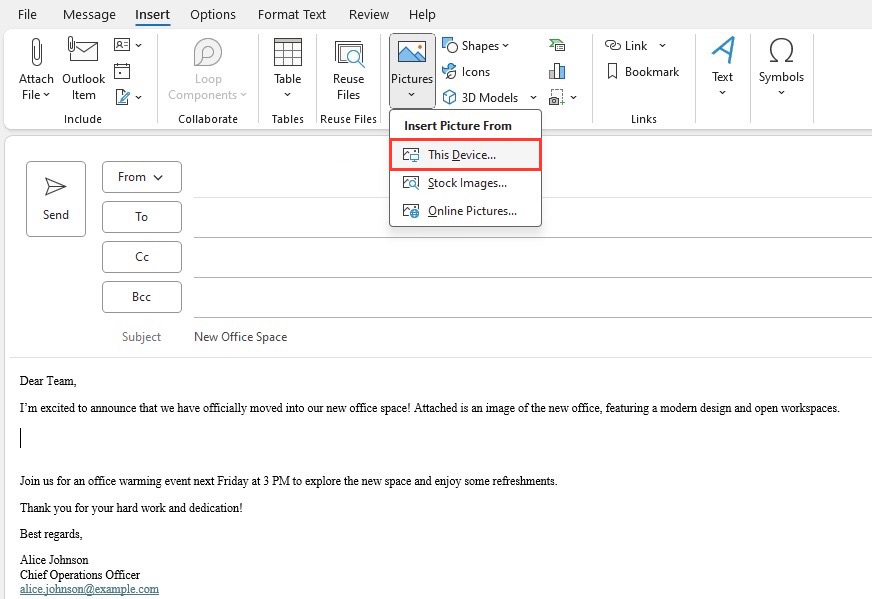
STEP 2: Select ‘Pictures’.
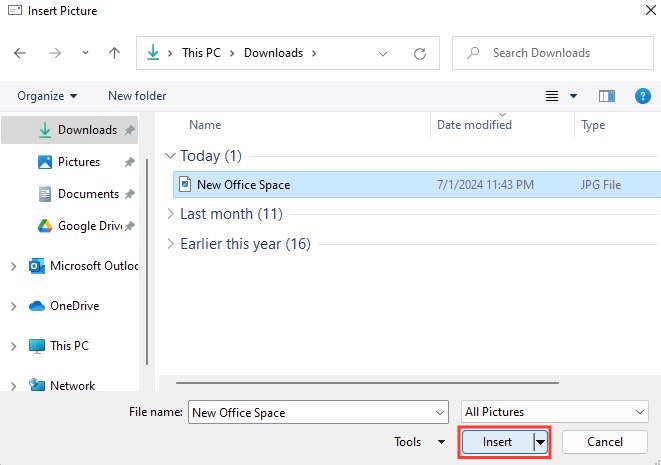
STEP 3: From here, you can choose an image saved on your device or pick one from stock images if you’re in need of inspiration. Once you click ‘Insert,’ the image plops right into your email.
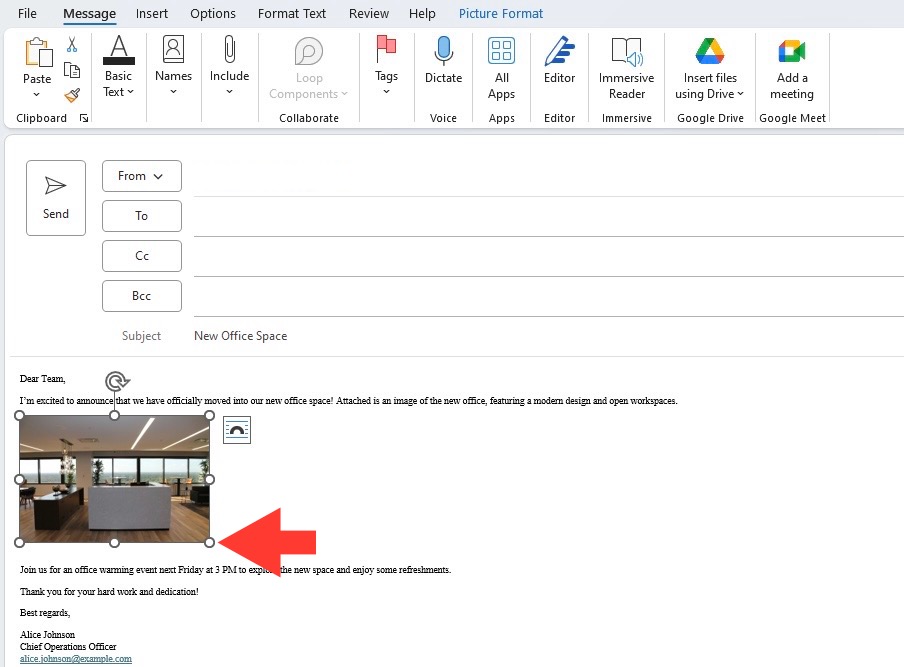
STEP 4: It’s straightforward, immediate, and you can resize or reposition the image as needed to fit your email layout perfectly.
Drag and Drop: The Speedy Alternative
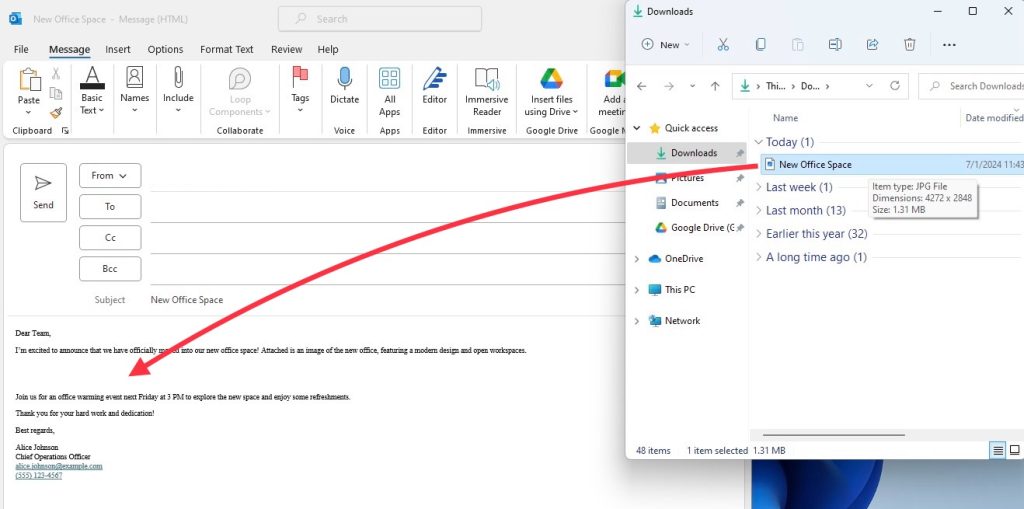
Want to sidestep the menu navigation? Drag and drop is your speedy alternative. Open the folder where your images are stored, then simply click and drag your chosen image into the body of your Outlook email. Voilà! The image is inserted inline, where you can then adjust and format it to your liking. Note that while this method is quick, it’s best for when you have the image folder readily accessible and just need to sling an image into your message pronto.
Advanced Techniques for Efficient Image Insertion
Linking Pictures from OneDrive or SharePoint
If you often collaborate with a team, you’ll find linking pictures from OneDrive or SharePoint to be a game-changer. Begin by ensuring your image is uploaded to a shared folder and that your teammates have the necessary access. Then, use the ‘InsertPicture’ macro to pull images directly into your email. It’s a seamless process that not only keeps your messages light but also ensures the most recent image version is used. Plus, with single sign-on, there’s no need to repeatedly log in—once you’re set up, inserting images becomes a one-click wonder.
Adding Images via URLs for Dynamic Content
Harness the power of the internet by adding images via URLs to bring dynamic content into your Outlook emails. This method is particularly useful for real-time content, like a live weather map or a stock chart. To do this, switch to HTML view in the template editor, craft the <img> tag with the desired URL, and specify the image’s dimensions. When recipients open your email, the image will display the most up-to-date information available from the web source. Remember, images linked in this way should be publicly accessible to ensure they appear correctly for all recipients.
Personalization with Profile Photos
Insert a Profile Picture from Azure Active Directory
Adding a personal touch can make your emails more trustworthy and engaging. You can insert your profile picture from Azure Active Directory into your Outlook emails to do just that. It’s as simple as selecting the ‘Insert picture’ button in the template editor and choosing ‘Insert Photo from Azure AD’. After setting the desired dimensions and clicking ‘OK’, your official profile image will be part of your email template, creating consistency and a professional appearance across all your correspondence.
Add an Image to Your Email Signature
Personalizing your email signature with an image, like your company logo or professional headshot, can leave a lasting impression. To add an image to your Outlook signature, navigate to the Signatures section of the email preferences. Here, you can either drag your desired image into the signature box or use the Insert Image option. Once inserted, you might want to resize or add a hyperlink to the image, providing your recipients with immediate access to your website or portfolio.
Click here to read the tutorial on Email Signatures in Outlook!
Troubleshooting Common Image Issues in Outlook
Resolving Blocked Images in Outlook
Sometimes, Outlook might block images in an email to protect you from potentially harmful content. To resolve this, you can change your settings to automatically download pictures for trusted senders or adjust email security options for more liberal image downloading. Just head to the ‘Trust Center’ settings under ‘File’, then ‘Options’, and tweak the ‘Automatic Download’ settings to your preferences. This can ensure that your images—and those from people you trust—will always be displayed.
Adjusting Email Settings for Optimal Image Display
For the best image display in your recipients’ inboxes, it’s crucial to adjust your email settings accordingly. In Outlook, you can optimize your message by selecting HTML format, which supports images and complex layouts, or by choosing to embed small images directly within the email to prevent them from being blocked. Additionally, consider using ‘Retina-ready’ images at higher resolutions for viewers with high-definition screens. This ensures that your images look crisp and professional, no matter the device.
Saving Time with Shared Email Templates
Incorporating Images into Outlook Templates
Streamlining your workflow is easy when you incorporate images into your Outlook templates with Shared Email Templates. You can add pictures that personalize and provide visual enhancement, like logos, banners, or product images. Once you’ve added these images to your template, they’ll appear every time you use it, saving you the hassle of inserting them manually for each email. Think of it as setting the stage once and then putting on multiple performances with no extra prep needed.
Managing Template Libraries for Quick Access
Organizing your template libraries in Outlook can dramatically speed up your email composition. By managing your libraries efficiently, you can categorize templates for different purposes or projects and have quick access to them. This means less time searching and more time sending crisp, image-rich emails that convey your message effectively. Remember to maintain a good naming convention for your templates and regularly update them to include the latest images, ensuring they stay relevant and ready for instant use.
FAQs
What types of image files can be used in Outlook emails?
Outlook supports several image file types, including JPEG, PNG, GIF, and BMP. JPEG is commonly used for photographs, PNG for transparent backgrounds, GIF for animations, and BMP for high-quality images. Choose the best format based on the quality and purpose of your image.
How do I ensure my images are displayed correctly in the recipient’s inbox?
To ensure correct display, use widely supported image formats like JPEG or PNG, keep image sizes reasonable, and check your email’s HTML code if embedding directly. Additionally, use a reliable email design and test your email with different clients before sending it out.
Is there a way to insert animated GIFs into Outlook emails?
Yes, you can insert animated GIFs into Outlook emails if you’re using Outlook as part of a Microsoft 365 subscription. Use the ‘Online Pictures’ option in the ‘Insert’ menu to select and add GIFs from online sources such as Bing Images or GIF providers.
John Michaloudis is a former accountant and finance analyst at General Electric, a Microsoft MVP since 2020, an Amazon #1 bestselling author of 4 Microsoft Excel books and teacher of Microsoft Excel & Office over at his flagship MyExcelOnline Academy Online Course.

