Learn about Excel with our Free Microsoft Excel Online Course!
Key Takeaways
- To invert picture colors in PowerPoint, right-click the desired slide, choose “Save as Picture” to save the slide as an image and remember to name the file for easy identification.
- Open the saved image in Paint by right-clicking it and selecting “Open With > Paint,” use the ‘Ctrl + A’ shortcut to select the image, then right-click and choose “Invert Color.”
- After inverting the image in Paint, save it, and then insert it back into your PowerPoint by going to the “Insert” tab and clicking on “Pictures,” resize and adjust the placement as necessary on the slide.
When and Why to Invert Image Colors
To invert picture colors in PowerPoint is to enhance readability and contrast especially when dealing with text overlays or graphics. Presentation slides can become visually more engaging and information easier to digest. In scenarios like creating photo negatives or preparing designs for special printing processes, inversion plays a key role.
Initial Steps Before Inverting Colors
Before you jump into the exciting world of color inversion, take a moment to do a bit of prep work that will ensure seamless editing. Start by inspecting your images for quality and resolution; after all, a clear picture reflects better when inverted. Then, consider the colors present in the image and how they might affect the slide’s overall look post-inversion. Next, create a backup of your original images—just in case you need to revert to the starting point.
Here’s a concise checklist:
- Verify image quality and resolution.
- Assess the color balance and composition.
- Duplicate your images for a safe backup.
By following these easy initial steps, you’ll be setting yourself up for a successful and hassle-free inversion process.
Table of Contents
Flipping Colors with a Few Clicks
Using PowerPoint’s Built-In Features for Inversion
PowerPoint simplifies your life when you want to invert an image. There’s no need for an external editor; all the magic happens within the program! Here’s how they make the process downright effortless:
STEP 1: Right-click the desired slide that contains the image, choose “Save as Picture” to save the slide as an image and remember to name the file for easy identification.
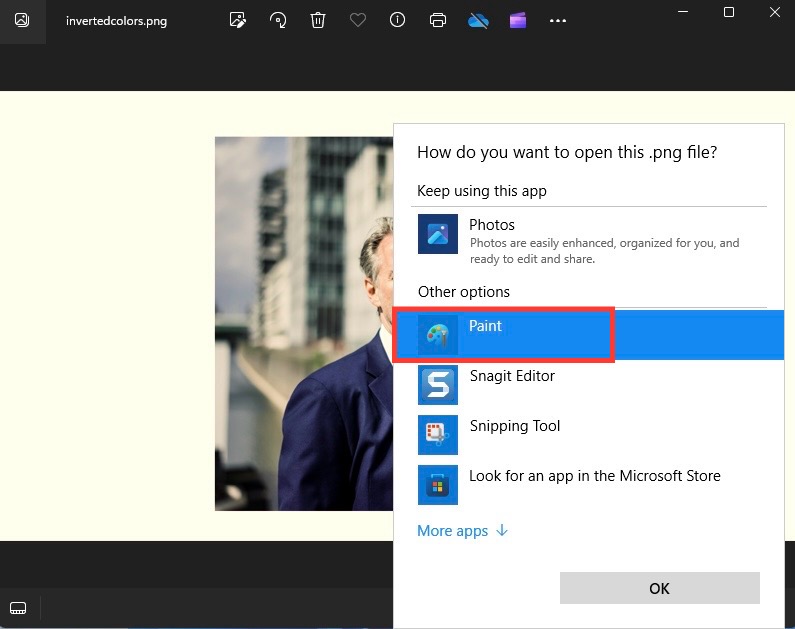
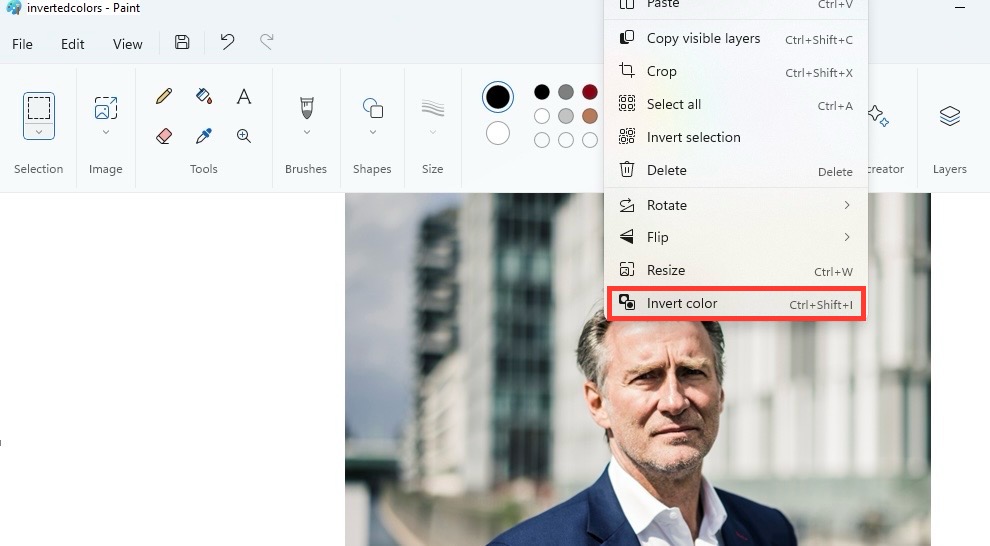
STEP 2: Open the saved image in Paint by right-clicking it and selecting “Open With > Paint,” use the ‘Ctrl + A’ shortcut to select the image, then right-click and choose “Invert Color.”
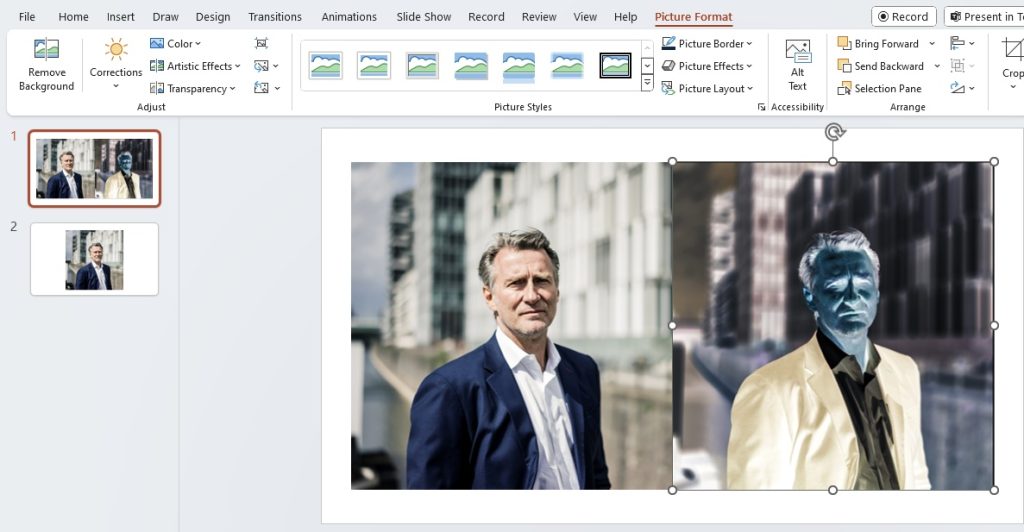
STEP 3: After inverting the image in Paint, save it, and then insert it back into your PowerPoint by going to the “Insert” tab and clicking on “Pictures,” resize and adjust the placement as necessary on the slide.
This straightforward series of actions transforms your image in seconds, reinforcing PowerPoint’s reputation as a tool that’s not just for bullet points and bar graphs!
Fine-Tuning Inverted Images for Visual Impact
Once you’ve inverted your images, you might find that a little extra tweaking can go a long way in creating that perfect visual impact. Fine-tuning lets you match the inverted colors to your presentation’s theme and enhances the overall aesthetic.
- Adjust brightness and contrast for more definition.
- Tinker with color saturation to make certain hues pop or recede.
- Use the ‘Artistic Effects’ feature for more stylization options.
Remember, the goal is to maintain visual harmony across all slides while ensuring your key message shines through.
Beyond Basic Inversion
Adjusting Color Saturation and Tone after Inversion
Now, let’s talk about putting the finishing touches on your inverted images. Adjusting the color saturation and tone can drastically change the mood of your slide. To tweak these:
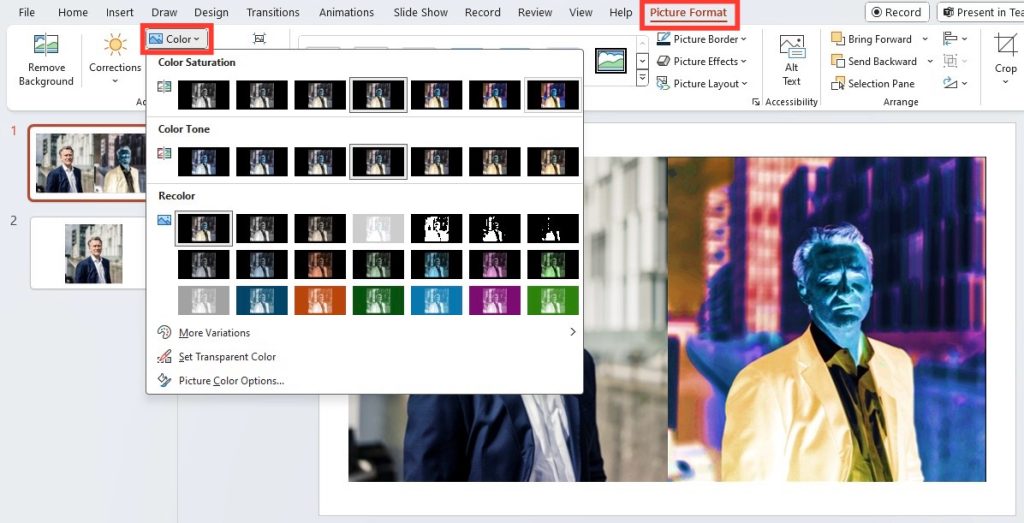
STEP 1: Click on your inverted picture and again head to the ‘Picture Format’ tab.
STEP 2: Use the ‘Color’ dropdown to play with saturation—increasing it for intensity or decreasing it for subtlety.
STEP 3: For adjusting tone, select ‘Color Tone’ and pick a temperature that complements your slide’s color scheme.
Such adjustments can soften overly harsh inversions or add depth where needed, making your presentation visually cohesive and appealing.
Resetting Images Back to Original Format
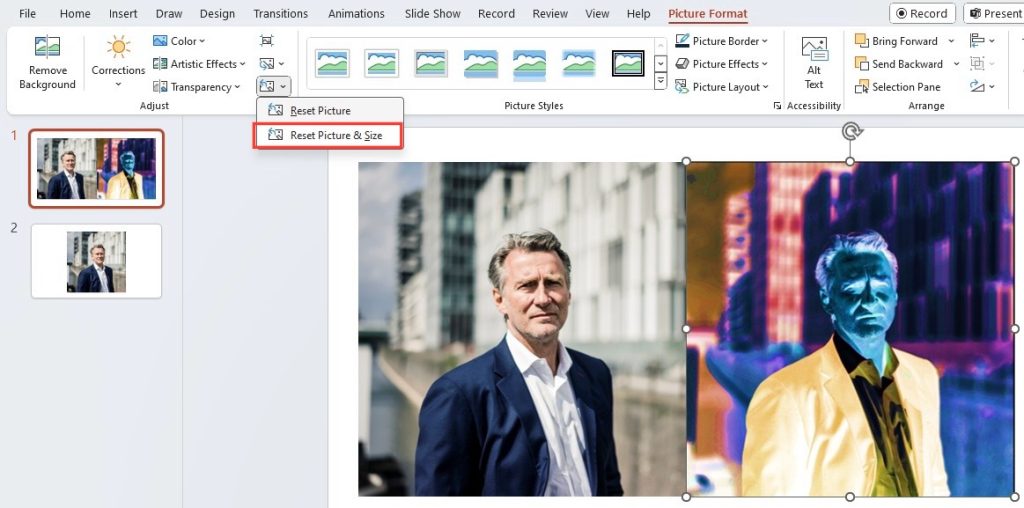
If you ever feel like your artistic venture didn’t pan out as expected, PowerPoint has your back! To revert your image to its original state:
STEP 1: Select the transformed image on your slide.
STEP 2: Click on the ‘Picture Format’ or ‘Format’ tab in the ribbon.
STEP 3: Find and click on the ‘Reset Picture’ button.
STEP 4: Choose ‘Reset Picture & Size’ if you want to go full circle, including size adjustments.
That’s it. They will breathe life back into the original image, ready for new creative experiments!
Working with Shapes and Graphics Post-Inversion
Inverting colors doesn’t stop with images; shapes and graphics in your slides can also play into the inversion effect. Here’s what you need to know when working with these elements post-inversion:
- Utilize the ‘Format Shape’ pane to adjust fill and line colors for shapes, further customizing the inverted look.
- Remember that color inversion will affect text within shapes and graphics; adjust font colors accordingly for readability.
- Be mindful of the overall design; ensure that the inverted colors of your graphics and shapes complement the slide’s palette.
By keeping these points in check, you’ll maintain a harmonious and professional design throughout your presentation.
Streamlining Your Skills
Tips for Efficiently Managing Multiple Images
When dealing with multiple images in a PowerPoint presentation, staying organized and efficient is key. Implement these tips for a smoother experience:
- Use the slide sorter view to get an overview of where images are placed throughout your presentation.
- Group images or use the ‘Selection Pane’ to keep track of layered items easily.
- Apply color inversion and other effects to multiple images at once by selecting them while holding down the ‘Shift’ key.
By incorporating these strategies, you’ll navigate the editing process with ease, ensuring all your images are managed effectively for the best visual result.
Troubleshooting Common Inversion Issues
Dealing with Pixelation After Inversion
Pixelation can be a pesky issue when inverting colors, making images look less sharp. To minimize this:
- Ensure you’re working with high-resolution images before inverting colors.
- Avoid over-enlarging images after inversion, as this can exacerbate pixelation.
- For minor pixelation, try using the ‘Compress Pictures’ option with the ‘Print (220 ppi)’ resolution setting for a potential fix.
If pixelation persists, it can be a sign to source a higher-quality version of your image or consider an alternative visual that maintains clarity post-inversion.
Making Sure Your Inverted Images Remain Consistent Across Platforms
Consistency across different platforms ensures your presentation looks just as you intended, no matter where it’s on display. To secure this:
- Test your presentation on multiple devices and operating systems to check for color variances.
- Embed fonts and use standard PowerPoint themes to reduce the risk of format changes.
- Save your images in a widely compatible format, like PNG, for consistent display quality across platforms.
By taking these preemptive steps, you’ll reassure yourself that the impact of your inverted images remains as designed, regardless of the viewing platform.
Embracing the Power of Possibility
Exploring Related Features and Tools in PowerPoint
There’s a whole world of features and tools in PowerPoint that complement image inversion, just waiting to be explored:
- Delve into the ‘Artistic Effects’ to give your inverted images an extra flair or subtlety.
- Experiment with ‘Remove Background’ to isolate the subject after inverting colors.
- Utilize ‘Transparency’ sliders to blend your images seamlessly with slide backgrounds.
These tools empower you to create a one-of-a-kind presentation that’s both professional and creative.
FAQ: Mastering the Art of Inversion in PowerPoint
How can I ensure high-quality inversions for my PowerPoint images?
Ensure high-quality inversions by starting with high-resolution images, using PowerPoint’s compression tools wisely, and adjusting the contrast and brightness after inversion for the best visual clarity.
Is it possible to invert picture colors on PowerPoint for Mac?
Absolutely, inverting picture colors on PowerPoint for Mac follows a similar process to that on a PC—use the ‘Format Picture’ options to tweak and invert as needed.
What should I do if inverted images appear differently during presentations?
If inverted images appear differently, double-check them on various devices before presenting and adjust your presentation settings to match the display you’ll use most often.
Can I save an inverted image from PowerPoint to use elsewhere?
Yes, you can save an inverted image from PowerPoint by right-clicking the image, selecting ‘Save as Picture’, and choosing your preferred format.
John Michaloudis is a former accountant and finance analyst at General Electric, a Microsoft MVP since 2020, an Amazon #1 bestselling author of 4 Microsoft Excel books and teacher of Microsoft Excel & Office over at his flagship MyExcelOnline Academy Online Course.

