Microsoft Excel, a robust spreadsheet tool, is not just for numbers; it’s a versatile platform that can streamline your letter formatting process. By leveraging Excel’s comprehensive formatting features, you can craft professional, visually appealing letters that stand out. Whether you’re drafting business correspondence or personalized invitations, using Excel for letter formatting ensures precision and flexibility in your document creation.
Key Takeaways:
- Excel is a versatile tool for formatting letters, offering precision and flexibility in document creation.
- Customization options, such as fonts, colors, borders, and images, allow for a professional and personalized touch.
- Proper page layout settings, including margins, orientation, and print preview, ensure well-structured and readable letters.
- Alignment, spacing, and text formatting enhance professionalism, making letters visually appealing and easy to read.
- Excel templates streamline letter creation for business correspondence and invitations, saving time while maintaining consistency.
Table of Contents
Why Excel for Letter Formatting?
Versatility and Accessibility
Excel’s versatility and accessibility make it an ideal choice for letter formatting. The program is part of the Microsoft Office suite, familiar to most users, and widely used in both professional and personal settings. This widespread usage ensures seamless collaboration and document sharing.
Additionally, Excel’s availability across multiple devices, including desktops, tablets, and smartphones, allows you to access and edit your letter formats on the go. Its intuitive interface is designed to accommodate users at various skill levels, making it accessible for anyone looking to enhance their document presentation without a steep learning curve.
Customization Options
Excel offers an array of customization options that allow you to tailor your letters to suit your specific needs and style preferences. From altering fonts and adjusting text sizes to changing font colors and adding background shades, customization in Excel is straightforward. You can easily incorporate logos or branding elements by embedding images or customizing headers and footers.
Moreover, Excel’s capabilities extend to formatting cells with borders and shading, enabling you to create visually distinct sections within your letters. This flexibility means you can design a letter that reflects your personal or professional brand, ensuring consistency across all your communications.
Setting Up Your Excel Document for Letters
Adjusting Page Layouts
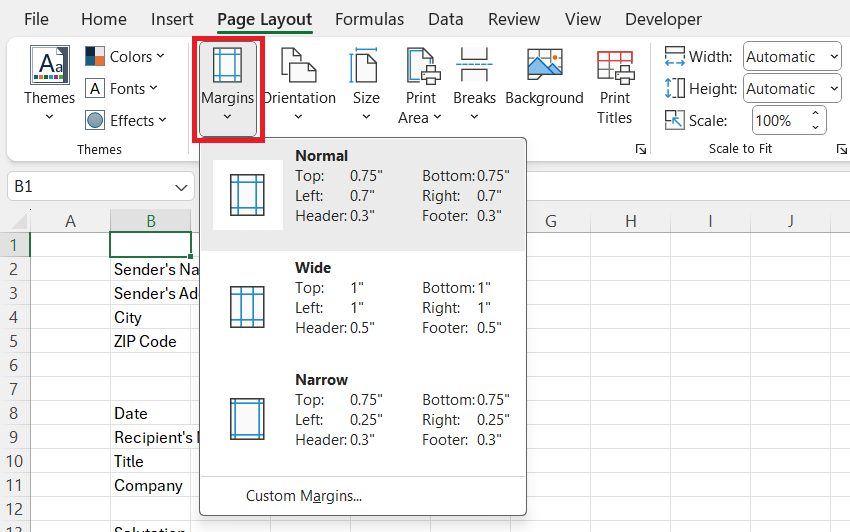
Adjusting page layouts in Excel is essential to create visually appealing letters that align with standard document formatting. First, navigate to the Page Layout tab, where you can modify settings to suit your letter’s requirements. Set the margins to provide ample space around the text, ensuring the content is not cramped.
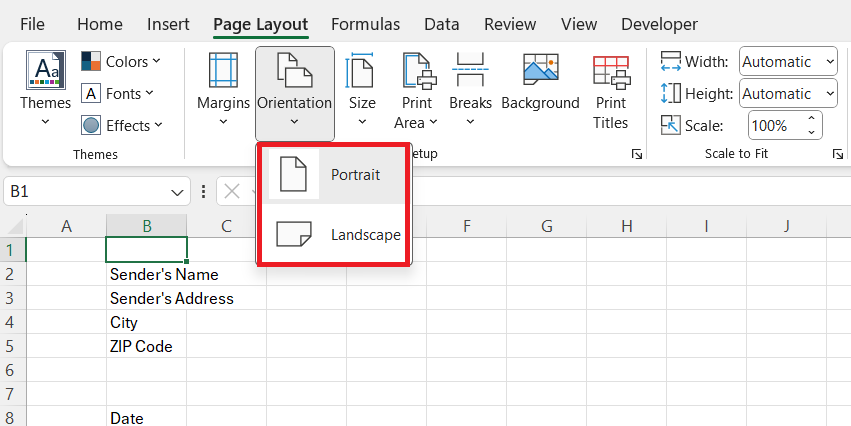
You can choose between portrait and landscape orientations based on the layout needs, with portrait generally preferred for letters.
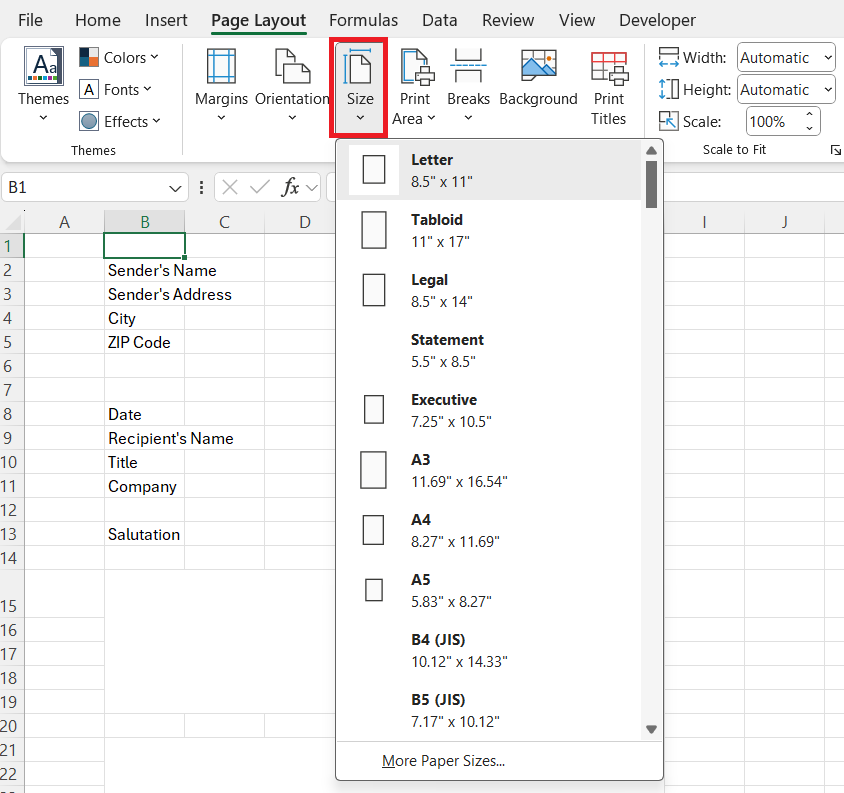
Adjust the paper size according to your intended delivery method, like A4 for international correspondence.
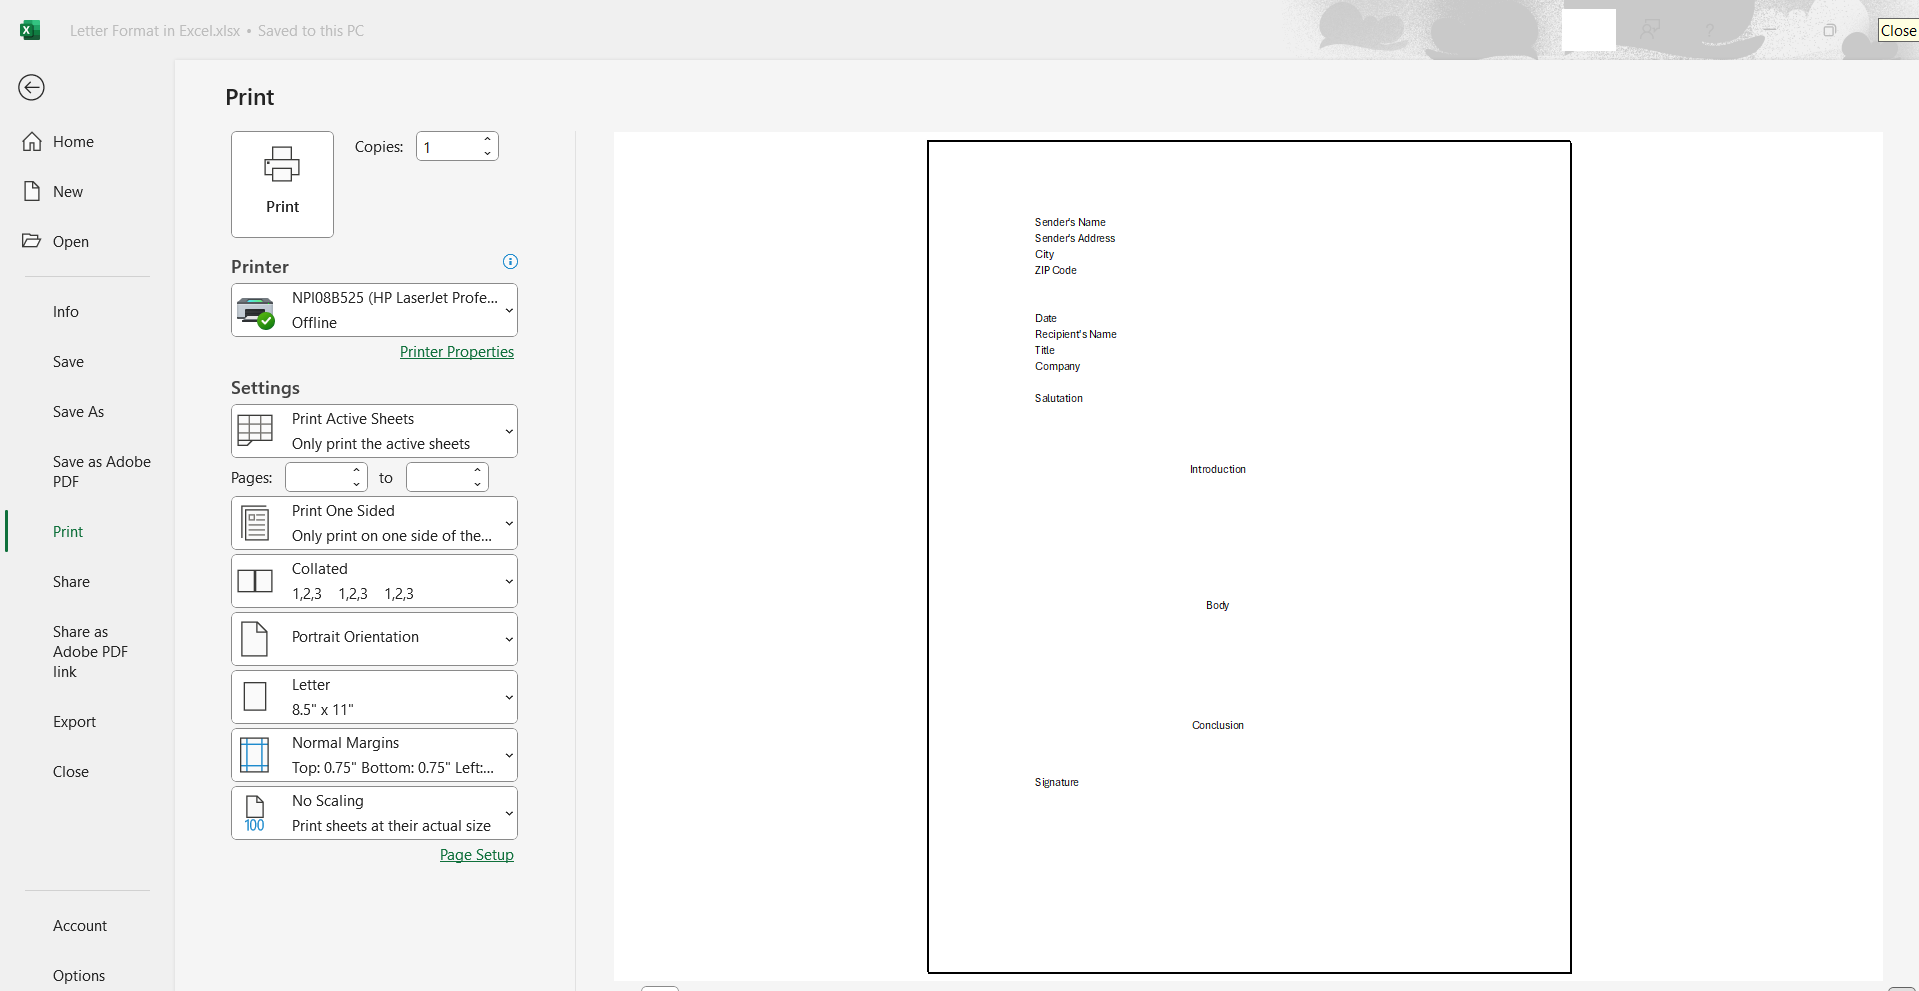
Utilize print previews to confirm that everything appears well-aligned and consistent across pages before finalizing your letter. Press Ctrl + P to get Print Preview.
This attention to layout details can significantly enhance the readability and professionalism of your correspondence.
Formatting Tips to Enhance Professionalism
Font Selections and Management
Selecting and managing fonts effectively in Excel can dramatically enhance the professionalism of your letter. Begin by choosing a font that is both legible and reflects the tone of your communication. Common professional fonts such as Arial, Calibri, or Times New Roman are excellent choices for business letters, while more decorative fonts can be used for less formal communications. Once you’ve selected a font, maintain consistency in size and style throughout your document.
To manage fonts effectively, employ Excel’s font group features on the Home tab. Use bold, italics, and underline sparingly, applying them to emphasize key information or headings.
You can adjust the font size to create a hierarchy of information, ensuring important details stand out.
Additionally, make use of the Font Color and Fill Color options to add emphasis or create thematic consistency, but avoid overusing them, which could distract from the main content.
These considerations will help ensure your letters are not only functional but also visually engaging.
Leveraging Borders
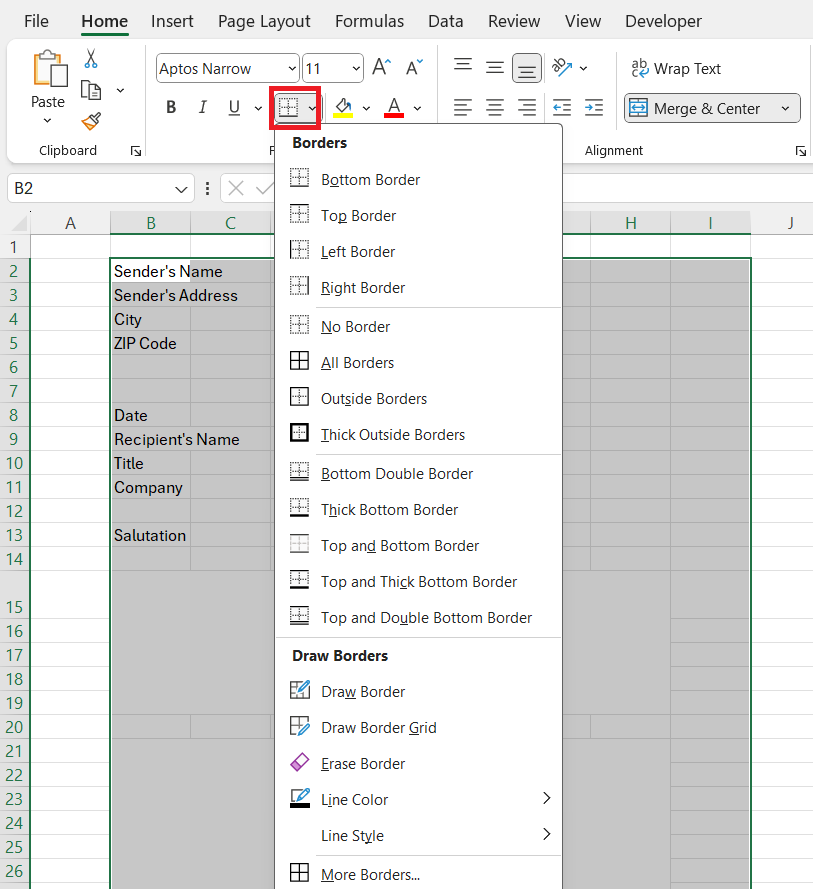
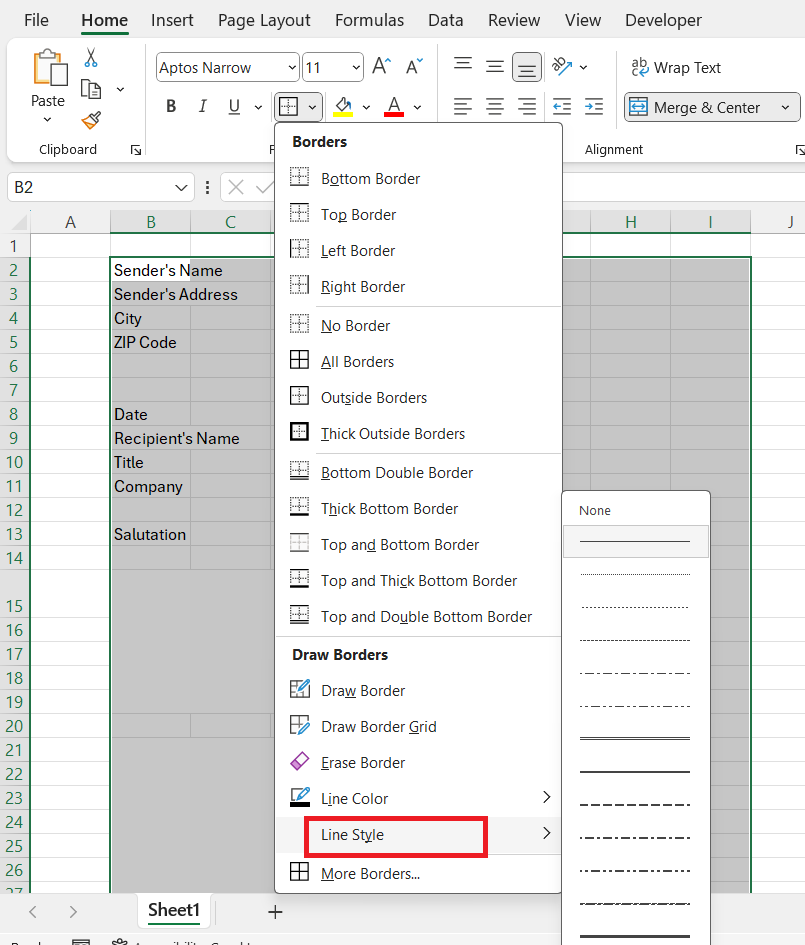
Leveraging borders and shading in Excel can add a professional touch and enhance the visual structure of your letters. Borders help define areas of text within your document, creating clear distinctions between sections such as headers, addresses, and body content. To apply borders, highlight the cells you wish to format, then select the Border icon to choose from options like solid, dashed, or double lines.
Customize the thickness and color to align with your document’s aesthetic while ensuring a clean, professional look.
When using borders and shading, moderation is key; excessive use can lead to a cluttered appearance, detracting from the letter’s message. Proper application of these features can contribute significantly to the overall layout, making your correspondence more engaging and easy to navigate.
Mastering Alignment and Spacing
Mastering alignment and spacing is crucial to ensuring that your letters in Excel are organized and easy to read. Alignment options allow you to position your text accurately within cells, adding a coherent appearance to your document. You can align text to the left, right, or center, depending on the style and structure of your letter.
For a polished look, it is typical to left-align most text, particularly body paragraphs, while headings or titles might be centered for emphasis.
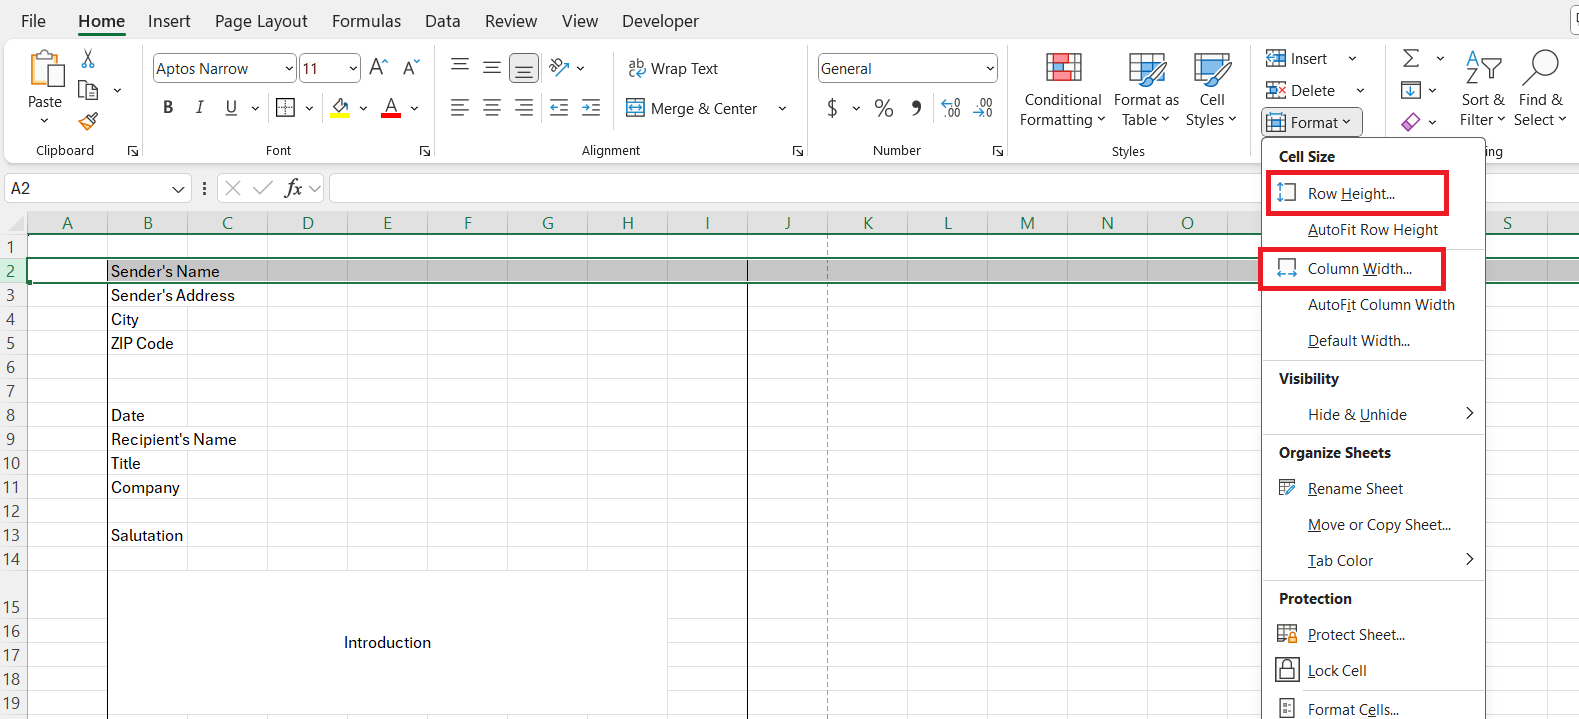
Spacing is equally important in maintaining readability and preventing the text from appearing too dense. Adjust cell padding and line spacing to provide sufficient space between lines and sections.
This can be done by altering the row height and column width to your desired proportions.
It’s also beneficial to use the ‘Wrap Text’ feature, which ensures complete visibility of all content within a cell without overflowing other areas.
By paying attention to these details, you can create a letter with clear, professional spacing that guides the reader naturally through your communication.
Real-Life Applications of Excel Letter Formats
Business Correspondence
Using Excel for business correspondence involves structuring professional letters that convey clarity, precision, and respect through effective formatting. Business letters require a formal tone and consistent styling, attributes that Excel’s features are well-suited to support. Start with a clean and organized layout by selecting a pre-designed template tailored for business communication, focusing on including essential elements like the company’s letterhead, contact information, and clear sections for date, address, salutation, body, and closing.
Excel’s grid structure allows you to easily align text and maintain consistent spacing, crucial for uniformity in business documents. Employ the use of tables for clear data presentation, such as inventory details or annual reports, ensuring that information is structured, accessible, and visually distinct. Conditional formatting can be used discreetly to highlight key parts of the document, such as payment terms or action items, enhancing their visibility without overwhelming the formal tone.
By using Excel to format business correspondence, you ensure a high level of professionalism, meeting the expectations of corporate standards and effectively communicating your message to colleagues, clients, and stakeholders.
Personal and Customized Invitations
Designing personal and customized invitations in Excel offers a unique blend of creativity and practicality, allowing you to deliver heartfelt messages with style. With Excel’s versatile formatting tools, you can craft invitations that reflect the occasion’s theme, be it a casual gathering or a formal event. Begin with a customizable template that outlines basic sections for event details, such as the time, date, location, and RSVP information. These templates can be personalized to include decorative elements suited to the occasion.
Utilize Excel’s formatting features to enhance the invitation’s appeal. Play with color palettes and font styles to align with the event’s theme—pastel colors for a baby shower or elegant fonts for a black-tie dinner. Incorporate images or graphics by embedding them into cells for added personalization, such as including the host’s picture or thematic icons.
Excel allows you to easily adjust the layout, ensuring that text and images are balanced and not overcrowded, which maintains a readable structure. By leveraging Excel’s functions, you can create distinctive, custom invitations that resonate with your guests and add a personal touch to any event.
FAQs
How to format letters in Excel?
To format letters in Excel, start by selecting an appropriate template or layout that includes sections like headings, addresses, and greetings. Choose consistent font styles and sizes for a cohesive look. Utilize alignment settings for orderly text arrangement. Apply borders, shading, and conditional formatting to emphasize key areas, making sure to keep the design clean and professional.
What are the benefits of using Excel for letter formatting?
Using Excel for letter formatting offers numerous benefits, including robust customization options that allow for precise control over layout and style. Its grid system aids in maintaining consistent spacing and alignment, essential for professional-looking documents. Additionally, Excel’s templates and formatting tools streamline the creation process, saving time while producing polished, tailored letters.
Can I use Excel templates for different types of letters?
Yes, Excel templates are highly versatile and can be adapted for various types of letters, including business correspondence, invitations, and personal messages. These templates provide a structured starting point, with customizable features to meet specific needs, whether you’re crafting formal corporate letters or more creative personal invitations.
How do I ensure my letters appear professional when printed?
To ensure your letters appear professional when printed, use a clean and consistent layout with appropriate formatting, including standard fonts like Arial or Times New Roman. Set correct margins and utilize Excel’s print preview feature to check alignment and spacing. Choose high-quality paper for printing and ensure your printer settings are adjusted for optimal output, maintaining crisp text and images.
How to type letters in Excel?
To type letters in Excel, begin by opening a worksheet and creating a layout with designated sections for the header, date, recipient address, body, and closing. Click into each cell to type your content, using text alignment tools to organize the content neatly. You can format the text using font options to adjust size, style, and color for a professional appearance.
John Michaloudis is a former accountant and finance analyst at General Electric, a Microsoft MVP since 2020, an Amazon #1 bestselling author of 4 Microsoft Excel books and teacher of Microsoft Excel & Office over at his flagship MyExcelOnline Academy Online Course.

