When I first began using Excel, I quickly realized that understanding logical operators was key to unlocking its full potential. Logical operators are the foundation of many powerful formulas, allowing me to create complex conditions and filter data with precision. Let me walk you through what I’ve learned, the tips and tricks I’ve picked up along the way, and how these operators have transformed the way I use Excel.
Key Takeaways:
- Logical functions are essential for creating dynamic conditions in Excel, transforming basic spreadsheets into powerful tools.
- Mastering logical operators like IF, AND, OR, and NOT can automate decision-making processes and enhance data analysis.
- Logical operators streamline workflows by enabling quick data comparisons, validations, and error handling, reducing manual effort.
- Combining logical operators with functions like COUNTIF and SUMIF makes it easy to analyze data based on multiple criteria.
- Advanced techniques, such as array formulas and IFERROR, improve the robustness and efficiency of Excel formulas.
Table of Contents
Introduction to Streamlining Excel Workflows
The Power of Logical Operators in Excel
Excel workflows are revolutionized by harnessing the incredible capability of logical operators. These operators are the cornerstone for setting up conditions that respond to dynamic data—a critical function for streamlining spreadsheet manipulations.
They allow us to move beyond simple data entry, and into an area where Excel begins to interact with the information it contains, providing insightful output based on logical reasoning.
How Logical Operators Can Make Excel Work Faster and Smarter
By learning to effectively use logical operators in Excel, we can turbocharge the way Excel handles data, enabling it to perform sophisticated sorting, querying, and validation swiftly. These operators can drastically reduce the time spent on manual data comparison, allowing for rapid automation of tasks that previously required exhaustive human intervention.
Essentially, they help to make data analysis a leaner, more intelligent process, saving not just time but also improving the accuracy of our work.
Understanding the Basics of Excel Logical Operators
What Are Logical Operators?
Logical operators in Excel help me perform comparisons and make decisions based on those comparisons. They’re essential in determining whether conditions are true or false. Here are the most common logical operators I use:
- Equal to (
=): Checks if two values are equal. - Not equal to (
<>): Checks if two values are not equal. - Greater than (
>): Checks if one value is greater than another. - Less than (
<): Checks if one value is less than another. - Greater than or equal to (
>=): Checks if one value is greater than or equal to another. - Less than or equal to (
<=): Checks if one value is less than or equal to another.
Using Logical Operators in Formulas
The first time I used logical operators was in a IF statement. The IF function allows me to create a condition, and depending on whether it’s true or false, Excel returns one of two values.
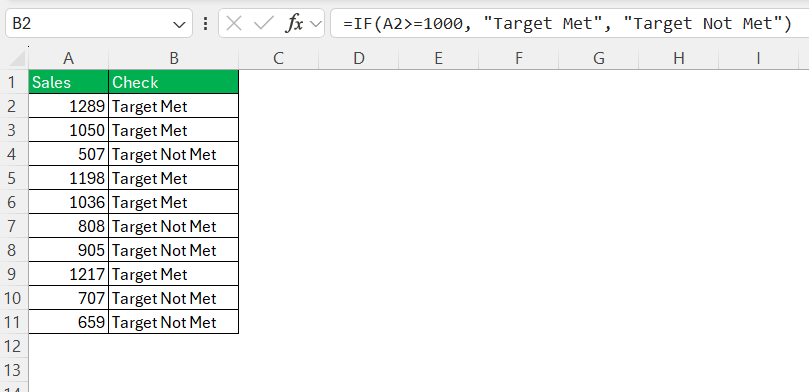
For example, I often use the following formula to check if a sales target has been met:
=IF(A2>=1000, “Target Met”, “Target Not Met”)
This formula checks if the value in cell A2 is greater than or equal to 1,000. If it is, Excel displays “Target Met”; if not, it displays “Target Not Met.” This simple check has saved me countless hours.
Advanced Techniques with Logical Operators
Combine Conditions with AND and OR
One trick that’s been incredibly useful for me is combining conditions using AND and OR. For example, when I need to ensure multiple conditions are met, I use AND. If I only need one of several conditions to be true, I go with OR.
Tip: When using OR, remember that if any single condition is true, the result is true. This is particularly useful for validating multiple criteria without needing every condition to be met.
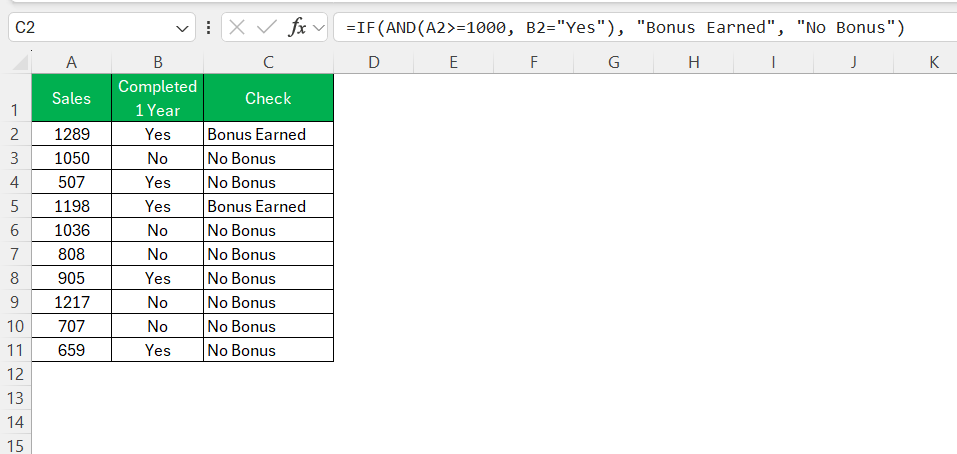
=IF(AND(A2>=1000, B2=”Yes”), “Bonus Earned”, “No Bonus”)
This formula checks if the value in A2 is greater than or equal to 1,000 and if the value in B2 is “Yes.” If both conditions are true, it returns “Bonus Earned”; otherwise, it returns “No Bonus.”
Avoid Errors with IFERROR
Sometimes, I’ve run into errors when a formula doesn’t return a valid result. Wrapping my formulas with IFERROR helps me manage these situations. This trick is a lifesaver when working with complex conditions.
Tip: Use IFERROR to return a custom message or value when an error occurs, making your formulas more robust and user-friendly.
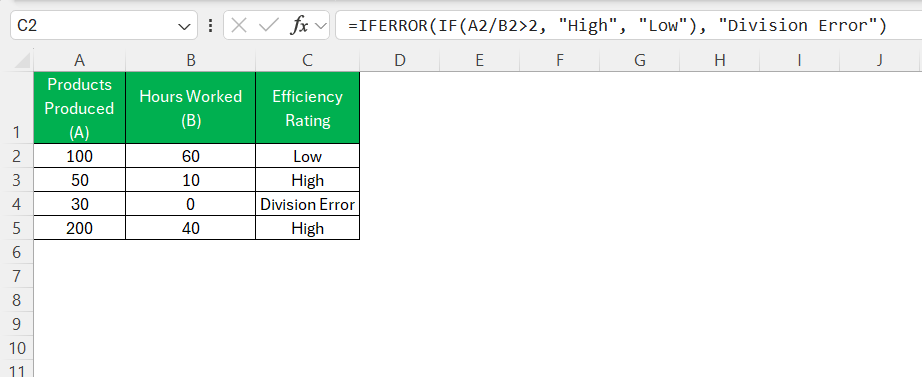
=IFERROR(IF(A2/B2>2, “High”, “Low”), “Division Error”)
This formula checks the ratio of A2 to B2, but if there’s a division by zero or another error, it returns “Division Error” instead of breaking the formula.
Count and Sum with Conditions
Using logical operators within COUNTIF, SUMIF, and their counterparts have been a huge time-saver. I can quickly tally up items or sum values that meet specific criteria without needing to filter or sort data manually.
Tip: For even more complex conditions, use COUNTIFS or SUMIFS, which allows you to apply multiple criteria.
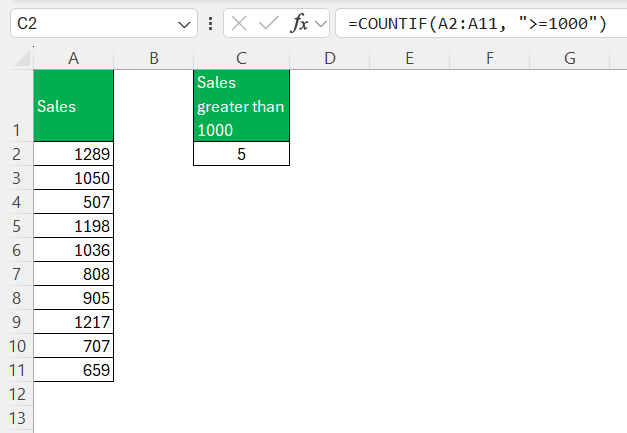
=COUNTIF(A2:A10, “>=1000”)
This formula counts how many values in the range A2:A10 that are greater than or equal to 1,000.
Use Array Formulas for Advanced Conditions
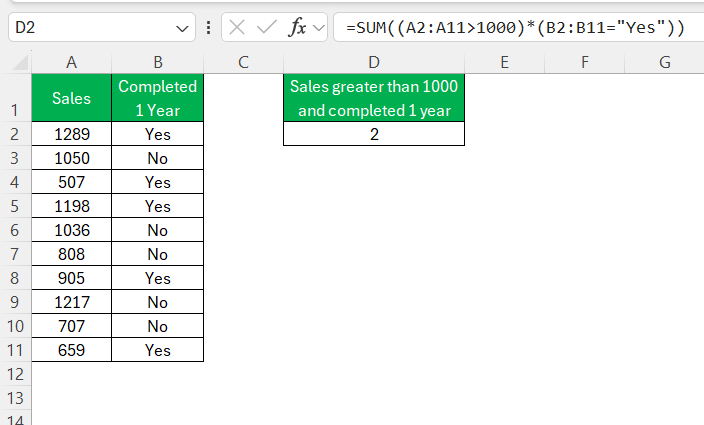
There are times when I’ve needed to check multiple conditions across different ranges. Array formulas, combined with logical operators, have allowed me to do this efficiently. While they can be tricky to master, they offer powerful functionality.
Tip: Press Ctrl + Shift + Enter after typing your formula to create an array formula, which can evaluate multiple conditions across ranges.
=SUM((A2:A10>1000)*(B2:B10=”Yes”))
This array formula sums the values in column A where the value is greater than 1,000 and the corresponding value in column B is “Yes.”
Leverage NOT for Reversed Logic
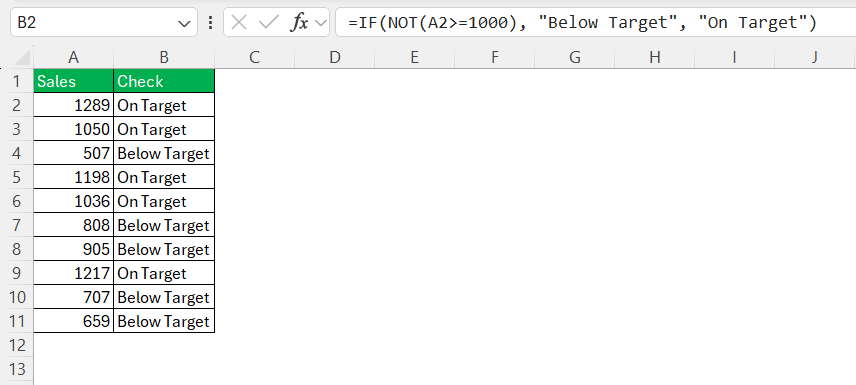
The NOT function has come in handy when I needed to reverse a condition. Instead of writing complex negations, NOT it simplifies the process, making my formulas clearer and easier to manage.
Tip: Use NOT to invert conditions, especially when you want to check if something is not true.
=IF(NOT(A2>=1000), “Below Target”, “On Target”)
This formula returns “Below Target” if the value in A2 is less than 1,000, effectively reversing the logic of a simple comparison.
Conclusion
Mastering logical operators has been a game-changer for me in Excel. They’ve given me the ability to perform detailed analyses, automate decisions, and make my work more efficient. These tips and tricks have further enhanced my ability to use logical operators effectively, making my formulas more powerful and resilient.
I encourage you to experiment with logical operators in your own spreadsheets. Whether you’re just starting out or looking to deepen your Excel skills, these operators, along with the tips I’ve shared, are a fundamental part of becoming an Excel power user.
FAQ: Unraveling Queries on Excel Logic
What is the logical function in Excel?
A logical function in Excel is a feature that allows us to perform conditional tests on values and formulas, resulting in a ‘True’ or ‘False’ outcome. These functions make decisions based on certain criteria and are essential for data analysis and decision-making within spreadsheets.
How Do I Create a Basic Logical Formula in Excel?
Creating a basic logical formula in Excel starts with the IF function. Enter =IF(logical_test, value_if_true, value_if_false) into a cell, replace logical_test with your condition, value_if_true with the outcome if the condition is met, and value_if_false for the opposite case. This sets up a simple decision-making structure in your worksheet.
Can Logical Operators Be Used for Non-Numeric Data in Excel?
Yes, logical operators in Excel are not limited to numeric data. They can also handle text and dates. For example, operators like “=” and “<>” can compare text strings, and similar logic can apply to dates to filter or sort data based on time criteria.
What Are Some Common Errors to Watch Out For When Using Logical Operators?
Common errors to watch out for when using logical operators in Excel include incorrect syntax, such as mismatched parentheses or mix-ups between similarly named functions. Ensure that the operators and their associated functions are applied correctly and consider Excel’s error messages and prompts as tools for quick troubleshooting.
What are operators in Excel?
Operators in Excel are symbols that specify the type of calculation or comparison to be performed. They include arithmetic operators for mathematical operations, comparison operators for evaluating two values, text concatenation for joining strings, and reference operators for cell ranges. Each plays a distinct role in crafting Excel formulas and functions.
John Michaloudis is a former accountant and finance analyst at General Electric, a Microsoft MVP since 2020, an Amazon #1 bestselling author of 4 Microsoft Excel books and teacher of Microsoft Excel & Office over at his flagship MyExcelOnline Academy Online Course.

