Table of Contents
Setting the Stage for Successful Mail Merging
Preparing Your Data Sources
Preparing your data sources is the foundation of a successful mail merge. Your first step? Choose where your personalization details will come from. Excel spreadsheets and Outlook contact lists are the usual go-tos. Ensure your selected data source is well-organized, with each piece of information — names, email addresses, etc. — in separate columns. If you’re starting from scratch, you can even whip up a list right in Word as part of the mail merge wizard.
Remember, crisp and clear data leads to seamless merges and error-free emails, helping you make a polished impression every time you click ‘Send’.
Composing a Compelling Main Document
Composing a compelling main document sets the tone for my mail merge. I’ll want to craft content that resonates with each recipient as though it’s been tailored just for them. To begin, I create my document in Word, focusing on the body of my message. I skip the personalized details for now — this is my email template.
I write as if I’m speaking to one person rather than a faceless crowd, but I leave spaces where names, dates, or other specific details will be inserted during the merge. This blend of universal content and personal touches transforms a generic email into a meaningful communication.
Remember, the secret to a successful mail merge lies in a document that’s both engaging and easy to adapt for each unique recipient.
The Mail Merge Mechanism in Outlook
Step-by-Step Guide to Performing a Mail Merge
Embarking on a mail merge with Outlook is easier than you might think. Let’s break it down step by step:
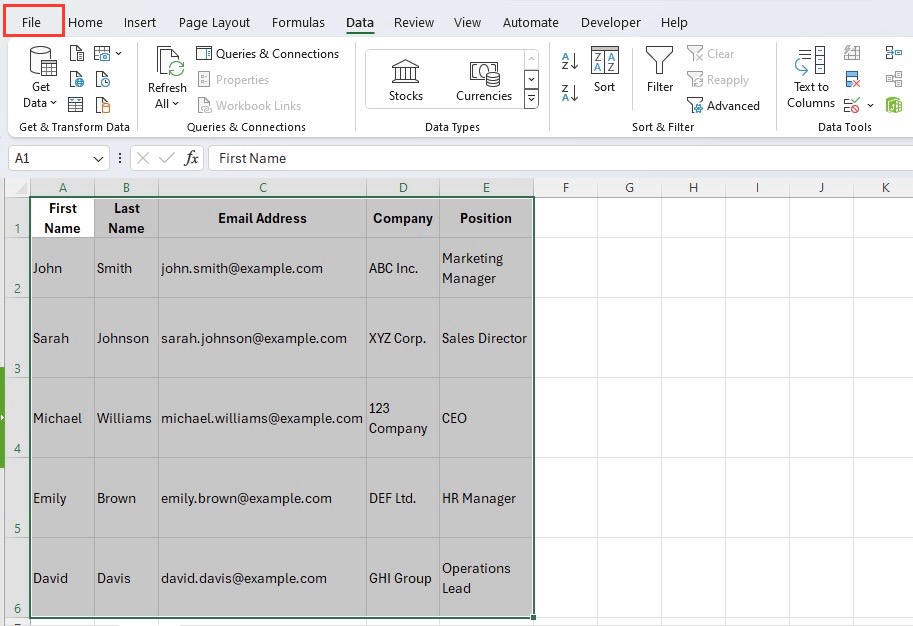
STEP 1: Open the contact spreadsheet in Excel. This will be the engine of personalization, feeding details into your email. Make sure each column in the spreadsheet is clearly labeled (e.g., First Name, Email Address).
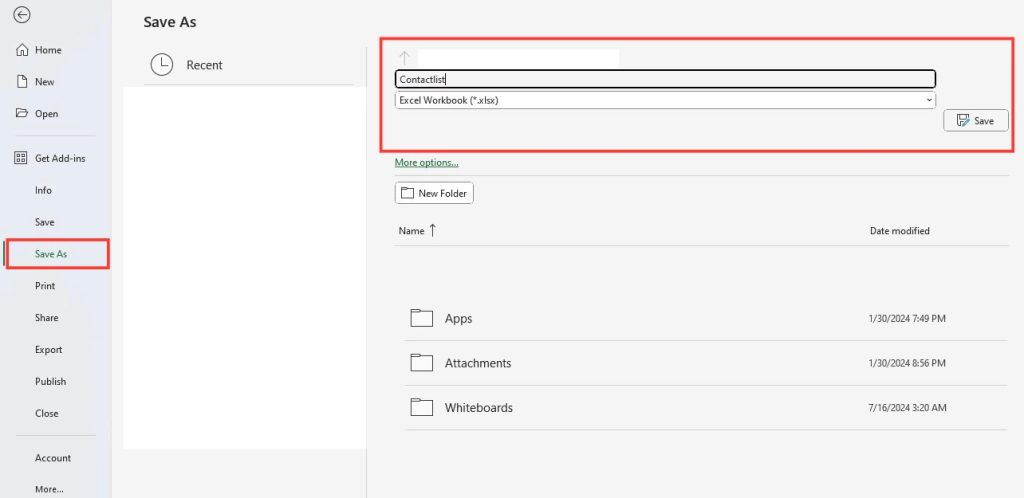
STEP 2: Save the Excel file. Name it something like ContactList.xlsx.
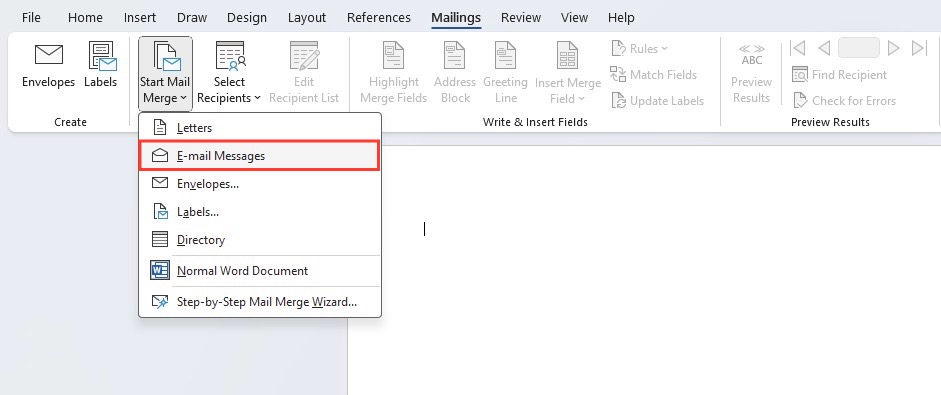
STEP 2: Open Microsoft Word and go to the “Mailings” tab > “Start Mail Merge” > “E-mail Messages”.
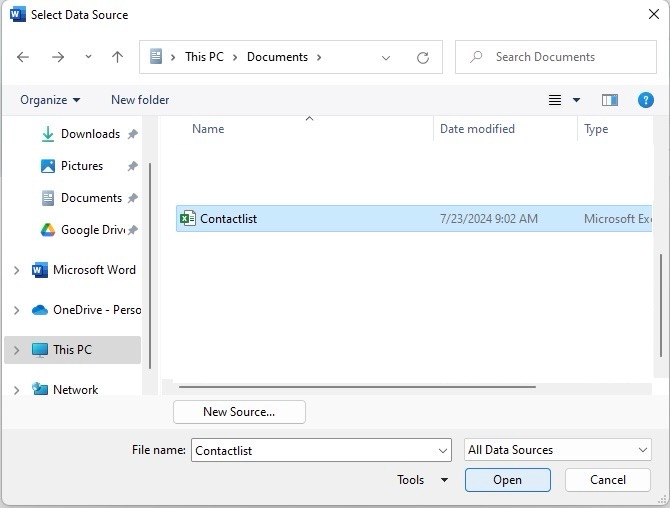
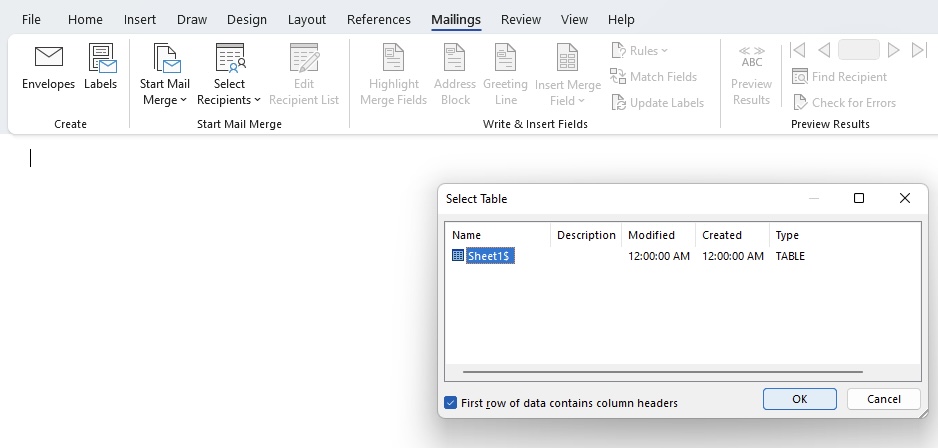
STEP 4: From ‘Select Recipients’, choose your data source. Word will now sync up with your Excel sheet or Outlook contacts.
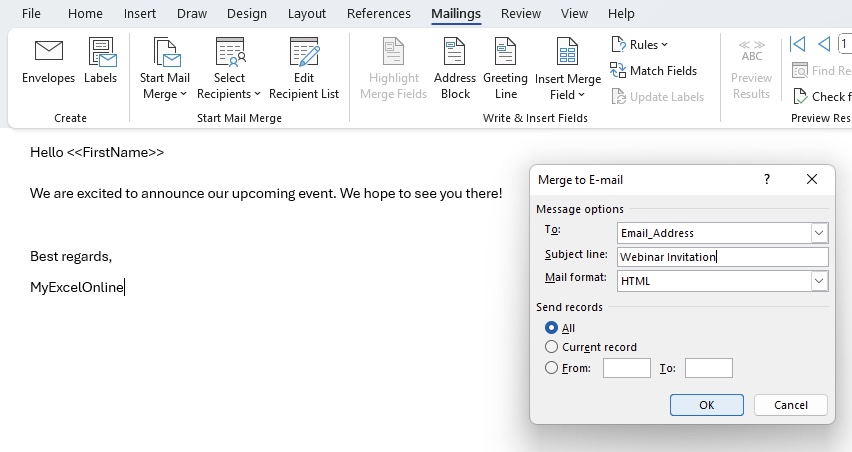
STEP 5: Wherever you want a personal detail to appear (like a first name), click ‘Insert Merge Field’, and select the corresponding column from your data source.
STEP 6: Take a peek at how your emails will look by clicking ‘Preview Results’. Make adjustments if needed until it’s just right.
STEP 7: After hooking up with Outlook, hit ‘Finish & Merge’ to start sending your personalized emails out into the world.
Follow these steps, and you’ll transform your email communication from mundane to magnificent, one mail merge at a time.
Tips for Personalizing Your Emails
To make each recipient feel truly special, infuse your emails with the magic of personalization:
- Employ Merge Tags Wisely: Insert merge tags such as [firstname], [lastname] or [companyname] to pull in data from your source and seamlessly integrate it within your email’s text. This makes each email feel like a one-on-one conversation.
- Tailor Content Based on Segments: If your data allows, go beyond names. You could mention something relevant to each recipient’s city or industry, making your email resonate even deeper.
- Include a Personal Note: Whenever possible, add a space for a brief note that lets you add a comment or observation that’s unique to each recipient. Even a simple, personalized comment can significantly enhance the sense of genuine connection.
- Respect the Tone and Relationship: The level of familiarity should match the relationship you have with your recipients. An email to a long-time client can be warmer than to a new prospect.
- Test Before Sending: Do a dummy run with a small segment or your own email address to check the personalization’s viability. It ensures that you catch any errors before the full rollout.
By following these tips and adding a sprinkle of personal care to your emails, you’ll surely see an uptick in engagement and rapport with your audience.
Overcoming Common Mail Merge Challenges
Addressing Limitations of Mail Merge in Outlook
Confronting the limitations of mail merge in Outlook is crucial for a smooth experience. Here’s how to tackle some of the common constraints you might encounter:
- Lack of Tracking: Without in-built analytics, it’s hard to gauge the impact of your emails. One workaround is to use third-party tools that integrate with Outlook, providing insight into opens, clicks, and replies.
- Compatibility Issues: Outlook’s mail merge works primarily within its ecosystem. If you need to collaborate across different email services, consider using universal formats for data, like CSV files, or look into other mailing platforms that are more flexible.
- The Collaboration Challenge: Outlook mail merge is traditionally a solo act. To incorporate teamwork, save the data source in a shared location, use shared mailboxes, or explore specialized email marketing tools that offer collaborative features.
- User Experience Hurdles: The process can often feel clunky. Familiarize yourself with the necessary steps through guides and templates, which can smooth out the experience.
- Software Requirements: An active Office 365 subscription is necessary for optimal use. If that’s a roadblock, investigate alternative mail merge tools that don’t require such commitments.
By staying proactive and resourceful, you can deftly overcome these obstacles and harness the full potential of mail merge in Outlook to keep your email game on point.
Solutions for Sending Mass Emails with Attachments
Sending mass emails with attachments in Outlook doesn’t have to be a headache. To breeze through this challenge:
- Leverage Mail Merge Toolkit: Instead of Outlook’s standard options, consider a Mail Merge Toolkit that allows you to attach individual files for each recipient.
- Opt for Cloud Storage Links: If the attachments are large, you could upload files to a cloud service like OneDrive or Dropbox and include shareable links in your mail merge. This ensures hassle-free delivery and downloads.
Always preview and test your email before full deployment to confirm that attachments or links are functioning correctly. These solutions help maintain a touch of personal care while managing mass mailings with ease.
Best Practices for a Flawless Mail Merge Process
The Do’s and Don’ts When Organizing Your Mailing List
Navigate your mailing list like a pro with these do’s and don’ts:
- Do verify all contact details for accuracy before you start. Typos can lead to bounces and lost opportunities.
- Do segment your list to target specific groups. This helps tailor your messaging for better engagement.
- Don’t forget to update your list regularly. Outdated information can derail even the best email campaigns.
- Do respect privacy and consent. Ensure you have permission to email the contacts on your list.
- Don’t overlook the importance of opting out. Always include an unsubscribe link to maintain trust and comply with regulations.
By following these guidelines, you’ll enhance the effectiveness of your mail merge and maintain a positive relationship with your recipients.
Ensuring Data Security During the Mail Merge Operation
Data security during mail merge is paramount. You’re handling sensitive information, and it’s your responsibility to protect it. To do so:
- Opt for Local Operations: Choose tools that work within your environment. The Mail Merge Toolkit, for example, ensures that your data doesn’t leave your local system, thus avoiding exposure through third-party servers.
- Password Protection: Secure your personalized documents with a password. This step is key to preventing unauthorized access and maintaining the confidentiality of your communications.
- Regular Software Updates: Keep your Microsoft Office suite updated to protect against vulnerabilities and benefit from the latest security features.
- Access Control: Limit who can access the data sources you use for your mail merge. The fewer the hands on your data, the less the risk of a breach.
By embedding these security practices into your mail merge operations, you can rest easy knowing your and your recipients’ data is secure.
Real-world Applications of Mail Merge in Business Communications
Scenarios Where Mail Merge Maximizes Productivity
Mail merge really shines in scenarios where communication on a large scale yet with a personal touch is essential. Here are some instances:
- Client Updates: Keep your clients in the loop with project progress, policy changes, or company news by sending individualized updates swiftly.
- Marketing Campaigns: Launch your newest product or service with a personalized touch to boost engagement and return on investment.
- Event Invitations: Organizing a webinar or workshop? Send tailored invitations to drive up attendance and create an inviting experience right from the inbox.
- Seasonal Greetings: Holidays or company milestones are a great opportunity to strengthen relationships using custom messages with personal flair.
- Billing and Reminders: Dispatching bills, subscriptions renewals, or appointment reminders? Automate these with mail merge to ensure on-time delivery and response.
In each of these scenarios, mail merge not only saves time but also elevates your brand, forging stronger connections through personalized communication.
Frequently Asked Questions about Mail Merge in Outlook
How Do I Start a Mail Merge in Outlook with Existing Contacts?
Starting a mail merge in Outlook with existing contacts is straightforward:
STEP 1: Launch a new Word document for your email text.
STEP 2: Click ‘Mailings’, then ‘Start Mail Merge’, and select ‘E-Mail Messages’.
STEP 3: Go to ‘Select Recipients’ and choose ‘Choose from Outlook Contacts’.
STEP 4: Pick your Outlook contacts folder and you’re set to personalize and send.
It’s that simple! Now your outreach can be personalized and efficient, all with a few clicks.
Can I Include Attachments in My Outlook Mail Merge?
Yes, you can include attachments in your Outlook mail merge using the Mail Merge Toolkit. Specify the attachment’s path in your data source and enter its field name in the Toolkit to send personalized attachments to each recipient.
How do I create a mail merge group in Outlook?
Creating a mail merge group in Outlook is a breeze:
STEP 1: In Outlook, navigate to ‘Contacts’ and select ‘New Contact Group’.
STEP 2: Give your group a name and add contacts either manually or from your existing contacts.
STEP 3: Save the group. When performing a mail merge in Word, select this group as your recipients.
Your group is ready, primed for personalized, bulk email magic with mail merge!
John Michaloudis is a former accountant and finance analyst at General Electric, a Microsoft MVP since 2020, an Amazon #1 bestselling author of 4 Microsoft Excel books and teacher of Microsoft Excel & Office over at his flagship MyExcelOnline Academy Online Course.

