As a seasoned user of Microsoft Teams, I’ve noticed that audio problems can be a recurring nuisance, disrupting the flow of virtual teamwork. Among these, microphone malfunctions are particularly vexing. I’ve encountered a raft of issues like muted audio, physical muting of devices, selection errors for audio input, and permission settings that block Teams from accessing the microphone—all of which can throw a wrench into the works.
Key Takeaways
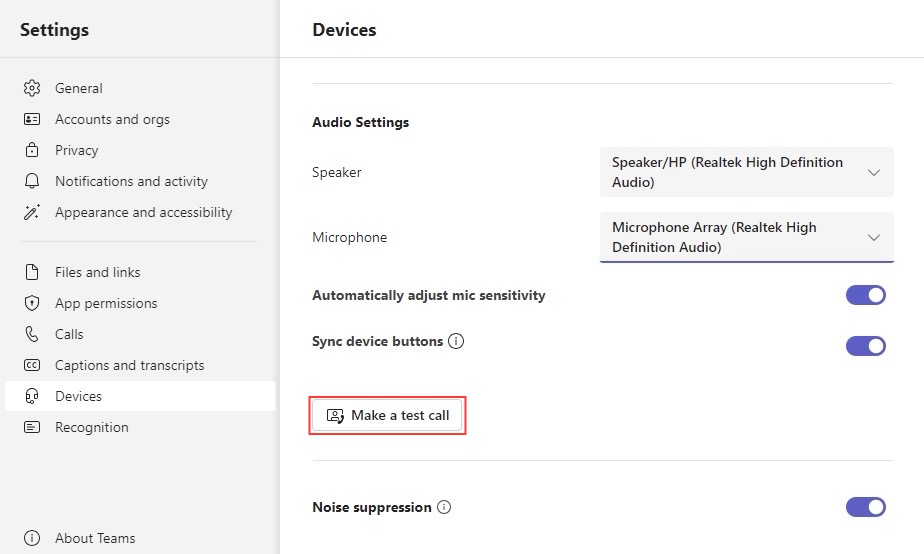
- Ensure your Microsoft Teams microphone is selected as the default device by accessing the settings through your profile picture, navigating to the “Devices” tab, and choosing your microphone under the “Microphone” item.
- Test your microphone within Microsoft Teams by making a test call after setting it as the default. Click the “Make a test call” button and speak; if successful, your voice will be played back to you.
- If the microphone doesn’t work, check system settings outside of Teams by using the command “mmsys.cpl” in the Run dialog (Win + R), adjusting audio volumes in the “Recording” tab, and applying any necessary changes.
Importance of a Working Microphone for Seamless Communication
A functional microphone is the linchpin of any productive online meeting. Without it, we may as well be sending digital smoke signals. Clear audio is critical for ensuring effective collaboration, understanding nuanced conversations, and maintaining a professional atmosphere. In essence, a microphone issue isn’t just a technical hiccup—it can translate into miscommunication, wasted time, and even tarnished credibility. To illustrate this point, consider a scenario where a key participant in a strategic meeting can’t share their insights due to audio failure—it’s not just a missed opportunity, but a real detriment to collective success.
Table of Contents
Initial Checklist Before Troubleshooting
Verify Your Teams is up to Date
Before diving headfirst into troubleshooting the microphone on Microsoft Teams, it’s wise to ensure the app is current with its updates. Updates are tantamount to a fresh coat of digital paint; they tend to fix known bugs, enhance security, and sometimes, even improve audio quality. I make it a habit to manually check for updates by clicking on the menu beside my profile picture and selecting ‘Check for updates.’ If a message pops up saying, “You’ve got the latest version,” then it’s a green light to proceed with other fixes. Otherwise, I let the app work its magic and install any available patches automatically—simple yet effective!
Assess Your Internet Connection Quality
Now, when it’s time to point the lens at connectivity, I cannot stress enough that a stable internet connection is to a smooth Teams call what oxygen is to a flame. A bandwidth bottleneck can lead to audio packets dropping faster than a poorly juggled set of knives, causing breakups or complete audio blackouts. I always run a quick internet speed test before an important call. If I detect any connection issues, I’ll troubleshoot my Wi-Fi or hardwire into my router to ensure that my voice is as clear and uninterrupted as a mountain stream.
Navigating Through Device Settings
Providing Necessary Permissions to Microsoft Teams
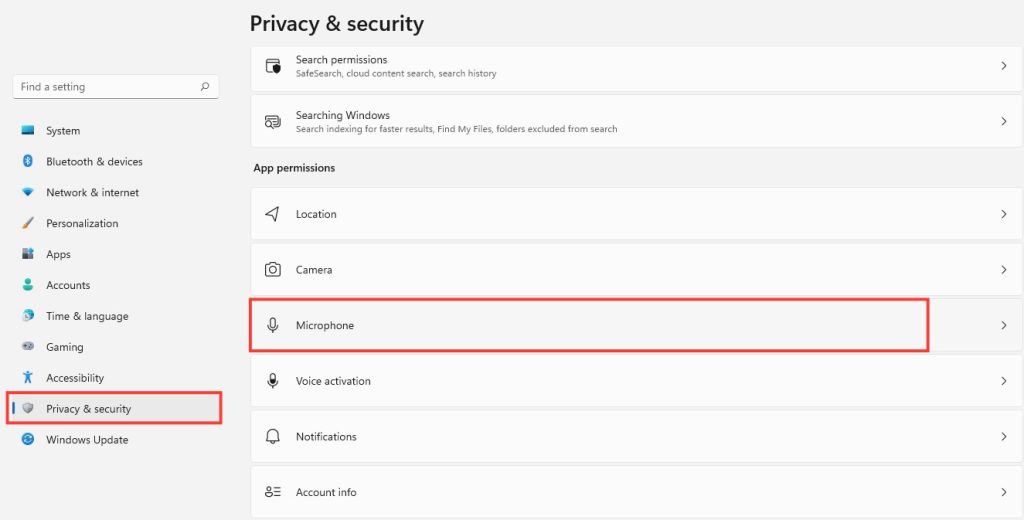
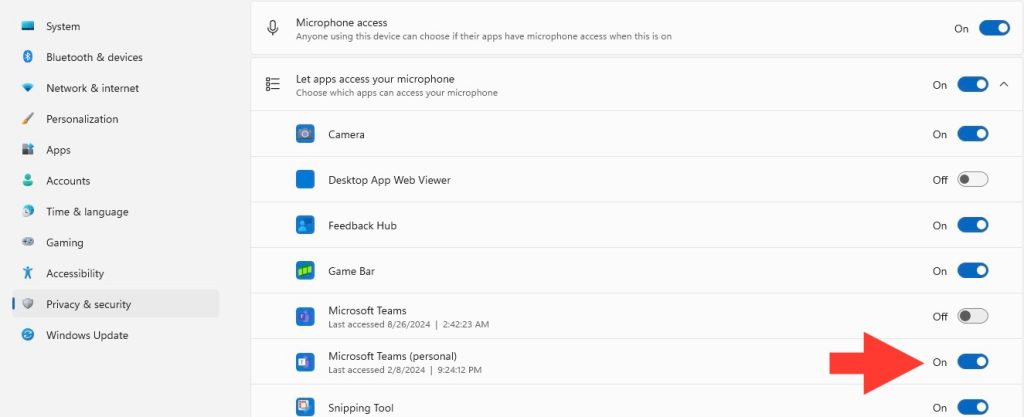
To bring an add-on’s microphone capabilities into play on Microsoft Teams, it’s crucial that I set it up with the right permissions. Microsoft Teams respects our privacy by allowing us to manage these permissions distinctly. For instance, if an app within Teams can’t seem to get a word in edgewise, I quickly head over to my computer settings. Here’s what I do: I click the ‘Privacy and security’ menu, select ‘Microphone,’ then flick on the ‘Microphone’ toggle. This simple act of digital diplomacy usually sees a return of microphone privileges, posthaste.
Simplified Solutions to Common Microphone Problems
Running the Built-in Audio and Speech Troubleshooters
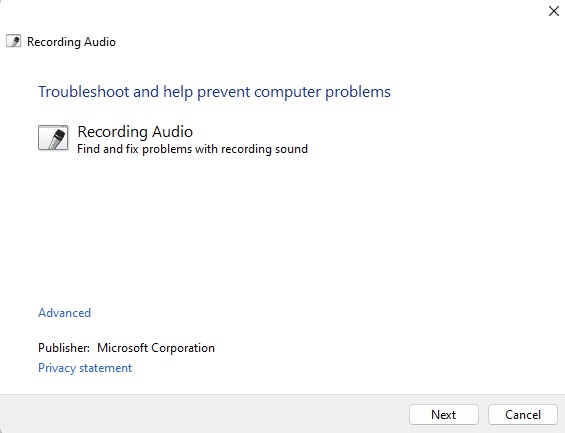
In my arsenal of tools for swiftly dispatching microphone mishaps, the built-in Audio and Speech Troubleshooters in Windows are nothing short of lifesavers. When faced with mic troubles, I dive into the Control Panel, invoke the Speech Troubleshooter for a focused fix, or the Recording Audio Troubleshooter as a second line of defense if needed.
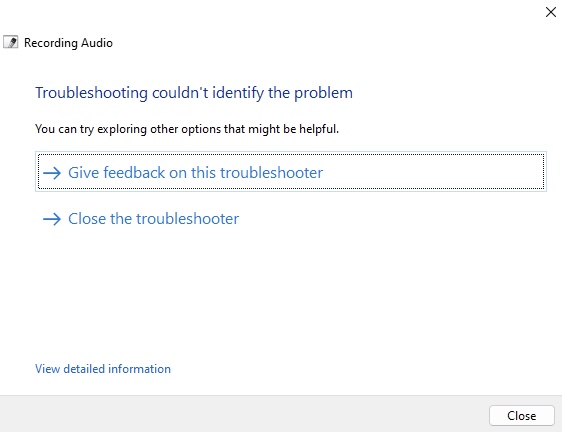
With each, I follow the cues, let the troubleshooter work its magic, and apply any suggested resolutions. It’s a systematic approach that often restores harmony to Teams audio with minimal fuss—just a few clicks can set things right.
Optimizing Privacy Settings for Microphone Access
To ensure my microphone is not just heard but also heeded by Microsoft Teams, I navigate the occasionally labyrinthine corridors of Windows privacy settings. Here, I ensure that the microphone access for the device is toggled on. It’s a vital privacy setting that, when correctly optimized, allows Teams—not to mention myself—to communicate without digital barriers. I also look under the “Choose which Microsoft Store apps can access your microphone” section to make sure Teams is selected. This feels akin to providing a guest with a house key, ensuring that Teams can enter the realm of microphone access without a hitch.
Pro Tips for Microphone Management in Teams
Selecting the Right Audio Input in Teams Settings
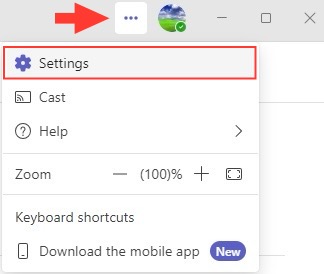
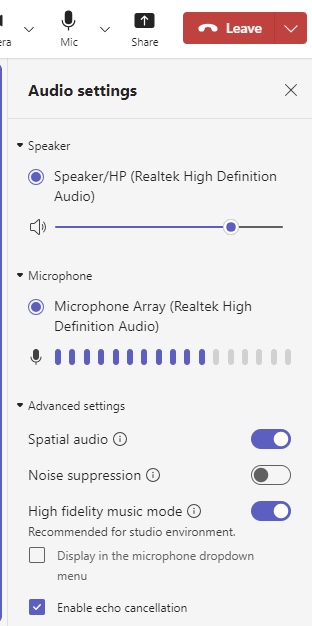
I’ve learned that selecting the right audio input in Teams is akin to picking the right instrument for a concert—you want something that will carry your tune across without a hiccup. In Teams, I click on the 3 dots beside my profile picture, select ‘Settings,’ and then navigate to ‘Devices.’
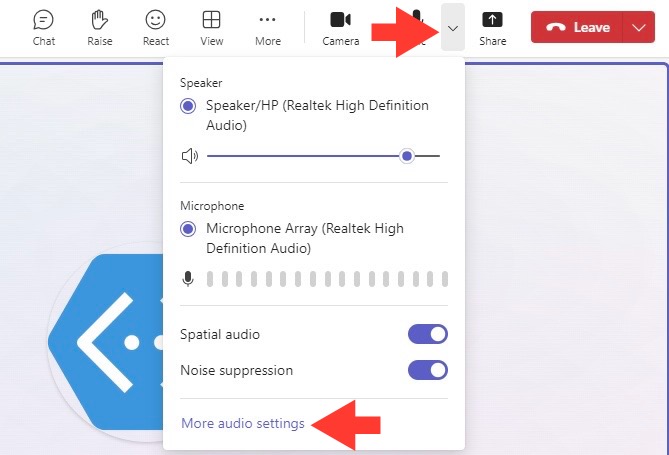
From there, I carefully peruse the ‘Microphone’ dropdown menu to ensure that my preferred audio input is at the helm. Once selected, I often perform a quick test call in Teams to ensure my voice is not only heard but also crystal clear. With the right mic in command, I’m all set for seamless audio delivery in my virtual meetings.
Adjusting Your Microphone Volume for Clarity
When it’s showtime in a meeting, my voice needs to be more than just background music—it should be front and center. That’s why adjusting the microphone volume is vital for clarity. I unearth the Sound settings, propel myself to the Levels tab, and then adjust the slider, tuning my mic’s volume to a sweet, ear-friendly range.
Ideally, I aim for a volume that doesn’t just whisper but doesn’t shout either—a level that, like Goldilocks’ porridge, is just right. Following these adjustments, I ensure that all sonic elements are perfectly balanced for my audience in Teams.
Advanced Strategies for Tech Savvy Users
Resetting Microsoft Teams Completely
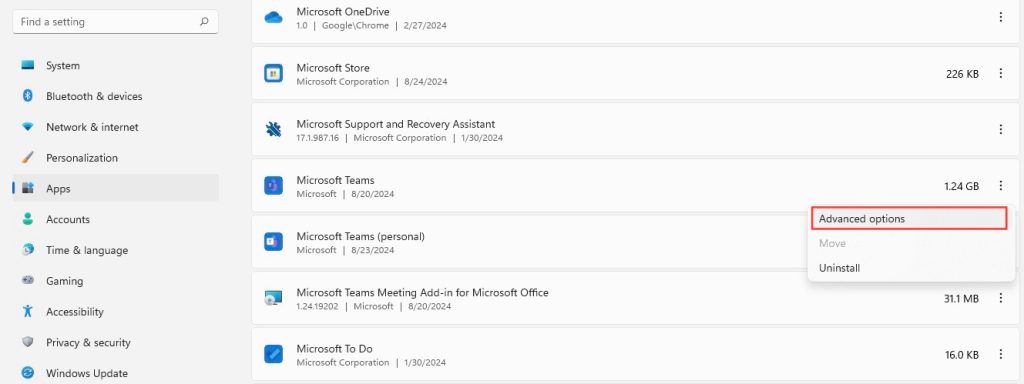
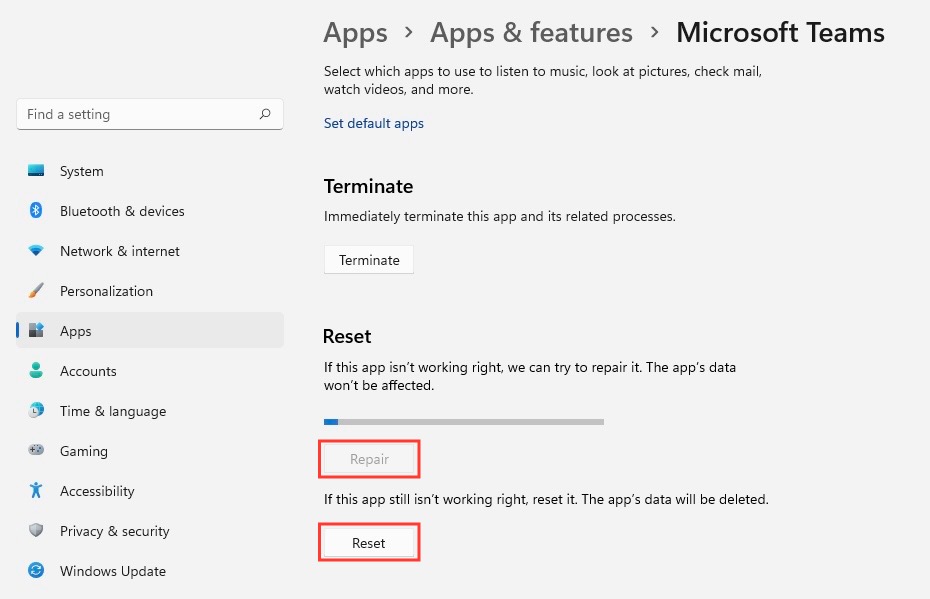
When Teams refuses to cooperate, a full reset can be the metaphorical digital kick that solves the issue. Resetting the app clears its cache and gives it a fresh start, free from any prior tangles. For the Microsoft Teams Universal Windows Platform (UWP) app, this involves accessing ‘Apps & Features’ in the Windows Settings, selecting Microsoft Teams, and then clicking ‘Advanced options.’
There, I’m presented with the ‘Repair’ and ‘Reset’ options. “Repair” attempts to fix issues without affecting data, but when that won’t cut it, I opt for “Reset” to clear all data and give Teams a clean slate.
When All Else Fails: Reinstallation Tactics
Removing and Reinstalling Microsoft Teams
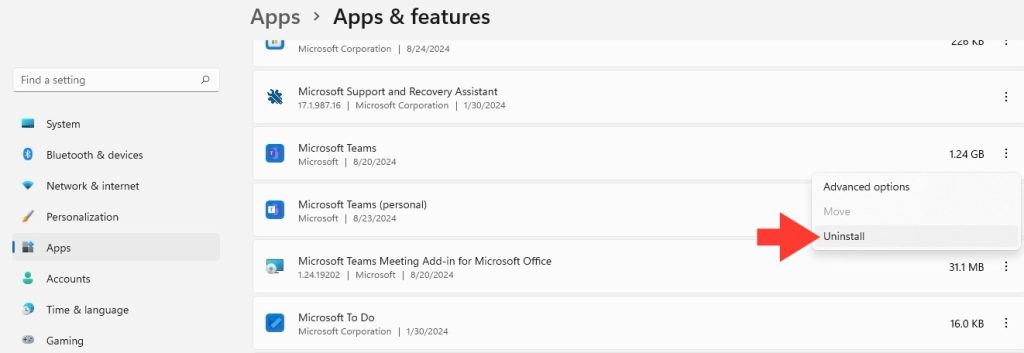
Sometimes, the age-old adage of ‘turning it off and on again’ needs a modern twist—uninstalling and reinstalling. When I’ve exhausted every other avenue, removing Microsoft Teams can often clear any lingering gremlins. On Windows 10 and 11, the process is straightforward: I navigate to ‘Apps & Features,’ select Microsoft Teams, and initiate the uninstallation. A restart for good measure, and then I fetch the latest version of Teams, either via Microsoft Store for the UWP app or directly from the Teams website for the desktop version. Reinstalling gives Teams a pristine environment, and like a phoenix, it often rises, microphone issues resolved.
FAQs on Solving Microsoft Teams Microphone Problems
How do I enable my microphone access in Microsoft Teams?
To enable your microphone access in Microsoft Teams, click on your profile picture, navigate to ‘Settings,’ select ‘Devices,’ and choose your microphone from the dropdown menu. Also, check Windows settings by hitting ‘Start,’ then ‘Settings,’ ‘Privacy,’ and selecting ‘Microphone.’ Ensure ‘Allow apps to access your microphone’ is on, and confirm Teams is listed under ‘Choose which apps can access your microphone.’
What should I do if other apps are affecting my Teams microphone usage?
If other apps are affecting your Microsoft Teams microphone usage, close those applications to prevent them from commandeering the mic. For a more permanent solution, adjust your system settings to prevent apps from accessing the microphone while Teams is in use. You can manage this in the Privacy settings under ‘Microphone’ on your computer.
How do I check if my mic is working on Microsoft Teams?
To check if your mic is working on Microsoft Teams, click your profile picture, then ‘Settings,’ and select ‘Devices.’ Click ‘Make a test call’ under ‘Audio devices.’ Follow the on-screen instructions to test your microphone’s functionality. You’ll be able to speak and hear your audio playback if it’s working correctly.
John Michaloudis is a former accountant and finance analyst at General Electric, a Microsoft MVP since 2020, an Amazon #1 bestselling author of 4 Microsoft Excel books and teacher of Microsoft Excel & Office over at his flagship MyExcelOnline Academy Online Course.

