Learn about Excel with our Free Microsoft Excel Online Course.
Key Takeaways
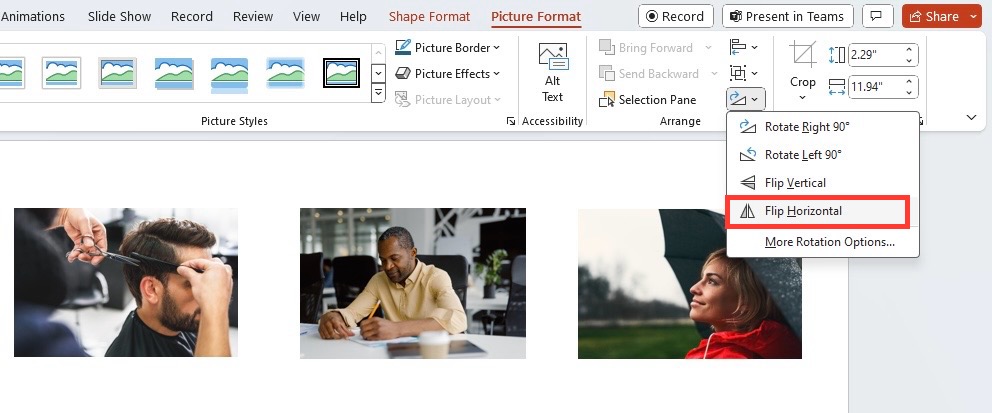
- To create a vertical mirror image in PowerPoint, select the image you wish to mirror, then navigate to the “Picture Format” tab and click “Rotate” within the “Arrange” group before selecting “Flip Vertical.”
- Flipping or mirroring images in a PowerPoint presentation enhances visual appeal and can help align images with the overall design and text of the presentation, easily done through the “Rotate” button on the “Picture Format” tab.
- Mastering image rotation and mirroring in PowerPoint is accessible for users of all skill levels, providing a straightforward and quick way to manipulate images for a more professional and visually impactful presentation.
Getting Started with Basic Rotation Techniques
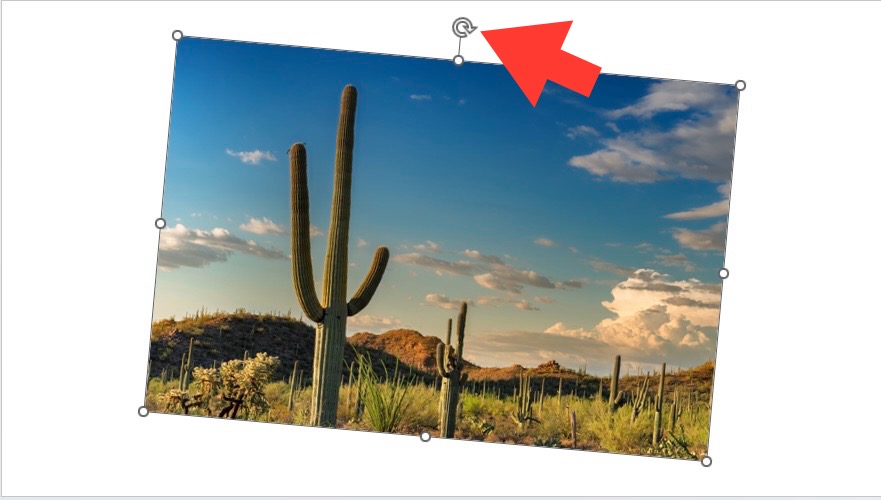
Rotating objects in PowerPoint may seem daunting, but it’s a breeze once you get the hang of it. To start, you’ll select the object you want to rotate by clicking on it. Now, look for the rotation handle—the little circle above the object—and drag it in the desired direction. If you’re dealing with text boxes, shapes, or pictures, these steps are universally applicable.
Rotate to an Exact Angle by Degrees – The Precision Approach
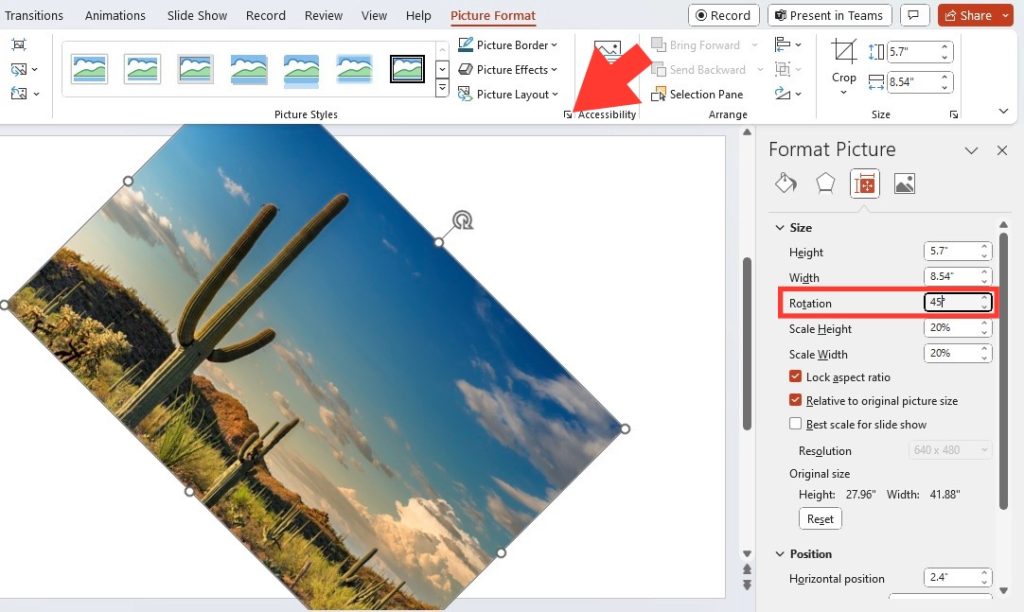
When your design calls for precision, rotating to an exact angle in PowerPoint gives you full control. Follow these steps to adjust your objects down to the degree:
STEP 1: Select the element you need to rotate.
STEP 2: Head to the “Picture Format” tab if it’s an image, or appropriate tools for shapes and text boxes.
STEP 3: Click on the diagonal arrow on the bottom-right of the Picture Styles panel, and find the “Rotate” option.
STEP 4: In the dialog box, enter the exact number of degrees for rotation and hit “Enter.”
This method ensures your design aligns perfectly, which is crucial for detailed graphics or when alignment amongst multiple objects is critical.
Utilizing Keyboard Shortcuts for Quick Rotations
Speed up your design workflow with these handy keyboard shortcuts for rotating objects in PowerPoint:
- Flip Horizontal: Ctrl+Alt+Shift+O
- Flip Vertical: Ctrl+Alt+Shift+I
- Rotate Clockwise: Ctrl+Alt+Shift+
> - Rotate Anticlockwise: Ctrl+Alt+Shift+
<
Using these shortcuts can make quick adjustments a breeze, especially when you’re fine-tuning the layout of your slides. Remember, these combinations might feel tricky at first, but with a bit of practice, you’ll be rotating objects like a pro!
Table of Contents
Creative Uses of the Mirror Effect
Improving Composition with Mirrored Images
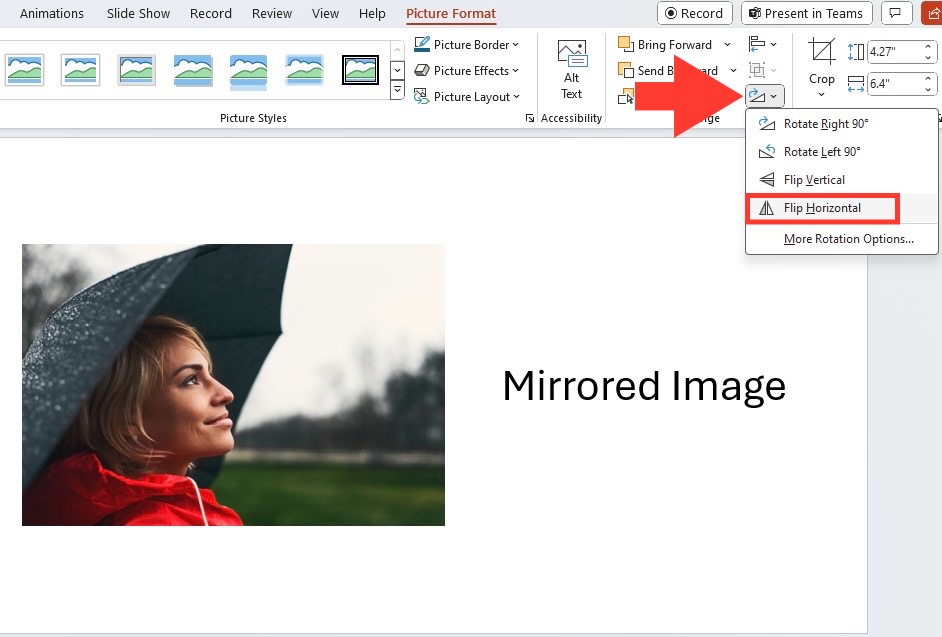
Mirroring images can dramatically improve the composition and focus of your slides. Say you’ve got a photo of someone gazing off to the left, and you want their gaze to lead to your slide’s text – just flip the image horizontally by going to Picture Format>Click on the Rotate Objects icon on the Arrange Panel>Flip Horizontal to reorient their attention directly onto your content. This simple trick can guide your audience exactly where you want them to look.
Reversing Text and Graphics for Impactful Presentations
Reversing text and graphics can add an unexpected twist, making your presentation stand out. To reverse text, you’ll need to be crafty since PowerPoint doesn’t directly flip text boxes. Instead, take a screenshot of your text, and then insert this image into your slide. You can now flip it as you would with any graphic. This technique can emphasize a point, simulate reflection effects, or add a creative spin to your visuals.
Overcoming Common Issues While Rotating and Mirroring
Can I Mirror Multiple Objects at Once?
Absolutely, you can mirror multiple objects at once in PowerPoint! Here’s how:
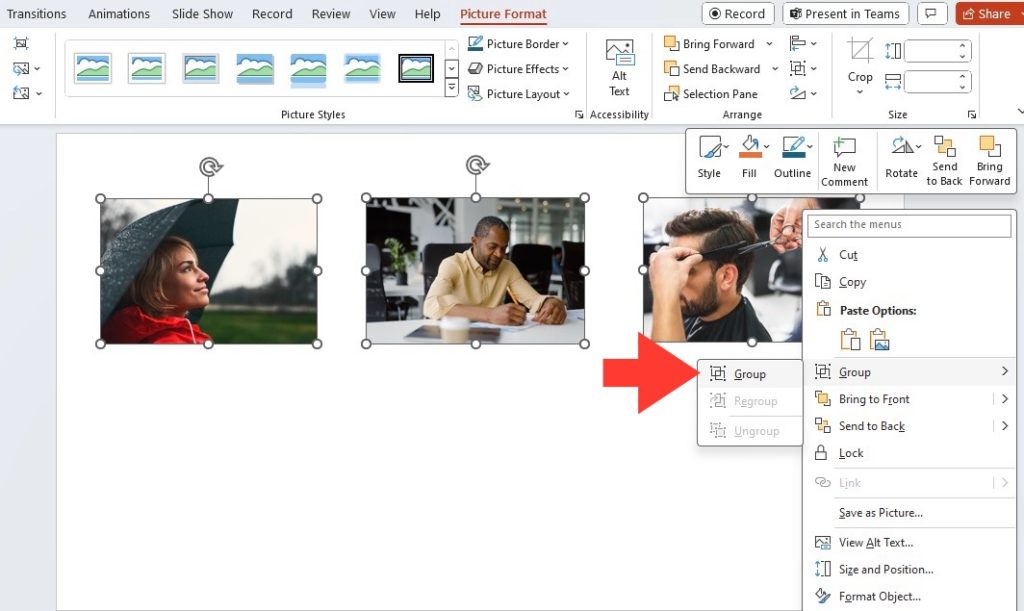
STEP 1: Select the objects you want to mirror by holding down the ‘Shift’ key as you click on them. Right-click and choose “Group.”
STEP 2: Go to the “Picture Format” or “Format” tab, depending on whether you’re dealing with images or shapes/text boxes.
STEP 3: Choose “Rotate” and then pick “Flip Horizontal” or “Flip Vertical” to achieve the mirror effect on all selected items.
STEP 4: This bulk action saves time and keeps your mirrored objects aligned perfectly with one another.
Remember, using PowerPoint’s “Flip Horizontal” or “Flip Vertical” will affect all selected objects, so deselect any you don’t want to be mirrored.
How to Revert Objects Back to Their Original State?
If you’ve rotated or mirrored an object in PowerPoint and need to return it to its original state, follow these steps:
STEP 1: Click on the object to select it.
STEP 2: Go to the “Picture Format” tab.
STEP 3: Click on the diagonal arrow on the bottom-right of the Picture Styles panel, and find the “Reset” option.
This action will revert the object back to its initial orientation and appearance, making it simple to undo any changes you’ve made.
FAQs About Rotating & Mirroring Objects in PowerPoint
How Can I Rotate or Mirror an Object to a Specific Angle?
To rotate or mirror an object to a specific angle in PowerPoint, you’ll need to:
STEP 1: Select the object.
STEP 2: Click on “Format” under “Picture Tools” or the equivalent for shapes and text.
STEP 3: Select “Rotate” and then “More Rotation Options.”
STEP 4: Type in the exact degree of rotation and press “Enter” to apply.
This precision approach allows you to fine-tune object positioning for perfect alignment and professional-looking slides.
Keep in mind that for mirroring, you’ll choose “Flip Horizontal” or “Flip Vertical” instead of entering a degree value.
Are There Any Shortcuts to Quickly Rotate Objects in PowerPoint?
Yes, PowerPoint offers keyboard shortcuts for quick object rotation:
- For a horizontal flip: Ctrl+Alt+Shift+O
- For a vertical flip: Ctrl+Alt+Shift+I
- To rotate clockwise: Ctrl+Alt+Shift+
> - To rotate counterclockwise: Ctrl+Alt+Shift+
<
These shortcuts enable you to efficiently alter the orientation of your objects without taking your hands off the keyboard, streamlining your slide design process.
Is It Possible to Apply the Mirror Effect on Text Boxes or Shapes?
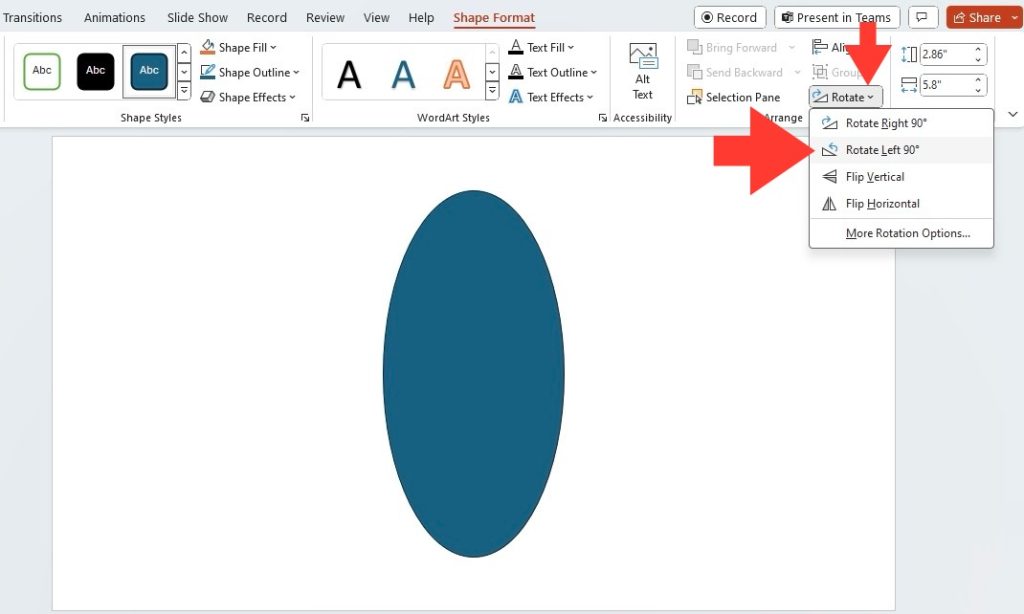
Yes, applying the mirror effect on text boxes or shapes in PowerPoint is possible, but there’s a creative workaround for text. Here’s the approach:
- For shapes, select the shape, click on “Shape Format,” go to “Rotate,” and then choose “Flip Horizontal” or “Flip Vertical.”
- For text boxes, take a screenshot of the text as it cannot be flipped directly. Insert the screenshot back into the slide and use the rotate options to mirror it.
This method lets you achieve the desired mirror effect even for text, ensuring your slides look as polished and impactful as intended.
John Michaloudis is a former accountant and finance analyst at General Electric, a Microsoft MVP since 2020, an Amazon #1 bestselling author of 4 Microsoft Excel books and teacher of Microsoft Excel & Office over at his flagship MyExcelOnline Academy Online Course.

