As we embark on the journey to productivity, I can’t help but emphasize the synergy between OneNote and Outlook. These two Microsoft applications, when used in tandem, become more than just their separate parts. OneNote’s versatile digital notebook capabilities perfectly complement Outlook’s robust email, calendar, and task management features. By syncing OneNote with Outlook, I can effortlessly bridge the gap between communication and organization. It’s like having a personal productivity hub, where all my notes, contacts, schedules, and tasks coexist in harmony.
Key Takeaways
- Syncing OneNote with Outlook enables users to import important email messages and meeting invites directly into their notes, streamlining workflow and improving note-taking efficiency.
- Within Outlook, creating a new task and selecting the “OneNote” option allows the integration of tasks into OneNote, ensuring that tasks are accessible and manageable across both platforms for better organization.
- To continually benefit from the OneNote and Outlook integration features, users can update their preferences in the Outlook Options dialog box, choosing whether to use the “Send to OneNote” feature with OneNote for Windows 10 or the desktop version.
The Benefits of Using OneNote with Outlook for Enhanced Organization
Integrating OneNote with Outlook offers several advantages that I find essential for anyone thirsting for better organization. First and foremost, it simplifies my workflow by allowing me to manage emails, meetings, and tasks from a single point of access. I can easily convert emails into actionable items within OneNote, helping me track important conversations and to-dos without cluttering my inbox.
Moreover, this integration improves my time management by syncing calendar events with my notes. I can prepare for meetings by linking pertinent notes to calendar entries in Outlook, ensuring that all my key points and documents are just a click away when I need them. This not only maximizes my meeting preparedness but also reduces the duplication of information, freeing up even more time for critical thinking and strategic planning.
Finally, when I work in a team, using OneNote with Outlook is a game-changer for collaboration. We can share notebooks, distribute minutes of meetings with ease, and collectively manage project tasks directly linked to our email conversations and calendars. This unison creates a transparent and dynamic workspace where everyone stays informed and aligned with our common goals.
Table of Contents
Setting Up Your Workspace
Essential Preparations to Sync OneNote with Outlook
Before diving into the syncing process, I ensure that my preparations set the stage for a smooth integration. Firstly, it’s crucial to verify that both OneNote and Outlook are installed and updated to their latest versions. This prevents any compatibility issues that might arise during the syncing process.
Furthermore, I confirm that I’m logged into both applications with the same Microsoft account, which is necessary for the sync to work correctly. I also take a moment to organize my OneNote notebooks, creating sections and pages that correspond to the emails, meetings, and tasks I plan to sync from Outlook. This pre-emptive organization helps me later when categorizing and retrieving information.
Lastly, I check my internet connection, as sync features typically require an active online connection to function properly. With these essential preparations in place, I’m ready to link OneNote and Outlook for a seamless integration that can take my productivity to the next level.
Activate Send to OneNote Function in Outlook
Activating the ‘Send to OneNote’ function is a small yet significant step to bridge Outlook with OneNote. Here’s how I go about it:
STEP 1: Launch the Microsoft Outlook desktop app on your computer.
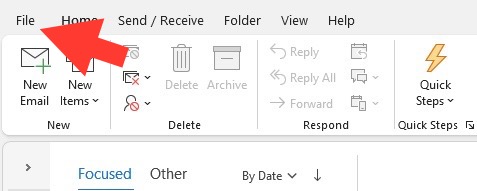
STEP 2: Click on the File tab located in the top-left corner of the Outlook window.
STEP 3: From the menu, select Options. This will open the Outlook Options dialog box.
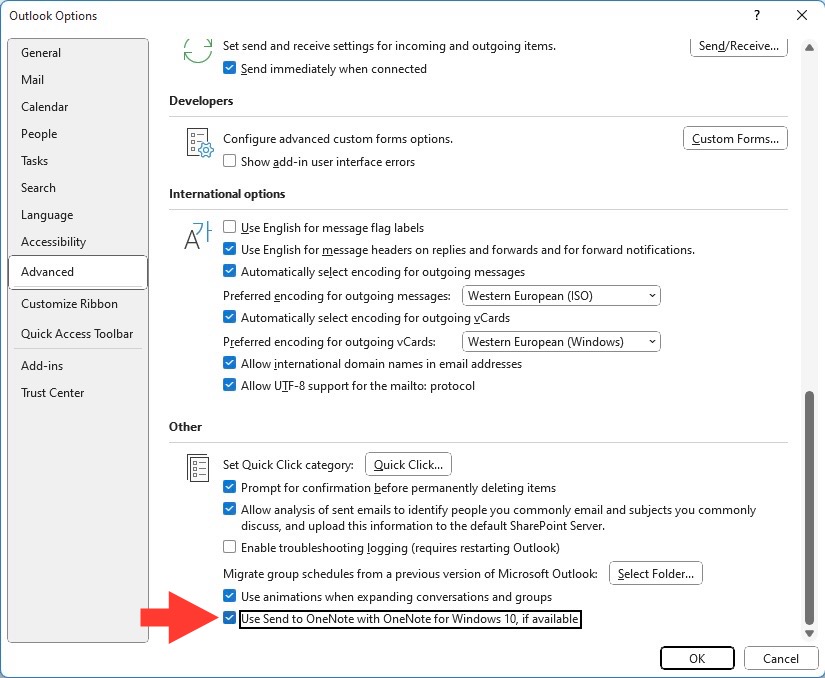
STEP 4: In the Outlook Options dialog box, look at the left sidebar and click on the Advanced tab.
STEP 5: Scroll down to the Other section within the Advanced tab > Find the checkbox labeled “Use Send to OneNote with OneNote for Windows 10, if available.”
STEP 6: Make sure the checkbox is ticked. If it’s not, click on it to enable the feature.
STEP 7: After ticking the checkbox, click on the OK button to save your changes and close the dialog box.
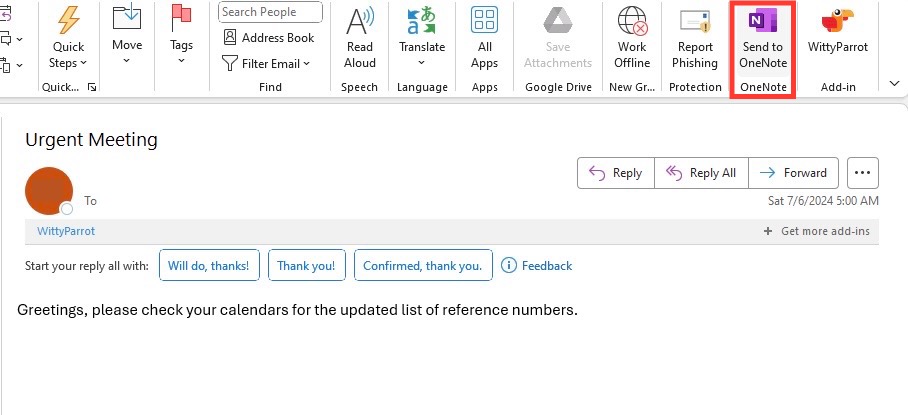
STEP 8: Now that the feature is enabled, it should be integrated automatically if you’re using the latest version of Office 365. To verify, open an email from your Outlook inbox.
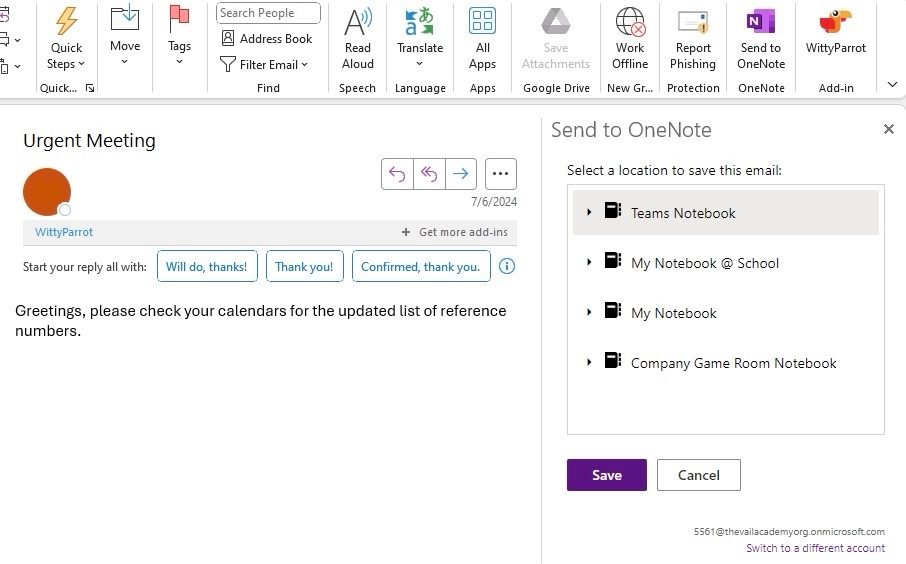
STEP 9: Click on the three-dots icon (more options) within the email window. Look for the Send to OneNote option in the dropdown menu.
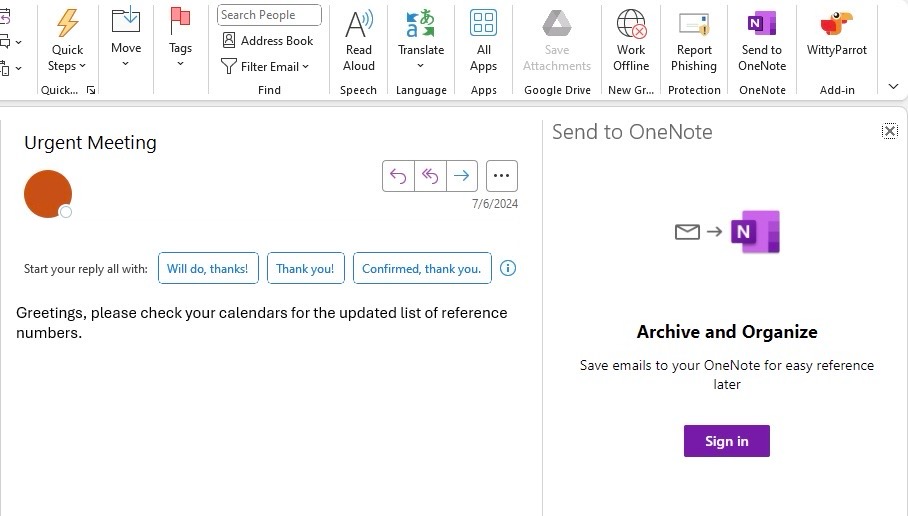
You can now use it to send emails directly to OneNote.
Streamlining Email Management
Save Time by Sending Emails from Outlook to OneNote
Saving time while managing emails is one of the primary reasons I appreciate the integration between Outlook and OneNote. When I come across an email that requires detailed attention or contains information I need to revisit later, I send it directly to OneNote with just a few clicks.
In the desktop version of Outlook, I open the email I want to save. From there, I click on the ‘Move’ section in the Home tab and choose ‘OneNote’ from the dropdown options. Alternatively, I right-click the email, select the ‘OneNote’ option, and then choose the specific notebook and section in OneNote where I want to store the email.
On the web version, after opening the email, I look for the OneNote icon, often located in the email header’s toolbar or under the ‘…’ (more actions) menu. Once I click it, I select the desired destination in OneNote and the email is immediately sent.
Doing this not only archives the content outside my crowded inbox but also allows me to make personal annotations, comments, and reminders next to the saved email content in OneNote. It’s a significantly efficient way to keep track of important information without going back and forth between apps.
Transform Outlook Meetings into Actionable OneNote Tasks
Meeting details in Outlook can quickly turn into actionable tasks in OneNote, which is crucial for follow-ups and ensuring responsibilities are tracked. Whenever I’m part of a meeting scheduled in Outlook, I transform the key action items discussed into tasks in OneNote by sending the meeting details to OneNote before the meeting begins.
By doing this, not only can I take meeting notes directly alongside the agenda and attendee list, but I can also highlight tasks, set deadlines, and even link back to the Outlook Calendar event for future reference. Here’s the straightforward process: in Outlook Calendar, I double-click on the meeting to open its details, then select ‘OneNote’ in the ribbon or via the ‘…’ (more actions) menu. I choose where in OneNote to send it, and like magic, my meeting lives in both places.
Once the details are in OneNote, I add checkboxes next to each action item to create a to-do list effortlessly. This way, as tasks are completed, checking them off feels satisfying and keeps the momentum of the project going.
Optimizing Task Management
Adding Tasks in Outlook Directly from OneNote
When I’m working in OneNote, adding tasks to Outlook directly from my notes is a seamless process that boosts my task management efficiency. If I jot down a to-do list or mark an important follow-up during note-taking, I can easily turn these into Outlook tasks right from OneNote.
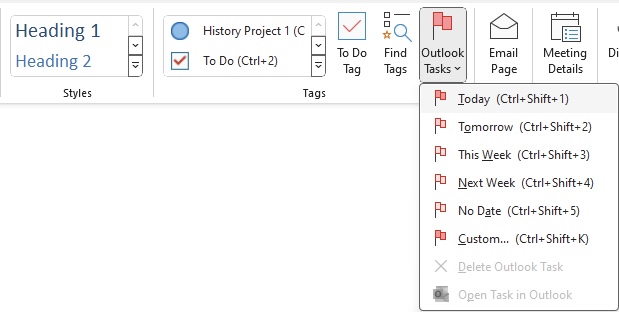
The trick lies in OneNote’s task integration capability. For instance, while in OneNote, I simply click the line of text that I want to turn into a task. Then, under the ‘Home’ tab, I choose ‘Outlook Tasks,’ and select a due date, such as ‘Today’ or ‘Next Week.’ A corresponding flag — which represents the task’s due date — appears next to the item in OneNote.
Consequently, when I open Outlook and navigate to my Tasks, the items I flagged in OneNote appear there as well. This feature ensures that I don’t lose track of important to-dos and can manage my tasks directly within Outlook, where I can assign more details, reminders, and priority levels if needed.
Create and Manage an Outlook Task List within OneNote
Creating and managing an Outlook task list within OneNote is an aspect of task management that has significantly streamlined my organizational approach. When I make a list of tasks in OneNote, I don’t just see a static list; instead, I create a dynamic task management system that syncs with Outlook.
Here’s how I manage this: in OneNote, once I have drafted a list of actions, I place my cursor at the end of a task description and click on the Outlook Tasks drop-down in the ‘Home’ tab. From there, I select the appropriate timeframe for each task. These OneNote tasks then materialize in my Outlook To-Do List, allowing me to set reminders, assign them to others, or mark them as important.
To view my tasks, I simply switch back to Outlook, click the Tasks button on the Navigation Bar, and there it is—my OneNote task list, perfectly in sync within Outlook. This integration is a timesaver, keeping all tasks from various projects in one easily accessible place while retaining the rich note-taking features of OneNote.
Enhancing Meeting Efficiency and Collaboration
Utilize OneNote to Take Comprehensive Meeting Notes from Outlook Events
Taking comprehensive meeting notes directly from Outlook events via OneNote is a feature I find indispensable. As soon as meeting details are imported into OneNote, I have a structured framework on which to base my notes. This framework not only includes basic information like the date, location, and list of attendees but also the agenda, which serves as a guide for the meeting’s proceedings.
To make the most of this functionality, before or during the meeting, I open the corresponding Outlook event and click on the ‘Meeting Notes’ option. While I prefer taking notes on my own to keep them private, I could also choose to share notes with the meeting attendees. When I select ‘Take notes on your own,’ OneNote launches and a new page with the meeting details appears. Here, I can capture all the discussion points, decisions made, and action items that arise from the meeting — organized and in context.
This method ensures that my notes are detailed and actionable, providing not just a record of what was discussed but also the context necessary to understand its significance. This comprehensive approach to note-taking fosters clarity and accountability, which ultimately boosts the output of every meeting I attend.
Collaborate on Meeting Notes Seamlessly with Team Members
Collaborating on meeting notes with team members is one of the standout features of using OneNote in sync with Outlook. By capitalizing on shared notebooks in OneNote, I can work alongside my colleagues in real-time during a meeting, ensuring everyone’s ideas and feedback are captured. This fosters a collaborative environment where minutes are not just a static record but a dynamic workspace that evolves as we interact.
To do this, I create or use a shared OneNote notebook that my team has access to. Before the meeting begins, I send out the notebook link or include it as part of the Outlook meeting invitation. During the meeting, all participants can add their notes, comments, or even audio and video clips onto the same page, which updates instantly for everyone. This way, we keep a centralized collection of meeting notes that can easily be referenced or updated by any team member.
Moreover, the integrated use of colorful pens, highlights, and tags in OneNote makes it easy to organize and prioritize different parts of the discussion, especially when we’re brainstorming or need to flag follow-up actions. This level of real-time collaboration and clarity isn’t just beneficial during the meeting; it’s also invaluable when we revisit our notes for revision or execute tasks after the meeting.
Tips and Tricks to Master OneNote and Outlook Integration
Intelligent Use of Tags and Hierarchies for Easier Retrieval
Harnessing the full potential of tags and hierarchies is a smart way to enhance retrieval in OneNote and Outlook. Tags in OneNote are my go-to for categorizing and prioritizing content within my notes. By simply assigning a tag, such as ‘Important,’ ‘Question,’ or creating a custom tag best suited to my project’s needs, I transform a sea of information into a structured repository where key details are highlighted.
OneNote’s tags also make searching for specific items a breeze. I use the ‘Find Tags’ feature to filter my search across notebooks, sections, or pages and find exactly what I need without the usual hassle of sifting through every line of text. The search results are conveniently linked to the relevant page, drastically cutting down the time I spend looking for information.
In Outlook, I use categories and follow-up flags to create hierarchies that help me prioritize emails and tasks. I assign different colors to categories representing various projects or levels of urgency, which visually segregates my Outlook items so I can address them in an organized manner. Combined with tags in OneNote, these hierarchies create a robust system where information retrieval is quick, logical, and stress-free.
Frequently Asked Questions (FAQ)
How Do I Enable the ‘Send to OneNote’ Feature in Outlook?
To enable the ‘Send to OneNote’ feature in Outlook, follow these steps:
- Open your Outlook desktop app and click on File, then choose Options.
- From the sidebar, select Advanced.
- Scroll to the Other section, check the box for ‘Use Send to OneNote with OneNote for Windows 10, if available,’ and press OK.
Your Outlook is now set up to send items to OneNote. You can test this by opening any email and looking for the ‘OneNote’ button in your ribbon or under the ‘Move’ section. If you see it, you’re good to go!
Can I Create Outlook Calendar Events from Within OneNote?
No, you cannot directly create Outlook calendar events from within OneNote, but you can link your notes to existing events in Outlook. If you’re preparing for a meeting in OneNote, you can indicate the date and time within your notes and later manually schedule it in your Outlook calendar to keep everything in sync.
Is There a Way to Bulk Sync Outlook Emails with OneNote?
Yes, there is a way to bulk sync Outlook emails with OneNote. For a comprehensive sync, you could use a cloud file manager like MultCloud. This allows you to move multiple emails from Outlook to OneNote by first saving them to your computer and then inserting them directly into OneNote. Access them anytime if they are stored in OneDrive connected with OneNote.
What Are the Advantages of Linking Outlook Tasks and OneNote?
Linking Outlook tasks and OneNote offers numerous advantages. It ensures enhanced task tracking by syncing the details of your tasks across both platforms, increasing productivity as you manage tasks and notes in one streamlined system. This integration also promotes better organization and facilitates efficient follow-up on action items discussed in meetings, captured as notes in OneNote and converted to tasks in Outlook.
John Michaloudis is a former accountant and finance analyst at General Electric, a Microsoft MVP since 2020, an Amazon #1 bestselling author of 4 Microsoft Excel books and teacher of Microsoft Excel & Office over at his flagship MyExcelOnline Academy Online Course.

