Navigating the Attendee List: Who’s Optional?
Understanding who to loop into your meeting can be likened to crafting a guest list for a special event. In the Outlook universe, it’s handy to know that not everyone needs to be an MVP. Making attendees optional in Outlook is what you need to do when you want to keep them in the loop with the freedom to join at their discretion. Think of them as your informed bystanders — aware and able to step in if needed, but not obligated.
By clearly separating out the must-haves from the nice-to-haves on your attendee list, you’re communicating priorities and maintaining an organized approach to meeting management.
Download our 141 Free Excel Templates and Spreadsheets!
Key Takeaways
- To include someone as an optional attendee in an Outlook meeting, simply add their email address in the “Optional” field when creating a meeting invitation. This keeps them informed without mandating their attendance.
- Optional attendees are clearly distinguished from required ones, enabling them to understand their role as being informative rather than obligatory, promoting a more flexible participation approach.
- Utilizing Outlook’s optional attendee feature ensures that all relevant parties receive important updates and meeting details, maintaining transparency and the potential for broader input without adding to the required attendee count.
Table of Contents
Unraveling the Role of Optional Attendees
When to Consider Someone an Optional Attendee
When laying out the groundwork for your Outlook meeting, discerning who needs a seat at the table and who can pop in as they wish is crucial. Consider tagging someone as an optional attendee if their input could enrich the discussion, but their absence wouldn’t derail your agenda. This might include subject matter experts who can provide clarity if needed, or team members from peripheral projects who might benefit from the updates but aren’t tasks’ owners.
Here’s a swift guide to identify optional attendees:
- Are they key decision-makers or executors? If not, they might not need to be required.
- Does the meeting cover content that directly impacts their work? If the answer is vague, optional may be the way to go.
- Could their insights offer added value to the discussion? Then, bring them into the fold without making it a priority.
By focusing on these points, you can skillfully curate your meeting’s attendee list, ensuring that everyone present has a distinct role, and those on the periphery are not burdened with unnecessary commitments.
Step-by-Step Process: Including Optional Attendees in Outlook
Adding Optional Attendees in Just a Few Clicks
Adding optional attendees to your Outlook meetings is a task you can accomplish with minimal fuss. To ensure everyone is kept in the loop, follow these simple steps:
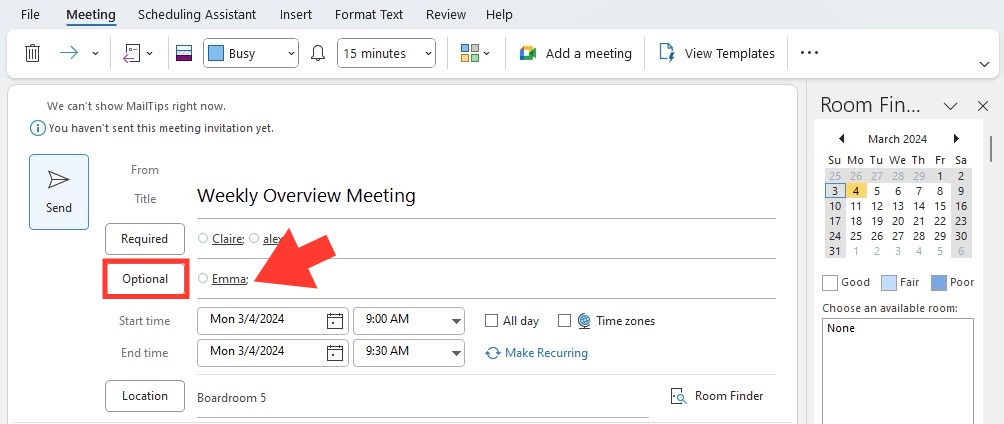
STEP 1: Open your Outlook calendar and select ‘New Meeting’ to start drafting an invitation.
STEP 2: Fill in the required attendees in the ‘To’ field. Here’s where your primary guests — those essential to the meeting’s objectives — will be listed.
STEP 3: Locate the ‘Optional’ button, often found beneath the ‘Required’ field. This is your gateway to including those who need to know but don’t necessarily need to show.
STEP 4: Enter the email addresses of those you’re inviting on an optional basis. Think of this as extending a flexible invite that keeps them in the know.
STEP 5: With everything in place, hit ‘Send’. Done correctly, this simple act can open doors to collaboration and ensure no one is left out of crucial conversations.
Remember, when everyone receives the correct invitation status, it sets the tone for an organized and efficient meeting.
For Mobile:
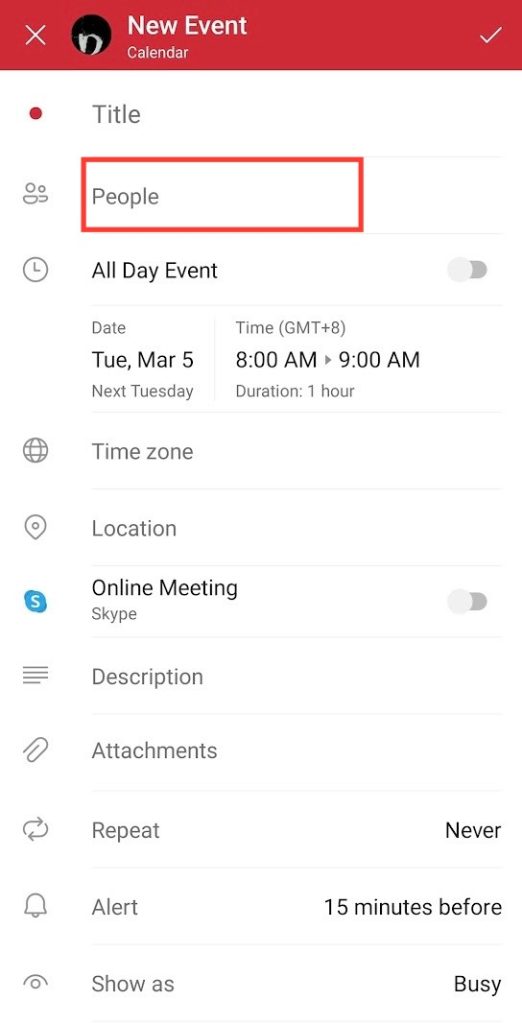
STEP 1: Open the Outlook app and tap on the calendar icon.
STEP 2: Tap ‘+’ to create a new meeting.
STEP 3: Required attendees go in the ‘Invitees’ section.
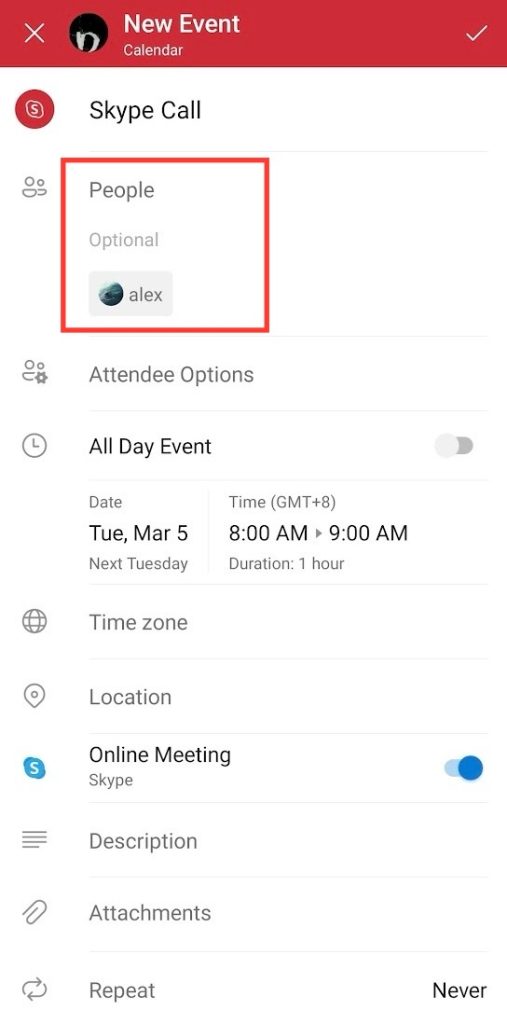
STEP 4: Tap on the ‘People’ sign to include optional attendees.
STEP 5: Fill in the meeting details and tap ‘Send’.
Adapting these steps to your device ensures that everyone, required or optional, gets looped into the meeting without hiccups, ensuring your invite list is always spot-on, no matter where you are.
Best Practices for Managing Outlook Meeting Invitations
Clear Communication with All Attendees
Ensuring clear communication with all participants is fundamental when managing your Outlook invites. Here’s how to keep everyone on the same wavelength:
- Be Specific in Your Invites: Use the invitation body to clarify the roles of required and optional attendees, articulating what is expected from each.
- Follow-Up Emails: If the meeting details change or if there are pre-meeting materials to review, send a concise email to update everyone.
- Post-Meeting Summaries: After the meeting, a brief summary or minutes sent to all, including those who couldn’t attend, keeps the communication loop closed.
Remember to check in with your optional attendees as part of your post-meeting outreach, just in case they want more insight into the discussion.
Updating All Participants Efficiently
Efficiency is key when updating meeting participants. In Outlook, you can swiftly send out updates that keep everyone, including optional attendees, in the loop. Here’s the rundown:
- Modify the Meeting: Open the existing meeting request and make the necessary changes.
- Send Updates Selectively: If only minor details have changed, you can choose to update only those affected by the changes. This avoids flooding everyone’s inbox with minor updates.
- Communicate Clearly: In your update, clearly state what’s changed. This is crucial for participants to understand the relevance of the update.
- Use the ‘Response Options’: Utilize Outlook’s built-in tools like ‘Request Responses’ and ‘Allow New Time Proposals’ to manage and gauge attendee responses efficiently.
By adopting these methods, you can ensure that all participants are equally informed and prepared, no matter their classification in the meeting.
FAQs on Outlook Optional Attendees
How do I differentiate between optional and required attendees in the invitation?
In your meeting invitation, you distinguish optional from required attendees by placing them in separate fields. Required attendees go in the ‘To’ field, and optional attendees are listed in the ‘Optional’ field. This visually separates them and sets clear expectations about their attendance. Additionally, it’s best to clarify roles in the meeting description so that all participants understand the part they’re expected to play.
Can optional attendees see each other’s responses?
Yes, optional attendees in Outlook can see each other’s responses if the meeting organizer has selected ‘Request Responses. This enables all invitees, both required and optional, to track who’s attending and who isn’t, fostering transparency among meeting participants.
How do updates to meeting invites affect optional attendees?
Updates to meeting invites in Outlook are sent to both required and optional attendees. When changes are made to the meeting details and the update is sent out, optional attendees receive the same notification as required attendees, keeping them informed about the new meeting time, location, or agenda.
Is it possible to change an attendee’s status from required to optional after sending the invite?
Absolutely, you can switch an attendee’s status from required to optional even after the invite has been sent in Outlook. Simply open the meeting request, move the attendee to the ‘Optional’ field, and send an update. This notifies all participants of the change in status, seamlessly adjusting their expectations.
John Michaloudis is a former accountant and finance analyst at General Electric, a Microsoft MVP since 2020, an Amazon #1 bestselling author of 4 Microsoft Excel books and teacher of Microsoft Excel & Office over at his flagship MyExcelOnline Academy Online Course.


