When you step away from your desk, be it for a vacation, a business trip, or an off-site meeting, your email doesn’t take a break. That’s where the out of office message steps in as your virtual gatekeeper. It’s crucial for maintaining communication with your contacts, letting them know that you aren’t ignoring their messages and giving them a timeframe for when they can expect a response. It also points them to the right person who can assist them while you’re away, ensuring that work continues smoothly without you.
Learn about Excel with our Free Microsoft Excel Online Course!
Key Takeaways
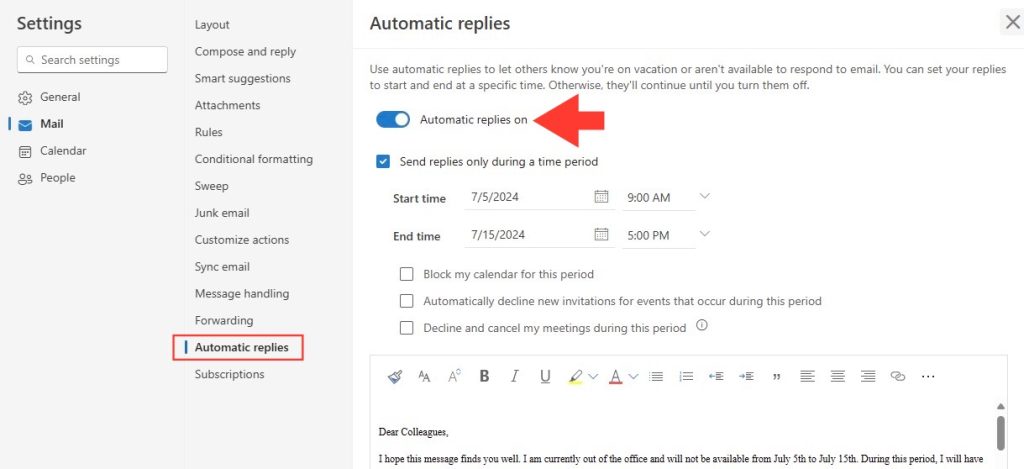
- Access Out of Office settings by navigating to “Settings > View all Outlook settings > Mail > Automatic replies” in the web version of Outlook, where you can turn on automatic replies, set a message, and select the duration of the auto-reply period.
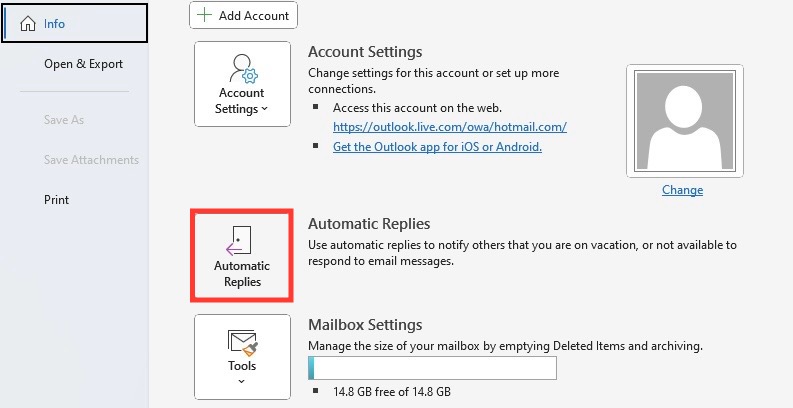
- For Microsoft Office Outlook users with an Exchange account, enable Automatic Replies by clicking “File > Info > Automatic Replies (Out of Office)” and set a specific time range for the replies to be active, crafting separate messages for internal and external contacts if desired.
- Utilize rules within the Automatic Replies for Outlook settings to prioritize incoming emails by criteria such as sender or subject, ensuring important contacts receive attention even when you’re away.
Outlook’s Versatile Auto Reply Feature
Outlook’s Automatic Replies feature is a lifesaver for those periods when you’re not monitoring your inbox. Whether you’re using Outlook Online, Outlook.com, or the desktop version, setting up an auto reply is a breeze. This feature not only sends out a custom message in your absence but also offers a range of options to tailor your replies. You can set a specific duration for the auto-reply, manage calendar settings, and decide if contacts outside your organization should receive a different message. It’s an essential tool for managing expectations and keeping your connections informed.
Table of Contents
Setting Up Your Auto Reply in Outlook
Crafting the Perfect Out-of-Office Template
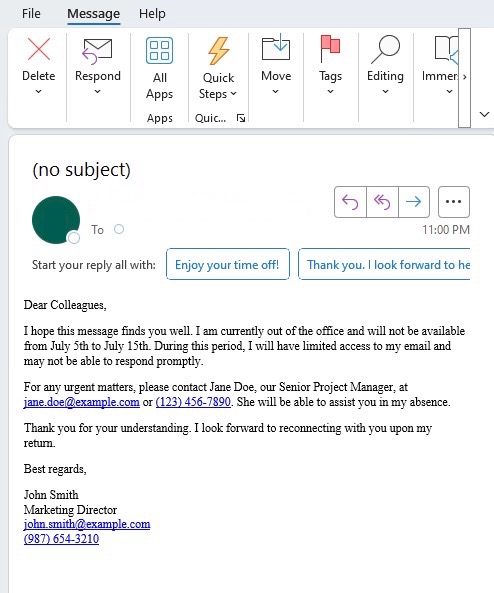
To craft the perfect out-of-office template in Outlook, start with a warm greeting followed by the pivotal information: the dates you’ll be out of the office and when you’ll be able to reply. Personal details about your whereabouts should generally be left out unless it’s pertinent to your work. Mention a point of contact for emergencies or immediate assistance, and include a note of thanks for the sender’s understanding.
Here’s a quick guide for constructing your template:
- Begin with a polite greeting.
- Clearly state the timeframe of your absence.
- Indicate an alternative contact for urgent matters.
- End on a professional note expressing anticipation to reconnect upon your return.
Remember, an efficient out-of-office message is straightforward but friendly, maintaining a balance between personal tenor and professional courtesy.
Detailed Steps for Configuring Auto Replies on Various Outlook Versions
Configuring your auto replies in Outlook might differ slightly depending on the version you’re using. Here’s a step-by-step guide for the most common Outlook scenarios:
Outlook for Microsoft 365, Outlook 2021, Outlook 2019, and Outlook 2016:
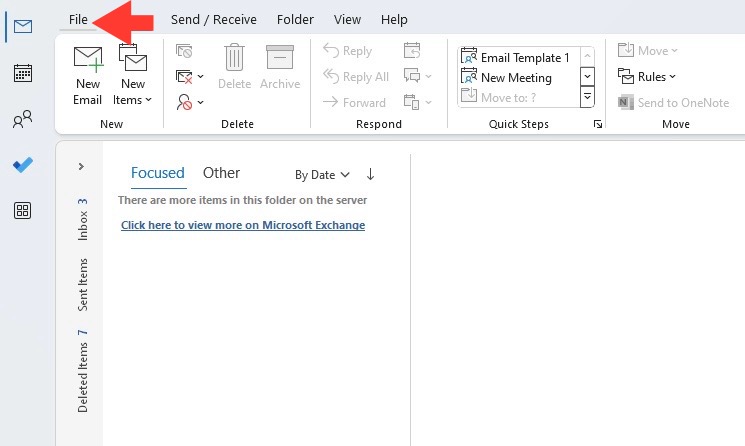
STEP 1: Open Outlook and click on the ‘File’ tab.
STEP 2: Select ‘Automatic Replies (Out of Office)’.
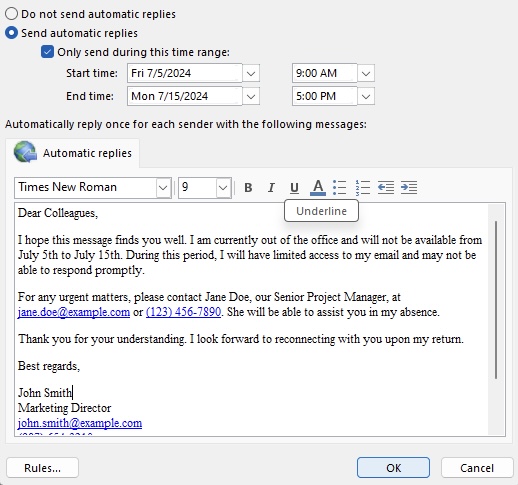
STEP 3: In the dialog box, choose ‘Send automatic replies’.
STEP 4: Optionally, set a time range for the replies to be sent.
STEP 5: Type your out-of-office message in the box provided for inside and outside your organization, if applicable.
STEP 6: Click ‘OK’ to save your settings.
Outlook on the web and Outlook.com:
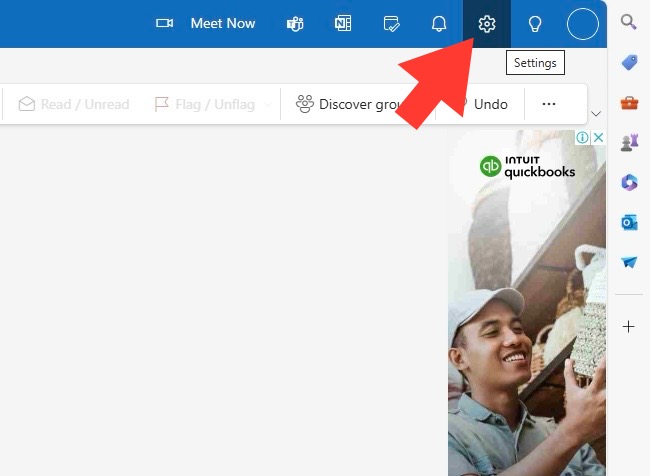
STEP 1: Click on the ‘Settings’ gear icon, usually located at the top-right corner.
STEP 2: In the ‘Search Outlook settings’ bar, type ‘automatic replies’ and select it.
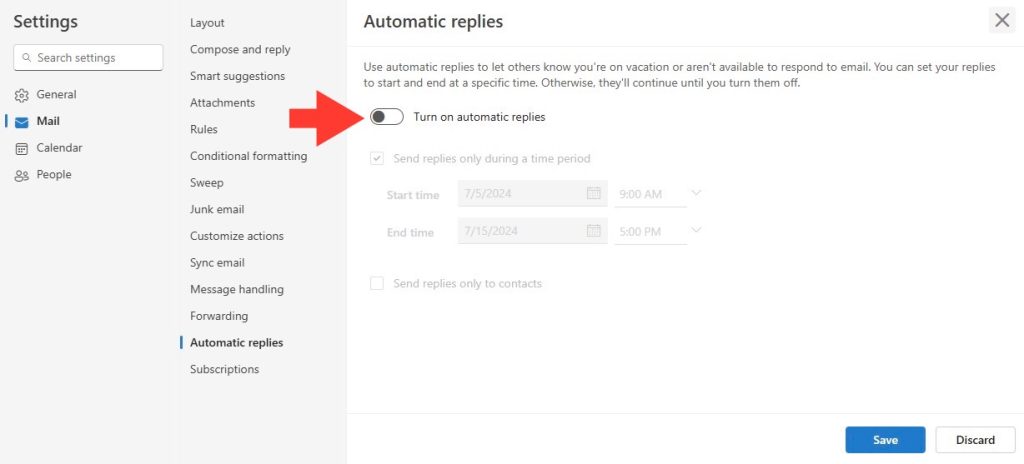
STEP 3: Toggle on ‘Turn on automatic replies’.
STEP 4: Enter your message and specify a time range if needed.
STEP 5: Choose whether to send replies outside your organization.
STEP 6: Click ‘Save’ to apply the automatic replies.
Outlook Mobile App:
STEP 1: Tap on the menu (represented by three lines or your profile icon).
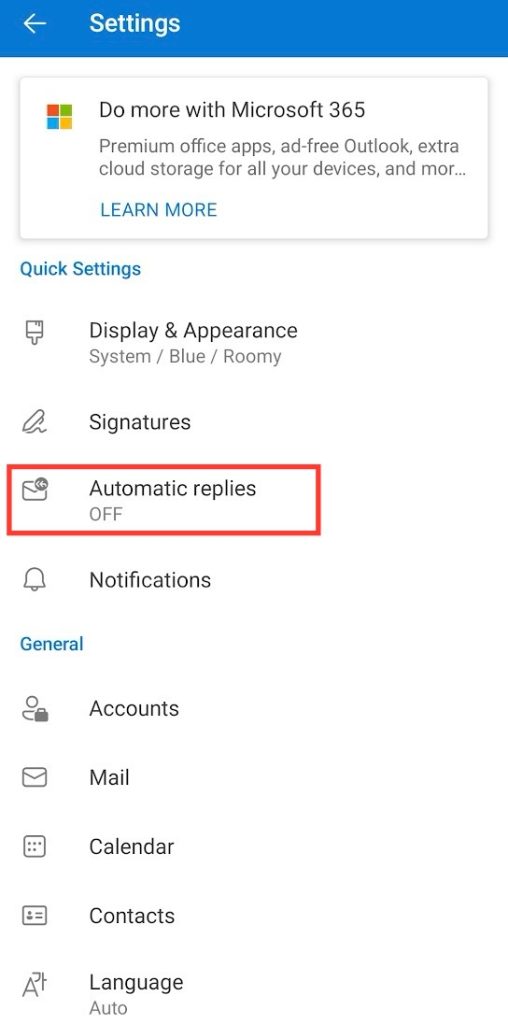
STEP 2: Select the gear icon for ‘Settings’.
STEP 3: Tap on your email account and select ‘Automatic Replies’.
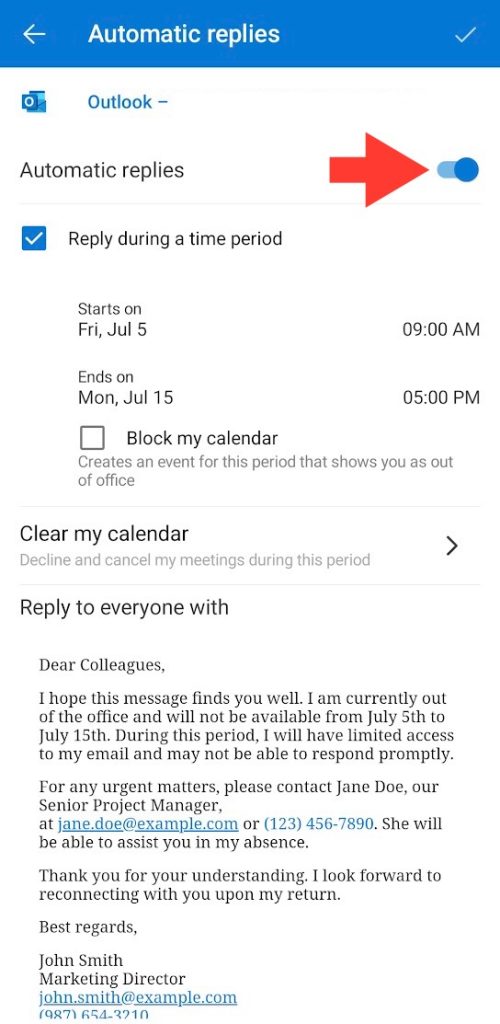
STEP 4: Switch it on, enter your away message, and specify if you want to send replies only during a specific period.
STEP 5: Save your changes.
Remember that your Outlook must be connected to a Microsoft Exchange Server or Office 365 to offer the auto-reply functionality.
Tips for Effective Out-of-Office Replies
Best Practices for a Professional Away Message
Ensuring that your out-of-office message strikes the right chord is key to maintaining professionalism while you are unavailable. Follow these best practices to make sure your message is effective:
- Keep It Simple: Your message should be concise and to the point. Let recipients know you are out of the office and when you will return.
- Be Specific but Not Too Detailed: Provide clear dates for your absence and expected return without oversharing personal details.
- Provide an Alternative Contact: Mention a colleague’s name and contact information who can be approached for immediate assistance.
- Set Expectations: If you won’t be checking emails at all, make it clear. Conversely, if you will be checking emails intermittently, let them know when they can expect a response.
- Mind Your Tone: Keep it friendly and professional. If humor aligns with your company’s brand, use it sparingly.
- Proofread: Double-check for typos and correct dates before activating your auto-reply.
And remember, while out-of-office messages are a helpful tool, they should be used judiciously — reserve them for times when you are genuinely unable to attend to your email.
Creative Ideas to Enhance Your Auto Reply
Add a dash of creativity to your auto reply to leave a lasting impression. Here are some inventive twists you can incorporate:
- Resource Sharing: Include links to helpful resources or recent work that may benefit the sender in your absence.
- Personal Touch: Wish recipients a great day or week, adding a bit of warmth to your message.
- Fun Facts or Quotes: Share an interesting tidbit about your destination if you’re traveling, or a relevant quote that reflects your professional ethos.
- Interactive Elements: Consider adding a poll or survey to engage your contacts, drawing attention to your auto reply.
- Brand Consistency: Embed your company logo, use brand colors, and maintain your brand voice to reinforce company identity.
These suggestions not only convey the necessary information but also ensure that your message stands out in a sea of standard auto-replies. Be sure to align any creative additions with your company’s brand and guidelines.
Common Troubleshooting for Outlook Auto Replies
Fixing Issues with Automatic Replies Not Working
Discovering that your automatic replies in Outlook aren’t working as intended can be frustrating, but there are several steps you can undertake to troubleshoot and resolve this common issue:
- Check Rules: Ensure there aren’t any conflicting Inbox rules that might be interfering with your automatic replies.
- Server Connection: Verify that your Outlook is connected to the server, as Outlook must be online with Exchange to send auto-replies.
- Date and Time Settings: Double-check that you’ve set the correct date and time range for your replies.
- Correct Mode: For desktop Outlook, ensure you’re working in Cached Exchange Mode, which supports this feature.
If these steps don’t solve the problem, it’s worth checking with your IT department as there could be issues related to server settings or permissions that are best handled by professionals.
Adjustments for Inconsistent Auto Reply Behavior
If you’re encountering inconsistent behavior with your Outlook auto replies, such as replies being sent sporadically or not at all, consider these adjustments:
- Review Message Formatting: If your auto reply includes hyperlinks, images, or other rich-text elements, they may not be compatible with all email clients. Try simplifying the format to plain text.
- Check Junk Email Settings: Sometimes, auto replies might be marked as spam. Review your junk email settings and any filters that might affect sending and receiving.
- Update Your Outlook: Make sure you’re running the latest version of Outlook, as updates can fix known issues.
- Inspect Mailbox Quota: If your mailbox is full or nearly full, it can prevent auto replies from sending. Archive or delete messages to free up space.
If these steps don’t resolve the inconsistencies, it may be necessary to seek further technical support, as underlying server configurations could be at play.
Wrapping Up and Disabling Auto Replies
How to Deactivate Your Outlook Out-of-Office Message
Once you’re back in the office, it’s simple to turn off your Outlook out-of-office message. Here’s how to deactivate it:
STEP 1: Open Outlook and go to the ‘File’ tab.
STEP 2: Click on ‘Automatic Replies (Out of Office)’.
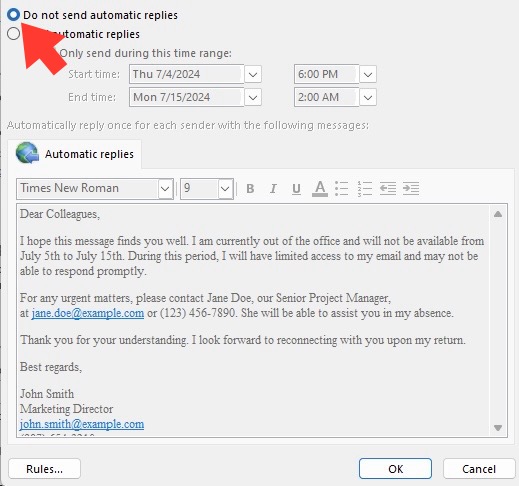
STEP 3: In the Automatic Replies dialog box, select ‘Do not send automatic replies’.
STEP 4: Click ‘OK’ to confirm.
Alternatively, if you had set a specific time for your automatic replies to end, they would deactivate automatically.
For Outlook on the web:
STEP 1: Sign in and go to ‘Settings’ (gear icon).
STEP 2: Type ‘automatic replies’ in the search box and select it.
STEP 3: Turn off automatic replies and click ‘Save’.
Outlook will immediately cease to send out the auto-reply, ensuring you do not confuse your contacts with out-of-date status information.
Final Checks Before Returning to Your Inbox
It’s a smart move to have a few final checks in place before diving back into your inbox after being out of office:
- Ensure your automatic replies are turned off—double-check so you don’t accidentally leave an outdated message running.
- Review your calendar and task list to get a snapshot of upcoming commitments and deadlines.
- Glance over emails you’ve received during your absence, prioritizing them to manage your time effectively upon your return.
- Check in with your designated point person or team to catch up on anything urgent that might need your immediate attention.
- Be prepared for a potentially high volume of emails; devise a strategy like time blocking to respond in batches.
By doing a quick rundown of these points, you can ensure a smooth transition back to work without overlooking any important matters.
FAQs: Navigate Auto Replies with Ease
What Should You Include in an Out-of-Office Auto Reply?
In your out-of-office auto reply, include a cordial greeting, the specific dates of your absence, and when you’ll likely respond to emails. Mention an alternative contact for any urgent matters and express thanks for the sender’s patience. Keep details simple and safeguard your privacy – only share what’s necessary for business continuity.
How Can You Set Up Auto Replies for Non-Business Hours or Holidays?
To set up auto replies for non-business hours or holidays in Outlook, use the same ‘Automatic Replies’ feature. Simply select the ‘Only send during this time range’ option and specify the start and end times that align with your office’s non-business hours or holiday schedule. This ensures your contacts are aware you’re off the clock or out of the office during these specific intervals.
How do I turn on out of Office in Outlook app?
To turn on out-of-office replies in the Outlook app, navigate to your inbox, tap the menu icon, and open the ‘Settings’ (gear icon). Select your account, tap ‘Automatic Replies’, switch them on, compose your message, set the duration, if needed, and then save. Your auto-reply is now active and will respond to incoming emails.
John Michaloudis is a former accountant and finance analyst at General Electric, a Microsoft MVP since 2020, an Amazon #1 bestselling author of 4 Microsoft Excel books and teacher of Microsoft Excel & Office over at his flagship MyExcelOnline Academy Online Course.

