Quick Outlook Email Backup: Save to Hard Drive in Minutes
Introduction to Quick Outlook Email Backup.
Protecting your precious email data is not just smart—it's essential.For Outlook users, the threat of data loss looms large, whether due to system crashes, accidental deletions, or malicious attacks.
Imagine losing all your vital correspondence and contacts in a blink! Regular email backups aren't just about avoiding inconvenience; they're about ensuring your peace of mind.
Stick around as we simplify the backup process so you can secure your email data effortlessly.
Introduction to Quick Outlook Email Backup
Protecting your precious email data is not just smart—it’s essential. For Outlook users, the threat of data loss looms large, whether due to system crashes, accidental deletions, or malicious attacks. Imagine losing all your vital correspondence and contacts in a blink! Regular email backups aren’t just about avoiding inconvenience; they’re about ensuring your peace of mind. Stick around as we simplify the backup process so you can secure your email data effortlessly.
Download our 141 Free Excel Templates and Spreadsheets!
Key Takeaways:
- You can easily export to PST using Outlook’s Built-in Feature.
- The Drag and Drop method is another viable option to quickly save 1 or more emails locally.
Simplifying the Backup Process
If the idea of backing up emails makes you cringe, fear not! The process can be incredibly simple with the right techniques. It’s all about finding the right method that matches your needs and schedule. Whether you choose a manual approach or an automated tool, streamline your backup process by setting up clear steps and scheduling regular backups. The goal here is to make backing up as routine as brushing your teeth—regular and thoughtless.
To kick things off:
- Decide on the backup frequency that suits your workflow.
- Choose your preferred backup method, whether it’s manual or automated.
- Stick to the schedule and keep consistent with your backups.
With these easy-to-implement steps, your Outlook email backup will be up and running before you know it. It’s about investing a small amount of time now to save a lot of hassle in the future. Now, let’s get you set up and secure!
Understanding Outlook’s Data Storage
Navigating PST and OST Files
Understanding the difference between PST and OST files is key when backing up your emails. Let’s break it down. PST files are your personal storage folders in Outlook, basically a digital filing cabinet where your emails, contacts, and calendar events are stored. They are ideal for creating backups and transferring data between accounts or computers.
On the other hand, OST files are more like a cache—they store an offline copy of your mailbox that syncs with the server. This allows you to access and work with your emails even without an internet connection, with any changes syncing back once you’re online.
When you’re looking to backup your Outlook data, focus on PST files. These are the ones you can easily export and keep safe on your hard drive. Remember, your emails are more than just bits of data; they’re records of communication that often hold significant value in your personal and professional life.
Reasons to Save Emails Locally
Saving your Outlook emails locally is an effective way to manage risk and ensure you always have access to your information. Here are a few compelling reasons to consider:
- Offline Access: Don’t depend on an internet connection. Saving emails to your computer means you can read and respond to them even when you’re offline.
- Backup Security: It’s a digital safety net. If your Outlook account faces problems or if it’s hacked, you have a secure backup ready on your hard drive.
- Organizational Control: Organize emails your way. When saved locally, you can sort and categorize them easily, making it a breeze to find that important message when you need it.
- Long-term Preservation: Save for posterity. Online services may not keep your emails forever; saving them to your hard drive means you have a long-term archive.
- Space Management: Free up mailbox space. Older emails can take up precious space in your online account — move them to your hard drive to keep your inbox clean and efficient.
These reasons highlight why making the move to save your Outlook emails locally isn’t just about playing it safe; it’s about taking control of your digital communication and ensuring you’re prepared for any situation.
Efficient Methods for Backing Up Emails
#1 Method: Export to PST Using Outlook’s Built-In Feature
Using Outlook‘s built-in feature to export your data to a PST file is both straightforward and reliable—it’s a method that many find effortless. This function is integral to Outlook’s design and offers a no-nonsense approach to ensure your emails are neatly backed up on your hard drive or desired storage device.
Here are the step-by-step instructions for exporting your emails, calendar, and tasks from Outlook to a .pst file using Outlook’s built-in feature:
STEP 1: Open Microsoft Outlook on your computer.
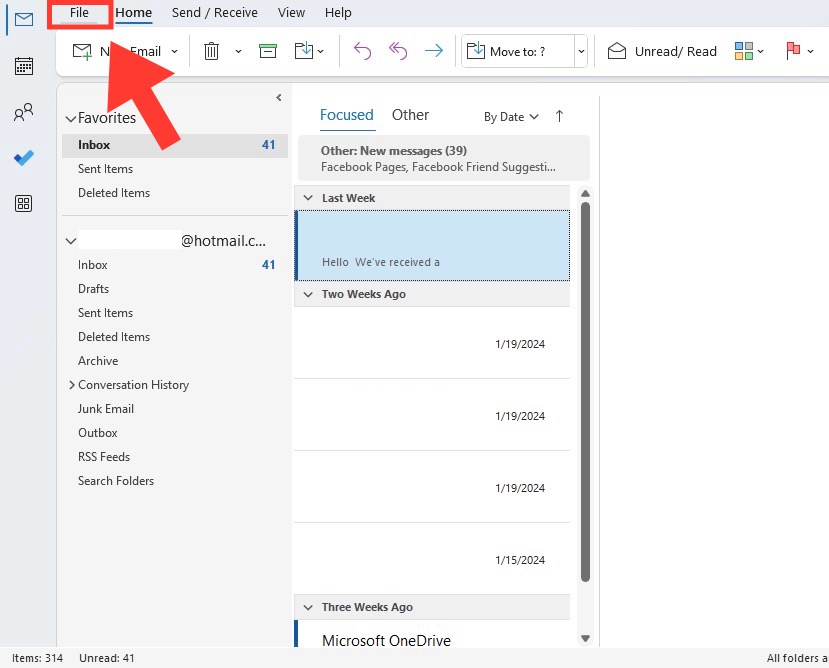
STEP 2: Click on the “File” tab located in the top menu bar.
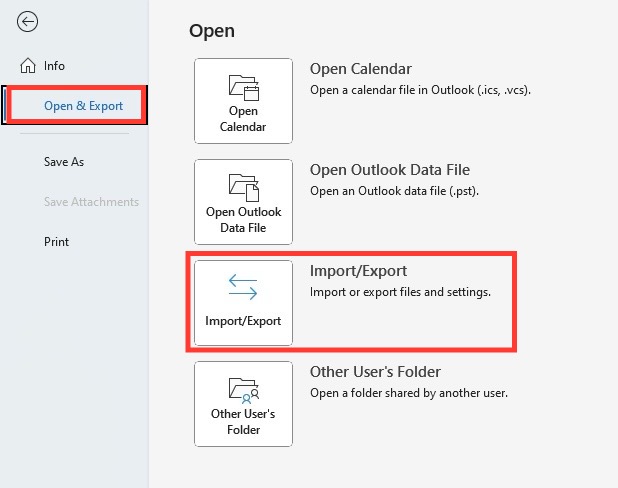
STEP 3: If you are using Outlook 2013 or a newer version, click on “Open & Export.” For Outlook 2010 and older versions, skip this step.
STEP 4: Choose “Import/Export” from the list of options. This will open the Import and Export Wizard.
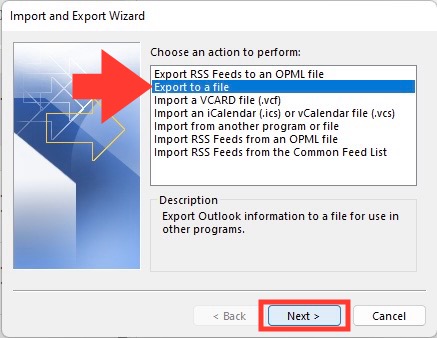
STEP 5: Select “Export to a file” from the choices available in the Import and Export Wizard and then click “Next.”
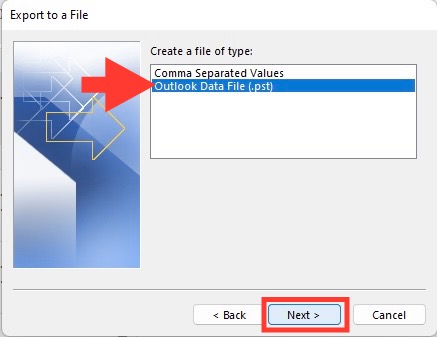
STEP 6: From the export options, choose “Outlook Data File (.pst)” and hit “Next.”
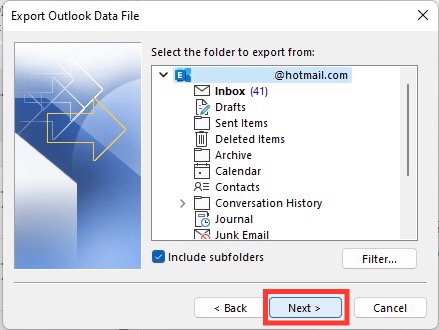
STEP 7: Now, select the folder or email account you want to back up. If you wish to back up your entire mailbox, select your email address at the top of the folder list.
STEP 8: Click “Next” once you’ve selected the data to export.
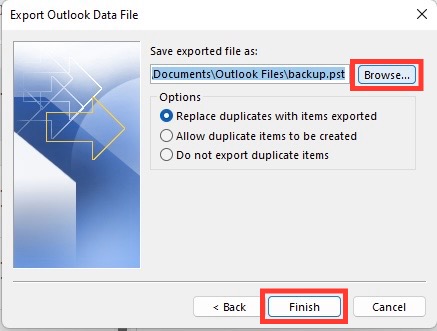
STEP 9: Browse to choose the location where you want to save the new .pst file. Here, you can also provide a distinct name for the file if you wish.
STEP 10: After selecting the destination and naming your .pst file, click “Finish.”
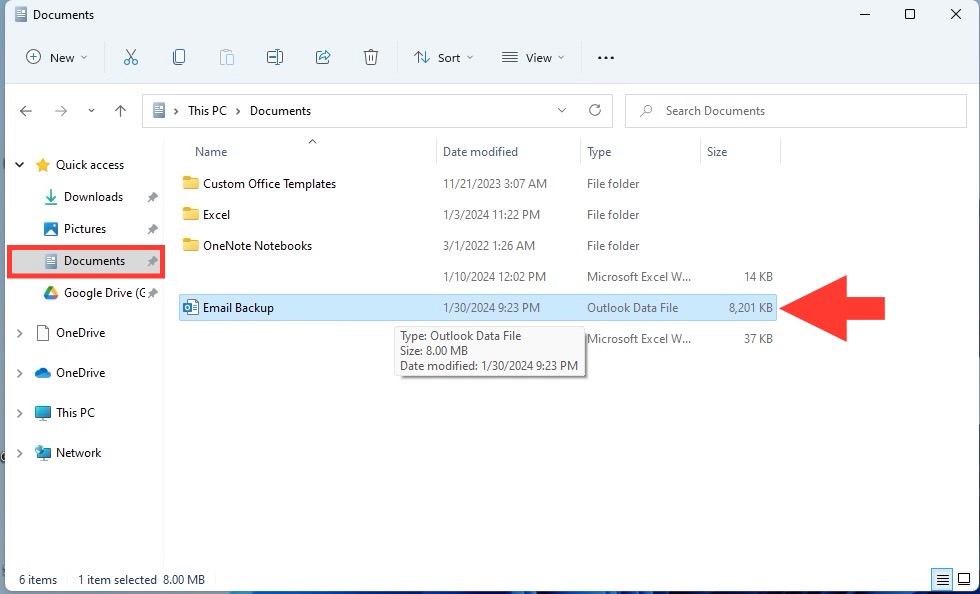
STEP 11: Verify if the .pst file has been created by navigating to the location where you chose to save it. Check that the file is present and has the correct name.
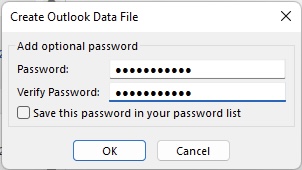
(Optional) If you want to add a layer of security, you can set a password for the .pst file when prompted after clicking “Finish.” Just enter the desired password twice as required, and remember to keep it in a safe place if you choose to do this step.
These steps will create a .pst file that serves as a backup of your Outlook data, which you can then import into another email account or keep for archival purposes.
Why is this method a winner?
- Quick and direct, it replicates your mailbox in a few steps.
- It creates a versatile PST file that can be moved, archived, or opened on different computers.
Top 5 Features:
- Flexible Selection: Choose precisely what you want to backup, from a single folder to the entire mailbox.
- Password Protection: Secure your PST files with a password for added security.
- Data Integrity: Ensures a complete backup, including all attachments and metadata.
- Ease of Use: User-friendly wizard guides you through the process.
- Time-efficient: Depending on the size, backing up can take just a few minutes.
Benefits:
- Easy to store and transfer your email data.
- Can serve as a solid disaster recovery option.
- You maintain personal control of your email archives.
- Facilitates smooth transitions to new computers or email accounts.
- Helps in fulfilling compliance requirements for data storage.
Drawbacks:
- May require manual initiation unless scheduled tasks are set up.
- Large mailboxes can result in large PST files, which can be cumbersome to manage.
Ideal for:
- Anyone from individual users to professionals who need a reliable way to keep their Outlook data accessible and secure across various scenarios.
Remember, exporting to a PST file is one of the best practices for backing up your emails, especially when planning to transition to a new device or as a precaution against data loss. Follow the prompts in the Outlook interface, and your emails will be safely tucked away in no time.
#2 Method: Drag and Drop to Save Individual Emails
The drag-and-drop technique is a quick and easy solution for saving individual Outlook emails to your hard drive. It is especially useful when you only need to backup specific messages, and don’t need the whole mailbox.
Here are the step-by-step instructions on how to use the drag-and-drop method to save individual emails from Outlook onto your computer:
STEP 1: Open the Microsoft Outlook application on your computer.
STEP 2: Navigate to the folder within Outlook that contains the emails you wish to save.
STEP 3: Click to select the individual email you want to save. To select multiple emails:
STEP 4: Hold down the “Ctrl” key on a Windows PC (or “Command” key if using a Mac) while clicking on each email you wish to back up.
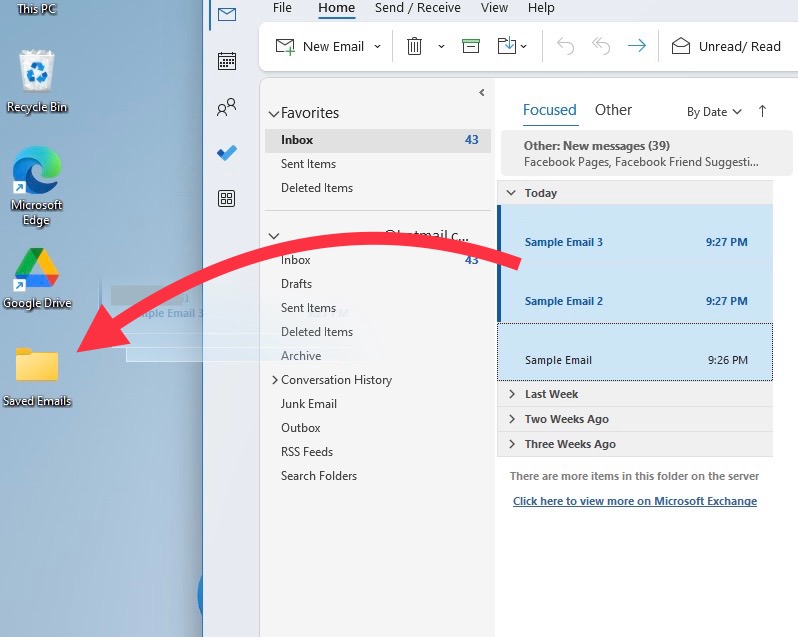
STEP 5: While the emails are selected, press and hold the left mouse button on one of the highlighted emails.
STEP 6: Drag the cursor to an open Windows File Explorer window, or to a folder on your desktop which you’ve created for your email backups.
STEP 7: If needed, you can open Windows File Explorer by pressing “Windows key + E” or by clicking on the folder icon on your taskbar.
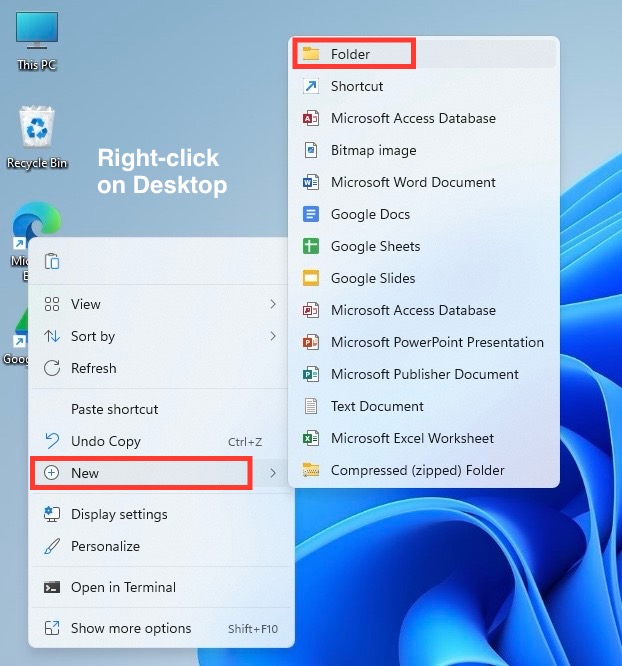
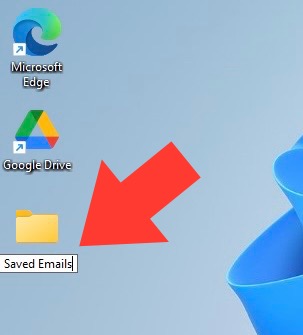
STEP 8: If you have not yet created a folder for the emails, right-click on your desktop, select “New”, then “Folder”, and give it a name.
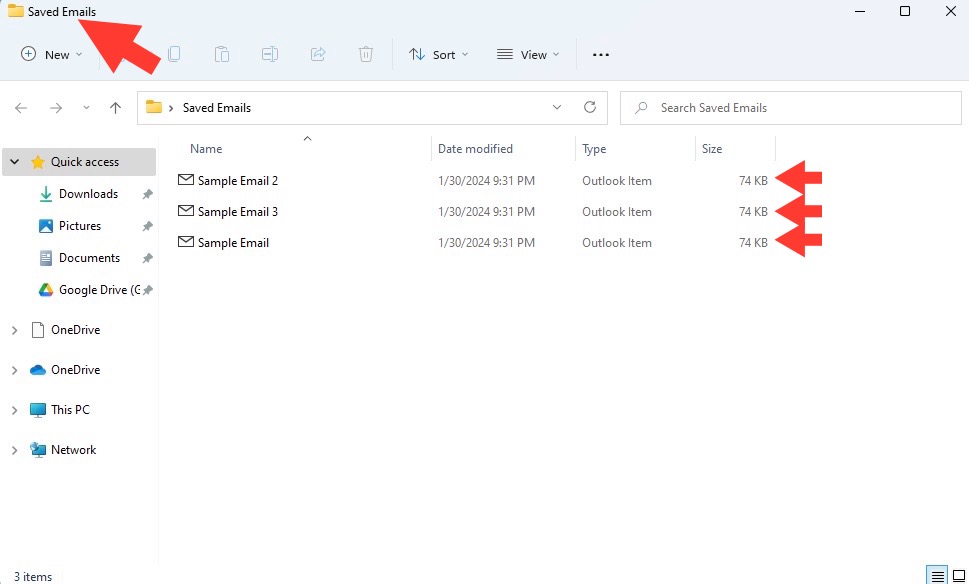
STEP 9: Release the mouse button once you are hovering over the desired destination folder. The emails will be copied or moved to the location.
Remember:
- If you are saving a large number of emails, it may take a few moments for all the files to be copied to the new location.
Why it’s a smart choice:
- It provides a speedy way to save important emails without the hassle of navigating through menus.
- Perfect for selective backups when you don’t need everything.
Top 5 Features:
- Simple Process: Click and drag without any complicated steps.
- Selective Backup: Choose exactly which emails to save.
- Quick Access: Instantly save and access emails from any folder on your computer.
- No Extra Tools Needed: There’s no need for additional software.
- Direct Control: Organize saved emails into folders on your own terms.
Benefits:
- Instantly save important emails outside of Outlook.
- Avoid the bulk of backing up the entire mailbox when not necessary.
- Flexibility in organizing emails in your preferred folder structure on your computer.
- Keep backups consistent with your current project or subject.
- Ease of sharing saved emails with others if necessary.
Drawbacks:
- Might be time-consuming for a large number of emails.
- Does not save entire folders or settings, only individual emails.
Ideal for:
- Users who need to archive specific emails quickly, whether for immediate reference, forwarding, or for use in presentations or reports.
Drag and drop is as easy as selecting your desired email(s), holding down the mouse button, and moving them over to a folder on your computer. Voilà! Your emails are backed up just like that.
Overcoming Common Outlook Backup Challenges
Addressing Size Limitations in PST Files
PST files are incredibly useful for storing your Outlook emails, but they come with their own set of limitations—size being a primary concern. Knowing how to manage and mitigate these limitations will ensure seamless access and prevent file corruption.
Why addressing size limits is crucial:
- Large PST files are prone to corruption, which can lead to loss of emails.
- Performance can degrade in Outlook with oversized PST files, leading to slowdowns or crashes.
Top 5 Strategies:
- Regular Archiving: Periodically move older emails into an archive PST, reducing the size of your primary PST file.
- Compact PST Files: Use Outlook’s built-in tool to remove empty spaces and reduce file size without losing data.
- Splitting PST Files: Divide a large PST file into smaller, more manageable files organized by date or category.
- Setting Auto-Archive Policies: Configure Outlook to automatically move older items to an archive PST file at set intervals.
- Avoiding Unnecessary Attachments: Save attachments separately and remove them from emails to keep PST file sizes down.
Benefits:
- Significantly reduces the risk of PST file corruption and data loss.
- Enhances Outlook’s performance, leading to quicker search and retrieval times.
- Easier to manage multiple smaller PST files than one unwieldy large file.
- Improved data organization when using multiple PST files for different periods or projects.
- Assures swift backup and restoration processes.
Drawbacks:
- Requires routine management and monitoring to maintain optimal PST sizes.
- Users must ensure not to exceed the PST file size limit, run close, or else risk file corruption.
Ideal for:
- Any Outlook user who relies on PST files for email storage, especially those with high email usage or large attachments.
By implementing these strategies, you can maintain your PST files well within size limits, ensuring email safety and optimal Outlook performance. Regular maintenance here is key—stay vigilant and your PST files will remain a reliable repository for your valuable communications.
Troubleshooting Export Issues
When exporting your Outlook emails, hiccups can occur. Being well-versed in troubleshooting these issues means you can deal with them swiftly, ensuring your email backup plan remains on track.
Understanding common pain points:
- It’s disheartening when exports fail, but familiarizing oneself with frequent issues can lead to quick resolutions.
- Knowing basic troubleshooting can save you time and prevent potential data loss.
Top 5 Troubleshooting Tips:
- Ensure Outlook is Updated: Running the latest version can resolve many export issues related to software bugs.
- Check for Corruption: Use the Inbox Repair tool (scanpst.exe) to fix corrupt PST files that could be causing export problems.
- Verify Disk Space: Make sure your target destination has sufficient space for the PST file; lack of space could halt the export.
- Restart Outlook: Sometimes a simple restart can clear temporary glitches that disrupt the export process.
- Disable Add-Ins: Outdated or faulty add-ins can interfere with Outlook’s functionality, so try disabling them if you encounter issues.
Benefits:
- Reduces frustration by equipping you with skills to handle common export issues.
- Saves time otherwise lost in figuring out why your export isn’t working.
- Ensures the integrity of your email data through proper export practices.
- Maintains productivity by minimizing disruption to your email management.
Drawbacks:
- It may require patience and a bit of tech-savvy to resolve some of the more intricate issues.
- Persistent problems may need advanced solutions or support from IT professionals.
Ideal for:
- Anyone who regularly exports their emails and wants to preemptively manage potential issues during the backup process.
When you’ve crossed off the basics and the problem persists, consider seeking support from peers who may have faced similar issues. A collaborative approach often brings novel solutions to light.
Rest assured, with a methodical approach, most Outlook export problems can be resolved, and your email backups can proceed without a hitch.
FAQs
Can I also save my emails to an external hard drive?
Yes, saving your Outlook emails to an external hard drive is not only possible, but it’s also a wise strategy for off-site backups. After exporting your emails to a PST file, simply connect your external drive and transfer the file. This provides an extra layer of backup, securing your emails against local machine failures.
Can I save emails from Outlook to my computer?
Absolutely! You can save emails from Outlook to your computer by using the Export feature to create a PST file or by dragging and dropping individual emails to a folder on your desktop. Both methods are straightforward and ensure your emails are accessible from your PC.
How do I save Outlook emails in bulk?
To save Outlook emails in bulk, use the Export function to create a PST file. This file can include all your emails or selected folders. Open Outlook and navigate to the “File” menu, then “Open & Export,” and click on “Import/Export” to begin the process, choosing “Export to a file” for a comprehensive backup.
How do I save Outlook emails to hard drive without PST?
Save Outlook emails to your hard drive without utilizing a PST file by using the export feature. Select your emails, go to the “File” menu, click on “Export,” and choose the format you prefer, such as HTML, Text, or CSV. Then, save the files to a designated folder on your hard drive.
What are the main benefits of backing up Outlook emails to my computer?
Backing up Outlook emails to your computer ensures data protection against loss from system failures or account issues. It also gives you the freedom to access your emails offline and provides a local archive for easy retrieval of important information.
John Michaloudis is a former accountant and finance analyst at General Electric, a Microsoft MVP since 2020, an Amazon #1 bestselling author of 4 Microsoft Excel books and teacher of Microsoft Excel & Office over at his flagship MyExcelOnline Academy Online Course.

