Download our 141 Free Excel Templates and Spreadsheets!
Key Takeaways
- Streamlined Efficiency: Outlook email templates help save time by enabling quick creation and customization of repetitive emails.
- Consistent Branding: Templates maintain brand consistency with standardized formats, fonts, and logos across all communications.
- Personalization Potential: Despite templates, ensure each email maintains a personal touch by customizing salutations, content, and attachments as needed.
The Advantages of Using Email Templates
Email templates are akin to a Swiss Army knife for your inbox – multi-functional and designed to save time. Once you embrace the power of templates, you’ll relish the swift workflow and uniformity they bring to your communications. They are especially useful when multiple team members handle email correspondence, ensuring consistent messaging and a professional brand image.
- Time Efficiency: No more typing out identical emails; templates do the heavy lifting.
- Brand Consistency: Keep your communications on-brand with standardized messages.
- Personalization: Easily customize templates for different recipients while maintaining a consistent base.
- Streamlined Workflow: Enhances productivity by reducing the effort spent on recurring tasks.
- Error Reduction: Predefined templates minimize the chance of sending out messages with errors.
Table of Contents
Step-by-Step Guide to Creating Your First Template
Navigating the Outlook Interface
Embarking on your journey of creating email templates in Outlook is smooth sailing when you’re familiar with the terrain. Navigate to the Home tab to begin with, which is your central hub for most email-related actions. From here, for crafting email templates, you will make your way to the more specific areas to finetune your messaging.
- Open Outlook: Launch the application to see your email dashboard.
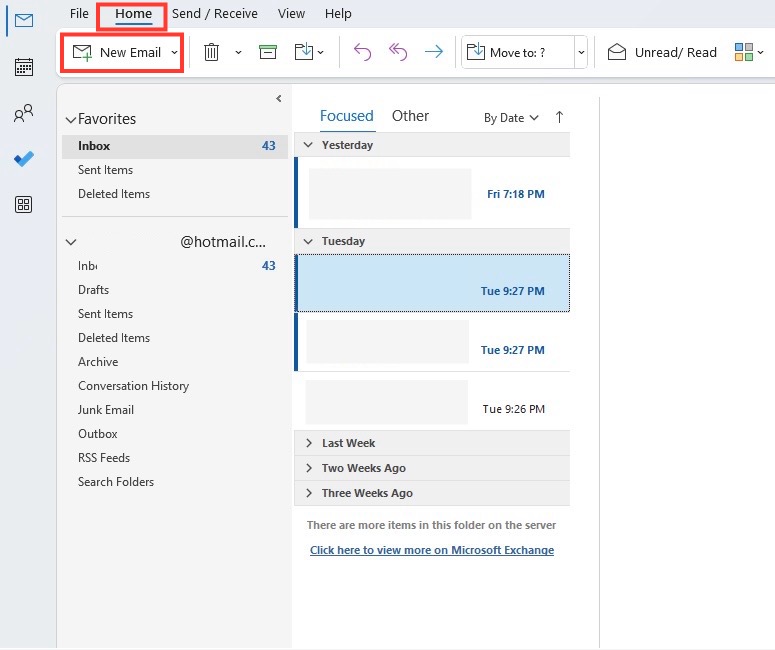
- The Home Tab: Here you locate New Email options and other main features.
- File Menu: For access to Outlook’s backend settings and managing accounts.
Crafting a Standard Email Template Quickly
Creating a standard email template in Outlook is a breeze. You’ll be turning those routinely sent emails into templates at lightning speed.
STEP 1: Click ‘New Email’ button on the Home tab.
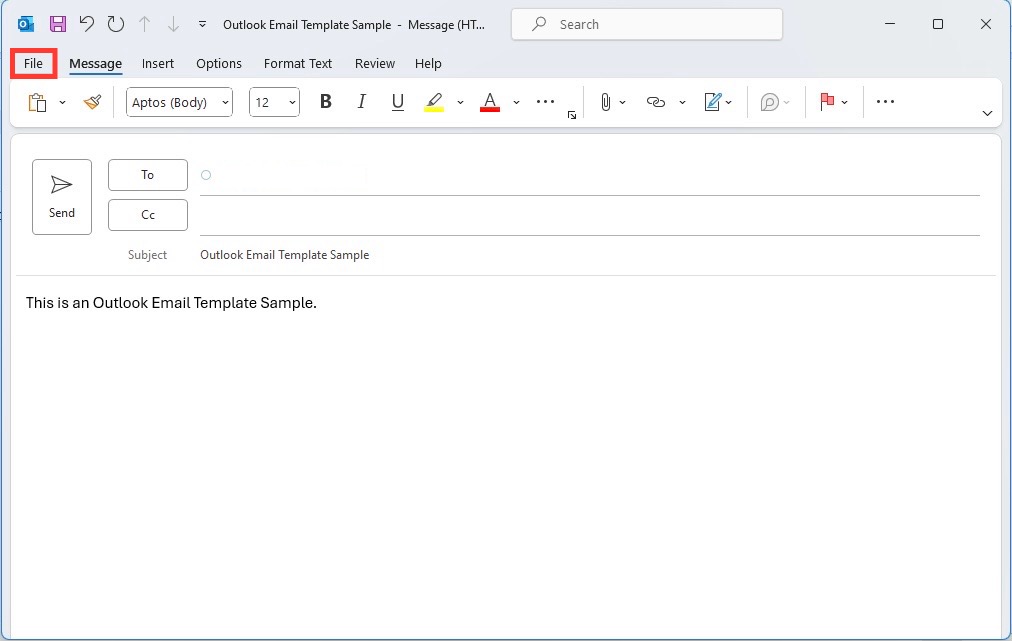
STEP 2: Draft your email just as you would normally—subject line, recipient, body text.
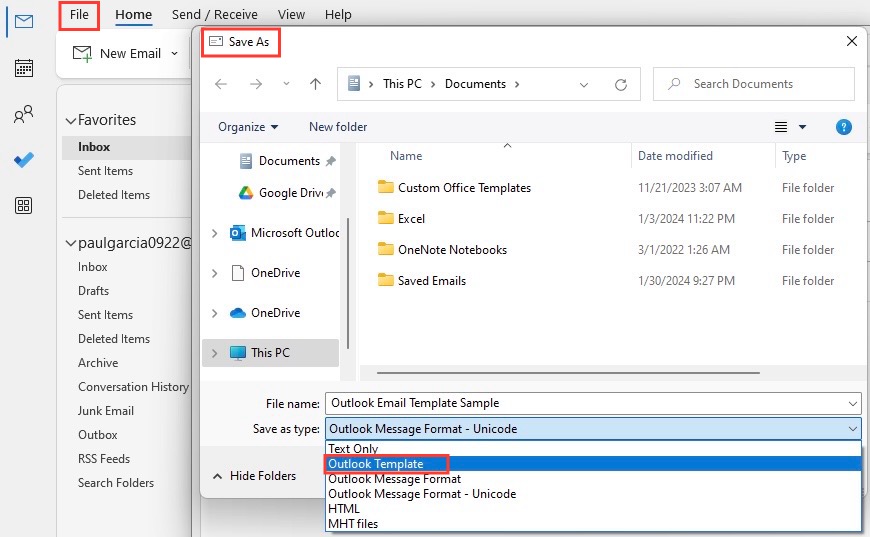
STEP 3: Click ‘File’ -> ‘Save As’ and select ‘Outlook Template (*.oft)’ from the dropdown menu in the Save As dialog box.
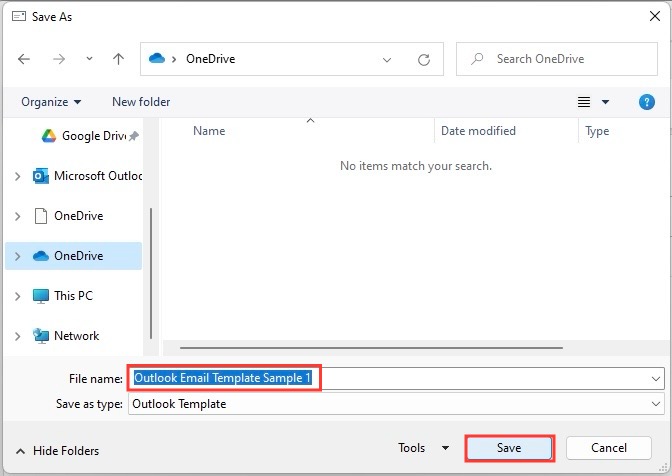
STEP 4: Give your template a descriptive name so you can easily find it later.
STEP 5: Save the template and close the email window. Voilà! Your template is ready to use.
Remember, you’ve just created a foundation. You can pull up this template and tweak the details to fit each unique situation.
Customizing Your Email Templates for Efficiency
Further Personalization Options in Quick Parts
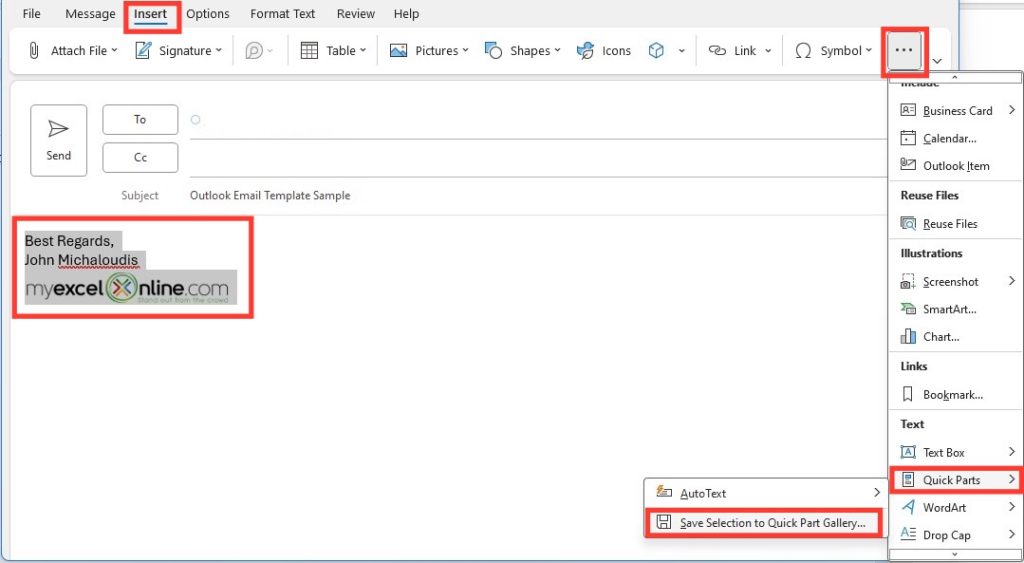
To make your emails even more personal and efficient, Quick Parts in Outlook are a godsend. They allow you to insert predefined snippets like greetings, signatures, or even paragraphs that you frequently use in your emails.
-
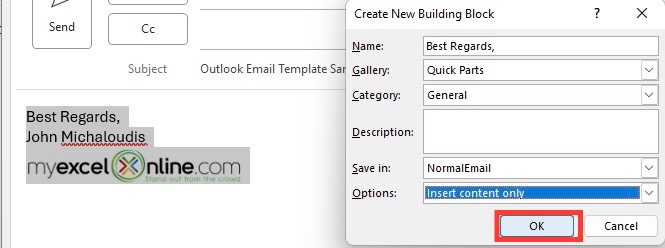
- Creating Quick Parts: Type out the text or insert a graphic, select it, go to the Insert tab, click on Quick Parts, and select ‘Save Selection to Quick Part Gallery…’.
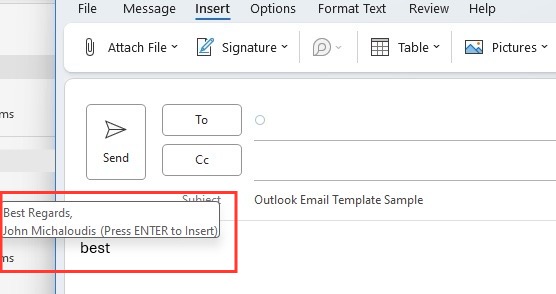
- Using Quick Parts: Place your cursor in the email where you want to insert the Quick Part, then click the Quick Parts button and select the one you need.
Personalization doesn’t stop at text. With Quick Parts, they can even maintain complex formatting or include images. It’s your tool to create a curated library of reusable elements that give your emails that extra touch of personality.
Incorporating AutoText and Signature Shortcuts
AutoText and signature shortcuts are your secret weapons for super-fast email drafting in Outlook. They behave like the lesser-known siblings of Quick Parts, focusing on smaller text blocks and automated sign-offs.
- Assign snippets of text – like addresses or phone numbers – to a keyword via AutoCorrect options.
- Just type the keyword, hit Enter or Space, and watch the magic as the text appears, saving you precious time.
Multiple Signatures Made Easy:
- Don’t limit yourself to one default signature. Create various signatures for different purposes and add pizzazz to your email endings.
- Switch between signatures depending on context – a professional one for business or a casual one for friends.
With these quick tricks, Outlook lets you maintain that personal touch while streamlining your productivity.
Tips for Effective Use of Email Templates
Balancing Content and Design for Better Engagement
Balancing your email’s content and design is like walking a tightrope – it requires focus, finesse, and a bit of flair. For better engagement, craft an email that marries informative content with an eye-catching yet unimposing design.
- Readable Fonts: Choose legible fonts that won’t have your recipients reaching for their reading glasses.
- Color Contrast: Ensure text stands out with the right background contrast, sticking to a 4.5:1 ratio for readability.
- Structured Layout: Use headings, bullets, and white space to direct attention and make content digestible.
- Visuals: Incorporate images or graphics that enhance the message—remember to add ALT text for accessibility.
- CTA: A distinguishable call-to-action button or link can significantly increase engagement.
Remember, an email shouldn’t be a visual assault on the senses; subtlety and clarity will win your readers every time.
Common Pitfalls to Avoid with Outlook Email Templates
Ensuring Compatibility Across Different Outlook Versions
Navigating the diverse landscape of Outlook versions can be tricky. What looks picture-perfect in one version can break apart in another. To ensure your email templates look great across all versions of Outlook:
- Simple Layouts Prevail: Use simple, table-based layouts as they tend to be more consistent across different Outlook versions.
- Inline CSS: Styles embedded directly within the HTML (inline CSS) are more likely to be rendered properly.
- Testing is Key: Before finalizing your template, test it across different versions of Outlook. Tools like Email on Acid or Litmus can automate this process.
- Images with Caution: Remember that some Outlook versions automatically block images, so always add ALT text and consider how the email looks without them.
By accounting for these factors, you can create templates that deliver the intended experience, no matter the version.
Avoiding Overlooked Design Flaws in Your Templates
Even the best-looking templates can hide insidious design flaws. To dodge these pitfalls:
- Ensure Swift Load Times: An Outlook template loaded with large files or numerous attachments can crawl to a load. Use smaller-sized attachments and streamline the number of files.
- Test Your Templates: Send your template to different Outlook inboxes to spot any anomalies in the display, broken links, or awkward layouts.
- Font Fumbles: Using too many fonts can confuse and overwhelm readers. Stick with one or two font styles for a clean look.
- Avoid Multiple Backgrounds: Outlook struggles with rendering multiple background images, so opt for a single image or just use block colors.
Keeping an eye on these details will help maintain the integrity of your designs and ensure your templates leave a lasting, positive impression.
Beyond Basics: Advanced Features of Email Templates
Using My Templates Add-in for Enhanced Functionality
For those ready to level up their email template game, the My Templates add-in for Outlook is your sidekick. This tool offers enhanced functionality such as:
- Ease of Use: Accessibly placed under the Home ribbon, this add-in lets you create, store, and apply templates all within the Outlook environment.
- Integrated With Your Account: Templates saved are stored in your mailbox for consistent access across devices, provided you are on an Exchange server.
- Pre-loaded Samples: Comes equipped with sample responses for immediate use, customizable for your unique needs.
By incorporating the My Templates add-in, you harness the power to expedite email creation further, making your workflow even more efficient.
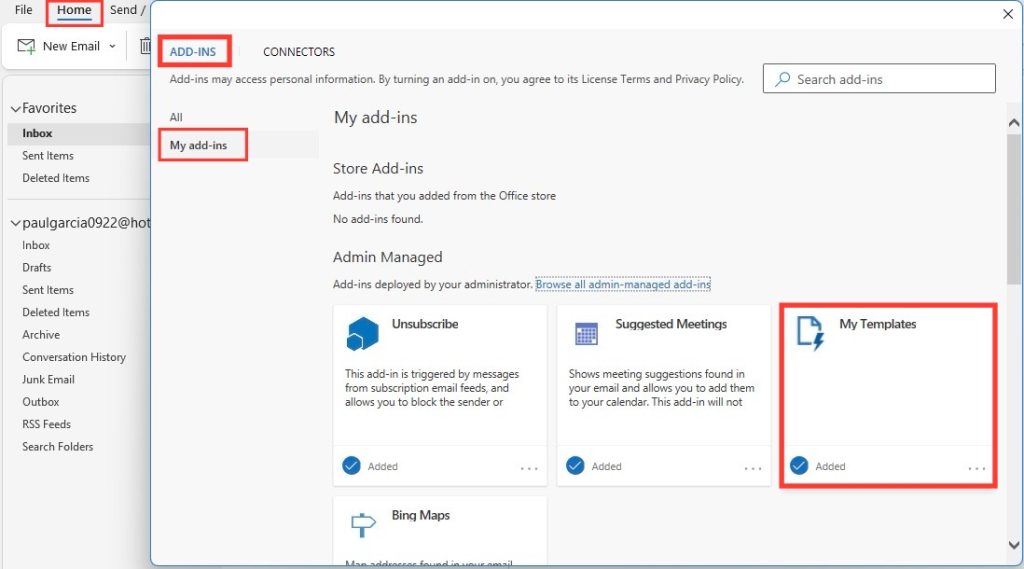
To ensure you have My Templates:
STEP 1: Open Outlook and navigate to the Home ribbon.
STEP 2: On the far right, click ‘Get Add-ins’.
STEP 3: Look under “My Add-ins” to see if My Templates is listed and enabled.
STEP 4: If not seen and you believe you qualify, try updating Microsoft Office.
The add-in is available for Outlook 2013 and later, bridging the gap between functionality and convenience.
Easy Sharing of Templates with Colleagues
Sharing templates with your colleagues in Outlook is like sharing a secret handshake—it strengthens the team and streamlines your workflow. Here’s how to seamlessly share the load:
Company-Wide Templates on Shared Network Drive:
- Create your templates folder in Outlook, and export it to a shared location all users can access.
- Others can add this folder to their template tree, ensuring uniformity and collaboration across the board.
- To maintain control and prevent unauthorized changes, consider setting permissions for who can edit the templates.
- Regularly update and distribute templates to keep everyone on the same page with the latest version.
By capitalizing on Outlook’s shared templates feature, your team can unite their efforts and deliver consistent, quality communication to clients or within the organization.
Quick Retrieval of Frequently Used Templates
One of the nifty benefits of Outlook templates is the “Recent” tab, which is your express lane to frequently used templates. It’s designed to make life easier by keeping your go-to content at your fingertips.
- When you use a template, Outlook automatically adds it to the “Recent” tab for quick access in the future.
- You can customize this tab to sort templates by frequency of use, name, or last used.
Plus, you’re not just limited to templates. The “Search” field is another speedster feature:
- Searching Made Simple: Type relevant keywords in the Search field to quickly pull up matching templates.
- Outlook retains your search history so that revisiting past queries is a snap.
By employing these quick retrieval methods, your email efficiency gets a turbo boost, allowing you more time to focus on content rather than searches.
FAQs on Quick Outlook Email Templates
Can I share my Outlook email templates with others?
Yes, you can share your Outlook email templates with others. If you store your templates in a shared network location, like a shared drive or through cloud storage platforms like OneDrive or Dropbox:
- Make sure your team has access to the shared folder.
- Instruct your colleagues on how to add the folder to their own Outlook template list for unified use.
This way, everyone can benefit from and contribute to a central repository of email templates.
Does the new Outlook have templates?
Yes, the new Outlook comes with easy-to-use email templates. You can access them by composing a new email, clicking on the three dots (More options) on the Message tab, and selecting ‘My Templates’ from the dropdown menu. This feature simplifies the process compared to the classic desktop version.
Where are Outlook email templates?
Outlook email templates are saved by default in a system folder, usually under:
C:\Users[UserName]\AppData\Roaming\Microsoft\Templates
You can also save templates in a custom location or a shared network drive for easier access and sharing among team members. Just remember the path or make it readily accessible for frequent use.
John Michaloudis is a former accountant and finance analyst at General Electric, a Microsoft MVP since 2020, an Amazon #1 bestselling author of 4 Microsoft Excel books and teacher of Microsoft Excel & Office over at his flagship MyExcelOnline Academy Online Course.

