Learn about Excel with our Free Microsoft Excel Online Course!
Key Takeaways
- Go to Outlook.com and click the People icon on the sidebar to manage your contacts.
- Create a new email group by clicking the down arrow next to the “New contact” button and selecting “New group”, then provide a name and description for your group.
- Add members to your email group by typing their names or email addresses and confirm each addition to build your group list.
The Power of Organization: Benefits of Creating Groups in Outlook
Creating groups in Outlook isn’t just about convenience; it’s also a powerful organizational tool that brings a multitude of benefits to your daily email communications. For starters, it keeps teams coordinated. Imagine you’re a project manager; with groups, you can ensure everyone stays on the same page by sending updates to the entire team with just one click.
Groups also streamline customer interactions. You can categorize clients by their needs or stages in the sales funnel, and send them personalized updates or offers, enhancing the customer experience while also saving precious time.
Collaboration is another area where groups shine. By setting up a group, your team can share calendars, files, and notes, essentially creating a digital workspace where everyone can contribute and access the latest project developments.
In a nutshell, Outlook groups help you organize better, communicate smarter, and collaborate more effectively—transforming how you manage email and your workload.
Table of Contents
A Step-by-Step Guide to Creating Your First Group
Before You Begin: Preparing Your Contact List
Before you start creating your group in Outlook, take a moment to tidy up your contact list. Ensure that all the contacts you plan to include have current and correct information. It’s like prepping ingredients before you cook; having everything ready and accurate makes the process smoother and the outcome better.
You may want to break down your contact list into categories or by how frequently you interact with them. This preliminary step helps in creating more targeted groups and in future communications.
To make this process easier, consider exporting your current contacts to a spreadsheet, where you can visually scan and edit information. Once you’ve updated your list, re-import it to Outlook, and you’re all set to assemble your groups.
Creating an Email Contact Group in Outlook
To create an email contact group in Outlook, follow these simple steps, and you’ll be on your way to more effective communication:
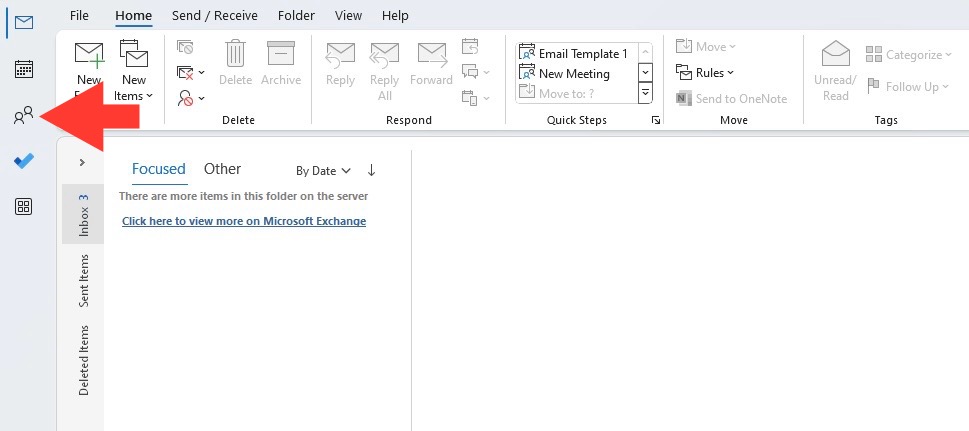
STEP 1: Open Outlook and navigate to the ‘People’ icon in the bottom left corner to access your Contacts.
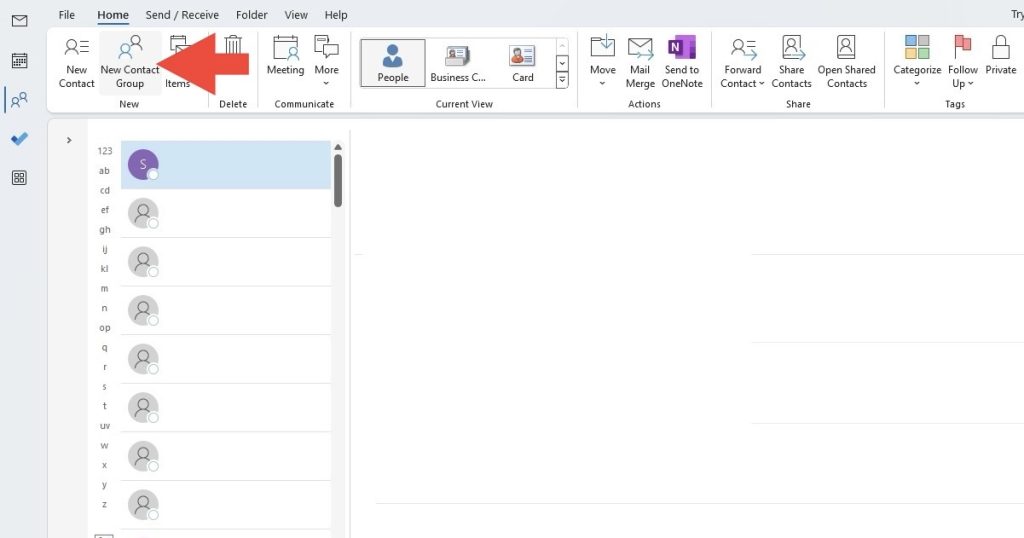
STEP 2: Click ‘New Contact Group’ in the top menu to start crafting your group.
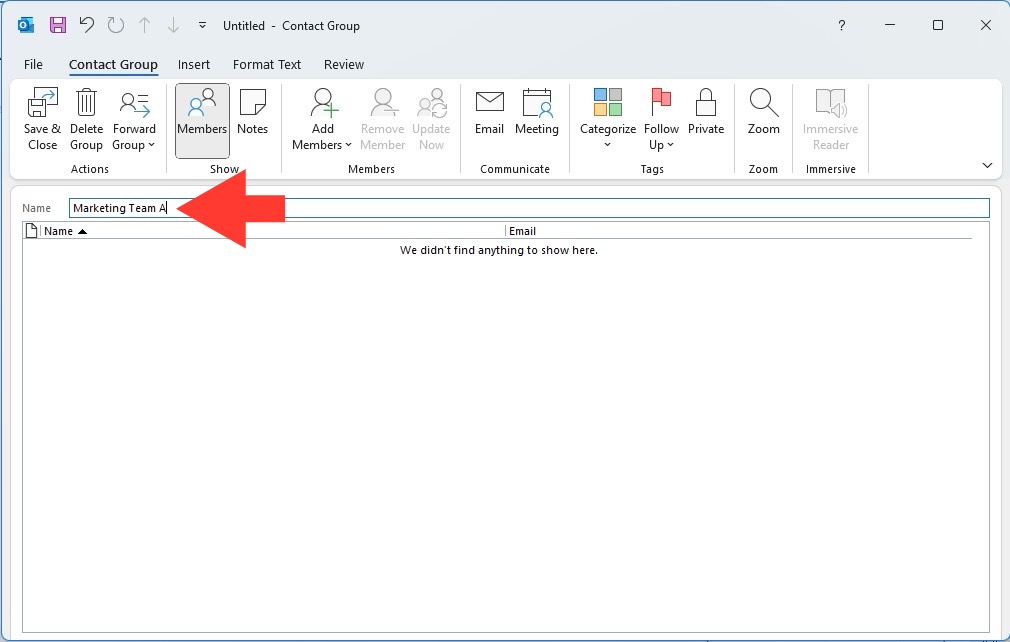
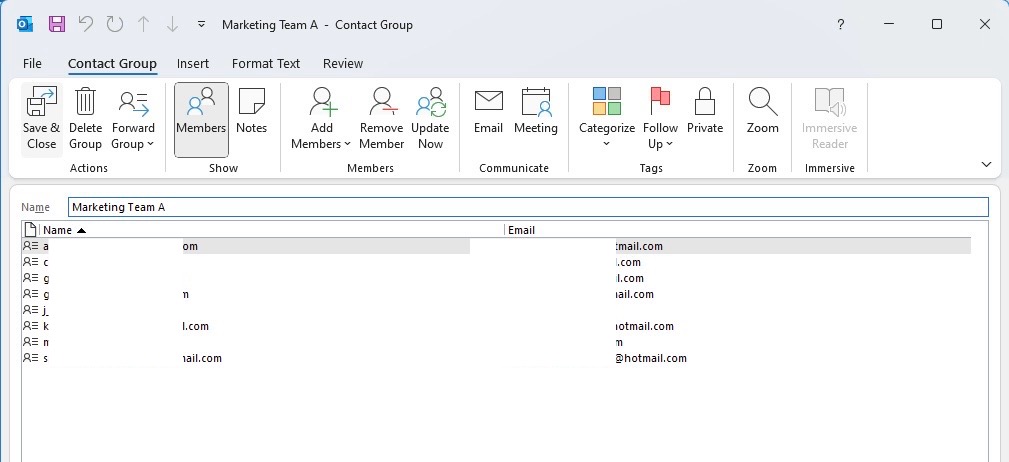
STEP 3: In the ‘Name’ box, assign your group a relevant and recognizable name.
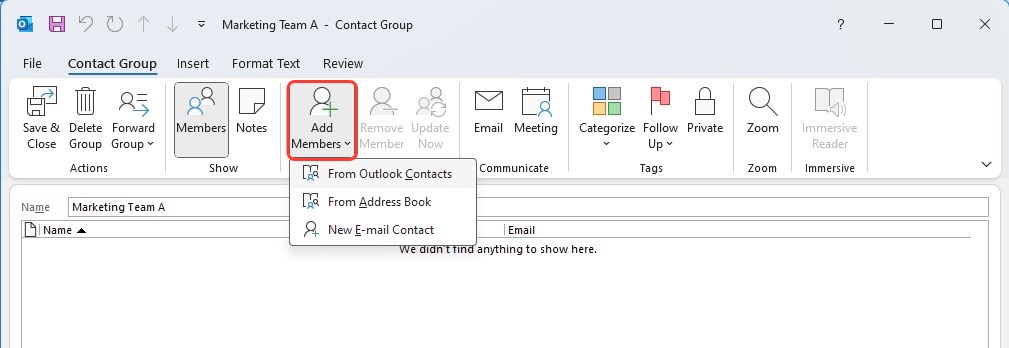
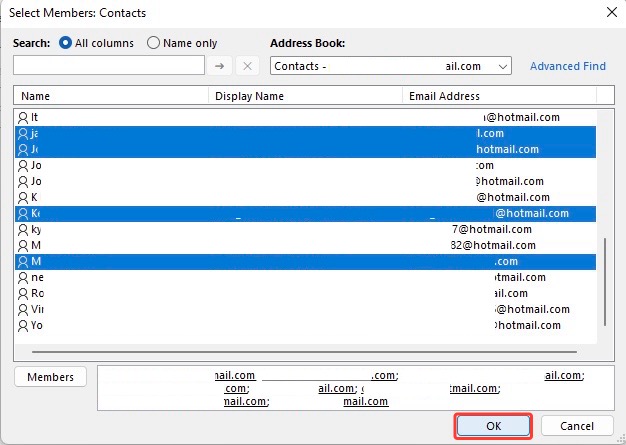
STEP 4: Add members by clicking ‘Add Members’ and choose contacts from your Outlook contacts or address book.
STEP 5: After you’ve selected all the desired contacts, click ‘OK’ to add them to your group.
STEP 6: Save your new group by clicking ‘Save & Close’ in the top menu.
And there you have it—your email contact group is ready! You can now effortlessly send a single email to the entire group instead of selecting contacts one by one.
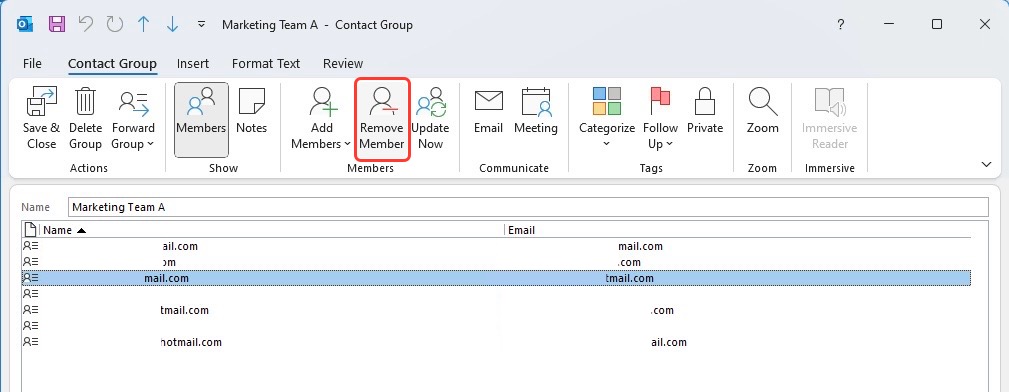
Remember, you can always modify your group by adding or removing members as needed. This helps keep your group list dynamic and up-to-date with shifting project teams or customer segments.
Customizing Your Outlook Group Experience
Managing Group Members with Ease
Managing your group members is straightforward once you have your Outlook group established. If there’s a need to modify your group, adding or removing members is hassle-free. Revisit the ‘People’ section in Outlook and select your group. Here, you’ll have the ability to manage your group members efficiently:
- To remove a member, just find their name, click the little ‘X’ beside it, and confirm the removal.
- To add new members, click ‘Add Members.’ You can then enter their name or email address, click ‘Add,’ and voilà – they’re part of the conversation.
Regularly updating your group ensures that everyone who needs to be in the loop is included, keeping communications smooth and relevant.
These ad-hoc changes mean your groups evolve with your needs, whether they’re for a one-time event or a long-term project. It lets you stay agile and responsive, which is crucial in today’s fast-paced world.
Tips for Naming and Organizing Your Groups
When it comes to naming and organizing your Outlook groups, being clear and specific is the way to go. To further refine your group organization:
- Categorize groups based on projects, departments, or functions, like “Product Launch Team” or “Event Staff.”
- Use sub-categories for more extensive networks. For bigger organizations, sub-groups under “Marketing” could include “Content Writers,” “SEO Analysts,” and “Social Media Team.”
- Don’t shy away from renaming groups if their focus shifts or if the original name doesn’t quite fit anymore.
Remember, a well-named group saves you the time you’d spend trying to remember who is in “Group 3” and allows you to focus on the more critical aspects of your work.
Advanced Group Features in Outlook
Setting Permissions and Roles within Your Groups
In Outlook, customizing group permissions and assigning roles is important to maintain order and control over group activities. This control makes sure that the right people have the necessary access to perform their jobs effectively without creating a free-for-all environment.
As the group owner, you can assign member roles like ‘Editor’ or ‘Viewer’. Here’s how it works:
- An ‘Editor’ can add or remove contacts, update group details, and send communications on behalf of the group.
- A ‘Viewer,’ on the other hand, may only have rights to view the conversations and files shared within the group but cannot make alterations.
Setting these permissions properly helps maintain data integrity and workflow, ensuring that members only have access to the functions that align with their responsibilities in the group.
Maintaining an Efficient Group System
Troubleshooting Common Outlook Group Issues
At times, you might face a few hiccups with Outlook groups, but don’t fret—they can usually be resolved with some quick troubleshooting tips.
Lost Contact Group? Check the ‘Deleted Items’ folder first. If you find your group there, simply restore it to your Contacts. Still missing? Time to recreate it from scratch or from a backup if you have one on hand.
Members not receiving emails? Verify that each contact’s email is correct. Ask members to peek into their spam folders just in case your email got trapped there, or perhaps you’ve hit a sending limit—consider dividing the group or sending emails in batches.
These tips handle the common pitfalls, ensuring smooth communications and maintaining group effectiveness.
Concluding Thoughts on Enhancing Email Productivity
Wrapping Up: Your Path to a Streamlined Inbox
With your newfound group management skills, your inbox is set to become a hub of productivity and organization. Email groups are a fantastic way to keep communication flowing seamlessly, allowing more time for you to tackle the big-ticket items on your to-do list. Embrace this new level of efficiency and watch as your workflow transforms, leaving you more time for strategic work and less on email management.
Parting Tips for Outlook Group Management
To wrap up, remember these parting pearls of wisdom:
- Keep groups relevant by reviewing and updating member lists regularly.
- Stick to a consistent naming convention for ease of search and recognition.
- Use the handy ‘Favorites’ feature to keep your most important groups just a click away.
- Back up your groups periodically to prevent data loss.
- Engage with Outlook’s support community or help resources if you ever hit a snag.
By following these tips, you’ll wield the power of groups like a pro, making your email routine not just bearable, but downright efficient.
FAQs – How to Create Email Groups In Outlook
How do I send an email to an Outlook group?
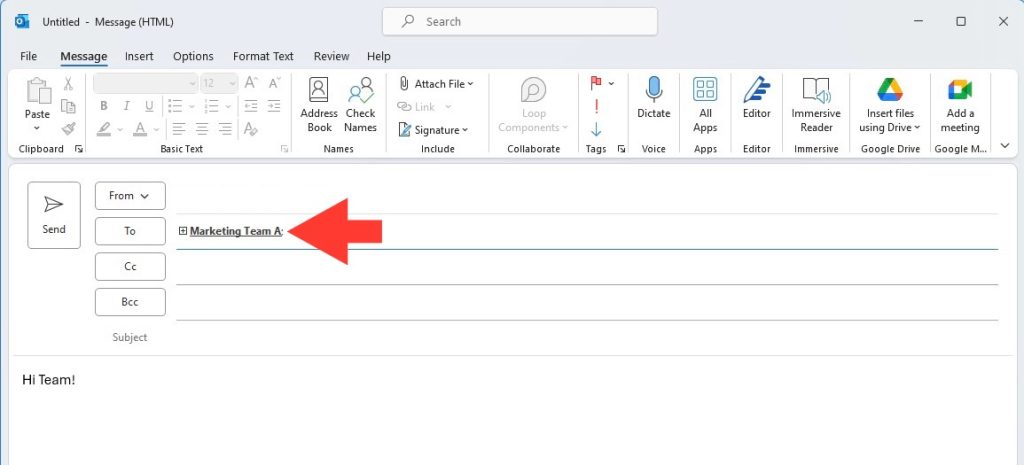
To send an email to an Outlook group, simply create a new email, type the name of the group in the ‘To’ field, and Outlook will suggest the full name. Click the group name to add it as the recipient, then write your email and hit ‘Send. Your message will reach all the members of that group.
What’s the difference between a Microsoft 365 group and an Outlook contact group?
A Microsoft 365 group is designed for collaboration, offering shared resources like a mailbox, calendar, and document library. An Outlook contact group is simpler, essentially an email distribution list used to send messages to a list of people.
Can I create a group in Outlook Web App?
Yes, creating a group in the Outlook Web App is possible. Navigate to ‘People’, choose ‘New contact list’, enter the group details, add members, and select ‘Create’ to finalize your group.
How can I delete or edit an existing contact group in Outlook?
To edit a contact group in Outlook, double-click the group to open it, make your changes, and select ‘Save & Close’. To delete, right-click the group and choose ‘Delete’. Confirm the action to remove the group permanently.
John Michaloudis is a former accountant and finance analyst at General Electric, a Microsoft MVP since 2020, an Amazon #1 bestselling author of 4 Microsoft Excel books and teacher of Microsoft Excel & Office over at his flagship MyExcelOnline Academy Online Course.

