In our increasingly interconnected digital workspace, mastering tools that foster collaboration is vital. Microsoft Teams, a hub for teamwork, has been a game-changer for many. But when we integrate Planner into Microsoft Teams, we open up a whole new realm of productivity. Planner melds with Teams effortlessly, meaning we don’t have to juggle between apps. It’s all there—our plans, updates, progress—in one place, ensuring key discussions and tasks don’t slip through the cracks and end up on forgotten sticky notes.
Key Takeaways
- To begin using Planner within Microsoft Teams, access the Teams app, select the relevant team, and click on the “Planner” tab, where you can create a new plan, import an existing one, or choose and tailor a template to fit your team’s requirements.
- Utilizing Planner in Microsoft Teams enables enhanced collaboration and project management, allowing team members to manage and update tasks within a single workspace, thus boosting productivity by minimizing the need to switch applications.
- Keep in mind that features and functionalities in Microsoft Teams and Planner may have evolved since the referenced video from December 2020, so it’s important to explore the current version for the latest updates and improvements.
The Benefits of Using Planner within Teams for Project Management
When we use Planner within Teams for project management, we introduce our workflow to an immense set of benefits. Firstly, communication is streamlined. With in-app discussions related to specific tasks, we possess immediate context, saving precious time often lost in explanatory back-and-forths. Secondly, Planner provides an at-a-glance status of all tasks, enhancing transparency and enabling us to swiftly identify bottlenecks or priorities.
Additionally, Planner’s integration in Teams allows us to:
- Harness the power of collaborative planning where tasks can be discussed and assigned in real time.
- Experience ease of access with project plans readily available within our Teams workspace, thus fostering consistent engagement with our projects.
- Enjoy centralization of resources, with the ability to attach files directly to tasks—minimizing the risk of important documents getting buried in email threads or disparate folders.
These features, and more, shift project management from a daunting chore to a seamlessly integrated component of our daily teamwork.
Table of Contents
Getting Started with Planner in Microsoft Teams
How to Create a New Planner in Teams
Creating a new Planner within Microsoft Teams is intuitive and offers a clear path to organized project management. Here’s how I tap into its potential:
- I navigate to the Teams app and choose the specific team channel that I want the Planner tab to live in.
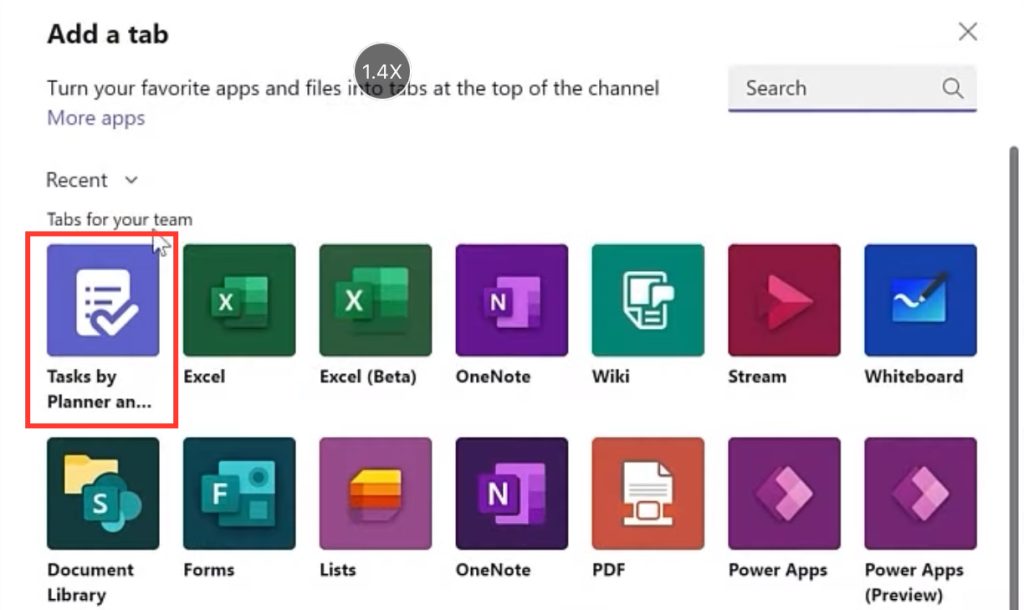
- At the top of my channel, I click the “+” icon to open the “Add a tab” panel, then select the Planner option—it’s usually illustrated by a small board icon.
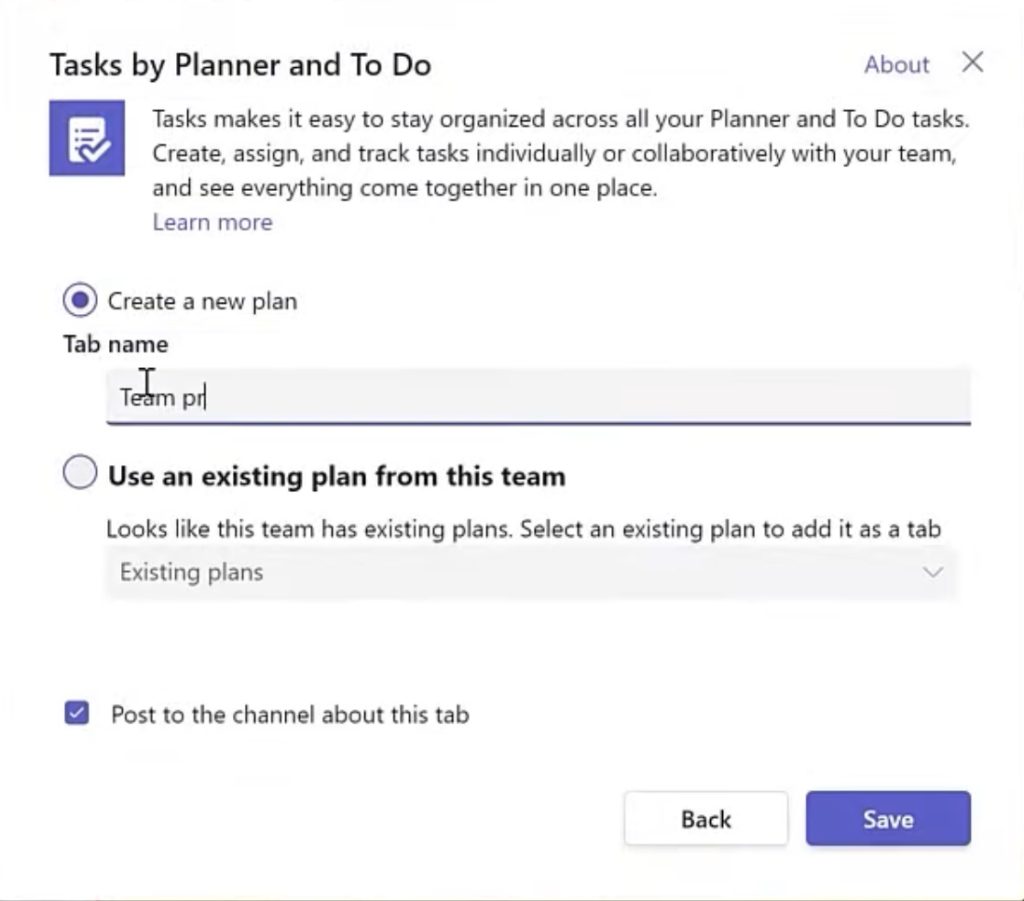
- I’m then presented with two choices—create a new plan or add an existing one. I go ahead and choose “Create a new plan,” give it a name that’s indicative of the project or goal, and click “Save.”
That’s it! Just like that, a new Planner tab appears in my chosen channel, and I’m ready to start adding tasks and assigning them to my teammates. This streamlined process ensures that I wasted no time in jumping straight into productive project management.
Adding an Existing Planner to Your Team’s Workspace
When it’s more efficient to reuse and adapt an existing plan rather than start from scratch, adding an existing Planner to our team’s workspace is a smart move. Here’s how I do it:
- Within the desired team channel on Microsoft Teams, I click on the “+” button to append a new tab.
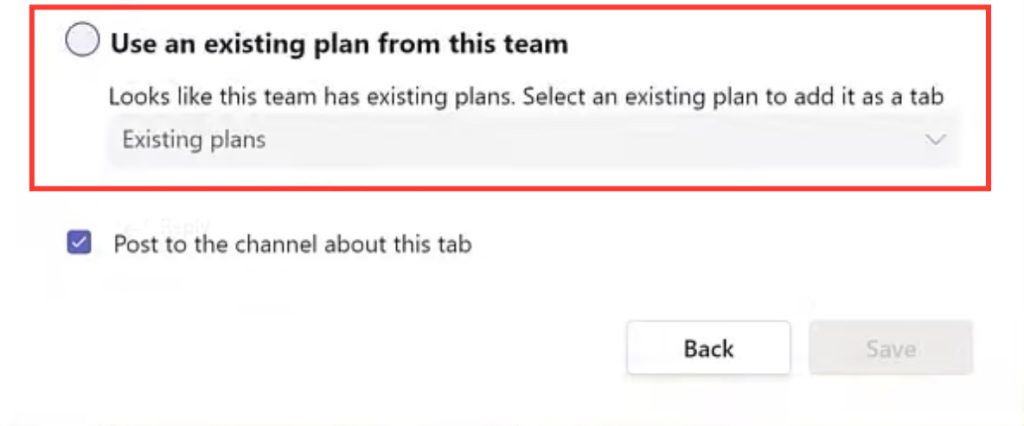
- From the options provided, I select “Planner” and then choose the “Use an existing plan from this team” option.
- A dropdown menu surfaces, showcasing all the available plans. I select the one that fits the bill and then click on “Save.”
And there I have it, the existing plan is now part of the Teams channel. By doing this, I ensure that the work my team has already invested into structuring tasks and objectives is not duplicated, but instead, leveraged to continue our momentum. Additionally, by posting about the new Planner tab in the channel, I make sure the entire team is clued-in and ready to collaborate on the existing framework.
Organizing Tasks Efficiently
Tip #1: Create Buckets for Each Stage of a Project
One of the first steps I recommend for organizing tasks within Planner in Teams is to create Buckets for every distinct stage of a project. This approach helps in neatly dividing the work and simplifying the project’s life cycle. Here are my top tips for leveraging Buckets:
- Plan how many Buckets I need by identifying each phase of my project. This might include stages like “Ideation,” “Development,” “Testing,” and “Deployment.”
- Assign clear and descriptive names to each Bucket to reflect the phase or type of tasks it contains.
- I avoid overcomplicating the structure. Too many Buckets can be just as confusing as too few.
- Use drag and drop to move Task Cards between Buckets as the project progresses and phases change.
By doing so, I can visually map out the flow of the project, and my team can quickly see what needs to be tackled next. It helps eliminate any redundant processes and keeps everyone aligned on the project’s status and timelines.
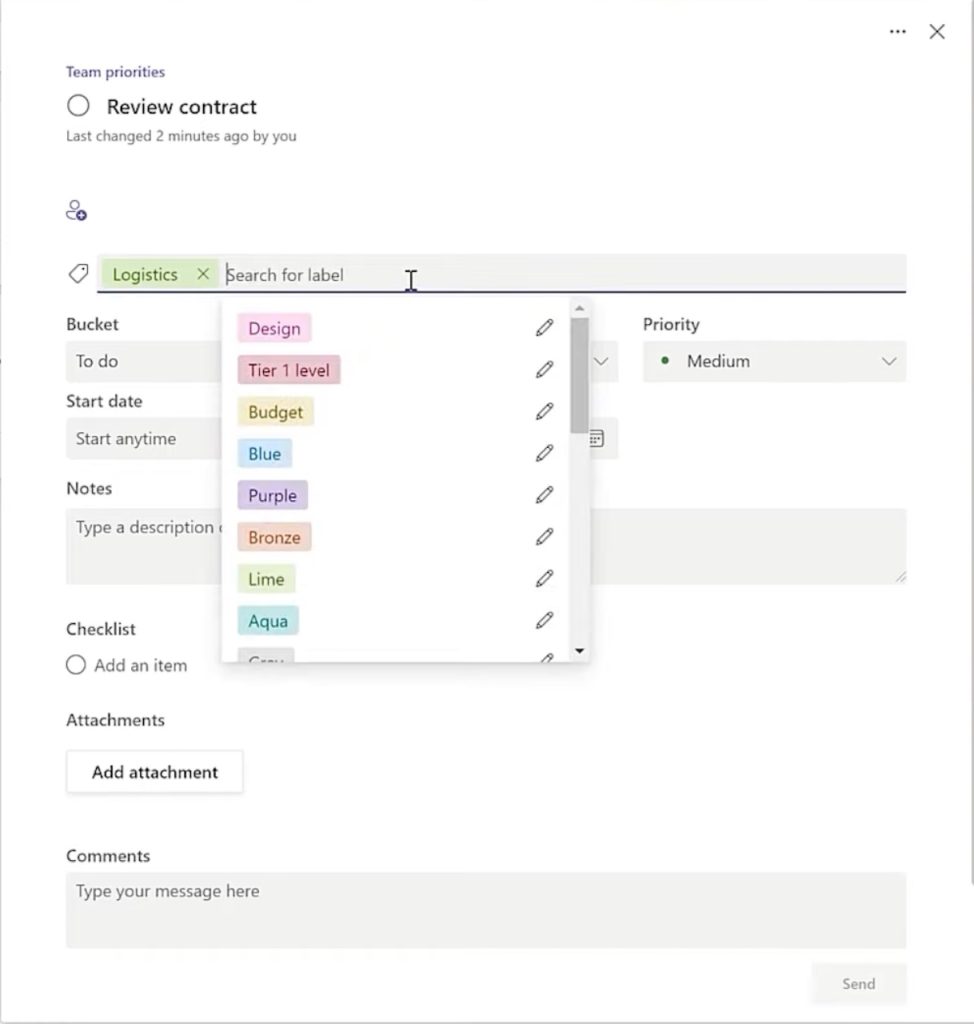
Tip #2: Organize Tasks Using Cards and Labels for Better Clarity
For better clarity in our projects, using Task Cards and Labels within Planner is a game-changer. Here’s how I bring order to the potential chaos:
- Task Cards represent individual tasks, and I make sure each card details clear action items so there’s no ambiguity about what to focus on.
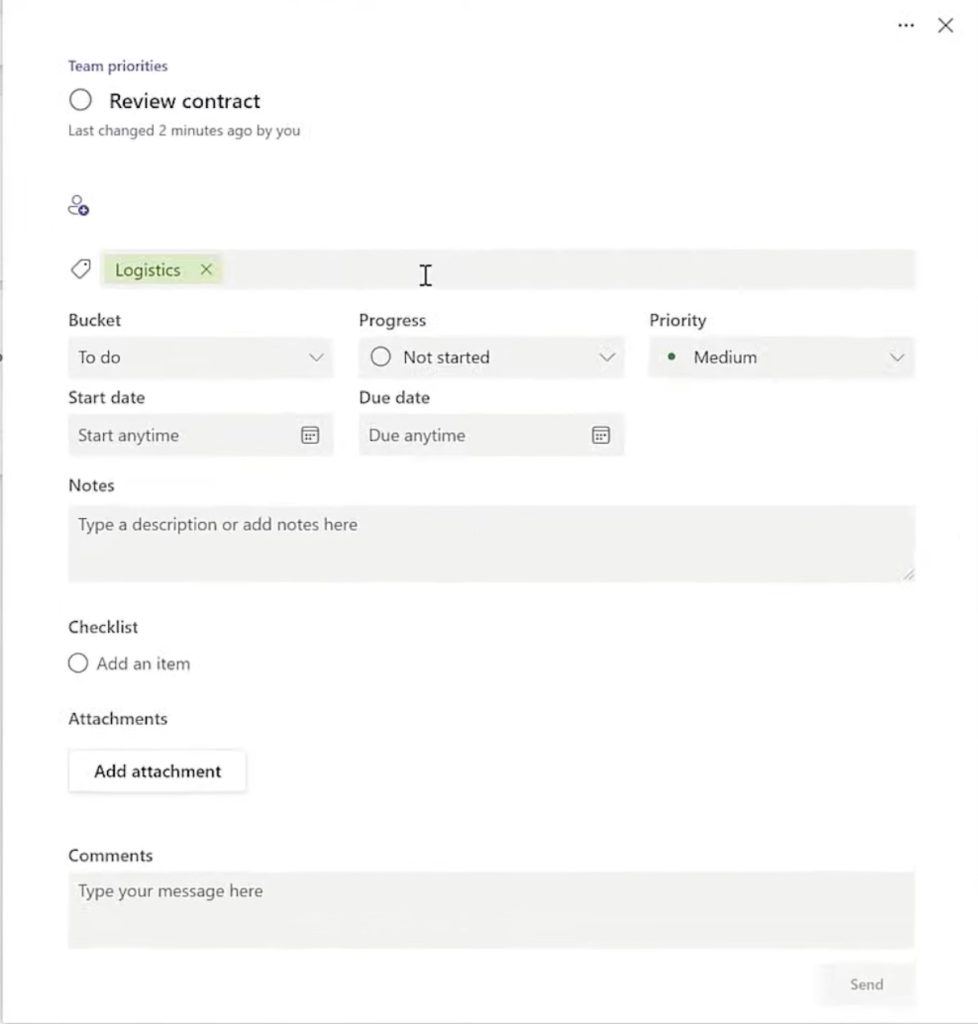
- I use Labels to color-code and filter tasks across different Buckets, saving time and ensuring nothing gets missed. For instance, I might tag urgent tasks with a red label to emphasize their priority.
The visual cues from color-coded labels offer an intuitive method for identifying task status at a glance. This strategy enables me and the team to focus our efforts and manage time effectively, ensuring that the most pressing tasks are completed first. Just as important, it also makes our weekly review meetings more efficient, as we can swiftly assess which tasks to address.
The key advantages are:
- Prioritization: High-priority tasks are instantaneously recognizable.
- Categorization: Assigning Labels based on task type, department, or project phase allows for quick filtering.
- Visibility: The whole team can easily see task status and understand workloads.
For more effective task organization, we might consider tagging quick wins as “low effort,” or long-term projects as “high effort,” enabling easier delegation and balanced workloads.
In the end, these cards and labels allow us and our teams to cut through the noise and focus on what’s truly crucial for our project’s success.
Collaboration and Communication Made Simple
#4 Work Together Effortlessly with Team Members
Working together with our team members is often synonymous with navigating a complex web of interactions and activities. But when we use Planner within Microsoft Teams, we have the opportunity to simplify this process.
The integration of Planner into Teams allows us to assign tasks directly to team members, which then show up in their calendars. We can also add comments to tasks, ensuring that all relevant information and dialogue remain attached directly to the relevant action item.
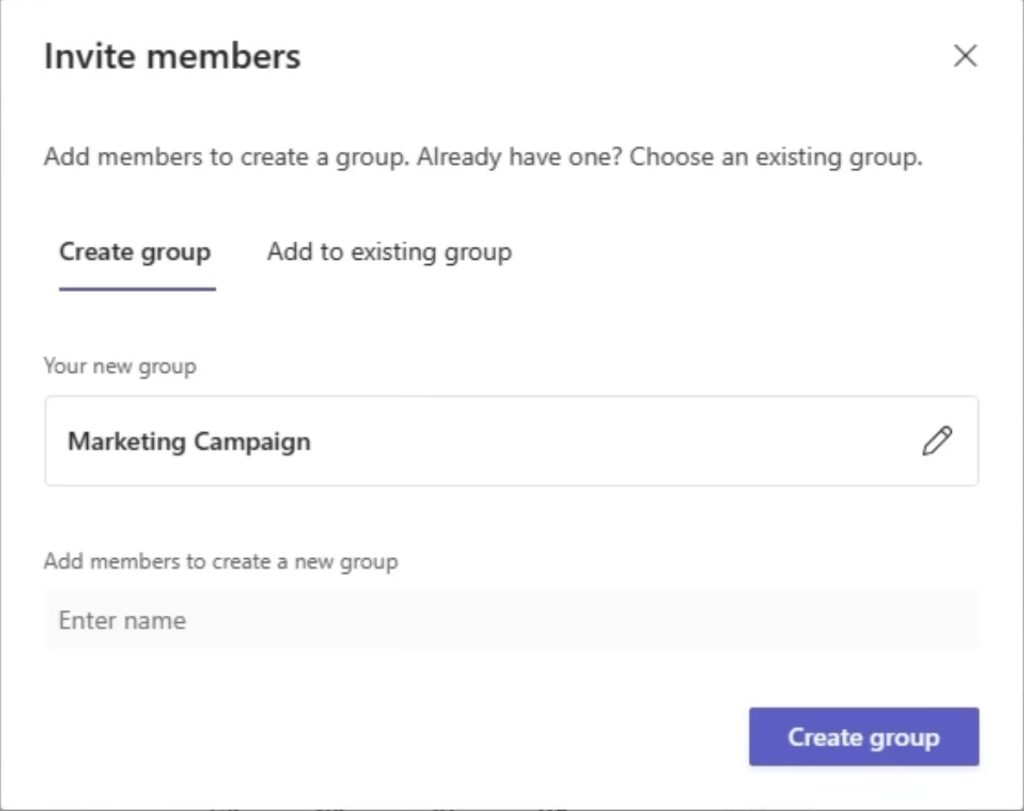
Moreover, Planner’s Group feature enables us to organize tasks by department or project team, allowing for easy visualization of who’s responsible for what. This way, we can delegate effectively, based on individual team members’ strengths, availability, and workload.
By making the most out of these collaborative tools, we break down silos and enhance teamwork, which leads to:
- A unified workflow where all actions and updates are centrally located.
- Reduced miscommunication, as tasks and instructions are clear and contextual.
- An inclusive work environment that fosters responsibility and accountability among all team members.
With these elements in place, we pave the way for a more effortless collaboration, one where team effort is channeled towards achieving common goals.
@mentions: Keeping Everyone in the Loop for Increased Accountability
Keeping every team member in the loop is crucial, and with @mentions in the Planner inside Microsoft Teams, we elevate accountability to a new level. By simply typing the “@” symbol followed by a team member’s name in task comments or updates, I instantly alert them to the message.
This feature ensures that:
- Team members receive immediate notifications, so critical updates don’t get overlooked.
- Everyone knows who is responsible for what, as specific individuals can be tagged in the context of a task.
- There is a seamless back-and-forth communication on task specifics, leading to quicker resolutions.
I find that @mentions are particularly beneficial during multi-faceted projects with various moving parts. They foster an environment where everyone is updated and can contribute effectively, reinforcing the sense of shared responsibility within the team. This results in increased engagement and ownership over tasks, driving the collective push towards project completion.
Advanced Task Management Features
Setting Notifications to Never Miss a Beat
Staying on top of our tasks is a breeze with Planner’s notification settings. I make it a point to tailor these notifications to ensure that I’m alerted about the updates that matter most, without being overwhelmed by a constant stream of alerts.
Here’s how I manage it:
- I select the Settings gear icon within Planner and head over to the Notifications section.
- I’m presented with a range of options—such as getting notified when a task is assigned to me or when there is a change in a task’s progress.
- I make my selections by selecting or clearing checkboxes to fine-tune the notifications I receive, and then I save my preferences.
These tailored notifications allow me to:
- Stay informed on pertinent changes without the clutter of non-essential alerts.
- Respond swiftly to updates on tasks I’m assigned to or have commented on.
- Make informed decisions about my prioritization based on real-time information.
Task notifications are seamlessly integrated into my Teams activity feed, so whether I’m at my desk or on the go with my mobile, I never miss a beat. This thoughtful way of keeping updated ensures that critical tasks are not only noticed but also actioned promptly.
Tracking Progress with Visual Dashboards for 100% Visibility
Visibility is paramount in project management, and visual dashboards in Planner give us just that—100% visibility over our team’s progress. This tool transforms intricate project data into easy-to-read charts and graphs that keep the entire team aligned on our goals.
Let’s take a closer look at what these dashboards offer:
- Chart View: Here, I see exactly how many tasks are in progress, pending, or completed. This immediate visual representation helps me gauge if we’re on track or need to pivot our strategy.
- Bucket Progress: At a glance, I can assess how each section of the project is advancing. This instant snapshot aids in pinpointing phases that may require additional resources or support.
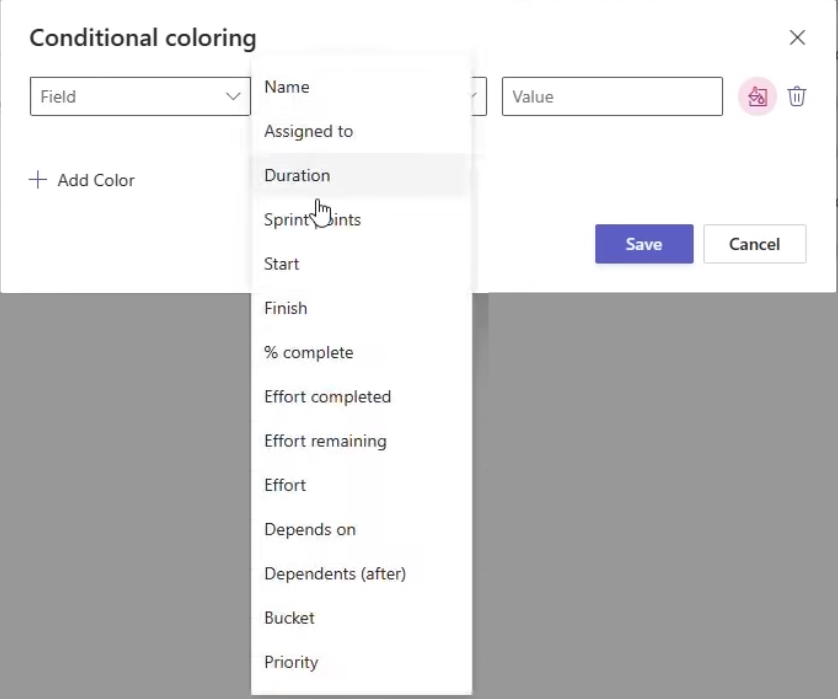
- Status Updates: Tasks can be color-coded based on their status which offers a visually impactful means of seeing which stage every task is in. This helps our team prioritize effectively.
By regularly checking these visual dashboards, I ensure that myself and all team members have a clear understanding of our project’s big picture. Additionally, when everyone has access to these insights, it fosters a collective responsibility that can be a powerful motivator to push a project over the finish line.
Customization and Personalization Tips
Tip #5: Personalize Your Overview with Smart Backgrounds
Adding a personal touch to the workspace can improve our interaction with the tools we use daily. In Planner within Teams, we can personalize our overview with smart backgrounds, making the visual aspect of our plans not just functional but also visually engaging.
Smart backgrounds can do the following:
- Reflect the nature or mood of the project, which could boost team morale and create a visual connection with the work at hand.
- Enhance ease of navigation by distinguishing between multiple plans through visual cues.
When I choose a smart background, I think about what visuals might inspire or bring clarity to my team. Perhaps a calm blue for strategic planning or an energetic orange for a product launch team. This personalization lends itself to creating an inviting and customized experience that aligns with our project or team identity.
To change the background, I click on the Plan settings and select “Change theme.” From there, a palette of backgrounds becomes available for me to select one that aligns with our project’s essence.
Remember, small details can make big differences in our daily workflows, and a pleasing aesthetic can be just the subtle morale boost our team needs to kick productivity up a notch.
Tip #6: Utilize the Planner File Store for Centralized Document Management
Centralized document management is critical for maintaining project coherence, and the Planner in Microsoft Teams excels at this with its file store feature. Here’s how I make full use of it:
- Within a task, I effortlessly upload and attach files directly from my computer or SharePoint. This draws all necessary documents into one, easily accessible location.
- Our team’s collaborative efforts are bolstered as any member can access, modify, or add documents, with every change saved in real-time—a true game-changer for maintaining document version control.
- Large, scattered email threads with attachments become a thing of the past. Instead, all documents related to a task are neatly housed under it in Planner.
The Planner File Store becomes our project document repository ensuring that the latest versions are always at our fingertips. When this is integrated within our Teams workspace, we have a powerful, unified environment for managing our tasks and their associated documents.
Here is what stands out for me:
- Efficiency: Time spent searching for documents is significantly reduced.
- Version Control: Only the most current document versions are used, avoiding any confusion.
- Collaboration: Seamless document sharing and editing improve teamwork and productivity.
I recommend maintaining a consistent naming convention and organizing files in a logical hierarchy for even smoother navigation. It’s important to outline best practices for your team to ensure that the Planner File Store is kept organized and that everyone knows how to find the documents they need.
Streamlining Your Workflow
Integrating To Do Lists from Planner into Microsoft Teams
Integrating To Do lists from Planner into Microsoft Teams has become second nature for me and it should for anyone aiming for peak productivity. This integration brings individual and team tasks all into one view, making my daily planning seamless and efficient.
Here’s how I bridge this integration:
- Under the “Tasks” section in Teams, I can see everything that’s on my plate from both Planner and To Do. This unified view prevents me from toggling between apps, maintaining my focus and workflow.
- Assigning tasks to specific team members sends them automatically to their To Do lists, ensuring that personal accountability aligns perfectly with our collective goals.
By using this interconnected system, I ensure a high level of synchronization within our team. We can see our individual tasks and understand how they fit into the bigger project scope, thereby aligning our personal to-do’s with our team objectives. This consistency and visibility help us manage our time and workload more effectively.
View and Manage All Assigned Tasks to Plan Your Day Effectively
Managing my daily workload with Planner in Microsoft Teams significantly improves my time-management skills. Within the platform, I can view all my assigned tasks and plan my day effectively using the “Assigned to me” and “My Tasks” views.
These views streamline my planning by allowing me to:
- Quickly identify what tasks I need to tackle on any given day.
- Determine priorities by sorting tasks based on due dates, urgency, or the order assigned by the team leader.
Moreover, I can update the status of tasks as I progress through the day, indicating to my teammates in real-time which tasks are in motion and which are completed. This practice enhances our team’s dynamic by keeping everyone informed and allowing us to adjust our plans as needed based on everyone’s progress.
With everything in one place, I find it easier to focus on what’s crucial—delivering quality work on time. And in the event of any unexpected changes, I can rapidly reassign tasks to balance the workload across the team. By starting each day with a review of my “Assigned to me” section, I gain clarity on my deliverables, empowering myself to be proactive and strategic with how I approach my work.
FAQs about Using Planner in Microsoft Teams
What Are the Key Differences Between Microsoft Lists, To-Do, and Planner?
Microsoft Lists, To-Do, and Planner each serve unique functions within the Microsoft 365 suite. Here’s the gist of their differences:
- Microsoft Lists is designed for tracking and organizing information. It’s ideal for creating repositories such as client databases, inventory, or company resources. You can think of it as a customizable list-making tool that integrates with SharePoint and Teams.
- Microsoft To Do is focused on managing personal tasks. It’s a daily planner that integrates with your Outlook tasks, allowing you to keep track of your individual to-dos, set reminders, and prioritize your workflow.
- Microsoft Planner is tailored for team-based project management. It allows us to create Kanban-style boards, assign tasks to team members, set deadlines, and monitor the progress of a project using visual dashboards.
Choosing between these applications depends on whether the task at hand is personal, requires complex datasets, or involves collaborative workflows.
How Can I Manage My Planner Notifications Within Teams?
To manage my Planner notifications within Teams, I follow a few easy steps:
- In Microsoft Teams, I click on the ellipsis (…) next to the Planner tab within the relevant team and select “Manage notifications.”
- From here, I can configure the types of notifications I want to receive, such as when a task is assigned to me or when someone comments on a task I’m following.
This approach keeps me informed without overwhelming my inbox, ensuring that I remain focused on what’s crucial. Remember, the goal is to receive just enough notifications to stay updated, not so many that I’m distracted.
Can Planner Integrate With Other Microsoft 365 Applications for Improved Workflow?
Absolutely, Planner integrates brilliantly with other Microsoft 365 applications, optimizing our workflows significantly. Here’s the scoop:
- Tasks in Planner can show up in Outlook calendars, offering a unified view of my deadlines alongside other commitments.
- Notes from OneNote can be attached to Planner tasks, centralizing our meeting notes and action items.
- Using Power Automate (formerly Microsoft Flow), I can set up custom workflows—like moving tasks to different stages based on set criteria or triggering notifications across platforms.
This level of integration creates a seamless ecosystem where data flows between apps, promoting efficiency and minimizing the need for duplicative work. These connections empower us to focus more on the task at hand rather than how it’s managed.
Any Tips for Using Planner During Remote Meetings or Events Planning?
Indeed, when we’re planning events or having remote meetings, leveraging Planner within Microsoft Teams is exceptionally rewarding. Here are my go-to tips:
- Pre-Meeting: I create tasks for all agenda items and assign them to participants before the meeting. This way, everyone comes prepared with their updates or materials.
- During the Meeting: We use the Planner board to guide the meeting, updating and moving tasks as we discuss each point. It ensures we cover everything and that resolutions are captured in real time.
- Post-Meeting: I review the plan to ensure all completed tasks are marked off and any new tasks are added. This follow-up solidifies the meeting outcomes and sets clear expectations for the next steps.
Planner’s real-time collaboration feature shows updates instantly, which is essential for maintaining momentum during discussions. By integrating it into our remote meetings and event planning strategy, we tap into Planner’s power to create structured, actionable, and trackable plans without ever leaving our Teams environment.
John Michaloudis is a former accountant and finance analyst at General Electric, a Microsoft MVP since 2020, an Amazon #1 bestselling author of 4 Microsoft Excel books and teacher of Microsoft Excel & Office over at his flagship MyExcelOnline Academy Online Course.


