Imagine setting up a presentation that runs by itself, smoothly transitioning from one slide to the next without you having to lift a finger. That’s the magic of PowerPoint Auto-Play. You simply determine the sequence and timing once, and PowerPoint takes it from there, keeping your audience engaged with a seamless flow of slides.
Download our 141 Free Excel Templates and Spreadsheets!
Key Takeaways
- Timing is essential when configuring PowerPoint slides to play automatically; select appropriate intervals that allow your audience to fully comprehend the information on each slide.
- Apply consistent transition effects to all slides when setting them up to auto-play, which contributes to a cohesive and professional-looking presentation.
- Always test your presentation after enabling the auto-play feature to ensure smooth operation and to make any necessary timing adjustments for an engaging audience experience.
Why embrace the ease of automatic slides
Gone are the days of fumbling with clickers or rushing back to your laptop to advance a slide. Embracing automatic slides isn’t just about simplicity – it’s about presenting with sophistication and ensuring your message is delivered without hiccups. They let you direct the audience’s focus, narrate your story smoothly, and by automating the mundane, you get to concentrate on engaging directly with your audience. Plus, you’ll look like a tech-savvy presenter who’s confident and in control. With Auto-Play, your presentations come to life as a well-rehearsed show that impresses and informs.
Table of Contents
Setting Up Your Slides for Auto-Play
Choosing the right slide timings for your presentation
Choosing the right slide timings is akin to perfecting the pace of a dance – too fast, and your audience misses the steps; too slow, and they lose interest. The key is to match the rhythm of your content with the intended flow of your presentation. Consider the complexity of each slide and the time it takes to absorb the information. If there’s rich content or data, give your audience a longer pause; if it’s a simple transition or an image, a shorter stay may suffice.
As you prepare, remember to anticipate the moments in your speech that need emphasis, and adjust your slide timings to allow space for those moments to breathe. Practice makes perfect, and by running through your presentation several times, you’ll get a sense of the natural timing that keeps your audience on track with your narrative.
Step-by-step Guide on PowerPoint Auto-Play
STEP 1: Open your PowerPoint presentation.
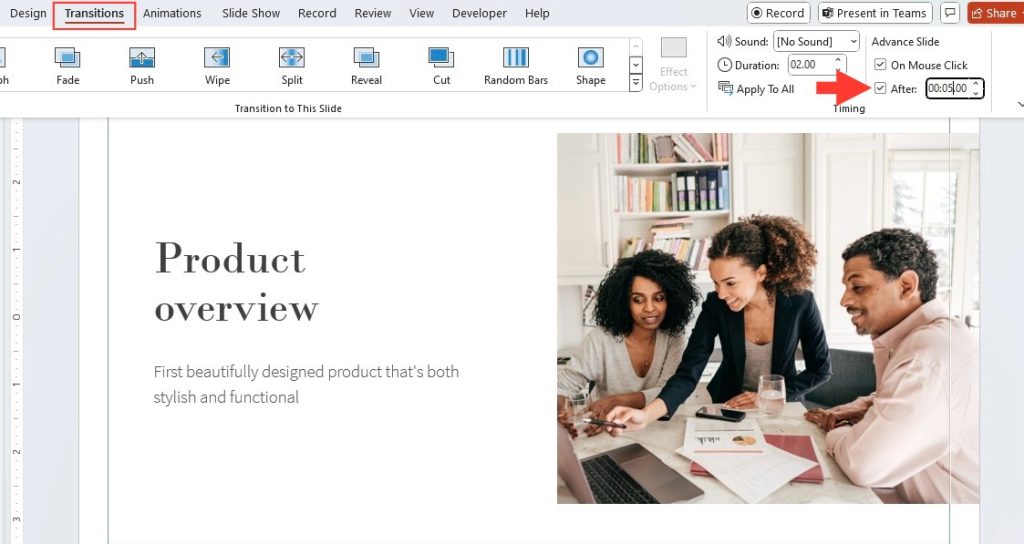
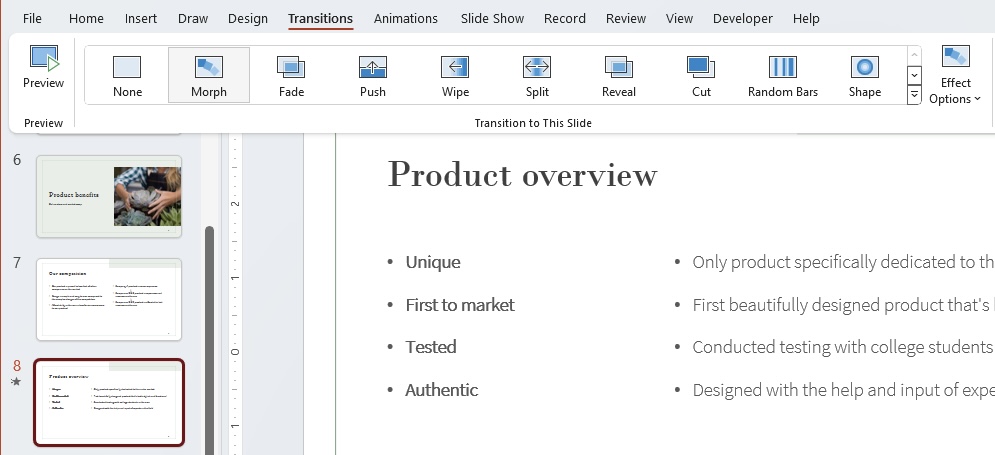
STEP 2: Select the slide where you would like the automatic playback to start from > Navigate to the “Transitions” tab in the PowerPoint ribbon.
STEP 3: In the “Timing” group, locate the “After” checkbox.
STEP 4: Check the “After” box to enable automatic slide advancement > Enter the amount of time you want to elapse before the slide advances in the field next to the “After” checkbox.
STEP 5: For example, enter “00:05.00” to advance after 5 seconds.
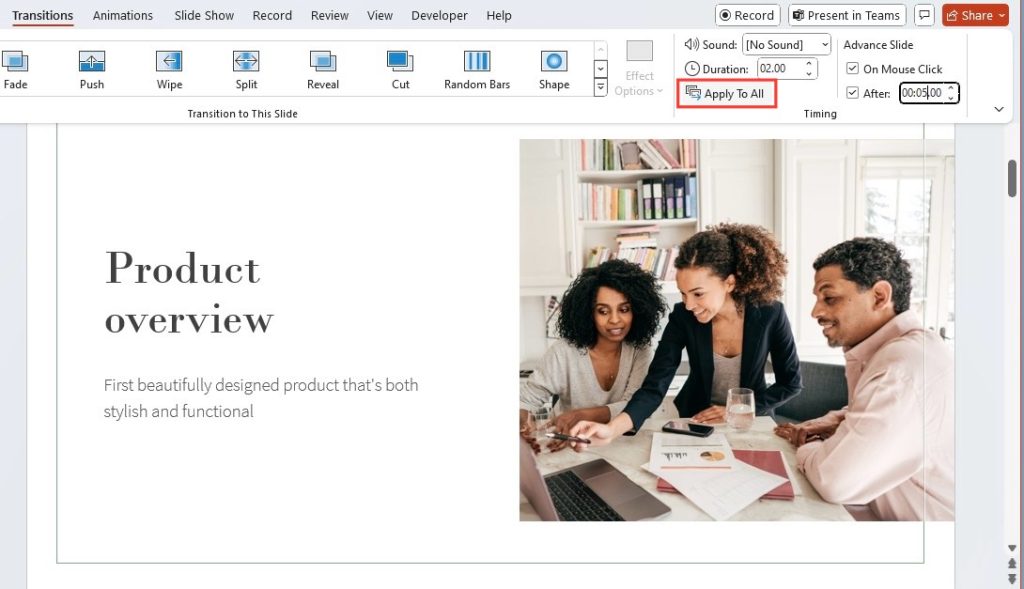
STEP 6: Repeat these steps for each slide that you want to auto-advance > To apply the same timing to all slides, click “Apply To All” after setting the timing for one slide.
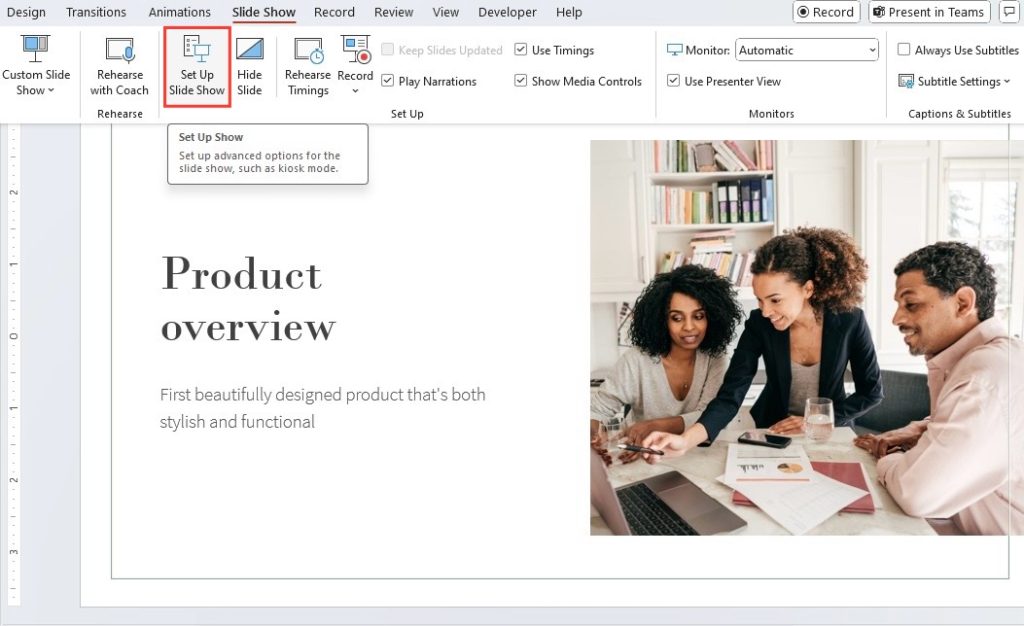
STEP 7: Once all timings are set, click on the “Slide Show” tab in the ribbon > Choose the “Set Up Slide Show” button in the “Set Up” group.
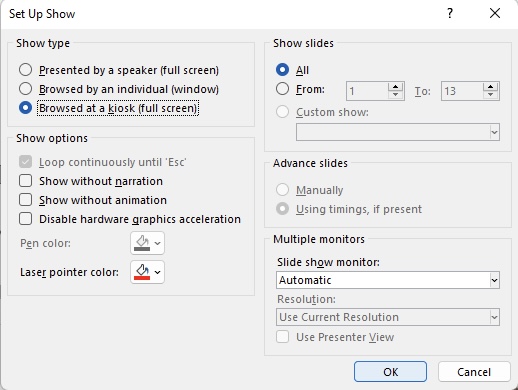
STEP 8: In the dialog box that opens, select “Browsed at a kiosk (full screen)” under the “Show options” to ensure slides play continuously > Click “OK” to close the dialog box.
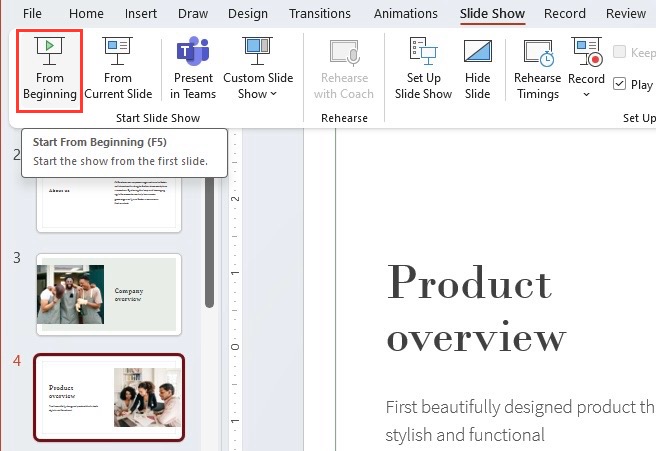
STEP 9: To test the automatic playback, click on “From Beginning” in the “Start Slide Show” group under the “Slide Show”
Remember to save your presentation to keep the timing settings.
Adding seamless transitions between slides
Transitions are the choreography that connects each piece of your presentation together, so adding seamless transitions between slides is vital. A smooth fade or an elegant wipe can keep your audience focused, while a more dramatic transition like a 3D cube or airplane might be used sparingly to signify a new section or topic.
To maintain a professional edge, consistency is key. Select a transition style that complements the tone of your presentation and apply it throughout to maintain that seamless feel. Don’t forget, PowerPoint’s ‘Apply To All’ function is your ally here, ensuring uniformity with just a click, so every slide glides effortlessly into the next, maintaining momentum and keeping your audience immersed in your narrative.
Elevating Your Presentation
Incorporating audio and video for a dynamic experience
Breathing life into your presentation is effortless when you incorporate audio and video for a dynamic experience. A well-placed video can break up the monotony of static slides, providing visual interest or demonstrating a point more powerfully than text alone. Likewise, background music or sound effects can set the mood or underscore key messages without distracting from your spoken words.
Remember to keep the multimedia relevant to your content, ensuring that every auditory or visual element serves a purpose in reinforcing your message. When executed with thoughtfulness, audio and video can transform a standard presentation into an engaging storytelling experience that captures and holds your audience’s attention from start to finish.
Tips for embedding multimedia without hiccups
To ensure your multimedia adds to the presentation rather than detracts from it, plan for a hiccup-free experience with these simple tips:
- Test Compatibility: Before the big day, verify that the video and audio files are compatible with PowerPoint and the presenting computer’s operating system.
- Keep Files Accessible: Embed the files directly into your presentation or have them in the same folder as your PowerPoint file to avoid broken links.
- Optimize Media: Use video and audio clips that are of high quality but optimized for size so as not to slow down your presentation.
- Avoid Auto-Play Glitches: If your slideshow is set to auto-play, remember that interactive elements like hyperlinks may not function as intended. Instead, use QR codes for a call to action, and ensure they are displayed for enough time.
- Use Built-in Tools: Trim your audio and video files using PowerPoint’s built-in features for a tailored experience that feels professionally edited.
By keeping these guidelines in mind, you can confidently embed multimedia elements knowing they’ll enrich your presentation and delight your audience.
Advancing Beyond the Basics
Exploring advanced autoplay features in PowerPoint
PowerPoint’s toolbox is brimming with advanced autoplay features that can add polish and depth to your self-running presentation. Dive into the timings feature to customize the duration of each slide or transition to match your script or music precisely. Explore action buttons or hyperlinks that, while not usually triggered in autoplay mode, can provide interactive options for users viewing the presentation on their own.
Don’t shy away from delving into the animation pane where you can sequence intricate animations for text and images that coincide perfectly with your slides auto-transitioning. This level of detail gives you the flexibility to craft a presentation that does more than just progress slides; it tells a compelling, dynamic story — all on its own.
How to handle looping and interactive elements
When handling looping and interactive elements, there’s a fine balance between repetition for impact and overkill that can lead to disengagement. Looping your presentation ensures that no one misses the key points, which is especially useful in settings like trade shows or information kiosks where viewers come and go.
To set up a loop, access the ‘Slide Show’ tab, click on ‘Set Up Slide Show’, then check the ‘Loop continuously until ‘Esc” option. While looping, it’s usually best to keep interactive elements minimal to prevent any disruption in the flow; however, adding a QR code can encourage interaction without the need for direct input on the slideshow itself.
Remember that while your presentation can loop indefinitely, attention spans will not. Craft every cycle of your slideshow with the same care as the first run-through, ensuring each loop is just as engaging as the last.
How to Stop GIFs in PowerPoint Presentations
Practicing for Perfection
The importance of practicing with auto-play presentations
Practicing with auto-play presentations can make the difference between a good presentation and a great one. While the slides glide by on their own, you still need to synchronize your spiel to the rhythm of the show. Rehearsals can help you internalize the timing, allowing you to pace your delivery effectively, making your points emphatically as the slides reinforce your message.
This practice is not just about memorization; it aids in refining the timings, fine-tuning transitions, and providing you with the comfort of knowing the content like the back of your hand. As such, when presentation day arrives, you’ll be able to navigate your auto-playing slides with confidence and charisma, fully assured that your timing is spot on.
Recording your performance for timing accuracy
Recording your performance can be a game-changer for timing accuracy in your automated presentations. When you record, you’re not just capturing the audible elements of your delivery, but also the subtleties of pacing and pauses that make your presentation come to life. By rehearsing with the recording tools, you catch timing misalignments that could trip up your flow during the actual delivery.
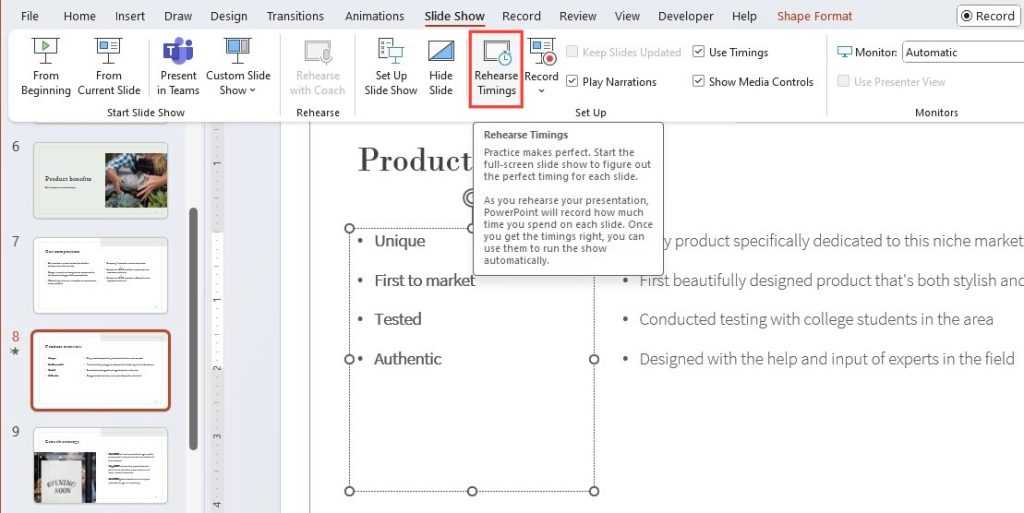
Use PowerPoint’s ‘Rehearse Timings’ feature to navigate through your slides, giving you a close approximation of how the final performance will feel. Afterwards, review the recording to ensure that your spoken words don’t race ahead or lag behind the visuals. With this invaluable feedback, you can fine-tune each slide’s duration, mastering the harmony between your narrative and the slides’ progression.
Alternatives to PowerPoint Auto-Play
Free tools that rival PowerPoint’s autoplay feature
While PowerPoint is a heavyweight in presentation software, several free tools offer similar, if not quite inventive, autoplay features that are worth considering. Google Slides, for example, provides a no-cost alternative with easy sharing capabilities, ideal for collaboration. Prezi is another option that brings a dynamic zooming effect to your presentations, creating a narrative journey for your audience.
Canva‘s presentation maker is user-friendly and packed with stunning design templates, making it simple for those with an eye for aesthetics but perhaps not as much technical know-how. And LibreOffice Impress offers a cross-platform solution with autoplay features that can hold its own against the mainstream.
By exploring these alternatives, you may discover a tool that resonates better with your needs or the specific requirements of your project.
Converting presentations for cross-device compatibility
Ensuring your presentation looks great regardless of where it’s played is paramount. Converting presentations for cross-device compatibility means taking steps to maintain visual integrity and functionality when transitioning from a laptop to a tablet, or from Windows to macOS.
PowerPoint itself offers options to save presentations as videos or PDFs, which are widely viewable on multiple devices without the need for PowerPoint software. For a more collaborative angle, platforms like Google Slides, accessible through a web browser, ensure that anyone with the link can view your presentation without compatibility issues.
When converting, double-check formatting, media playback, and interactive elements to ensure everything translates well across different platforms. A little time spent on conversion can save you from potential display hiccups, making sure your presentation hits the mark every time.
Final Touches Before Showtime
Ensuring your slideshow is ready to start automatically
To guarantee your slideshow starts automatically without a hitch, double-check your settings. Start by going to the ‘Slideshow’ tab and selecting ‘Set Up Slide Show.’ Pick ‘Browsed at a kiosk’ to loop it continuously, and ensure ‘Using Timings, if present’ is selected so the slides advance on their own.
It’s not just about the settings, though. Verify that your first slide is designed to welcome your audience and indicate that the presentation will begin momentarily—it’s a small touch that sets the professional tone. Lastly, confirm that all multimedia elements play correctly and all fonts and images are displaying as intended. With these final checks, you can rest easy, knowing your presentation is set to dazzle from the start.
Quick checks before your effortless presenting debut
Before you step into the spotlight, performing a few quick checks can ensure your effortless presenting debut is flawless. Start by ensuring the projector or screen you’re using is functioning properly and that it’s connected to your computer. Then, confirm that the sound (if you’re using audio) is at the right level and the speakers are working correctly.
Review your slide settings one final time to verify that auto-advance and timings are as you’ve set them. Conduct a brief run-through if possible, to see everything in action. Finally, have a backup plan ready; whether that’s a printout of your slides or a copy of the presentation on a USB drive, being prepared for the unexpected will help you maintain your cool.
Remember, a smooth performance is all about preparation, and these last-minute checks are your final rehearsal for showtime excellence.
FAQ: Mastering PowerPoint Auto-Play
How can I set my PowerPoint presentation to auto-play?
To set your PowerPoint presentation to auto-play, open your slideshow, go to the ‘Slide Show’ tab, and click ‘Set Up Slide Show. Select ‘Browsed at a kiosk’ for full automation. This will loop your presentation, moving through each slide based on your set timings. If you haven’t preset timings, go to ‘Transitions’, uncheck ‘On Mouse Click’ and set the ‘After’ timer for automatic advancing. Don’t forget to save your settings!
Can I make my PowerPoint slides advance automatically with sound?
Absolutely! To have your PowerPoint slides advance automatically with sound, first ensure your audio file is embedded in the slide. Then, go to the ‘Animations’ tab, select ‘Animation Pane’, and set the sound to start ‘With Previous’, aligning it with the slide transition. Adjust the slide advance timing under the ‘Transitions’ tab to match the length of your audio for a seamless experience.
What are some common mistakes to avoid with auto-play presentations?
A few common pitfalls to sidestep with auto-play presentations include setting slide durations too short, which can rush your audience, or too long, which might bore them. Also, avoid overusing fancy transitions and animations that can distract rather than enhance your message. Neglecting to test your presentation on the actual hardware you’ll be using can lead to unexpected tech hiccups. Lastly, forgetting to embed your fonts and media directly into the PowerPoint file can result in missing content when you switch devices.
Is it possible to export an auto-playing PowerPoint to video format?
Yes, you can export an auto-playing PowerPoint to video format. Just go to the ‘File’ tab, choose ‘Export’, select ‘Create a Video’, and choose your desired video quality. Ensure your timings and narrations are in place if you want them included. Once settings are adjusted, click ‘Create Video’, name your file, and save it in your preferred location. Your presentation will be saved as a video file, ready to play back with all the auto-advance timings intact.
John Michaloudis is a former accountant and finance analyst at General Electric, a Microsoft MVP since 2020, an Amazon #1 bestselling author of 4 Microsoft Excel books and teacher of Microsoft Excel & Office over at his flagship MyExcelOnline Academy Online Course.

