Download our 101 Advanced Excel Formulas & Functions Examples!
Key Takeaways
- Utilize specialized recovery software like PowerPoint Recovery Tool which allows users to detect, preview, and save repaired or recovered PowerPoint slides, even if they are corrupted or damaged.
- Ensure that the AutoRecover feature in MS PowerPoint is enabled, which frequently saves backup copies that can be retrieved from the AutoRecover folder following the specific directory path provided in the PowerPoint settings.
- For users with a OneDrive account, there is a possibility to recover deleted slides through the platform’s version history or backup features, which can serve as an additional safety net for lost files.
Common Scenarios for Slide Deletion
It’s not uncommon to face situations where you might accidentally delete a slide or two. Maybe you’re trimming down a lengthy presentation and unintentionally remove something important. Or perhaps in the midst of a team collaboration, slides get lost or overwritten by mistake. Power outages, hardware malfunctions, or software crashes can also lead to lost work, and sometimes, it’s just a matter of an unintended click or pressing the wrong key that can result in deletion.
Table of Contents
Essential Steps to Retrieve Deleted PowerPoint Slides
Utilizing the Recycle Bin
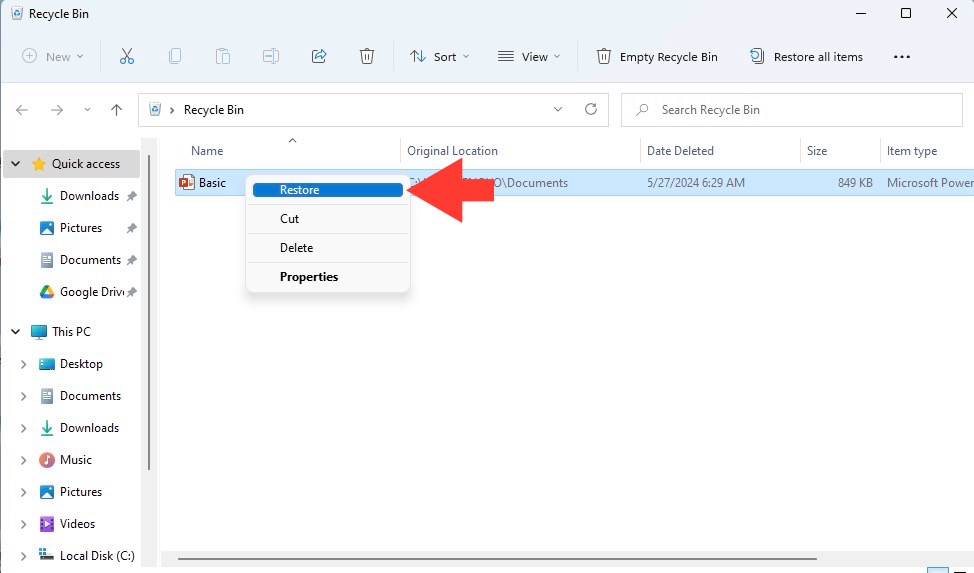
If you’re anxiously looking to retrieve that precious slide, start with the Recycle Bin on your computer – your first line of defense against accidental deletion. Just click on the Recycle Bin icon on your desktop, search for your PowerPoint file, and if it’s there, you’re in luck. Right-click on the file and select ‘Restore’ to send it sailing back to its original location. Remember, this trick works only if you haven’t emptied the bin since the deletion occurred.
Harnessing AutoRecovery Features
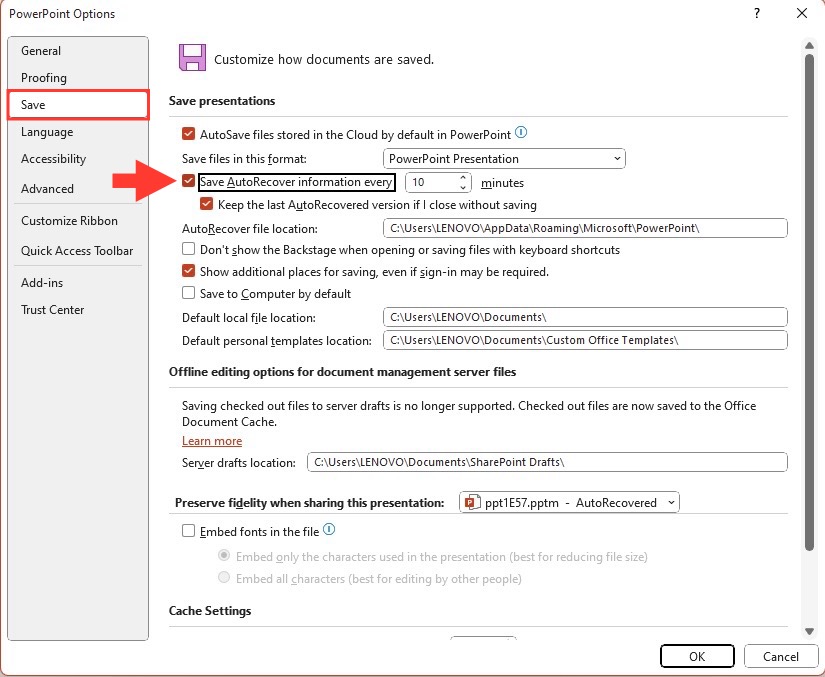
PowerPoint’s AutoRecover feature is a real lifesaver when it comes to retrieving unsaved presentations. It automatically saves a copy of your work at the intervals you specify, so even if you encounter a crash or unexpected shutdown, you’ve got a backup. To make the most of this feature, make sure it’s activated in PowerPoint’s options under Save. You can even customize the time interval for how often your work is saved. To access AutoRecover, go to File > Options > Save.
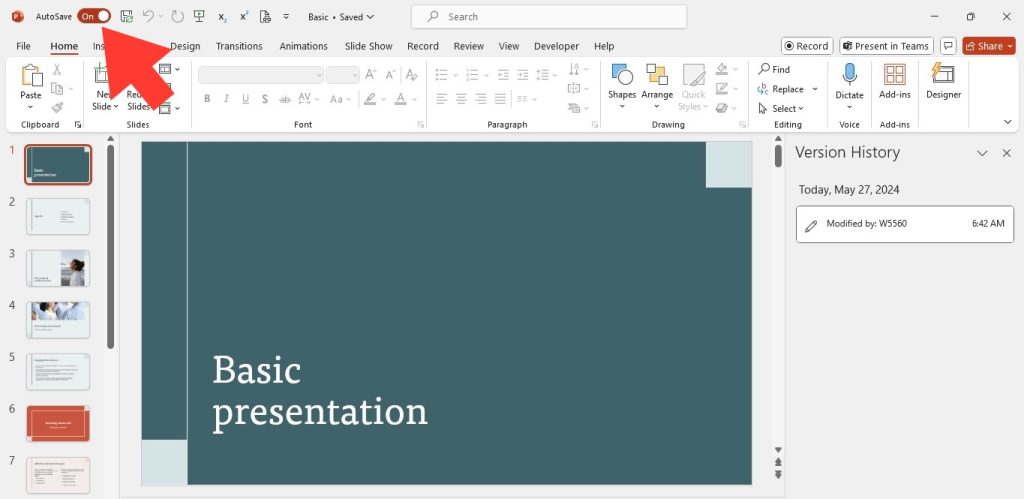
Remember, while AutoRecover is brilliant for emergencies, it’s not a substitute for regularly saving your work. Be sure to regularly hit that save button or enable AutoSave if you’re a Microsoft 365 user, which continually saves changes to your file as you work.
Advanced Recovery Solutions
Navigating Temporary Files and AutoSave Locations
Should you need to dig deeper to find your lost slides, temporary files and AutoSave locations are your next go-to spots. For Windows users, you can navigate to the folder specified by the AutoRecover file location in your PowerPoint options, often found under “C:\Users\[YourUsername]\AppData\Roaming\Microsoft\PowerPoint\”. On a Mac, you’ll look in “/Users/[YourUsername]/Library/Containers/Microsoft PowerPoint/Data/Library/Preferences/AutoRecovery”.
AutoSave, a feature available to Microsoft 365 subscribers, saves your files to OneDrive or SharePoint Online automatically. Hence, if you were working on a file sync’d with one of these services, check the file history or the online recycle bin – the previous versions of your file might just be there, waiting to be reclaimed.
To manually retrieve an AutoRecover file, try opening PowerPoint and it should present you with recovered files if there are any. If not, you can manually navigate to the AutoRecover directory and look for files with the “.tmp” extension which might be your unsaved slides.
Exploring Cloud Storage and Version History
Leveraging cloud storage solutions like OneDrive, Google Drive, and Dropbox adds an extra layer of protection for your PowerPoint slides. These services offer their version history feature, allowing you to view and restore to earlier versions of your file. You might find the previous iteration you’re longing for, or you may be able to recover a version before the deletion occurred.
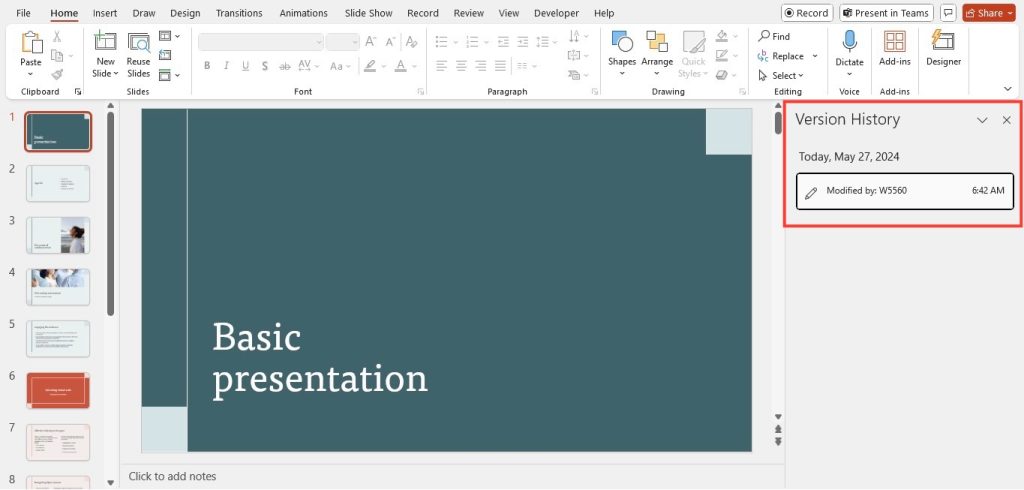
To explore version history, simply click ‘File’ > ‘Info’ > ‘Version history’ to see a list of saved versions. If working within OneDrive, right-clicking a file and selecting ‘Previous Versions’ reveals any available older versions, ready to restore with just a click.
Always ensure your cloud service’s sync feature is active while you are working, as your files are continuously updated and backed up online—this makes recovery efforts substantially easier and more reliable.
Preventative Measures to Avoid Slide Loss
Best Practices for Saving Your Work
To save your sanity along with your slides, adhere to these best practices for saving your PowerPoint work: first and foremost, make a habit of hitting [Ctrl] + [S] frequently to save your changes. It’s a quick action that can prevent a lot of grief. Additionally, get into a routine of creating backups for your files by saving them in multiple locations, such as on your local drive and in the cloud.
Consider setting reminders to save your work if you tend to get caught up in the flow and forget. Another good practice is to use versioning with your file names (e.g., presentation_v1, presentation_v2) so you can easily track changes and revert to earlier versions if necessary.
Implementing an automatic backup system on your computer, external hard drive, or cloud service is also a strong preventive measure. Your future self will thank you for the time and effort you put into keeping your work safe.
Leveraging PowerPoint’s Built-In Tools for Data Protection
Keep your precious slides under the shield of PowerPoint’s built-in data protection tools. Activate the AutoSave toggle in the menu bar to ensure your work is continuously preserved, a feature especially crucial when working on shared documents in the cloud. Furthermore, activate the AutoRecover function for a solid safety net that can catch your work should a mishap send your files into oblivion.
Investing a little time to familiarize yourself with these settings can pay dividends when you least expect it. Always close your files through the “Exit” option in the “File” menu to ensure your work is saved and synced properly. It might seem like extra steps now, but they’re invaluable habits that prevent future loss of your hard-earned slides.
Tips for Managing and Organizing PowerPoint Slides
Deleting Slides Without Losing Information
Thinking about trimming your PowerPoint presentation? Keep in mind that you can delete slides without permanently losing the content. Before hitting that delete button, consider transferring content to an appendix section at the end of the presentation or saving the slides in a separate backup file. That way, you retain access to all your original information which could come in handy for future presentations or reference.
When making deletions, review each slide carefully to ensure no essential information or linked resources are lost. You could even use the “Hide Slide” feature for slides you’re unsure about; they won’t show during the presentation but will remain in the file for potential reinstatement.
Understanding the Impact on Slide Numbering and Presentations
When you delete slides, be mindful of their impact on the overall flow and numbering of your presentation. In PowerPoint, slide numbers typically auto-update to reflect the current sequence after deletion, which keeps your presentation tidy and sequential. But this can also disrupt your narration or references made to slide numbers in speech or handouts.
To stay on top of things, check the numbering for consistency post-deletion, especially if you’ve specifically referred to slide numbers within your talk or in accompanying materials. Revisit your notes and edit any numerical references that no longer correlate with the updated slide order.
Additionally, consider the narrative sequence post-deletion. Make sure the removal doesn’t create gaps in information that would confuse your audience. If a slide with critical transition content is removed, you may need to update surrounding slides to maintain a coherent story flow.
Professional Tools and Software Aids for Recovery
PowerPoint Recovery with Specialized Software
Should all else fail, specialized PowerPoint recovery software can be your knight in shining digital armor. Programs like Easy PowerPoint Recovery are crafted to scour your storage for traces of lost or deleted presentations. They boast impressive algorithms that, more often than not, can piece together your precious work, preserving formatting, slide order, and media intact.
The beauty of these tools lies in their capacity to recover slides even from damaged, formatted, or inaccessible drives. With a full preview feature, these programs let you peek at the recoverable content before you commit to the actual recovery process, ensuring you know exactly what you’re restoring.
Always opt for reputable software solutions that prioritize the integrity of your data. And remember, the sooner you act after a file loss, the better the chances of full recovery.
When to Choose a Recovery Service Provider
If you’re struggling with complex data loss scenarios, or if the DIY recovery methods have hit a wall, it might be time to call in the pros. A recovery service provider steps in when the stakes are high: perhaps the presentation carries significant business value or contains irreplaceable research data. These services leverage advanced tools and techniques, often in a laboratory setting, to resurrect files that standard software can’t touch.
Consider a service provider when you’ve exhausted all other options, if the drive is physically damaged, or if the data loss situation is too intricate for consumer software. It’s a higher-priced route but one that maximizes your chances of recovery for truly critical data.
Before you decide, vet the service provider thoroughly for credibility and success rates, and ensure they provide a clear and transparent pricing structure.
FAQ
Can I recover a slide that was not saved before deletion?
Yes, it’s possible to recover unsaved slides if PowerPoint’s AutoRecovery feature was enabled or if you’re using AutoSave in Microsoft 365. Otherwise, you might find a temporary version in the PowerPoint autosave folder or through your cloud storage’s version history feature.
How do I restore a previous slide?
To restore a previous slide, navigate to the ‘File’ menu in PowerPoint, select ‘Info’, then ‘Version history’. Choose an earlier version that contains the slide you want to recover. If your file is saved on OneDrive, right-click on it, select ‘Version History’ and restore the desired version.
How can I prevent future loss of PowerPoint slides?
To prevent future slide loss, save your work frequently and enable AutoSave in PowerPoint if you have Microsoft 365. Use the AutoRecover feature, maintain regular backups on different devices, and consider cloud storage services for real-time syncing. Investing in reliable antivirus software and ensuring your system’s software is up-to-date are also key preventative measures.
John Michaloudis is a former accountant and finance analyst at General Electric, a Microsoft MVP since 2020, an Amazon #1 bestselling author of 4 Microsoft Excel books and teacher of Microsoft Excel & Office over at his flagship MyExcelOnline Academy Online Course.

