Losing an unsaved Excel file can be downright frustrating, especially if you’ve spent hours compiling data and running analyses. I’ve been there too, staring at my screen in disbelief, wishing there was a way to get my work back. The good news? There are a few reliable methods for recovering unsaved Excel files
In this guide, I’ll walk you through each one, so you’ll know exactly how to recover Excel file not saved by mistake.
Key Takeaways:
- AutoSave proactively backs up your work as you make changes, while AutoRecover helps restore unsaved files after unexpected shutdowns.
- Adjusting AutoSave to save every few minutes and enabling AutoRecover can prevent significant data loss.
- When the Document Recovery pane fails, searching temporary folders in your system can help locate unsaved files.
- Windows’ File History feature lets you retrieve earlier versions of Excel files, which can be a lifesaver for lost data.
- Cloud storage like OneDrive continuously backs up and syncs your files, making recovery easy in case of accidental closure or crashes.
Table of Contents
Introduction to Excel File Recovery
The Dread of Losing Excel Work
The sinking feeling that comes with the realization that hours of meticulous work might be gone in an instant is something I hope you never experience. While wrestling with complex data sets and formulas in Excel, it’s easy to forget a simple but crucial action – saving our work.
And when we encounter unexpected system crashes or power outages, the panic is real. The possibility of data loss can have significant consequences, particularly when dealing with critical financial reports or expansive datasets.
Why Excel Files May Go Unsaved
First, let’s look at why an Excel file may go unsaved. There are a few common reasons:
- Accidental Closure: You might have closed the file without saving it, especially if you’re in a hurry.
- Excel Crash: Excel sometimes crashes or freezes, often due to large datasets, complex formulas, or add-ins, causing unsaved work to be lost.
- System Shutdown: Unexpected power loss or system shutdowns can result in unsaved changes.
Understanding these situations can help you prevent them in the future, but for now, let’s focus on getting your file back.
Understanding Excel’s Recovery Features
In my experience, the integration of AutoSave and AutoRecover has been a lifesaver on numerous occasions. Essentially, AutoSave is our proactive guardian, silently working in the background. It’s handy for those instances where I’m so engrossed in my work that I forget to hit save. Automatically saving new documents that haven’t been manually saved yet acts as an interim safety net against data loss due to computer malfunctions or sudden power failures.
On the flip side, AutoRecover is the reactive hero, stepping in when I accidentally close an Excel workbook without saving or experiencing a system crash. It’s designed to help me recover the last saved version of my work. Remember, this feature depends on the fact that the document has been saved at least once; otherwise, there’s no recovery anchor point for AutoRecover to reference.
I like to envision AutoSave as a careful planner, preemptively safeguarding my progress at each step, while AutoRecover is the quick-response agent that jumps into action post-disaster. Together, they form an indispensable duo for anyone working with Excel.
Preemptive Measures to Recover Excel File not Saved
Setting Up AutoSave and AutoRecover
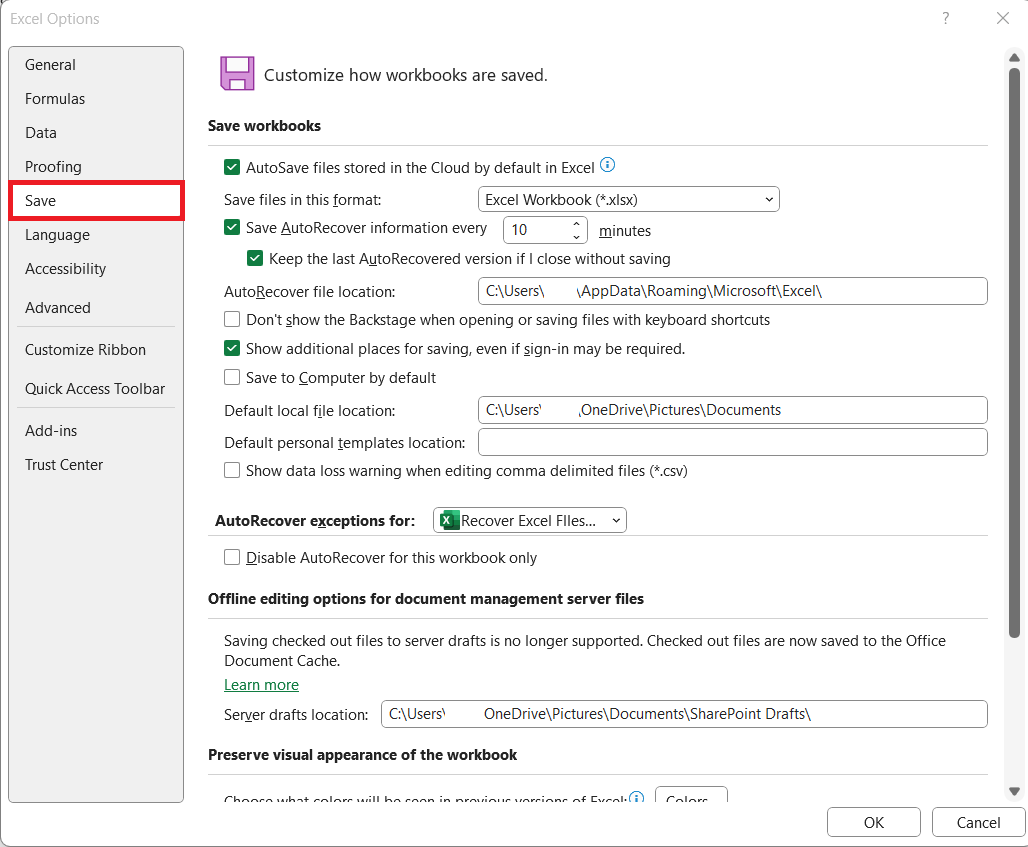
Setting up AutoSave and AutoRecover is a crucial step in safeguarding my Excel work. From the File menu, selecting Options and navigating to the Save pane gives access to modify these settings.
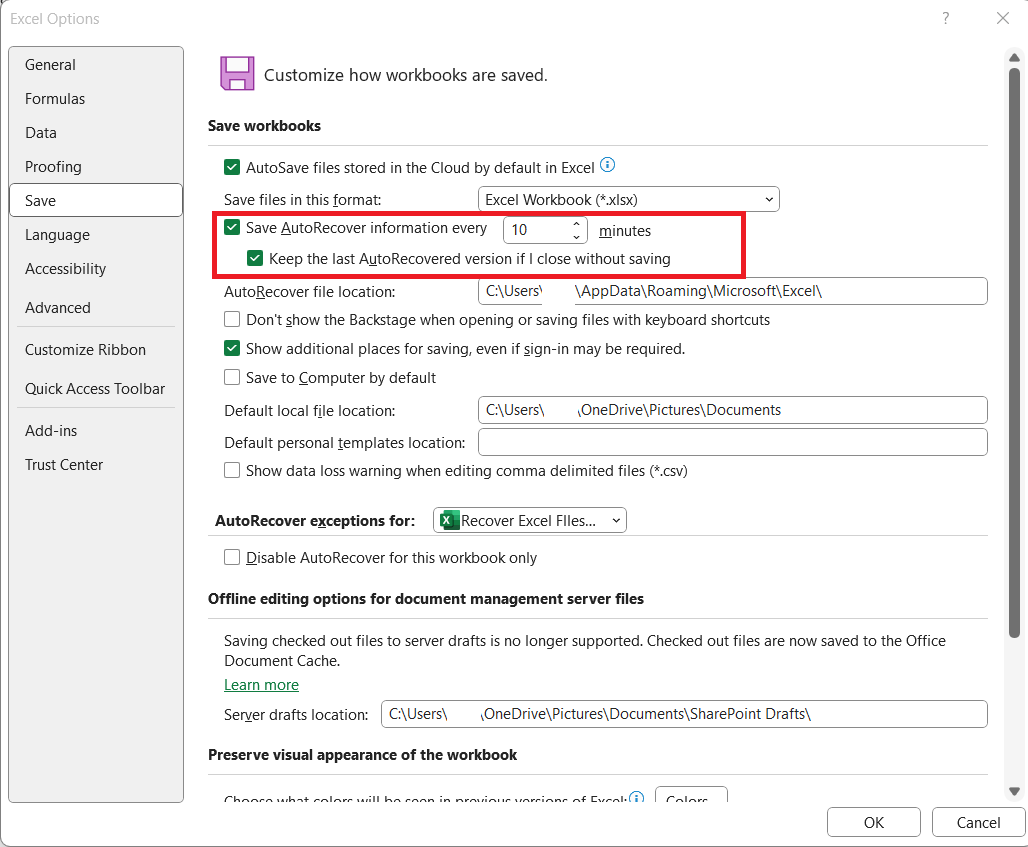
I always ensure both ‘Save AutoRecover information every X minutes’ and ‘Keep the last autosaved version if I close without saving’ are checked.
I can then breathe a little easier knowing that Excel is keeping an eye on my files.
Adjusting the time interval for AutoSave is within my control. By default, it’s set to save every 10 minutes, but depending on the importance and frequency of changes, I might decrease this to 5 minutes. This increases the versions saved and, in turn, my chances of recovering all changes in the event of a crash. Similarly, changing the AutoRecover file location to a more accessible or secure place is a smart move.
A tip I’d share is to consider the risks – if my work is particularly critical, I shorten the AutoSave interval for extra security against data loss due to crashes or power outages.
Utilizing Cloud Services for Back-Up
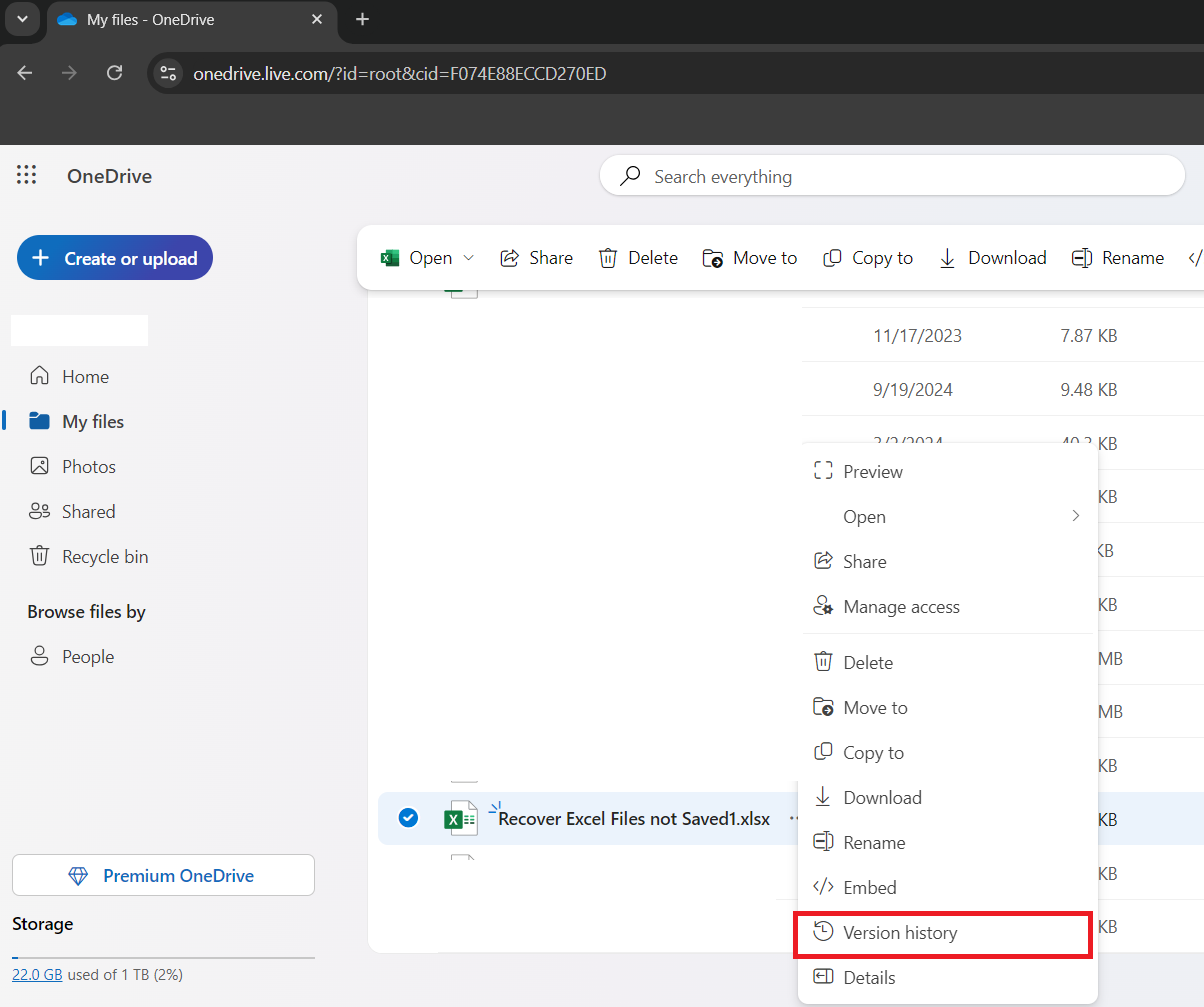
Embracing cloud services like OneDrive has been a game changer in ensuring the safety of Excel workbooks. OneDrive works hand in hand with Excel; not only does it allow me to open and save documents seamlessly from within the application, but it also synchronizes changes rapidly in real-time collaboration scenarios. When I work with others, OneDrive automatically keeps a history of document versions, showing when changes were made and by whom.
This feature allows me to revisit and restore an earlier version of the file if I ever need to revert to it. Utilizing cloud storage ensures that my Excel files are backed up automatically, securing my hard work against mishaps and technical hiccups.
Retrieving the Unsaved: Initial Steps
Exploring Excel’s Document Recovery Pane
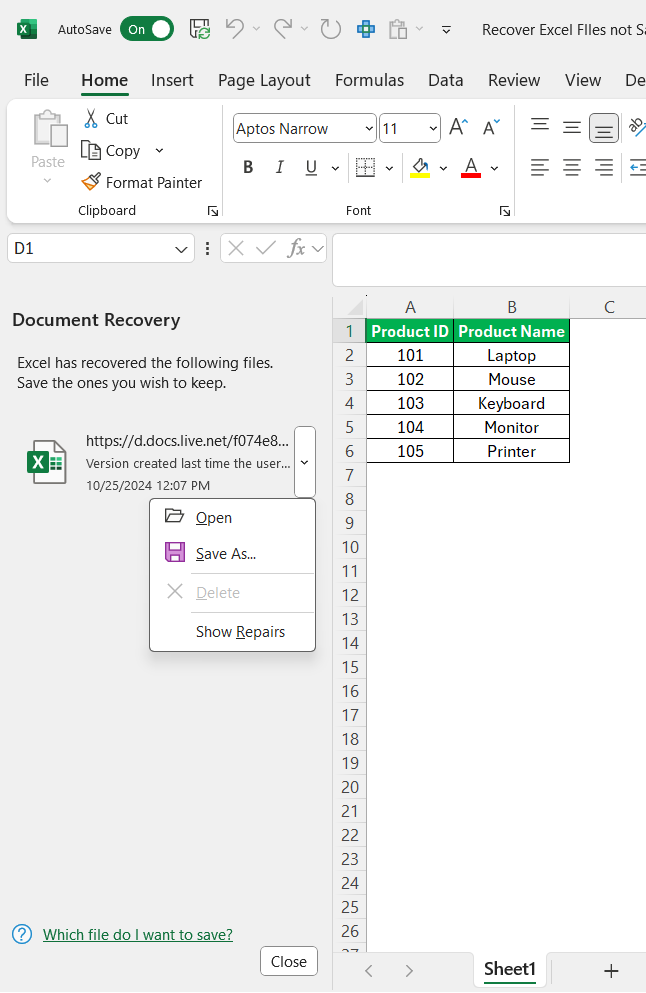
When I restart Excel after an unexpected shutdown, the Document Recovery pane is often a welcome sight. It presents a list of recoverable files, potentially saving me from the heartache of lost data. To make the most out of this feature, I scroll through the document recovery pane, taking care to identify each file I was working on before the abrupt closure.
Even when a file has never been saved before, it appears with a default name, usually something like ‘Book 1’, and it includes the work up to the last AutoSave checkpoint.
After reviewing the file to ensure it’s the right one, I follow a simple but crucial routine: immediately save the document. By selecting File, then Save As, I not only secure my work but also have the opportunity to organize it with a proper file name and choose the correct folder for storage.
It’s a straightforward process that can save a significant amount of effort and stress.
Harnessing the Power of Temporary Folders
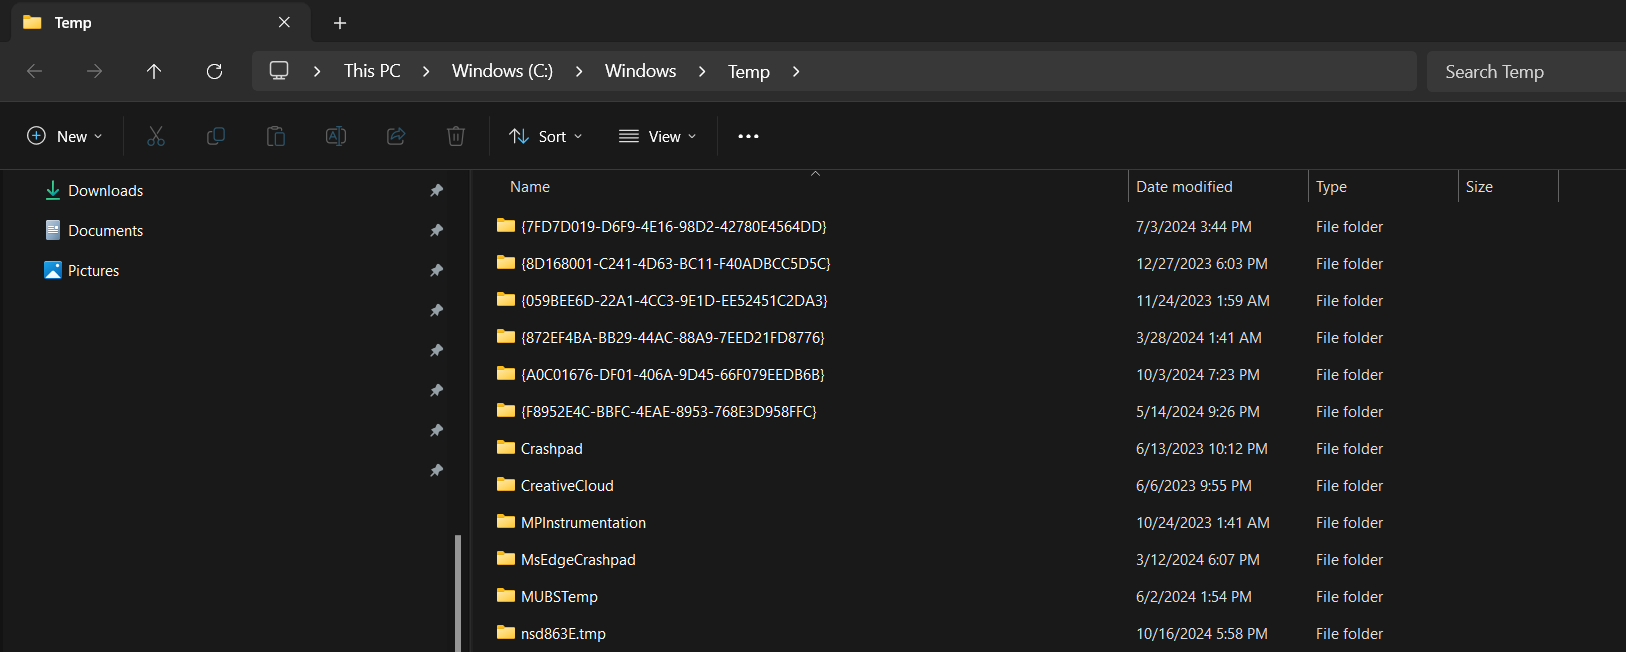
In cases where the Document Recovery pane doesn’t present the solution I need, temporary folders are my next line of defense. It’s easy to forget that Excel, like other Microsoft Office applications, keeps a running compilation of temporary files as we work. These TMP files may not always be visible within Excel itself, but once I know where to look, I can often retrieve versions of my work from these hidden repositories.
I navigate to the specific temp file path, which varies depending on my operating system version. For instance, in Windows 10 or 11, the temp files are typically located in C:\Windows\Temp or C:\Users[User Name]\AppData\Local\Microsoft\Office\UnsavedFiles.
After reaching this folder, I sort through the files by the date modified to find the relevant documents. It’s worth nothing that temporary files will have unusual file names, so I have to open them to confirm their contents.
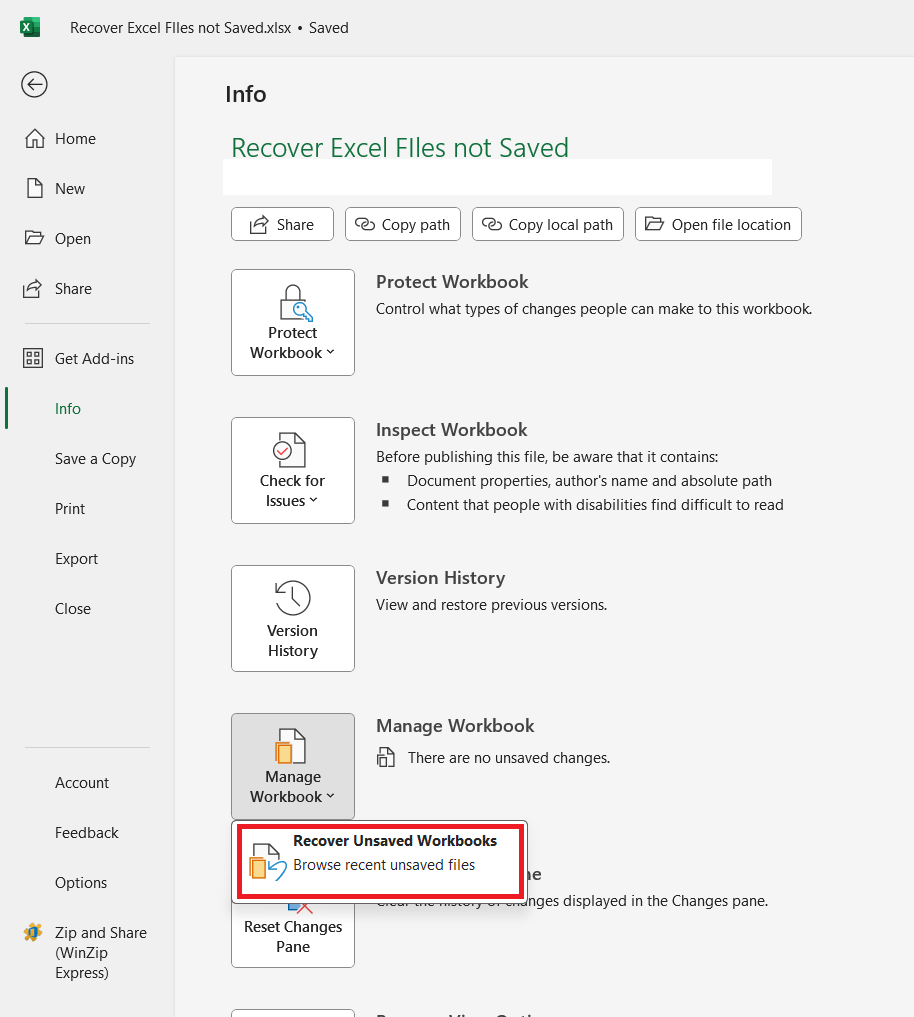
If Excel and the system are functioning normally, but I closed a workbook without saving it, I can leverage another handy feature within Excel. I simply open a new document, go to the File tab, then Info, followed by ‘Manage Workbook’. From there, ‘Recover Unsaved Workbooks’ can often unearth that precious file I thought I lost.
When providing Excel recovery guidance, I remind users that these methods are not foolproof—it’s still essential to save frequently and utilize backups. However, knowing how to harness the power of temporary folders can be a real lifesaver in a pinch.
Advanced Recovery Solutions
Diving into Previous Version Restorations
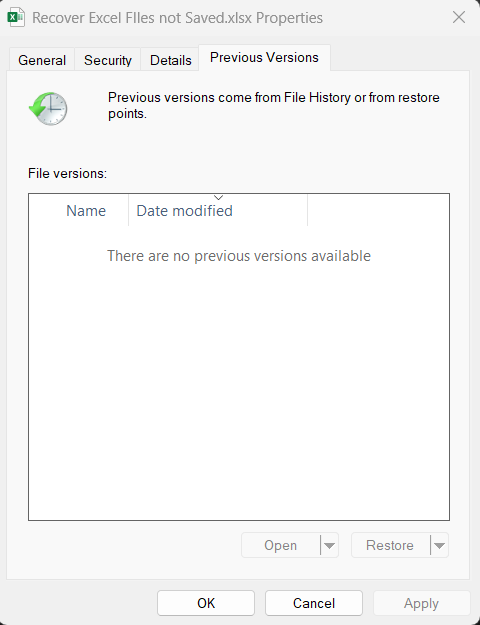
Having the File History feature enabled in Windows 10 can be tantamount to having a time machine for my files. To utilize it effectively, I’ve ensured an external drive is designated for this purpose. This function regularly saves snapshots of my files, so when I overwrite an Excel workbook, I can typically breathe a sigh of relief.
To restore a previous version, I right-click the file in File Explorer, select ‘Properties’, and tap the ‘Previous Versions’ tab. Here, a list of all historic saves of my Excel file is visible, allowing me to restore or copy a desired version.
In essence, Previous Version Restoration is akin to having an ace up my sleeve. It’s especially useful when we’re talking about those irreplaceable Excel files that capture weeks or even months of intricate work.
FAQ Section
Can I recover an unsaved Excel file?
Yes, it’s often possible to recover an unsaved Excel file. Start by opening Excel, go to the ‘File’ tab, and click ‘Recover Unsaved Workbooks’. If your file is there, double-click to open it and then save it immediately. If not, try checking temporary files or using third-party recovery tools. Always ensure that the AutoSave and AutoRecover options are configured correctly for future protection.
How can I configure AutoSave settings for better protection?
To configure AutoSave settings for better protection, open Excel and click ‘File’, then ‘Options’, and select ‘Save’. You can adjust the AutoSave interval—reduce it to save more frequently. Ensure ‘Save AutoRecover information every X minutes’ is checked. This ensures Excel captures recent changes if the application or system crashes unexpectedly.
What should I do immediately after realizing my Excel file wasn’t saved?
Immediately after realizing your Excel file wasn’t saved, reopen Excel to see if the Document Recovery pane appears with your unsaved document. If not, go to ‘File’, ‘Open’, ‘Recent’, and then ‘Recover Unsaved Workbooks’ at the bottom. Select the file and save it promptly if you find it there. If that doesn’t work, check the temp folder for backups.
Can previous versions of Excel files be recovered if AutoSave was off?
Yes, if AutoSave was off, you may still recover previous versions of Excel files. For Windows users, right-click the file in File Explorer, select ‘Properties’, and then ‘Previous Versions’. If using OneDrive, view the file’s version history online. These methods can restore an older version of the file, even without AutoSave.
Where are temporary unsaved Excel files stored?
Temporary unsaved Excel files are stored in the system’s AppData folder. The path varies based on your Windows version. For Windows 10/11, the path is: C:\Users[YourUsername]\AppData\Local\Microsoft\Office\UnsavedFiles. Make sure to replace ‘[YourUsername]’ with your actual username. These temp files can be your lifeline for recovering unsaved work.
John Michaloudis is a former accountant and finance analyst at General Electric, a Microsoft MVP since 2020, an Amazon #1 bestselling author of 4 Microsoft Excel books and teacher of Microsoft Excel & Office over at his flagship MyExcelOnline Academy Online Course.

