As an avid user who has created numerous presentations, I’ve seen firsthand the complications large PowerPoint files can create. Size matters significantly in PPT files, as they can grow exponentially with each added video, image, or audio clip. I’ve noticed that these bloated files often exceed the typical 20–25 MB limit for email attachments imposed by many servers, making sharing via email problematic.
A hefty PowerPoint presentation is not just an obstacle in emailing; it can also strain storage resources and cause delays during downloading or uploading. Personally, I’ve seen the frustration it causes when recipients struggle with a slow or impossible download due to the file’s sheer size. My objective here is to guide you through the importance of size management in presentations and share techniques to reduce PowerPoint size.
Key Takeaways
- Compress images within your PowerPoint by selecting a lower quality level such as “Small Size” or opt for the “Balanced” option to retain better image quality while reducing file size. Convert PNG images to JPEG format for further compression.
- Minimize use of high storage space elements by replacing 3D models with static images, and reduce audio and video content size if included within the presentation.
- Utilize PowerPoint’s built-in compression tools to compress your file as a PDF or a zip file simplifying the sharing and saving process. Add files to the compression process as-needed and download the compressed presentation once complete.
The Benefits of a Trimmed-Down Presentation
When I’ve managed to pare down my PowerPoint presentations, the benefits have been immediately clear. First and foremost, a trimmed-down presentation is far more accessible. No one likes waiting for a large attachment to download or struggling to open a file that lags due to its size. By keeping file size in check, we ensure ease of sharing and quick access for our audience, whether distributed by email, cloud services, or portable drives.
Smaller file sizes also translate to more storage space saved, not just on my device, but also for the recipients. I’ve had colleagues thank me for not clogging their inboxes with bulky files. It’s a matter of convenience and common courtesy.
Moreover, a concise file size often means a streamlined presentation. During the process of compressing, I’ve removed unnecessary elements, leading to a more focused, effective communication tool. Less clutter means my message is understood more clearly.
Finally, a lighter presentation is more web-friendly. For those of us who share presentations online, either through webinars or as downloadable content, smaller files mean faster loading times, which can improve user experience and engagement.
In summary, by reducing a PowerPoint file’s size, we enhance shareability, preserve storage, refine our content, and optimize web usage. These advantages solidify the importance of mastering compression techniques for anyone who frequently uses PowerPoint to communicate and share ideas.
Table of Contents
Effective Compression Techniques for PPT Files
Minimizing Multimedia File Impact on Size
In my practice, I’ve found that multimedia elements like audio and video are often the heaviest contributors to a bloated PowerPoint file. When we optimize these files, we can reduce the overall size substantially without sacrificing content richness.
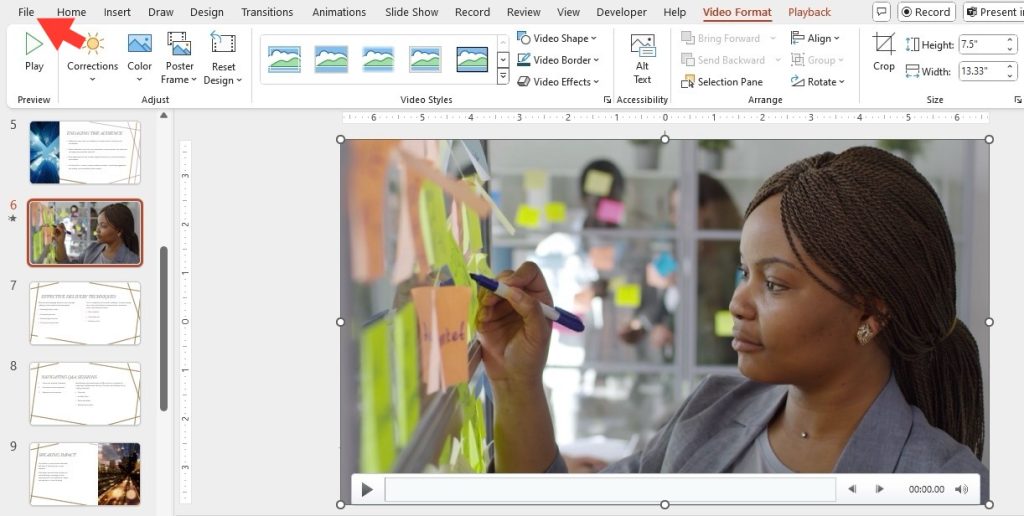
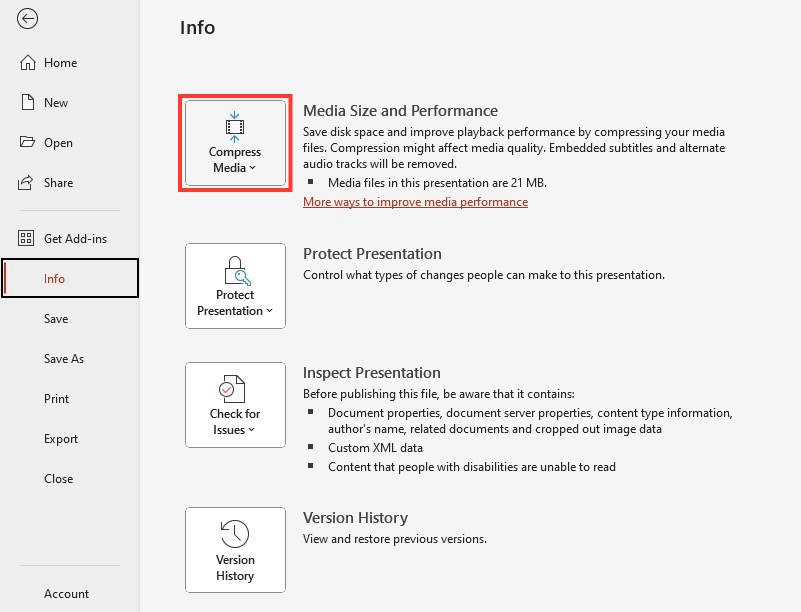
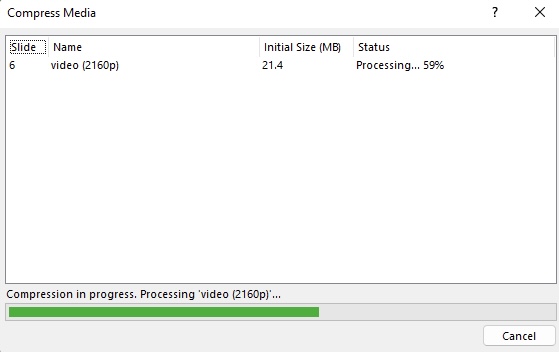
Microsoft PowerPoint on Windows offers a handy feature for this purpose. Go to the ‘File’ tab and click on ‘Info.’ You should find ‘Compress Media’ if your presentation contains audio or video. Here, you can select the quality of compression; choices range from Full HD to Standard—each serving different needs and consequences on size. After compression, a summary of the size reduction helps us evaluate the effectiveness.
To fine-tune this process, it’s crucial to consider the delivery method of the presentation. For instance, a high-quality video might be essential for a large auditorium setup but unnecessary in a small conference room or when shared through email.
Remember, while the in-built compressions feature is convenient, it might not always offer the highest degree of compression. That’s when third-party software solutions come into play, which can compress multimedia files before adding them to the PowerPoint presentation.
Through these methods, we can keep our presentations rich and engaging, while also ensuring they remain sleek and manageable in size, striking a balance that culminates in a professional and efficient delivery of information.
Advanced Strategies to Shrink Your Slides
Optimize Images Without Compromising Quality
Optimizing images in a PowerPoint presentation without compromising quality is a real game-changer. It’s a delicate balance, but it’s possible to achieve it so our slides can still look crisp and professional. When we do it right, the result is a visually stunning presentation that doesn’t take up unnecessary space.
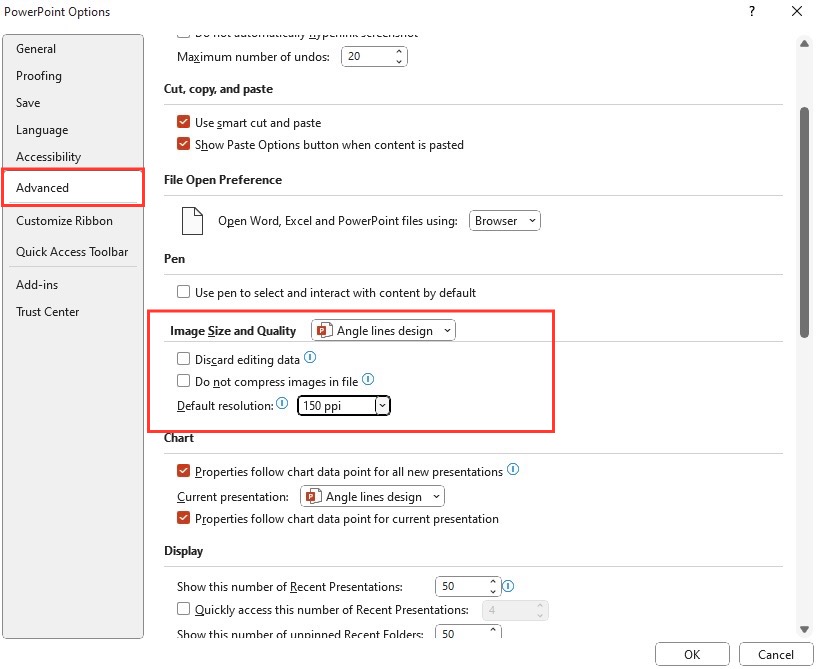
I always start by reconsidering the resolution of my images. PowerPoint has an option to adjust the default resolution, which can be found under ‘File’ > ‘Options’ > ‘Advanced’, under ‘Image Size and Quality’.
Here, selecting a resolution like 150 ppi (pixels per inch) lowers file size without a dramatic impact on on-screen quality. The ‘Discard editing data’ feature ensures that only the final version of the image is kept, shaving off even more bytes.
Further reductions can be made by cropping images within PowerPoint to remove unnecessary areas before even inserting them into the slides. This preemptive strike means that the file size starts low and stays that way.
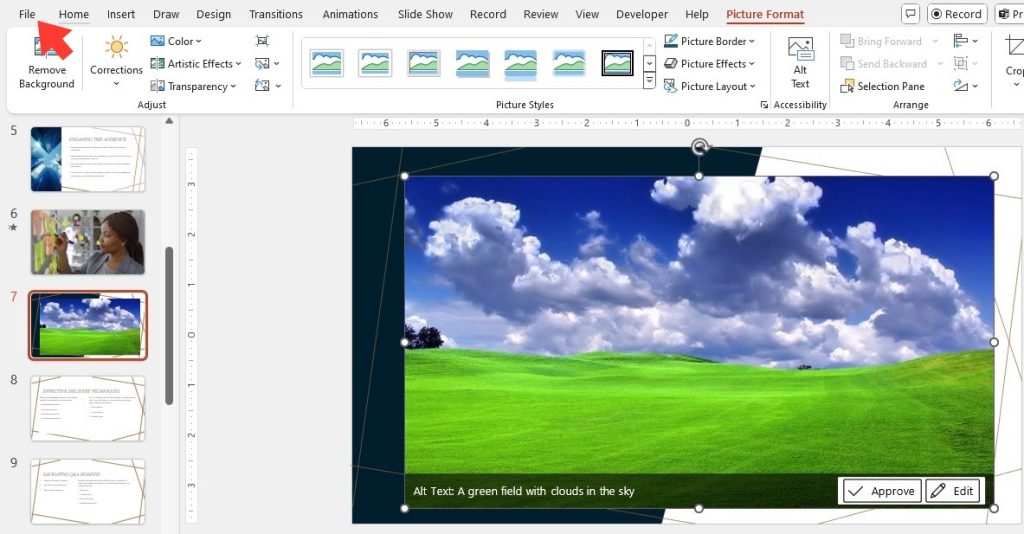
Before I finalize my presentation, I use the ‘Compress Pictures’ option, which can be found on the Picture Tools Format tab. This functionality allows me to compress all images within the presentation at once and even remove cropped areas of pictures to decrease the file size further.
But a word of caution: always check the visuals post-compression. Basic compression settings often reduce file size without a noticeable drop in quality, but going too far can blur images. This is where striking the right balance between size and visual fidelity becomes an art. It’s crucial to review the slides after compression, ensuring that the images remain clear and effective for delivering the intended message.
Managing Fonts and Characters to Save Space
Managing fonts and characters is a lesser-known yet powerful way to save space in PowerPoint presentations. Custom fonts can add a unique touch to our slides, but they often contribute to file bloat. Fortunately, there’s an efficient way to include them without the excess weight.
I typically follow a simple workflow to handle this: I embed only the fonts that I have used. This involves navigating to ‘File’ > ‘Options’ > ‘Save’. There, under ‘Preserve fidelity when sharing this presentation’, I select ‘Embed fonts in the file’, and then I choose ‘Embed only the characters used in the presentation’. This smart choice omits all the unnecessary characters, leaving behind only what the presentation requires.
On occasions where I’m sure others will need to edit the presentation, or it’s intended for diverse platforms, I include all characters by choosing ‘Embed all characters’. This ensures that anyone, regardless of whether they have the font installed or not, can view and edit the presentation as intended. Though this might increase the file size a bit more, it’s a practical decision to maintain consistency across different users.
It’s crucial not to overlook this step, as custom fonts can make a significant impact on presentation aesthetics. By embedding fonts wisely, I ensure that the look and feel of my slides remain intact, irrespective of where or how the PowerPoint file is opened.
Embedding fonts efficiently can lead to a substantial decrease in file size, increasing portability and user experience, ensuring that my presentations maintain a professional appearance while keeping load times low for my audience.
Leveraging ZIP and PDF Formats for Compact Sharing
Whenever I’m tasked with sharing PowerPoint presentations, especially those that are too bulky even after optimizations, leveraging ZIP and PDF formats becomes my go-to strategy for compact sharing. It’s an excellent way to maintain the integrity of my slides while reducing their shareable size.
The process of zipping a PowerPoint file is quite simple and can make a difference when handling multiple presentations or associated files, such as documents or spreadsheets related to my presentation. By compressing these files into a ZIP folder, I save space and consolidate everything into one manageable package.
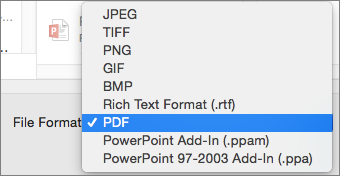
Another potent method, which often yields even better results, is converting the PowerPoint file to a PDF format. This route is especially handy when my primary concern is viewing rather than editing the slides. PDFs maintain the layout and design of the slides across all platforms and devices, which is critical for preserving the impact of my presentation.
Smallpdf, an online tool I often use, can compress these PowerPoint files even more effectively. First, it converts the PPT file to a PDF, which generally has a smaller file size with retained visual fidelity, and then, if needed, I can use the “Export As” option to turn the PDF back into an editable PPT file.
Smallpdf also adds the advantage of easy sharing and added security, which is not always available with a simple ‘save as PDF’ function in PowerPoint itself. After compressing and converting, it offers options to send the file via a link, or save it directly to cloud services like Dropbox or Google Drive.
These approaches, the ZIP and PDF conversions, have become a crucial part of my workflow when managing and sharing PowerPoint presentations. They allow me to provide access to my slides in the most efficient sizes without compromising on design or delivery.
Maintaining Presentation Quality During Compression
Ensuring Visual Fidelity Post-Compression
Ensuring visual fidelity after compression requires a keen eye and a bit of fine-tuning. In my experience, the trick lies in carefully choosing compression settings that reduce file size without noticeably degrading the appearance of images and graphics.
After I compress images or other multimedia elements in PowerPoint, I always perform a thorough review of the presentation on various devices and screens. This helps me verify that the visuals have maintained their clarity and impact. I look for any signs of pixelation or blurriness, especially in areas with fine details or text over images.
For important presentations, I’ll often go a step further by requesting feedback from a colleague or even simulating the presentation on the intended output device, be it a projector or a large monitor. This “real-world” test can reveal how the compressed elements will look to the audience and allow for any necessary adjustments before the final presentation.
I also make use of the ‘Undo’ feature if I’m not satisfied with the results of the compression. Because PowerPoint compresses and saves a copy of the image within the document, I can revert to the original version and try again with different settings that might offer a better balance between fidelity and file size.
In doing so, I make sure that every visual element in my presentation does its job effectively: conveying information in a clear, engaging, and professional manner. With the right approach to compression, I can keep file sizes manageable without ever letting on that I’ve cut a single byte.
Keeping Audio and Video Quality Intact
Maintaining high audio and video quality while minimizing their impact on file size is a critical aspect of presentation compression. In practice, I’ve found that judicious use of compression settings is key to keeping multimedia elements in top form.
For videos, I often take advantage of PowerPoint’s built-in ‘Compress Media’ feature. Before I compress, I deliberate over the content’s final destination and the required video quality. If it’s a simple background video without much detail, I might opt for ‘Standard (480p)’ to save the most space. For more complex or detailed videos, I’d likely select ‘HD (720p)’. This goes a long way towards balancing file size and quality — especially when connectivity may not be consistent, like in meetings or conferences.
Audio, however, can be trickier, as lower bit rates can quickly degrade quality. So, when I compress audio files, I ensure they remain clear and audible without taking up an undue amount of space. I use custom settings for bit rate only if the default compression options provided by PowerPoint don’t meet my quality standards.
Another strategy I employ is to use media in formats known for their efficient compression and high quality, such as H.264 for video and AAC for audio. These modern codecs are engineered to deliver high-quality media at lower file sizes.
By adopting a thoughtful approach and regularly reviewing the output, I assure that I’m delivering audio and video that meets both size constraints and quality expectations. Thus, my presentations remain engaging, professional, and are easily shared, irrespective of the audience’s access to high-end tech.
Utilization of Tools and Software Solutions
Exploring Built-in PowerPoint Features
Microsoft PowerPoint is equipped with a variety of built-in features to help reduce file size without the need for external tools. I’ve learned that taking advantage of these can greatly streamline the compression process.
For starters, the ‘Compress Media’ and ‘Compress Pictures’ options are invaluable. They allow me to optimize audio and visual elements directly within my presentations. Moreover, I can choose the level of compression for each — a flexibility that enables me to cater the quality to the intended use of the presentation.
The feature that allows me to embed only the characters used in the presentation, instead of entire fonts, is one that I initially overlooked. Yet, this has turned out to be a subtle but potent way to shave off excess file size. It’s especially handy when dealing with presentations that will be displayed on systems other than my own.
Linking to files rather than embedding them is another practical feature. Suppose the presentation includes data or multimedia that’s too large to include internally. In that case, I can simply link to those files on the web or a network, keeping the core PPT file lightweight.
PowerPoint’s ‘Save As’ feature gives me options too. Saving my presentation as a ‘PowerPoint Picture Presentation’ can also reduce file size since it converts slides into images, eliminating any excess data from the original PowerPoint objects.
Lastly, the ‘Inspect Document’ tool is a personal favorite. Not only does it find and remove hidden metadata, comments, and personal information that could inflate file size, but it also ensures my presentations are clean and professional before sharing.
By exploring and utilizing these features, I confidently streamline the compression process, often without needing to invest in or learn additional software. This practical approach saves time and results in effective, shareable presentations.
FAQ: Answers to Common PowerPoint Compression Questions
What Is the Ideal Size for a PowerPoint File?
The ideal size for a PowerPoint file often depends on its intended use. For instance, if I’m emailing a presentation, I aim to keep the file under the typical 10 MB limit imposed by many corporate email servers to prevent bounce-backs. For larger presentations that require higher image quality or have embedded multimedia, I’ve found that staying under 100 MB is practical to facilitate smoother transfers when using cloud storage or file transfer services. Remember, the “ideal” size is one that maintains quality while being easily shareable across intended platforms.
How Can I Compress a PowerPoint File Without Losing Quality?
To compress a PowerPoint file without losing quality, I use the built-in ‘Compress Pictures’ option, choosing the resolution that balances size and quality. I also use ‘Compress Media’ for videos. Where possible, I save slides as JPEGs before reinserting them to reduce file size while maintaining visual fidelity. For best results, I customize compression settings and check the quality after compression.
Why is my PPT file so large?
Your PPT file may be large due to high-resolution images, embedded videos, and audio clips, which take up considerable space. Also, the use of extensive custom fonts, master slides with heavy graphics, or simply having a large number of slides can contribute to the size. Optimizing these elements can significantly reduce your file’s size while preserving its content’s integrity.
John Michaloudis is a former accountant and finance analyst at General Electric, a Microsoft MVP since 2020, an Amazon #1 bestselling author of 4 Microsoft Excel books and teacher of Microsoft Excel & Office over at his flagship MyExcelOnline Academy Online Course.

