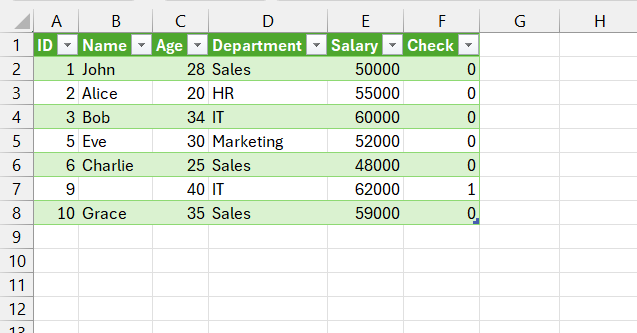
Handling blank cells in Microsoft Excel is a common task, especially when dealing with large datasets. Blank cells can cause issues in data analysis and calculations, so it’s important to know how to efficiently remove or handle them. In this article, we’ll explore several methods to remove blank rows in Excel.
Key Takeaways:
- Common Task: Handling blank cells in Excel is a frequent necessity, especially with large datasets.
- Data Integrity: Removing blanks is crucial for maintaining data integrity and accuracy in analysis.
- Multiple Methods: Excel offers several methods to remove blanks, including filtering, Go To Special, conditional formatting, formulas, and Power Query.
- Efficiency Boost: Using Excel tricks to remove blanks saves time and enhances productivity.
- Precision Needed: Careful removal of blanks ensures accurate data analysis and prevents errors in reporting and calculations.
Table of Contents
Introduction to Excel Efficiency
The Importance of a Clean Dataset
Have you ever faced the frustration of a cluttered Excel dataset? You know the feeling when an unclean dataset prevents you from gleaning the insights you need – it’s incredibly time-consuming and quite frankly, annoying.
Maintaining data integrity in Excel is non-negotiable, especially in fields like investment banking where every digit counts. A clean Excel file is not just about aesthetics; it’s about the accuracy and reliability of your analysis and conclusions.
Reducing Steps with Excel Tricks
Isn’t it delightful when you discover a shortcut that saves you hours of manual labor? Well, when it comes to Excel, there are plenty of these time-saving tricks that can turn a tedious task into a simple step. By reducing the steps needed to clean up your spreadsheets, you not only work smarter and faster but also free up valuable time to focus on the analysis rather than the prep work.
From keyboard shortcuts that slice through commands to clever functions that automate menial tasks, these tricks are like a magic wand for your spreadsheet woes.
Streamline Your Spreadsheets
Understanding Blank Rows and Their Impact
Imagine trying to analyze a dataset only to realize your results are skewed because of pesky blank rows nestled between your neatly inputted figures. In investment banking, where precision is paramount, blank rows can be the bane of your existence.
Not only do they hamper filtering and sorting efforts, but they also wreak havoc on your formulas, potentially distorting the valuation of an enterprise. Recognizing and rectifying blank rows is not just a matter of tidiness; it’s about safeguarding the integrity of your financial models and ensuring the stability of your conclusions.
When to Remove Blank Rows and Cells
Removing blank rows and cells is not always just a matter of keeping your spreadsheet neat; it’s often a necessity for accurate data analysis and reporting. Think about when you’re creating pivot tables, running macros, or sorting data – that’s when blank rows can be particularly troublesome, disrupting the flow of data and skewing results.
So, if you’re preparing a financial report or consolidating data for a big presentation, that’s your cue to de-clutter the dataset. However, remember to check if those blanks serve a purpose, like formatting, before you hit delete. Precision is the game when deciding when to remove those silent spreadsheet intruders.
Methods to Quickly Remove Blank Rows
Method 1: Using the Filter Feature
One of the simplest ways to remove blank cells is by using Excel’s built-in filter feature.
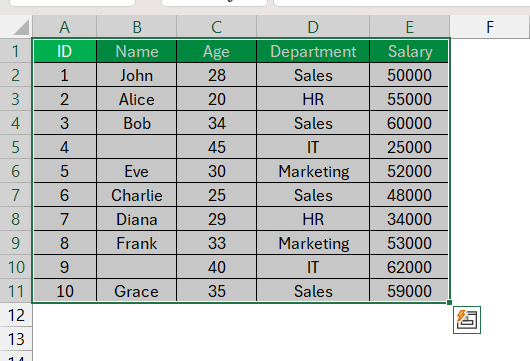
STEP 1: Highlight the range of cells you want to filter (e.g., your entire dataset).
STEP 2: Go to the Data tab on the Ribbon and click on Filter.
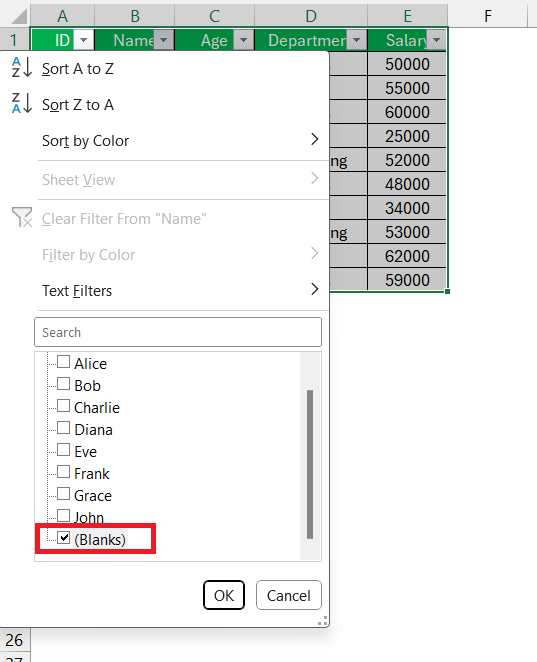
STEP 3: Click the filter arrow in the column you want to remove blanks from. Uncheck the (Blanks) option to filter out the blank cells.
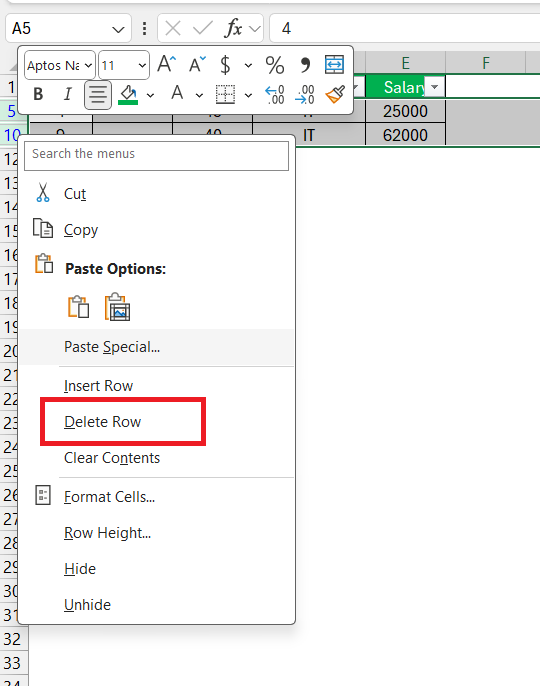
STEP 4: Select the filtered rows, right-click, and choose Delete Row. Clear the filter to see your dataset without blanks.
Method 2: Using Go To Special
The Go To Special feature allows you to quickly select and delete blank cells.
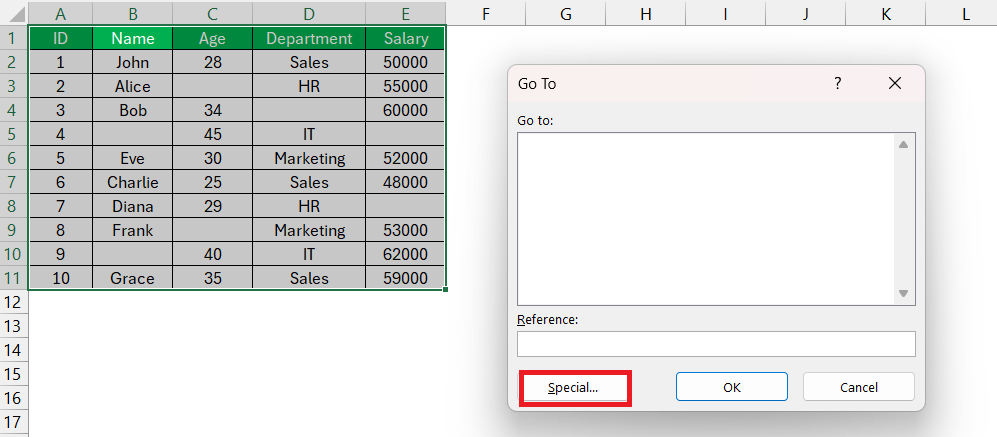
STEP 1: Highlight the range of cells containing blanks.
STEP 2: Press Ctrl + G to open the Go To dialog box. Click Special.
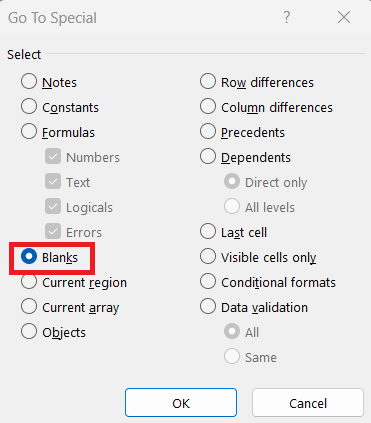
STEP 3: In the Go To Special dialog box, select Blanks and click OK.
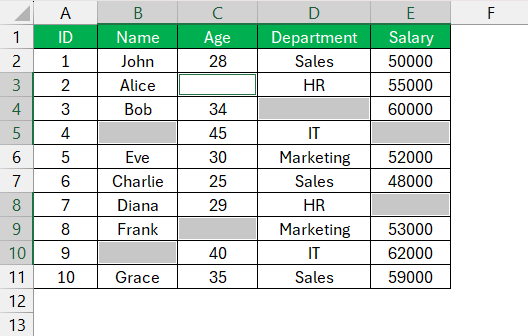
This will select all blank cells in the highlighted range.
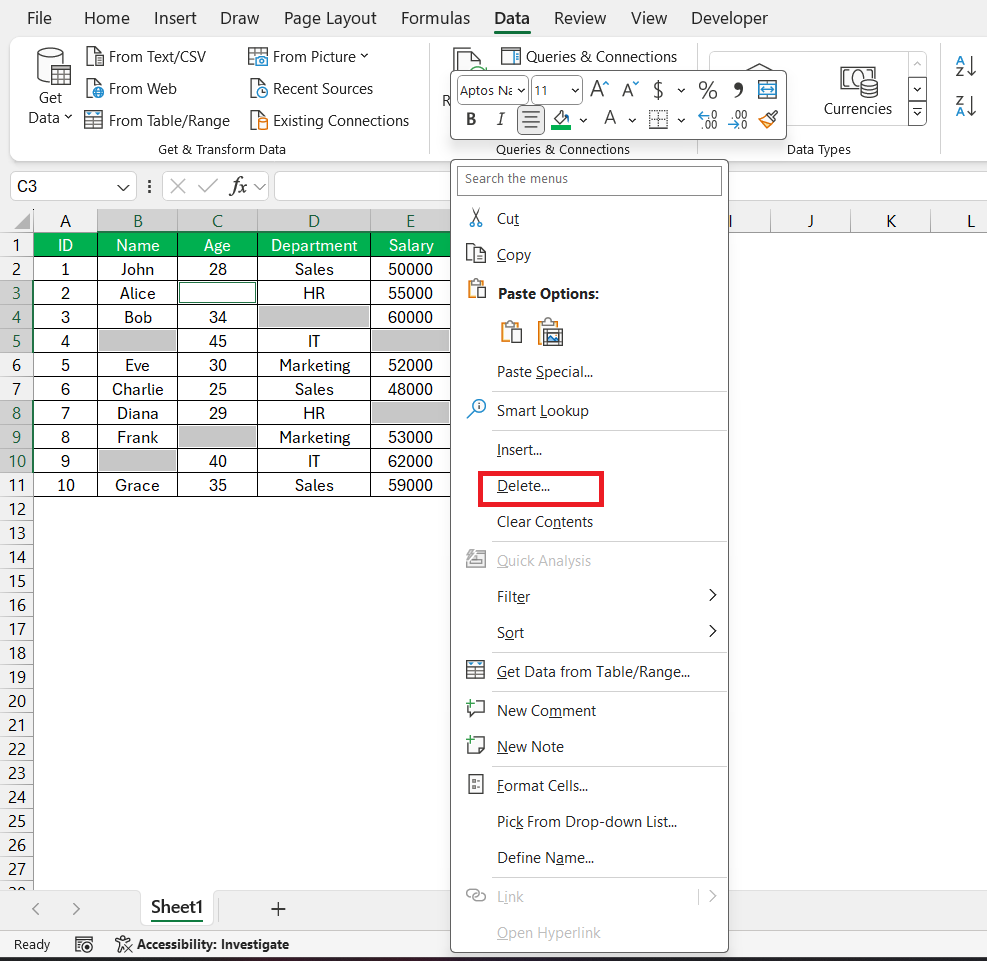
STEP 4: Right-click one of the selected blank cells, and choose Delete.
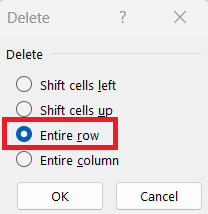
STEP 5: In the Delete dialog box, choose to Shift cells up or Delete entire row based on your preference.
The rows containing a blank cell will be deleted.
Method 3: Using Conditional Formatting
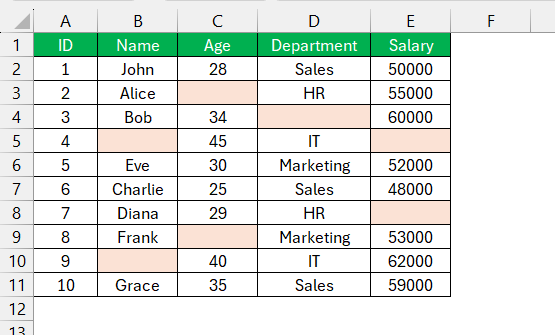
Conditional formatting can be used to highlight blank cells, making them easier to find and remove.
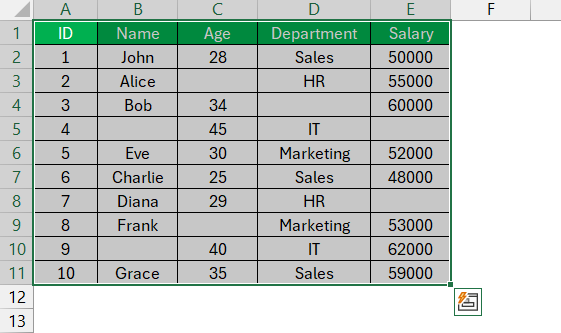
STEP 1: Highlight the range of cells you want to check for blanks.
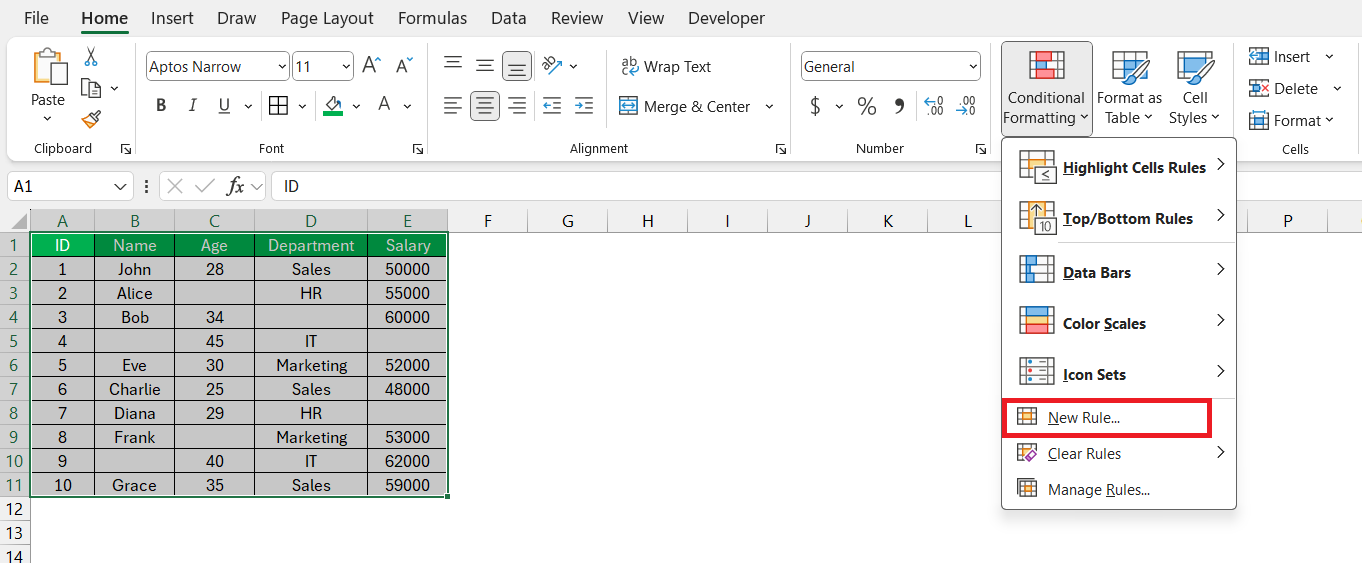
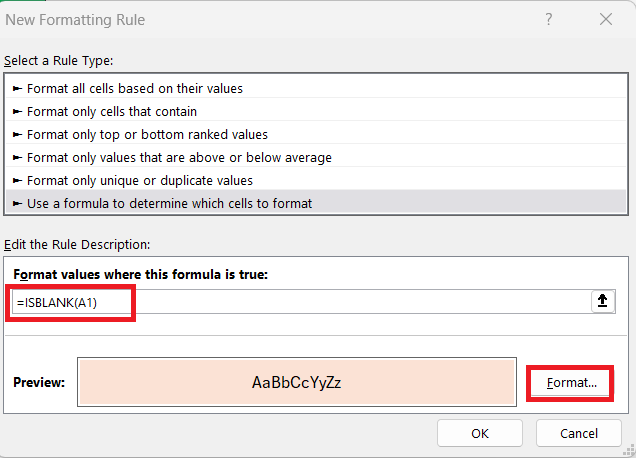
STEP 2: Go to the Home tab, click Conditional Formatting, then choose New Rule.
STEP 3: Select Use a formula to determine which cells to format. Enter the formula =ISBLANK(A1) (adjust the cell reference as needed). Choose a formatting style, then click OK.
STEP 4: Manually find and delete the highlighted cells or use a filter to remove them.
Method 4: Using Formulas to Remove Blanks
You can use formulas to create a new list that excludes blanks.
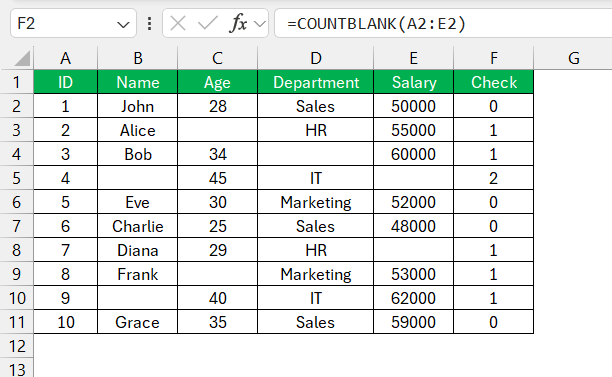
STEP 1: In a new column, use the formula =COUNTBLANK(A2:E2) to count the number of blank values from columns A to E.
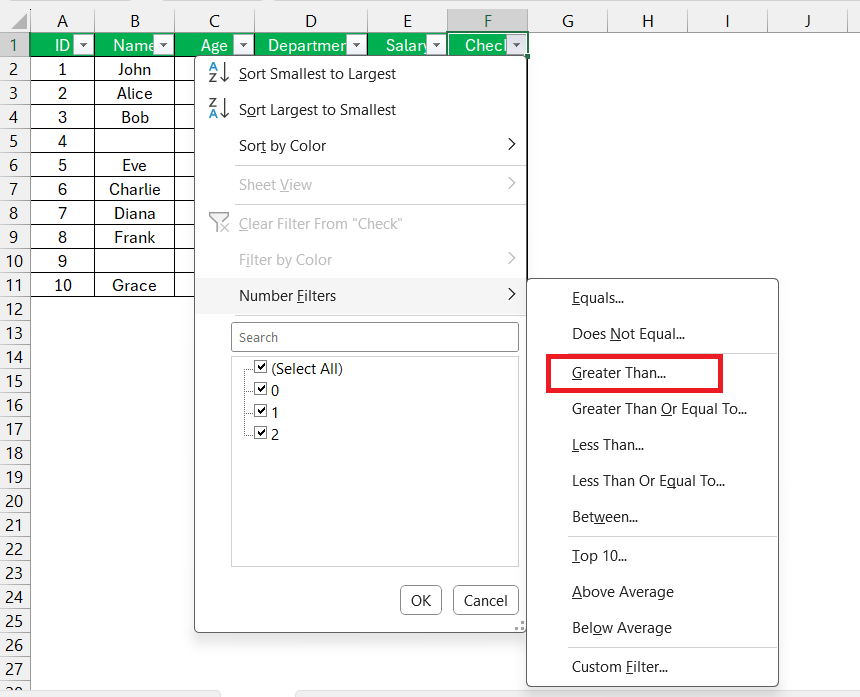
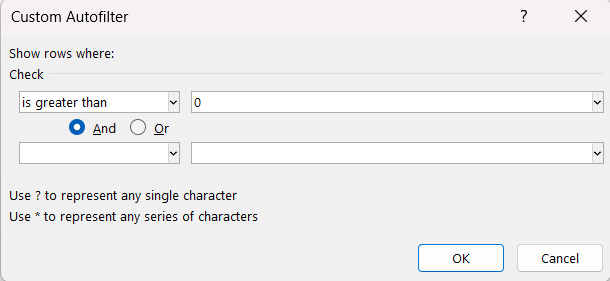
STEP 2: Click on the filter button and select Number Filter > Greater Than.
STEP 3: Type 0.
STEP 4: Go to the Home tab and select Delete.
Method 5: Using Power Query
For more advanced data cleaning, Power Query offers powerful tools.
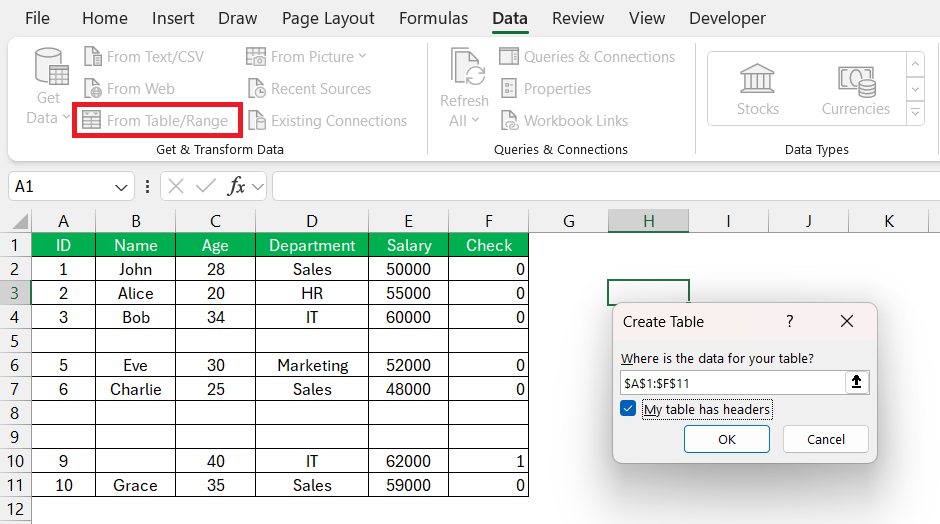
STEP 1: Select your data range and go to Data > From Table/Range.
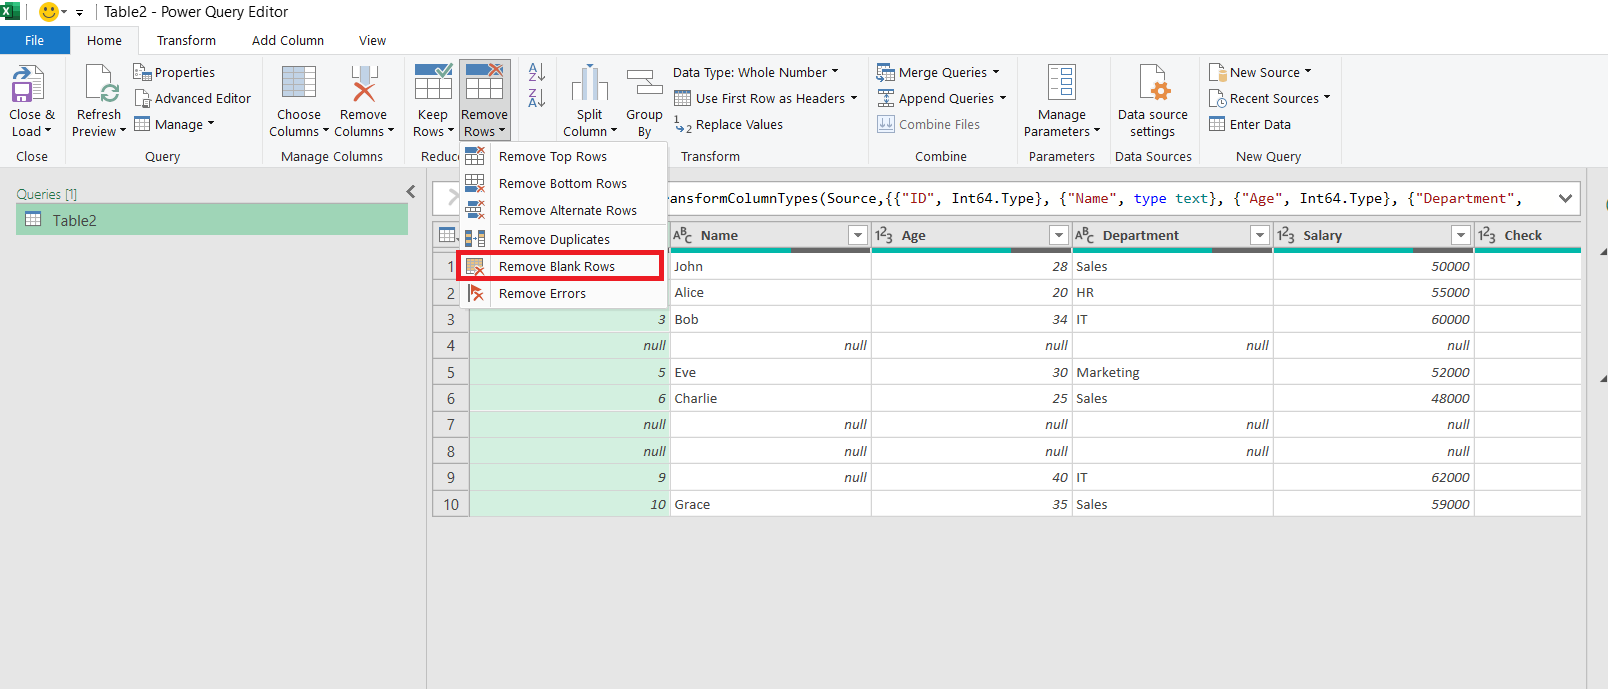
STEP 2: In the Power Query Editor, select the column containing blanks, then go to Home > Remove Rows > Remove Blank Rows.
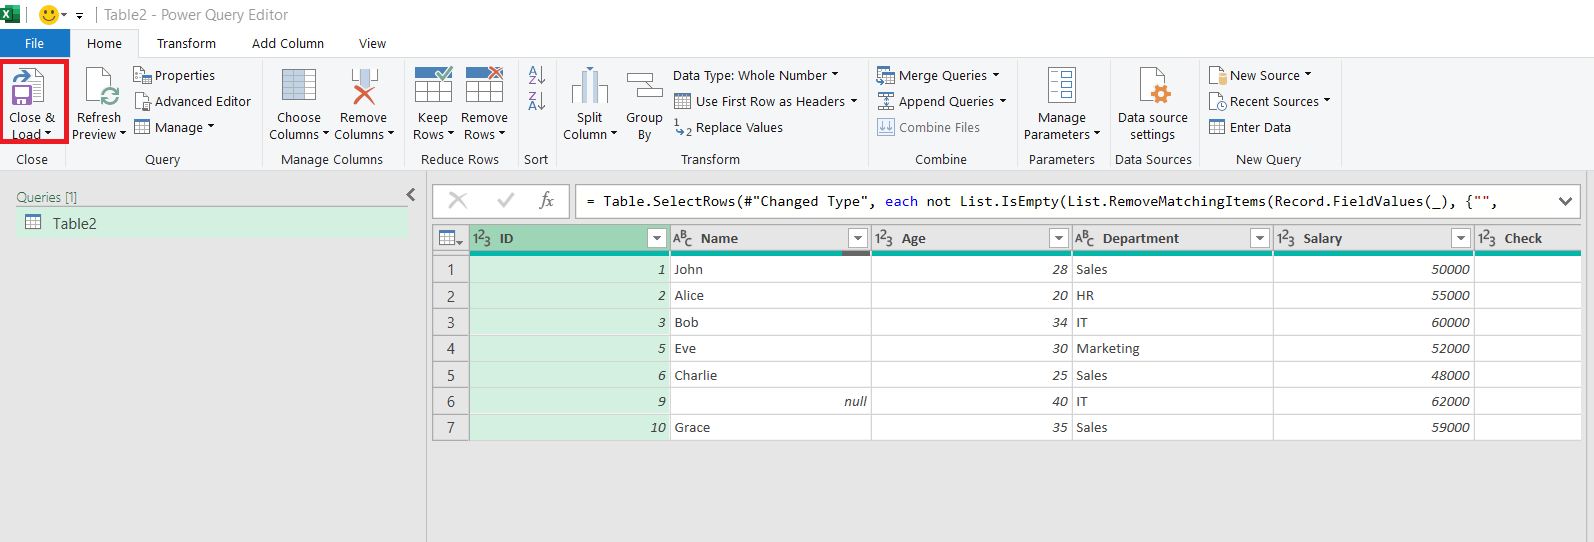
STEP 3: Click Close & Load to return the cleaned data to Excel.
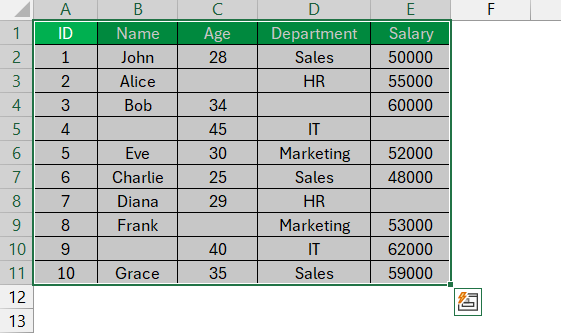
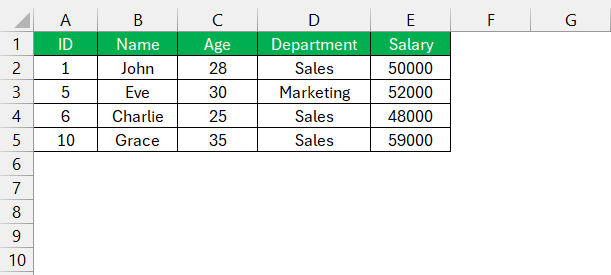
The final table with the blank row removed will look like this –
Tips and Tricks Before You Begin
Best Practices to Protect Your Data
Before diving into the deep end of data cleaning, let’s talk about safety nets and life jackets. To steer clear of data disasters, here are some best practices to enshrine in your process:
- Back It Up: Always, always start with a backup of your dataset. This is your contingency plan if things go south.
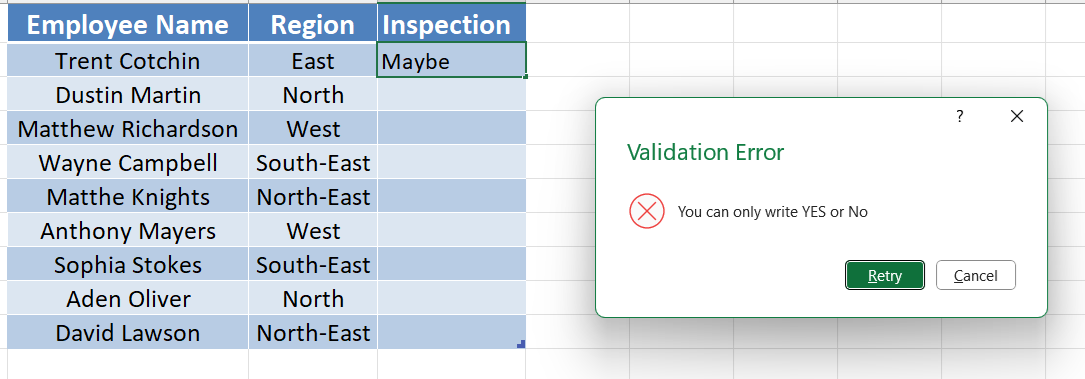
- Data Validation: Use Excel’s data validation features to prevent the input of undesired information from the get-go. This minimizes the chance of blank cell creation.
- Audit Trail: Keep a log of the changes you make. You might think you’ll remember, but it’s better to have a trail to retrace when needed.
- Test Run: Perform any row-deletion tricks on a small sample first. It’s like checking the water temperature before you take the dive.
- Version Control: Save different stages of your cleanup.
Following these steps is like having an Excel guardian angel, ensuring that your data remains intact and reliable throughout the cleansing ritual.
Master Shortcuts and Formulae
Unleashing the full power of Excel often means becoming a master of shortcuts and formulae. These are your nifty tools for navigating and manipulating spreadsheets with speed and agility. Here are some tricks of the trade:
- Keep the Shortcuts Close: Learn the keyboard shortcuts for actions you perform frequently. For instance,
CTRL + -(Control and Minus) lets you quickly delete rows or cells. - Formulae Are Your Friends: Engage with functions like
IF,VLOOKUP,INDEX MATCH, andCOUNTIFto sift through data with precision. Pivot TablesandConditional Formattingswiftly transform raw data into a polished, presentable form.- Grasp the
Find Duplicatesfeature to ensure data uniqueness, preventing repetitive analysis.
Tapping into these resources will not only save time but will also boost the accuracy and effectiveness of your work in Excel.
Precautions and Best Practices
When Not to Remove Empty Cells
Have you ever thought that a space of emptiness could mean more than just an absence? In Excel, not all empty cells are candidates for removal. Some blanks might be placeholders for future data or are deliberately nestled there to maintain the structure of a report or dataset. Removing them might disrupt the layout or calculations depending on those strategic spaces. Before you jump into deletion mode, take a moment to consider the purpose behind each blank cell. Sometimes, the void is just as important as the occupied space.
Ensuring Data Integrity During the Clean-Up Process
You’ve heard it said: “Handle with care,” and this applies just as much to your Excel data during a clean-up. Ensuring data integrity means cross-verifying that the right cells are tagged for deletion, especially when dealing with large datasets where blank rows may not be obvious at a first glance. Always back up your data before attempting any major clean-up. After running your formulas or macros, scrutinizing a random sample can offer peace of mind that the automated processes have worked correctly. Think of it as quality control – making sure that every piece of data is exactly where it needs to be for accurate analysis and decision-making.
FAQ: Overcoming Common Excel Hurdles
What is the shortcut to remove blank rows in Excel?
To quickly select blank rows in Excel, you can use the ‘Go To Special’ feature with a shortcut: Ctrl + G then Alt + S followed by K, and hitting Enter. Once selected, press Ctrl + - (Control and Minus) to delete the rows. For full-blank rows, this works like a charm, saving you from sifting through your data manually.
How do I ensure that deleting blank rows won’t affect my data?
To ensure you don’t unsettle your data while deleting blank rows, first back up your spreadsheet. Then, use ‘Go To Special’ to accurately select only the blank cells. Double-check selected areas before deleting and, if unsure, test the action on a copied tab to verify its effect on your dataset. Always proceed carefully to keep your precious data intact.
What’s the fastest way to remove blank cells without affecting adjacent data?
The fastest way to remove blank cells without disturbing neighboring data is to use the ‘Go To Special’ feature. Press F5, click ‘Special’, select ‘Blanks’, and then right-click to ‘Delete…’ with the option ‘Shift cells left/up’. This removes the empty cells and shifts the remaining ones accordingly to fill the gaps neatly.
How do I remove space in Excel?
To remove leading, trailing, and multiple spaces in Excel, use the TRIM function. Simply enter =TRIM(C9) into a new cell, where C9 is the cell with the space you want to eliminate. Drag the corner of the filled cell to apply this to your entire dataset, ensuring all extra spaces are gone.
How to exclude blank cells in the Excel formula?
To exclude blank cells from calculations in your Excel formula, utilize the IF function in combination with other functions. For instance, =IF(A1<>"",SUM(B1:B10),"") would only sum the range B1:B10 if A1 is not blank. This method prevents skewing your results with zeros or getting errors from empty cells.
John Michaloudis is a former accountant and finance analyst at General Electric, a Microsoft MVP since 2020, an Amazon #1 bestselling author of 4 Microsoft Excel books and teacher of Microsoft Excel & Office over at his flagship MyExcelOnline Academy Online Course.

