Managing data in Microsoft Excel can often involve refining your worksheet by removing unnecessary columns. Whether you need to delete surplus data to the right of a specific area or eliminate empty columns that clutter your spreadsheet, understanding how to efficiently delete columns is essential. This guide offers straightforward approaches to help you streamline your Excel workbooks by removing columns quickly and accurately.
Key Takeaways
- Spot unnecessary columns by checking for duplicates, outdated information, or mostly blank cells, streamlining your dataset.
- Use simple right-click options or keyboard shortcuts for swift column removal, ensuring data integrity through backup and validation before deletion.
- Excel filters act as spotlights, aiding in identifying irrelevant columns swiftly, and enhancing data management.
- Keeping spreadsheets organized is akin to a tidy workspace, enhancing focus and efficiency.
Download the spreadsheet and follow along with the tutorial on How to remove column in Excel – Download excel workbookRemove-Column-in-Excel.xlsx
Table of Contents
Streamlining Your Excel Workflow
The Importance of Keeping a Clean Spreadsheet
Maintaining a clean and orderly spreadsheet is akin to keeping your workspace tidy – it promotes focus, efficiency, and productivity. Cluttered spreadsheets can be overwhelming and detract from the task at hand, making it difficult to pinpoint critical data. A well-organized worksheet, free from unnecessary columns, allows for clearer analysis and decision-making.
Understanding Worksheets, Rows, and Columns in Excel
Think of your Excel file as a large book. Each worksheet is like a unique chapter, and within those chapters lie countless sentences formed by rows and stanzas shaped by columns. Now, just as a well-structured chapter has a logical flow, your worksheets must make it easy for you to navigate through your data stories.
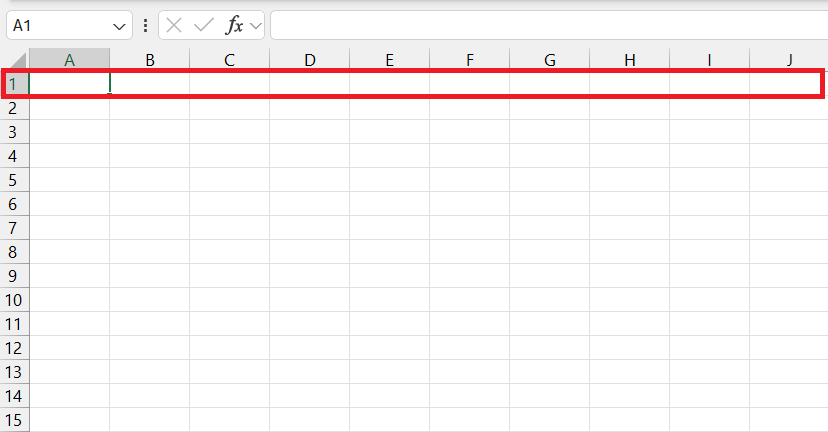
Rows in Excel run horizontally and are sequentially numbered, allowing you to go down the list with precision.
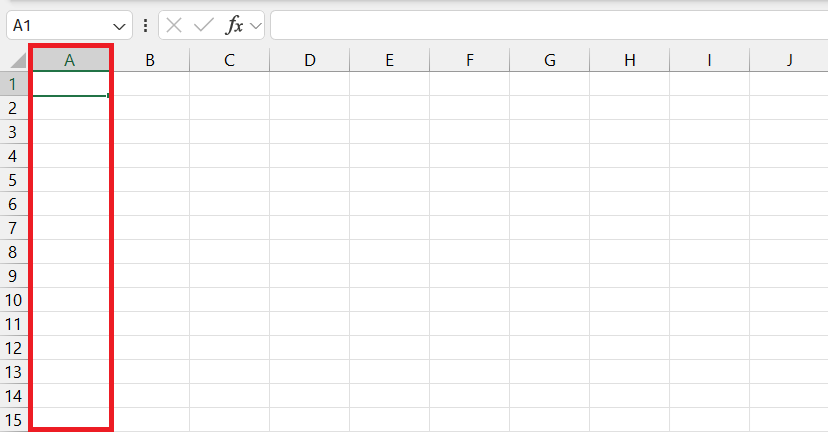
While columns stretch vertically, assigned with identifying letters, creating an address for every piece of data at the crossroads of column and row.
This grid system is the foundation upon which all data in Excel rests, ready to be shaped to your specifications, whether you require the uniformity of fixed sizes or the flexibility to insert and remove rows and columns as needed.
Identifying Columns for Deletion
Recognizing Redundant or Unused Data
Recognizing redundant or unused data is like spotting the unnecessary stuff around your house that you’re better off without. In Excel, look for columns that don’t contribute to your analysis, such as repeated information, irrelevant data fields, or placeholders left empty throughout your workflow.
Here are some signs that a column may be a candidate for deletion:
- It contains duplicate data that is already captured elsewhere in the sheet.
- The information is outdated and no longer needed for current analyses.
- All or most of its cells are blank, indicating it was possibly added by mistake or is no longer in use.
By tidying up and removing these excess columns, you’ll streamline your dataset, just as you would declutter your living space.
Using Filters to Pinpoint Columns for Removal
Filtering in Excel is like turning on a powerful spotlight to illuminate the columns worthy of your attention and those that should take their final curtain call. You can utilize Excel’s filter options to sort through large datasets with ease, pinpointing the columns that are no longer relevant.
Here’s a simple guide to using filters for this task:
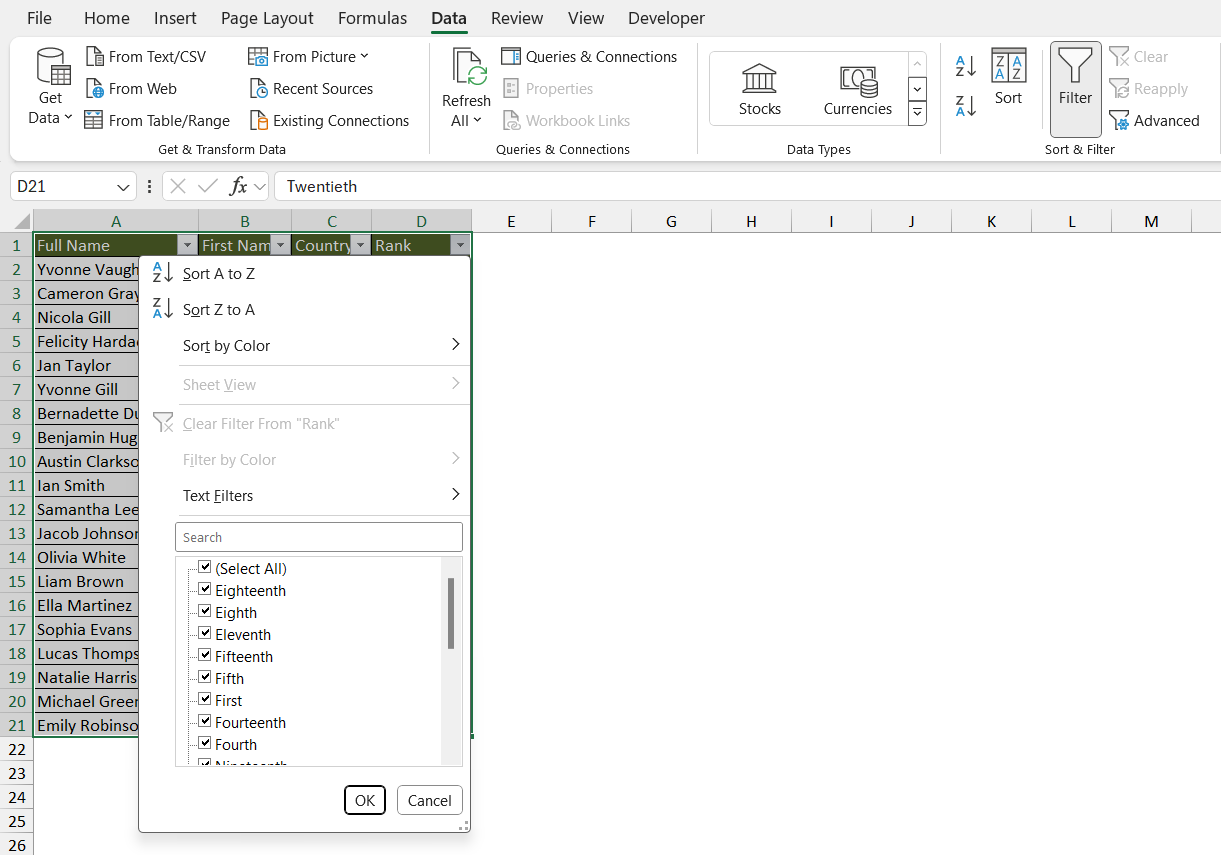
STEP 1: Select the entire sheet by clicking on the corner where rows and columns meet.
STEP 2: Head over to the “Data” tab and hit the “Filter” button.
STEP 3: Once the drop-down arrows appear, you can click on each to assess the data within that column.
Look for columns with data that don’t align with your current needs or analysis goals. These are often prime candidates for removal. By filtering and reviewing column contents systematically, you can make an informed decision about which to delete, simplifying your dataset and improving focus on the remaining relevant data.
Methods to Remove Columns in Excel
Method 1: Simple Deletions with Right-Click Options
Deleting a column via the right-click method in Excel is as straightforward as clearing off your desk – it’s the groundwork for a productive session. Here’s how you can do it neatly:
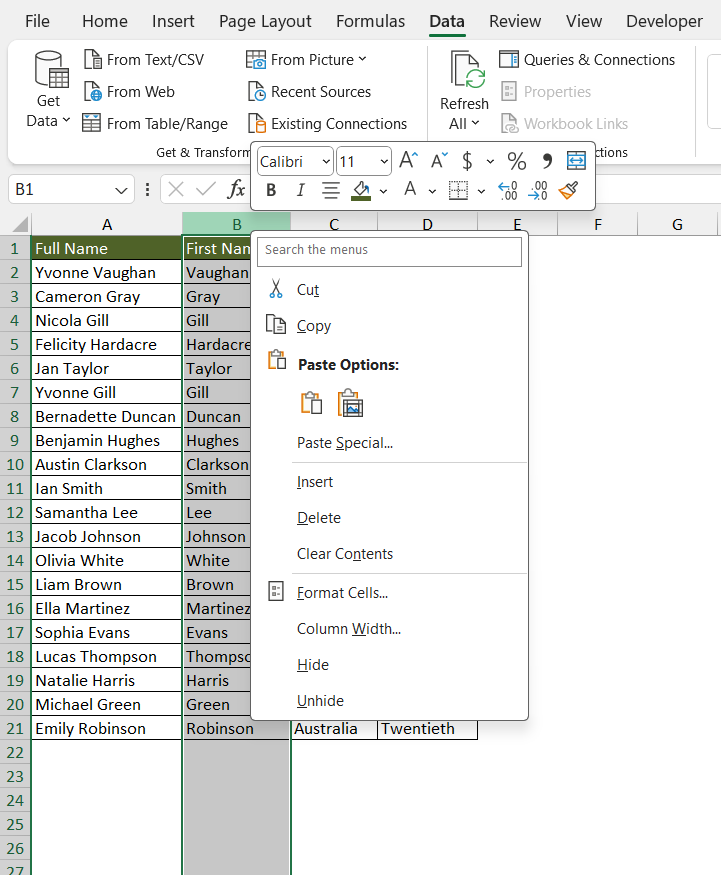
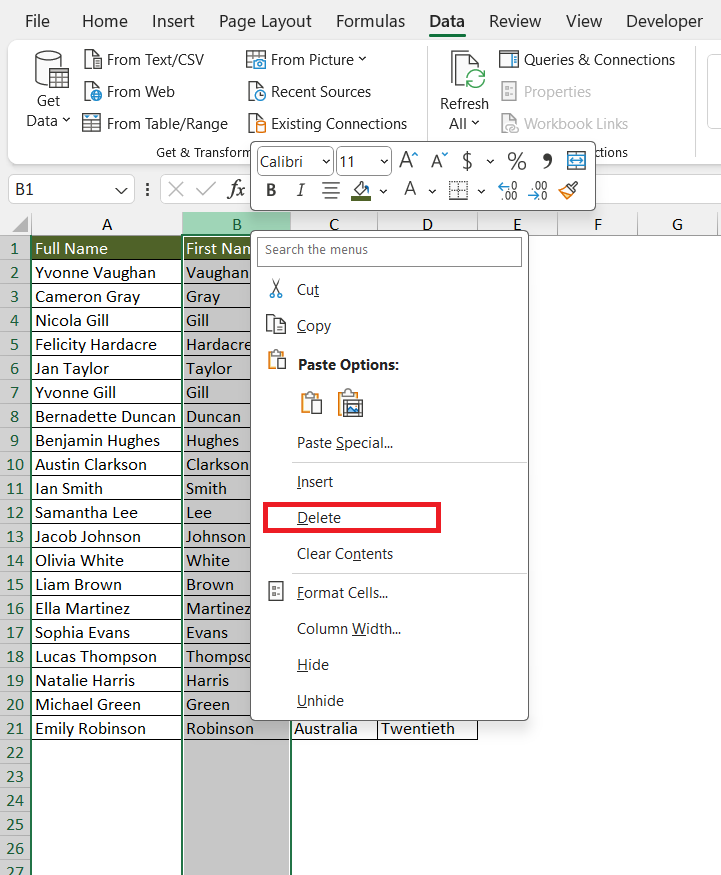
STEP 1: Click on the letter of the column you wish to remove. This highlights the entire column.
STEP 2: Right-click to bring up the context menu brimming with options.
STEP 3: Choose “Delete” from the list, and with a click, the column is whisked away.
This method works like a charm for quick deletions where simplicity is key. It’s perfect when you’re pruning one or a few columns in a more casual workflow.
Method 2: Swift Removal with Keyboard Shortcuts
Harnessing the magic of keyboard shortcuts for column deletion in Excel is like knowing a secret handshake – it’s a direct line to faster, more efficient data management. To perform this sleight of hand, follow these steps:
STEP 1: First, select the column by clicking its header letter. Or, for enhanced precision, use CTRL + Spacebar to ensnare the entire column.
STEP 2: Now, press and hold CTRL and tap – (minus key). Just like a well-aimed spell, the selected column vanishes.
This method is a significant time-saver, especially when you’re knee-deep in data and need to swiftly remove unwanted distractions. It brings a sense of control and rhythm to your work, particularly when repetitive tasks are at play.
Remember: On a Mac, swap CTRL for Command to achieve the same effect. If the goal is to delete multiple columns, extend your initial selection, then perform the same keyboard incantation to bid them all adieu simultaneously.
Best Practices for Column Management
Ensuring Data Integrity Before Deletion
Ensuring data integrity before pressing that delete key is as crucial as checking both ways before crossing the street. To preserve the sanctity of your dataset, consider the following steps:
- Save a backup: Before you make any changes, save a copy of the worksheet. This is your insurance policy against accidental data loss.
- Review meticulously: Each column could be housing integral data points. Scan them thoroughly to verify that their upcoming removal doesn’t sabotage your data narrative.
- Check formulas: If cells in your column are referenced by formulas elsewhere, deleting them could cause a spreadsheet calamity. Trace dependents to ensure no formulas will be affected adversely.
In essence, a few moments spent on these proactive measures can save hours of potential reconstruction efforts or data recovery.
Organizing Post-Deletion Layout for Clarity
After you’ve tidied up your spreadsheet by removing unwanted columns, consider the resulting layout as a freshly-tended garden—it’s time to ensure everything is in place for optimal growth. To organize your post-deletion layout for clarity, follow these guidelines:
- Adjust column widths: Make sure the remaining columns are suitably sized for their contents, not too wide or too narrow, for easy readability.
- Update headings: Revisit your headers to ensure they still accurately reflect the data beneath them; they act as signposts for quicker navigation.
- Realign data: If you have a mix of left, right, and center alignments, now might be a good time to standardize them to make the data easier to scan.
- Validate data relationships: Ensure that related data sets are still positioned next to each other. This aids in understanding the correlation and flow between different data points.
- Apply uniform formatting: Consistency in font, color, and style can make a massive difference in making your data not only presentable but also easier to analyze.
Taking the time to reorganize after column removals keeps your data garden well-manicured and your analyses robust and reliable.
Advanced Techniques for Bulk Column Removal
Deleting Multiple Adjacent and Non-Adjacent Columns
Removing multiple columns in Excel, whether they’re nestled together or scattered across the sheet, can be as smooth as orchestrating a well-practiced choir. Here’s how to conduct each scenario:
Utilizing Excel’s ‘Go To Special’ Feature for Blank Columns
Excel’s ‘Go To Special’ feature is a hidden gem for those looking to streamline their spreadsheets by removing blank columns. Imagine it as a metal detector that swiftly locates the hidden ‘treasures’ of empty space amidst a beach of data. Here’s how to use it:
STEP 1: First, select the area of your spreadsheet where the blank columns reside, or simply select the entire sheet if you’re unsure.
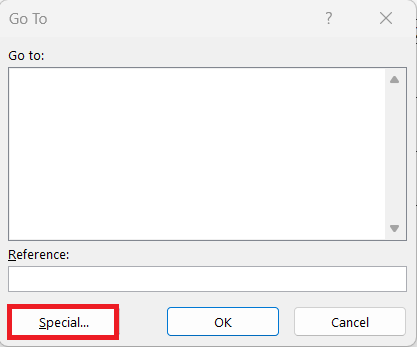
STEP 2: Next, press Ctrl + G, or F5 to open the ‘Go To’ dialog box, then click the ‘Special…’ button.
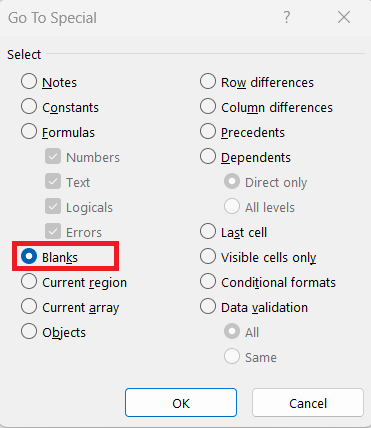
STEP 3: In the ‘Go To Special’ dialog box, choose ‘Blanks’. This action highlights all the blank cells in your selection.
STEP 4: Press and hold CTRL and tap – (minus key) and select Entire Column in the dialog box.
This will remove columns that contains blanks.
And like a master sculptor, you have chiseled away the excess, revealing a more refined and focused spreadsheet.
Common Pitfalls and How to Avoid Them
Mistakes When Deleting Vital Data
Deleting vital data is akin to accidentally throwing out your wallet while spring cleaning – it can have dire consequences. To avoid such blunders:
- Triple-check the importance of data before considering its removal. If in doubt, consult with a team member or refer to project guidelines.
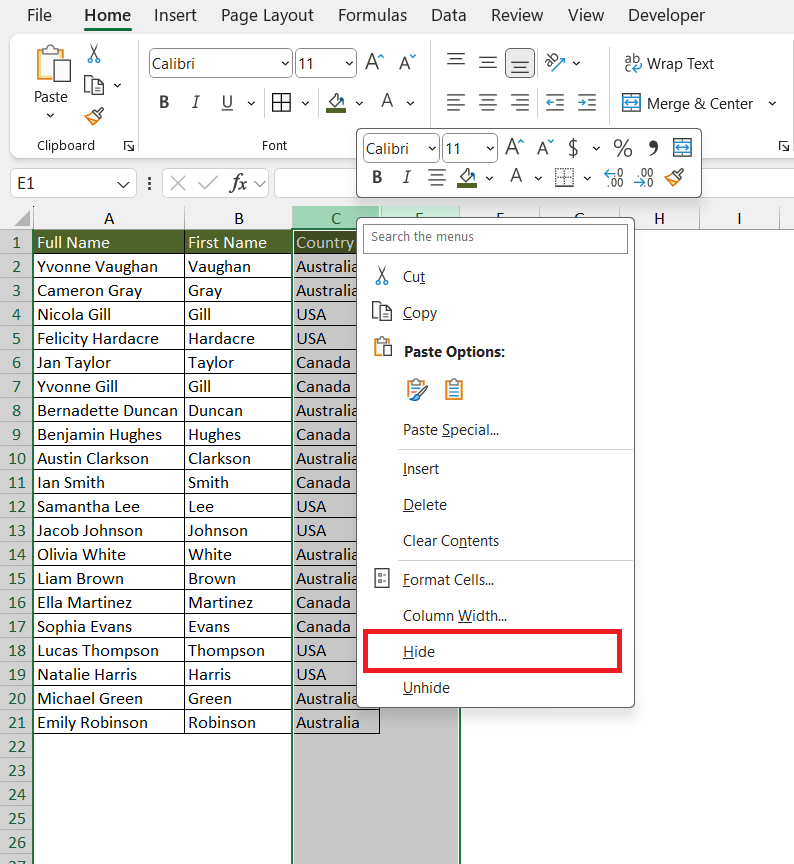
- Use “Hide” rather than “Delete” if unsure about the necessity of a column. This keeps your data intact but out of sight.
- Employ safeguards such as worksheet protection or creating data validation rules that prevent accidental changes to crucial cells.
By setting these precautionary steps into motion, you shield your dataset from the calamities of unintentional deletions, ensuring that every piece of critical information remains right where it belongs.
Solving Issues with Hidden and Filtered Columns
Addressing issues with hidden and filtered columns in Excel is about restoring order and visibility to your dataset. Perhaps you stumble upon a workbook with columns that have mysteriously vanished or can’t seem to delete rows that are supposedly non-existent. Here’s how you can tackle these conundrums:
- To reveal hidden columns, select the columns flanking the vanishing act and right-click to choose ‘Unhide’. The concealed data will reappear.
- For filtered columns, go to the ‘Data’ tab and click ‘Clear’ to remove all filters, bringing every column back into the spotlight.
- Remember, if columns remain elusive, they might be tucked away by a more permanent command such as ‘Group’; expand these to bring data back to the stage.
By keeping these strategies up your sleeve, you ensure that every piece of data has its moment in the sun and that you navigate your spreadsheets without falling into hidden data traps.
Recovering from Deletion Errors
Reliability of the ‘Undo’ Feature
Excel’s ‘Undo’ feature is your trusty sidekick, poised to swoop in and rescue your columns should your fingers slip in haste. As reliable as the tides, pressing Ctrl + Z (or Command + Z on a Mac) can instantly roll back the deletion of your column. This feature is especially effective when the mistake is caught immediately, keeping your data-integrity fears at bay.
But be forewarned, closing your workbook or excessive subsequent actions may dull your sidekick’s powers, rendering them unable to perform their restorative duties. Use the ‘Undo’ button with swift confidence, but also with the knowledge of its limitations.
Restoring Columns from Backup Versions
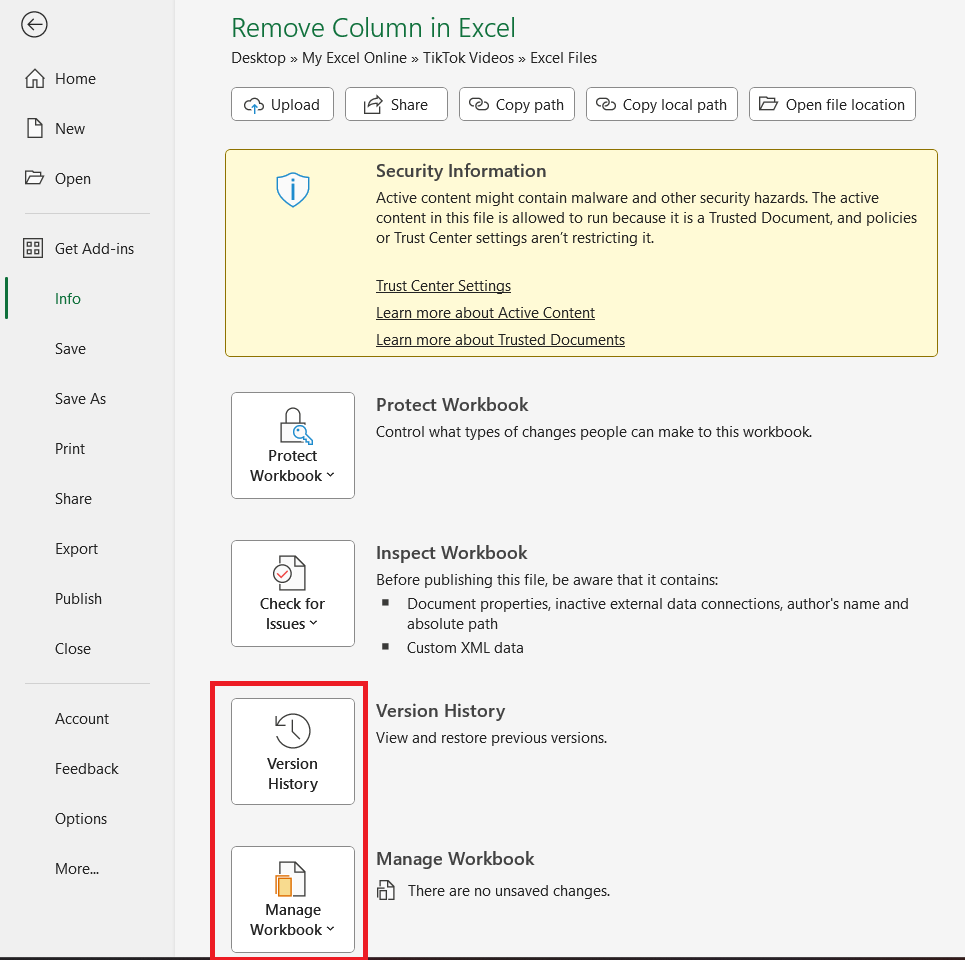
Should the ‘Undo’ feature fail you, all hope is not lost – Excel’s backup versions are akin to a time machine, allowing you to turn back the clock on your data. Here’s how to harness this power:
- Navigate to ‘File’ > ‘Info’ and look for ‘Manage Workbook’ or ‘Version History’, depending on your Excel version. This treasure trove stores historical snapshots of your spreadsheet.
- Sift through these echoes of the past to find the version with your column still intact, and open it.
- You can then either work from this version or copy the essential columns back into your current worksheet.
This method is like having a safety net beneath your high-wire act of data management, offering peace of mind that a safety copy is but a few clicks away.
FAQs
How Do I Quickly Remove Multiple Columns in Excel?
To remove multiple columns quickly in Excel, select the first column, hold down the “Shift” key and click on the last column you want to delete. Then, right-click and select “Delete” or simply press “Ctrl” (or “Command” on Mac) and “-” on your keyboard. This will remove all selected columns at once.
Is There a Way to Delete All Empty Columns at Once?
Yes, to delete all empty columns at once, insert a helper row and use the COUNTA formula to identify blank columns. Then, with the helper row utilized, select the blank columns, and delete them in one go.
Can Deleted Columns in Excel Be Recovered After Saving?
Yes, deleted columns can sometimes be recovered after saving. Look for and use features like ‘Version History’ or ‘Recover Unsaved Workbooks’ to restore previous versions of your Excel file. However, the success of recovery depends on the settings and version of Excel you’re using.
How do I delete extra columns in Excel that go on forever?
To remove column in Excel that go on forever, first, select the column immediately after your data ends. Then, press Ctrl + Shift + Right Arrow to highlight all remaining columns to the right. Right-click on the highlighted columns and choose “Delete.” This will remove all the selected extra columns in one action.
What is the shortcut to remove column in Excel?
The shortcut to remove column in Excel is Ctrl + - (holding the “Ctrl” key and pressing the minus key). First, select the column you wish to delete by clicking its header, then use the shortcut for quick removal.
John Michaloudis is a former accountant and finance analyst at General Electric, a Microsoft MVP since 2020, an Amazon #1 bestselling author of 4 Microsoft Excel books and teacher of Microsoft Excel & Office over at his flagship MyExcelOnline Academy Online Course.

