OneDrive is deeply integrated into Windows 10, serving as your convenient bridge to the cloud for file management. It offers a smooth experience for storing documents, photos, and other files online and accessing them from anywhere. Syncing across devices is a breeze, which means the work you do on your PC can be picked up on your phone or tablet without missing a beat.
Download our 141 Free Excel Templates and Spreadsheets!
Key Takeaways
- Uninstall OneDrive via Windows Settings by removing the desktop application from the PC Settings, ensuring it no longer integrates with your system.
- Disable OneDrive using the Registry Editor by navigating to `HKEY_LOCAL_MACHINE\SOFTWARE\Policies\Microsoft\Windows`, creating a new key called `OneDrive`, and setting the `DisableFileSyncNGSC` value to `1`, which will require a system reboot to take effect.
- Permanently remove OneDrive by either using standard uninstallation procedures or employing more advanced methods like Group Policy Editor, catering to different Windows account versions and user preferences.
Reasons for Disabling or Removing OneDrive Folder
There are quite a few reasons why you might want to turn off or remove OneDrive folders. For starters, if you’re not using cloud storage, OneDrive can be an unnecessary addition that prompts you often to save files you’d rather keep local. Also, for those conscious about their system’s performance, OneDrive can be seen as an extra load that potentially slows down the boot process. Then there’s the issue of storage – OneDrive’s default folder takes up space, and if you’re running on a machine with limited storage, every gigabyte counts. For users who prefer another cloud service, OneDrive might simply be redundant, or perhaps concerns around data privacy are leading you to seek a more private storage solution.
Table of Contents
Step-by-Step Guide to Disabling OneDrive on Boot
Adjusting Your Startup Settings
Tackling OneDrive’s behavior right from startup is a good place to begin. You can easily adjust your startup settings to prevent OneDrive from launching when you power up your PC. Here’s what you need to do:
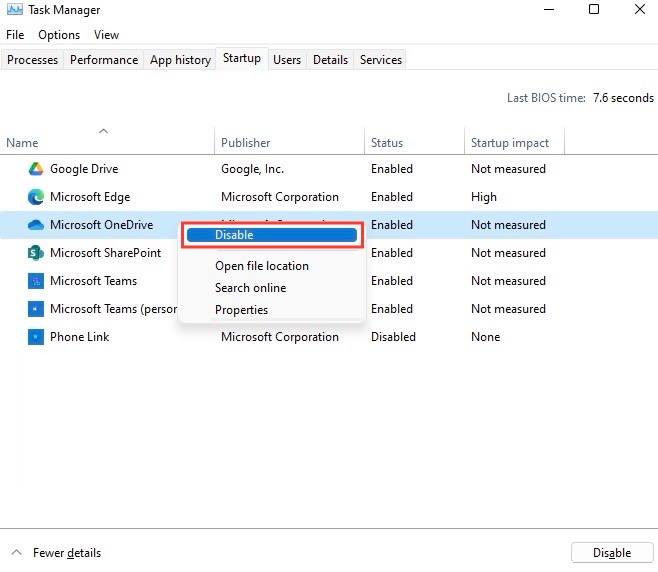
STEP 1: Open the Task Manager (Ctrl+Shift+Esc)
STEP 2: Navigate to the ‘Startup’ tab
STEP 3: Locate OneDrive in the list of startup applications
STEP 4: Right-click on OneDrive and selecting ‘Disable’
With these simple steps, you’ll ensure that OneDrive stays dormant unless you decide otherwise.
Utilizing Windows Group Policy Editor
If you’re looking to take a more hands-on approach, the Windows Group Policy Editor is your ally. It offers you advanced control over the behavior of OneDrive on your machine. Here’s a step-by-step guide to put the brakes on OneDrive:
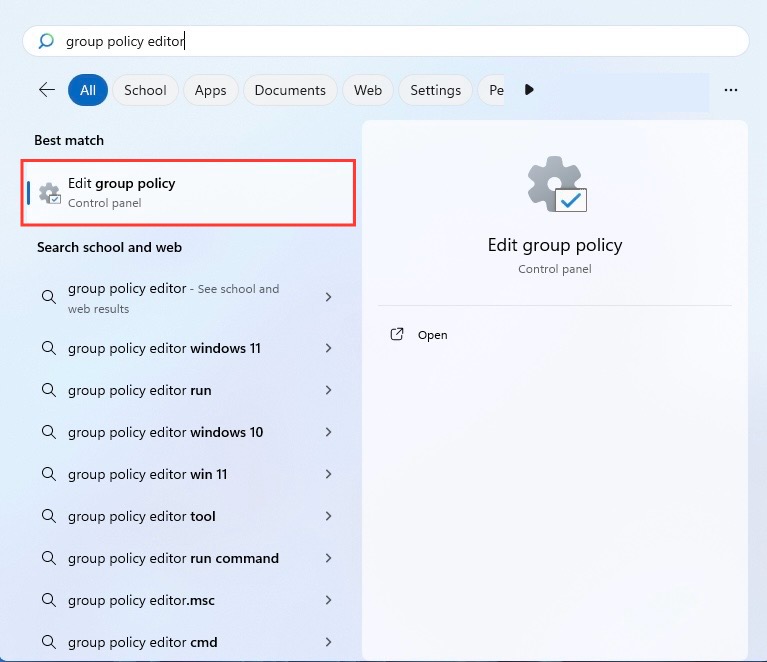
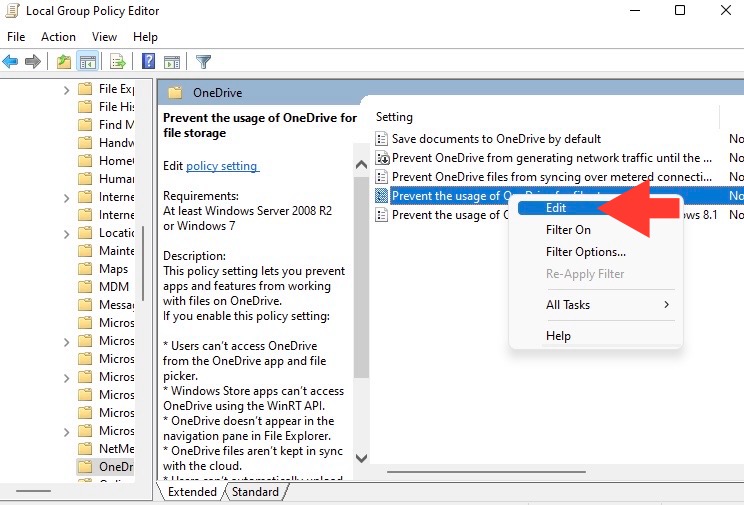
STEP 1: Open the Windows Start menu, type “Group Policy Editor,” and hit Enter to launch.
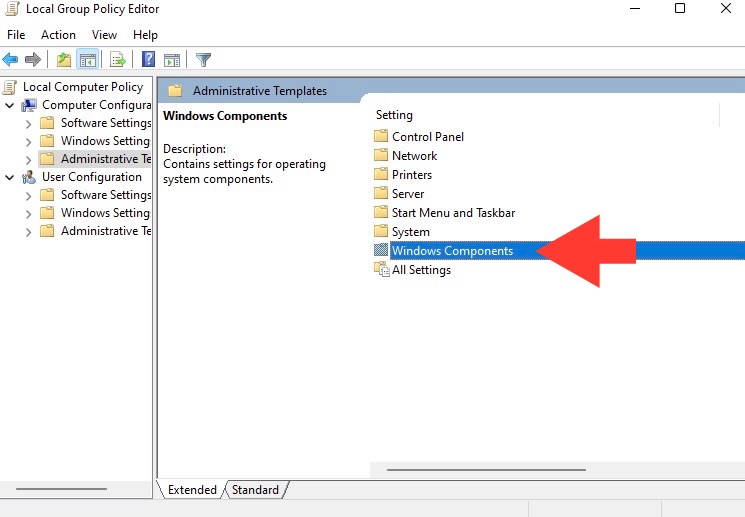
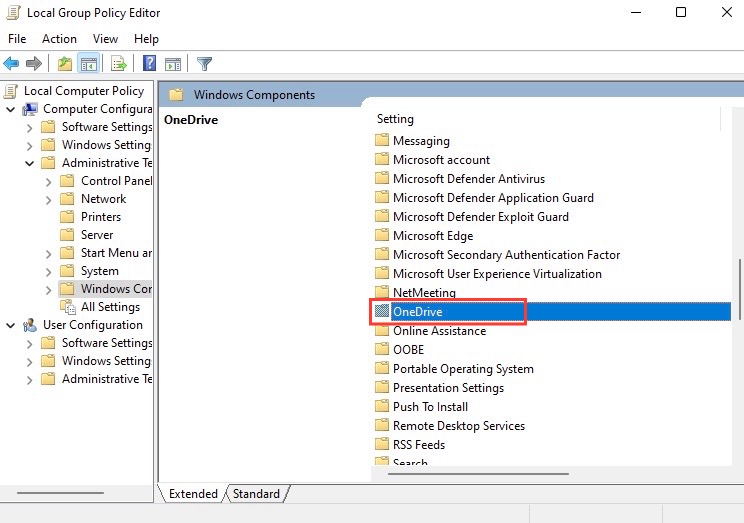
STEP 2: Navigate to: Computer Configuration > Administrative Templates > Windows Components > OneDrive.
STEP 3: Find and right-click “Prevent the usage of OneDrive for file storage.”
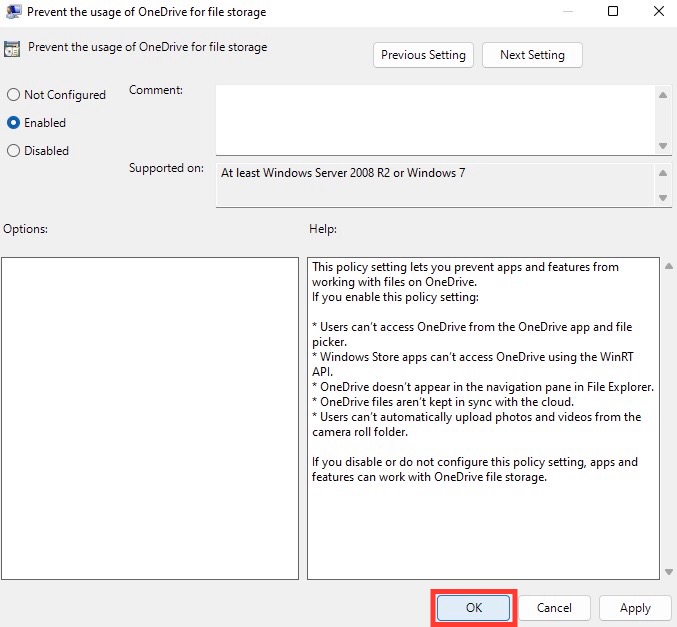
STEP 4: Click “Edit” and select “Enabled.”
STEP 5: Apply the changes by clicking “OK.”
Now, you’ve effectively disabled OneDrive. It’ll no longer show up in File Explorer, and you’ve taken back control over your file storage options.
Methods to Remove OneDrive Folder from File Explorer
Windows Settings Simplified
For those who prefer a straightforward approach without diving too deep into system settings, the Windows Settings menu offers a user-friendly way to remove OneDrive. Simply follow these steps:
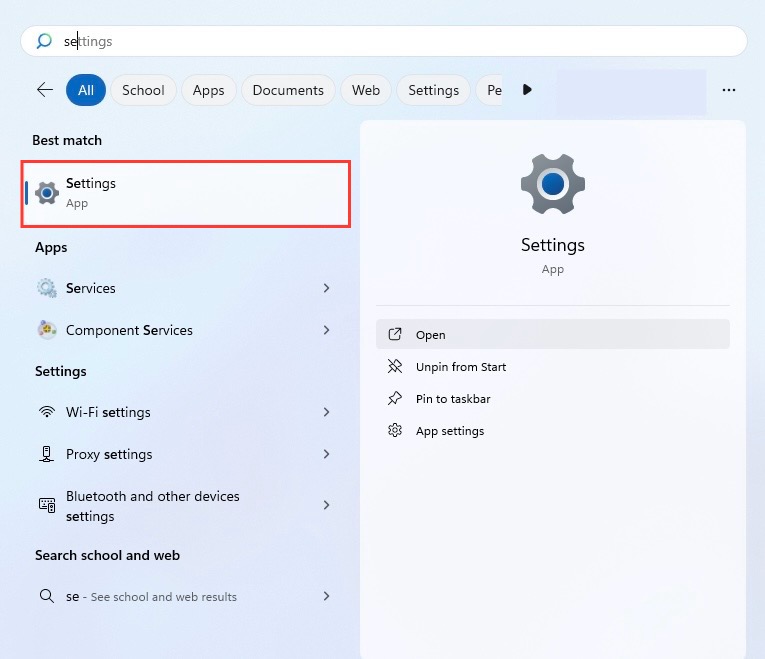
STEP 1: Click on the Start menu and select ‘Settings’.
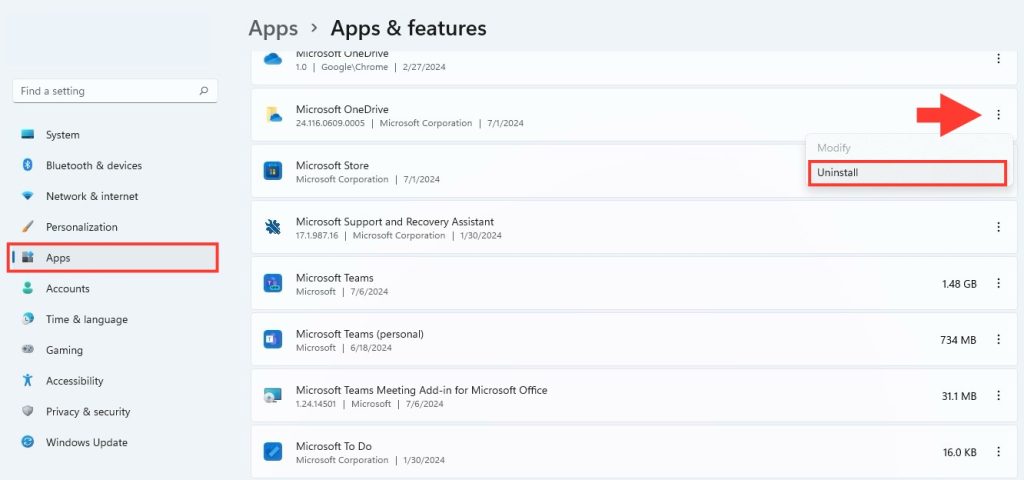
STEP 2: Go to ‘Apps’ and then ‘Apps & features’.
STEP 3: Scroll down to find Microsoft OneDrive.
STEP 4: Click on it and then select ‘Uninstall’.
This hassle-free method quickly removes the OneDrive app from your system, liberating you from the automatic sync and storage prompts.
The Power of Registry Editing
Registry editing is a mighty tool that allows you to tweak your system settings at a more granular level. If you’re on Windows 10 Home, where Group Policy Editor isn’t available, this is your go-to method. Take heed, though: editing the registry should be done with caution, but by sticking to these steps, you’ll be navigating like a pro:
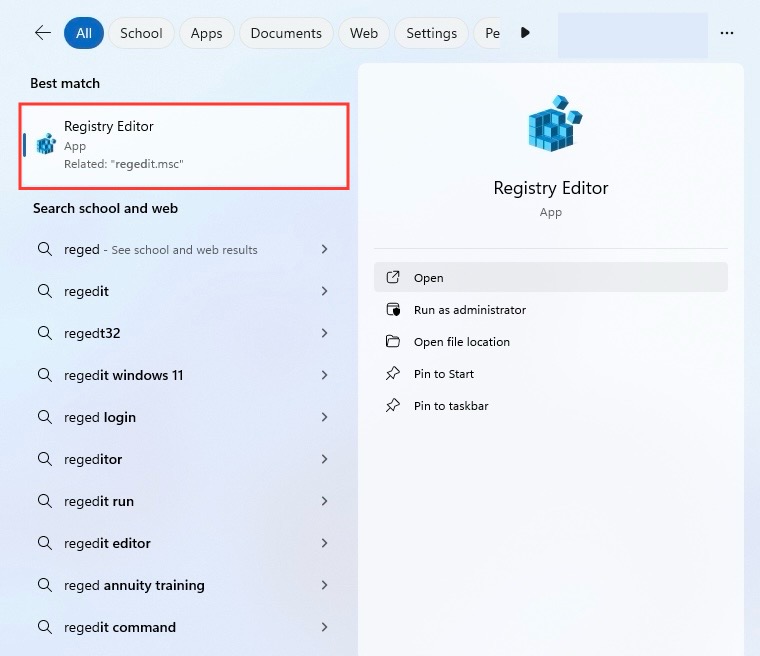
STEP 1: Press the Windows key, type “Regedit,” and hit Enter to launch Registry Editor.
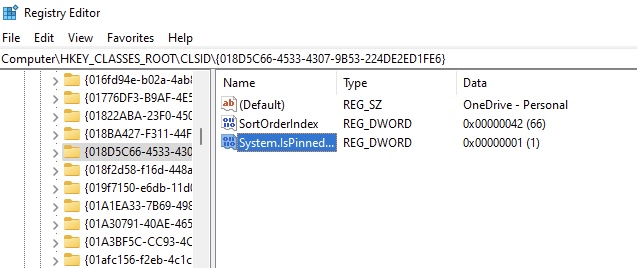
STEP 2: Navigate to the key: HKEY_CLASSES_ROOT\CLSID\{018D5C66-4533-4304-9B53-224DE2ED1FE6}
STEP 3: Within the right pane, locate and double-click System.IsPinnedToNameSpaceTree.
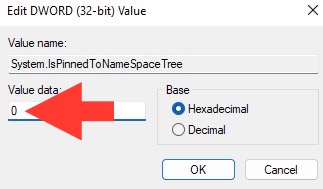
STEP 4: Change the value to 0 and click “OK”.
Additionally, for 64-bit users:
- Head to
HKEY_CLASSES_ROOT\Wow6432Node\CLSID\{018D5C66-4533-4304-9B53-224DE2ED1FE6}and repeat the process.
After a quick restart, you’ll notice OneDrive is no longer lurking in your File Explorer’s sidebar.
Operating without Local Copies: Using Selective Sync
How Selective Sync Frees Up Space
Selective Sync is a feature in OneDrive that allows you to choose specific folders to sync to your device, while leaving the rest in the cloud. This can significantly free up space on your hard drive because only the files you need are taking up local space. Think of it as an a la carte menu for your files – you only take what you fancy, leaving behind what you don’t, making it an efficient way to manage storage space on devices with limited capacity.
To use Selective Sync, go to OneDrive settings, click on the ‘Account’ tab, choose ‘Choose folders’, and then simply select the folders you want to sync. The rest will stay in the cloud, accessible but not occupying your disk space.
Managing Files Post-Selective Sync
Once you activate Selective Sync, managing your files becomes a breeze, with the bulk of your data residing safely in the cloud. For the folders you choose not to sync, they’re not gone; they’re simply stored online until you need them. When that moment arrives, it’s easy to access these files:
- Navigate to your OneDrive folder in File Explorer.
- Access your files directly through the OneDrive web interface.
- Or, if necessary, resync folders using the OneDrive settings.
Remember, changes made to the files on one device won’t automatically sync if that folder isn’t selected for syncing. This creates a more manual, but controlled, file management experience.
Anticipating the Effects of OneDrive Uninstallation
When you decide to uninstall OneDrive, anticipating the effects can help avoid surprises. Firstly, the OneDrive folder on your system will vanish, but your files aren’t lost—they remain safely stored on OneDrive’s cloud servers. Also, keep in mind that any files only stored locally within the OneDrive folder should be backed up elsewhere before uninstalling, or they’ll be gone for good.
Post-uninstallation, no further auto-syncing will occur, so any updates to cloud-stored files from other devices won’t reflect on your PC. If you choose to reinstall OneDrive later, a manual setup will be needed to restore your sync settings.
Additional Tips for a Smooth OneDrive Detachment
Cleaning Up Residual Files and Links
Cleaning up after uninstalling OneDrive is like dotting the i’s and crossing the t’s in your digital workspace. Residual files might linger, possibly taking up space or causing confusion. Therefore, run a quick system search for any remaining OneDrive folders and delete them. Don’t forget to check the system tray and start-up programs list to ensure OneDrive isn’t there, waiting to auto-start with your next boot.
Moreover, check for and remove any lingering shortcuts to the now-defunct OneDrive folder that may reside on your desktop or in File Explorer’s sidebar, maintaining a tidy and efficient workspace.
FAQ – Mastering OneDrive Removal in Win10
Can I Reenable OneDrive after Disabling It?
Absolutely, reenabling OneDrive after disabling it is as simple as reversing the original steps. If you used the Group Policy Editor, navigate back and set the policy to “Not Configured.” Or reinstall OneDrive if you have uninstalled it. Your files will be just as you left them in the cloud, ready to sync once again.
Will My Files Remain Safe in the Cloud If I Uninstall OneDrive?
Rest assured, uninstalling OneDrive won’t affect your cloud-stored files. They will remain intact and accessible through the OneDrive website or the mobile app, ensuring your data is safe and available whenever you need it.
What Should I Do if I Encounter Errors during the OneDrive Removal Process?
If you hit a snag during the removal process, restart your PC to ensure there’s no open instance of OneDrive. Should problems persist, run the Windows troubleshooter or consider seeking help from Microsoft’s support page specifically for OneDrive issues.
John Michaloudis is a former accountant and finance analyst at General Electric, a Microsoft MVP since 2020, an Amazon #1 bestselling author of 4 Microsoft Excel books and teacher of Microsoft Excel & Office over at his flagship MyExcelOnline Academy Online Course.

