Power Query lets you perform a series of steps to transform your messy Excel data. One of the most common steps I do, is to clean my data and remove rows, and Power Query gives you a lot of options to do so!
Key Takeaways
-
Quickly Remove Unwanted Data – Power Query allows you to remove rows based on conditions, helping clean up large datasets efficiently.
-
Delete Specific Rows by Position – You can remove top rows, bottom rows, or alternate rows without affecting the rest of the data.
-
Filter Out Rows Based on Values – Use filters to remove rows containing specific values, blanks, or errors.
-
Remove Duplicates for Clean Data – Power Query provides a one-click option to eliminate duplicate rows while keeping unique records.
-
Steps Are Recorded for Automation – Power Query saves every action as a step, so you can refresh data later without repeating the process.
Table of Contents
Our Source Table
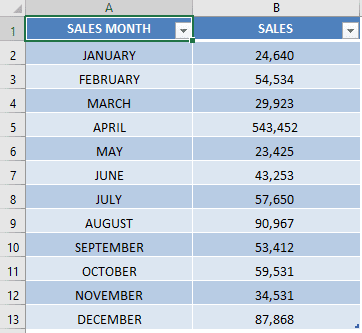
Here is our source table that we want to modify:
How to Remove Rows Using Power Query
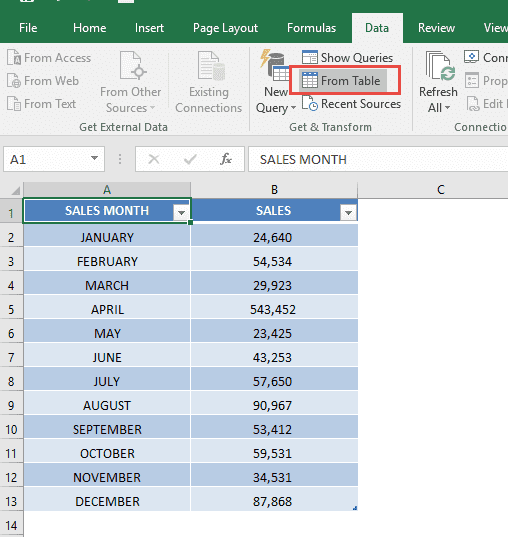
STEP 1: Our sample data contains the Sales numbers for each month. Let us first prepare to use this data in Power Query.
Go to Data > Get & Transform > From Table (Excel 2016) or Power Query > Excel Data > From Table (Excel 2013 & 2010)
Excel 2016:
Excel 2013 & 2010:
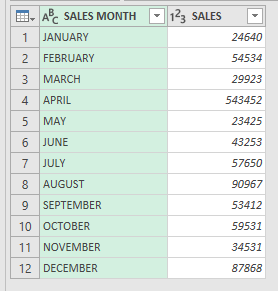
STEP 2: This will open up the Power Query Editor.
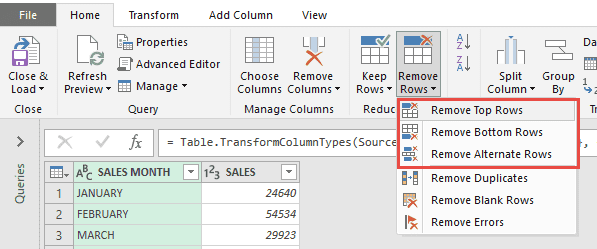
If you go to Home > Reduce Rows > Remove Rows
There are a lot of options! Let us see these 3 in action:
- Remove Top Rows
- Remove Bottom Rows
- Remove Alternate Rows
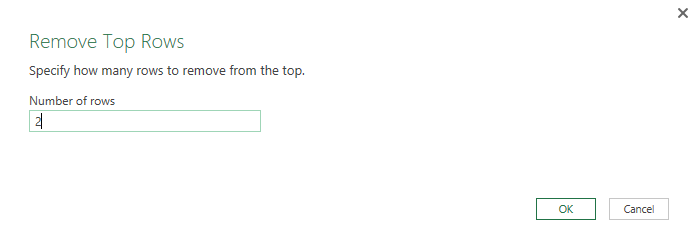
STEP 3: Go to Home > Reduce Rows > Remove Rows > Remove Top Rows
Let us try to remove the first two rows. Input 2 as the number of rows. Click OK.
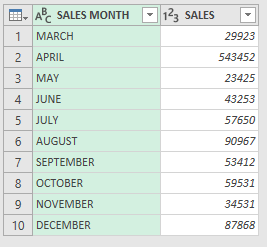
You can see January and February are now removed.
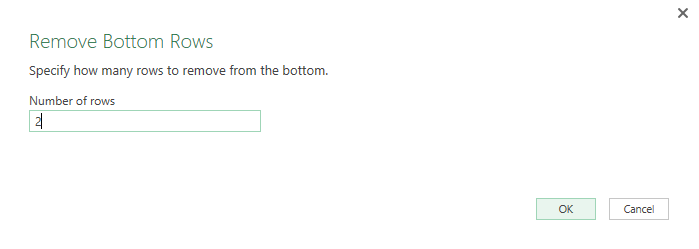
STEP 4: Go to Home > Reduce Rows > Remove Rows > Remove Bottom Rows
Let us try to remove the bottom two rows. Input 2 as the number of rows. Click OK.
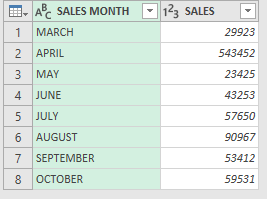
You can see November and December are now removed.
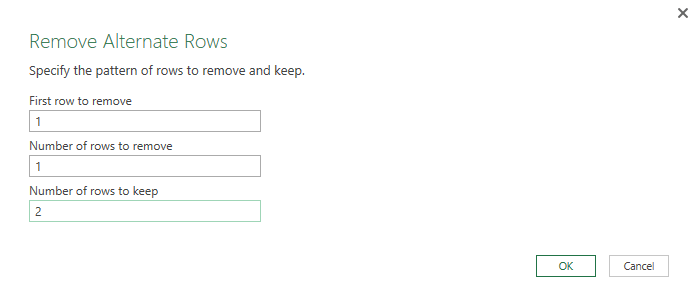
STEP 5: Go to Home > Reduce Rows > Remove Rows > Remove Alternate Rows
This is a bit trickier to use. Let us say we want to remove the following months: 3 (March), 6 (June) and 9 (September).
To do that, let us input the following:
- First row to remove – 1
- Number of rows to remove – 1
- Number of rows to keep – 2
- Click OK.
This will remove starting from the first row, then the pattern is that row will be removed, then skip the next 2 rows, then do the same pattern again. Essentially it means removing the first row of every 3 rows.
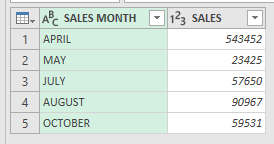
You can see March, June, and September are now removed.
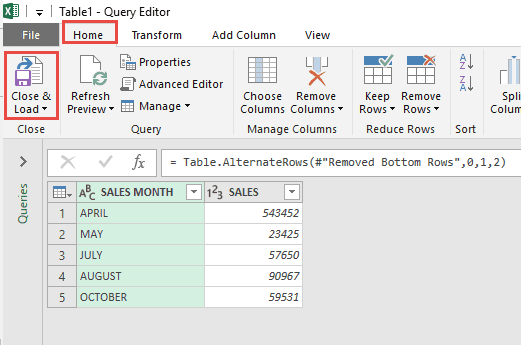
STEP 6: Click Close & Load from the Home tab and this will open up a brand new worksheet in your Excel workbook with the new data.
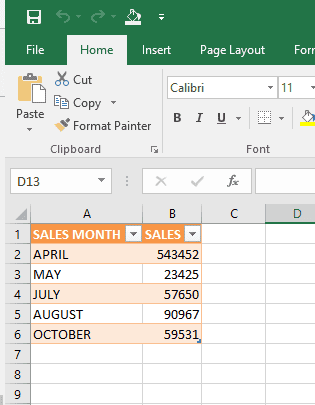
You now have your new Excel table with the cleaned up rows!
Frequently Asked Questions
How do I remove blank rows using Power Query?
In Power Query, select the column, go to Home → Remove Rows → Remove Blank Rows to delete all empty rows.
Can I remove rows based on a condition?
Yes! Use the Filter option in Power Query to exclude rows based on specific criteria, such as values, text, or date conditions.
How do I remove duplicate rows in Power Query?
Select the relevant columns, then go to Home → Remove Duplicates, which will delete repeated values while keeping unique ones.
Is it possible to delete the first or last few rows in Power Query?
Yes, under Home → Remove Rows, you can choose Remove Top Rows or Remove Bottom Rows and specify how many rows to delete.
Will my changes stay if I refresh the Power Query?
Yes! Power Query saves all steps, so when you refresh, Excel will apply the same row removal rules to updated data automatically.

Bryan
Bryan Hong is an IT Software Developer for more than 10 years and has the following certifications: Microsoft Certified Professional Developer (MCPD): Web Developer, Microsoft Certified Technology Specialist (MCTS): Windows Applications, Microsoft Certified Systems Engineer (MCSE) and Microsoft Certified Systems Administrator (MCSA).
He is also an Amazon #1 bestselling author of 4 Microsoft Excel books and a teacher of Microsoft Excel & Office at the MyExecelOnline Academy Online Course.
