Overview of Outlook’s Rescheduling Features
Outlook’s rescheduling features are designed to give you control and convenience when managing meetings. Whether you’re dealing with a one-time event or a series of recurring meetings, Outlook allows you to easily adjust dates and times. Tools are at your fingertips to suggest new times, inform attendees of changes, and swiftly update the calendar. These features save you from the hassle of back-and-forth communications, keeping everything streamlined and organized.
Learn about Excel with our Free Microsoft Excel Online Course!
Key Takeaways
- To reschedule a meeting in Outlook, open the calendar, double-click the meeting to access its details page, then change the time, date, length, or description, and click “Send Update” to notify attendees.
- You can also reschedule a meeting simply by dragging it to a new time slot in your calendar, and confirming the change when prompted, automatically sending an update to all attendees.
- Only the organizer of the meeting can reschedule or change meeting details, and if new attendees are added without changing the timing, there is an option to notify only the new attendees.
Table of Contents
Preparing to Reschedule a Meeting in Outlook
Checking Attendees’ Availability
Before you go ahead with rescheduling a meeting in Outlook, it’s prudent to check if the proposed time works for everyone involved. Thanks to Outlook’s Scheduling Assistant, glancing through your attendees’ availability becomes a breeze. It graphically displays free/busy information for all attendees, so you can find a time slot that is free for all. This pre-emptive step helps you avoid further rescheduling and ensures maximum attendance once the meeting is set.
Communicating Changes Effectively
Effective communication is the linchpin in successfully rescheduling meetings. When a change is inevitable, conveying the message promptly and clearly to your attendees is crucial. It’s good practice to explain the reason for the change to maintain transparency. Offer alternative dates and times directly in the communication to show your commitment to the meeting’s importance. Demonstrating respect for attendees’ time by apologizing for the inconvenience can help maintain good relations and set a positive precedent for future interactions.
Step-by-Step Guide to Reschedule Single or Recurring Meetings
Altering a One-Time Outlook Meeting
To alter a one-time Outlook meeting, follow these steps:
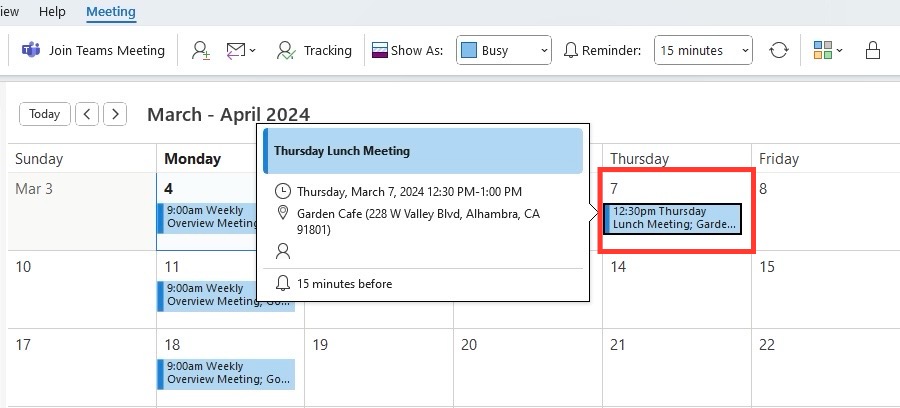
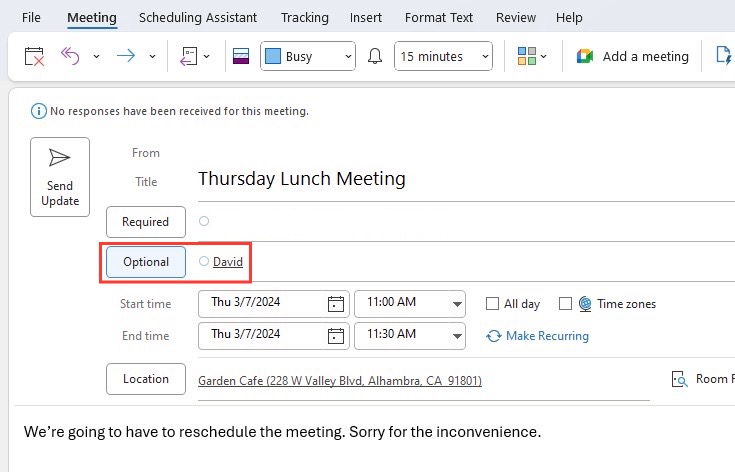
STEP 1: In your Outlook calendar, double-click the specific meeting to open it.
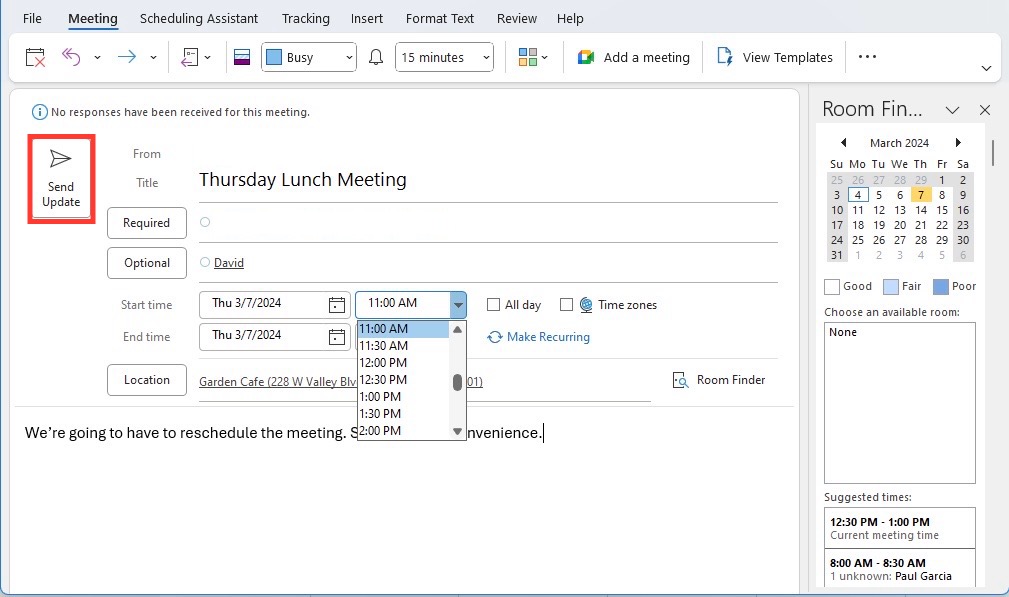
STEP 2: Choose a new time and date that suits everyone. Take advantage of the Scheduling Assistant to avoid conflicts.
STEP 3: Include a message in the body area if you wish to provide details or reasons for the reschedule.
STEP 4: Send the update by clicking the “Send Update” button to notify all attendees of the change.
Remember, it’s a good idea to follow up personally with key participants to ensure they are aware of the adjustments and to reinforce the importance of their attendance.
Adjusting Recurring Meetings and Series in Outlook
When it comes to adjusting recurring meetings and series in Outlook, you have the flexibility to edit a single instance or the entire series depending on your needs. Here’s what to do:
To Reschedule the Entire Series:
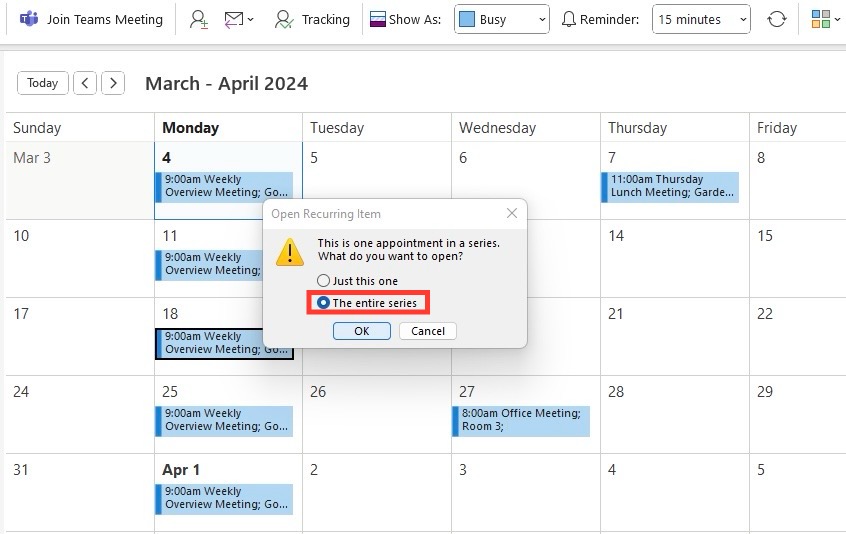
STEP 1: Open Outlook Calendar and double-click on any occurrence of the recurring meeting.
STEP 2: When prompted, select “The entire series”, then click “OK.”
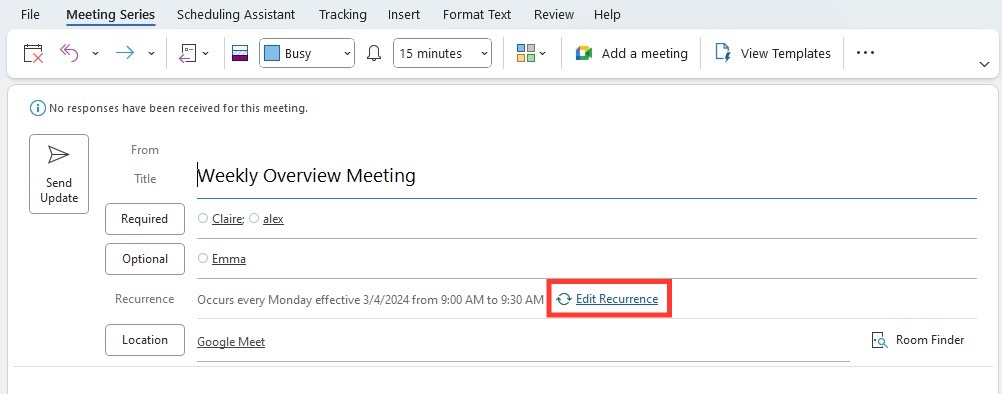
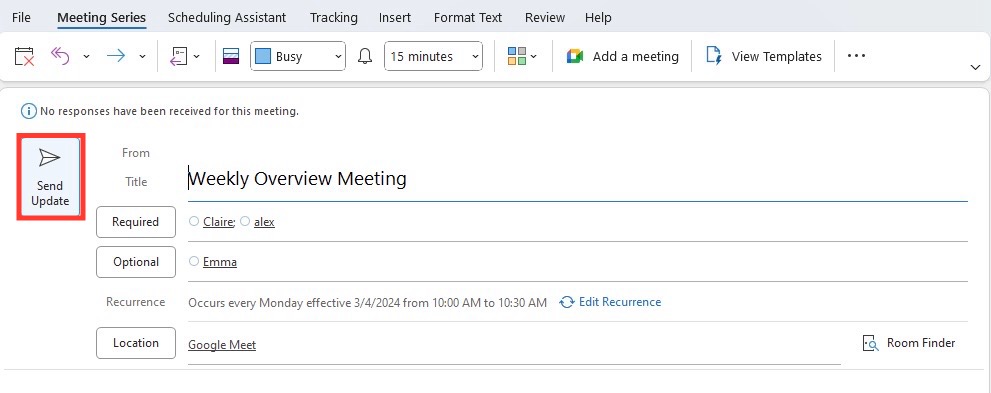
STEP 3: In the meeting series window, change any options as needed—such as subject, location, and time.
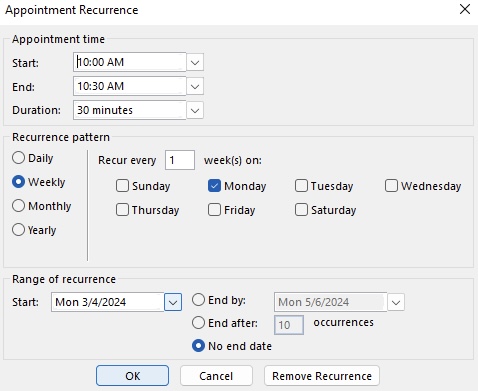
STEP 4: To edit recurrence settings, navigate to the “Recurrence” button to adjust frequency, range, and other recurring options.
STEP 5: After making changes, write a concise message to attendees to explain the alterations, then hit “Send Update.”
To Edit a Single Instance:
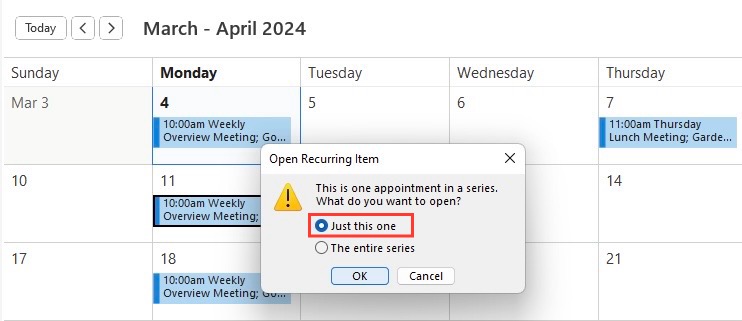
STEP 1: Click on the occurrence you wish to change in Outlook Calendar.
STEP 2: Choose “Just This One” when prompted.
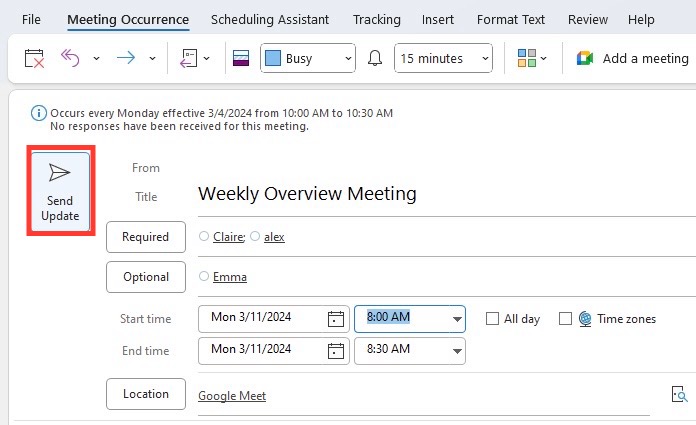
STEP 3: Modify the date and time as necessary and include any relevant notes to attendees.
STEP 4: Save or send the update for that single instance.
Bear in mind, changing one instance within a series comes with certain restrictions—you can’t reschedule it to a date that conflicts with another in the series. Communication of changes should also be clear to avoid confusion among participants.
Tips for a Hassle-Free Reschedule Process
Best Practices for Notification and Confirmation
For effective notification and confirmation when rescheduling, you’ll want to follow these best practices:
- Timeliness: Notify attendees as soon as possible about the changes.
- Clarity: Ensure the new details are clear and prominent in your message.
- Request for Confirmation: Ask recipients politely to confirm their availability. For example, “Please confirm receipt of this email and your availability for the newly proposed date and time.”
- Use of ‘Send Update’: Under the Meeting Organizer tab in Outlook, use the “Send Update” feature to notify attendees of the new date and time.
- Notify All Attendees: Make it a point to select “Notify Attendees” so that each person receives the update.
- Conflict Avoidance: Double-check the calendar to ensure the new timing doesn’t collide with other events.
- Personal Touch: Personalize your message, recognizing each attendee’s importance and maintaining a rapport.
Every change in the meeting should ideally come with a brief explanation of why the rescheduling is necessary, along with an apology for any inconvenience caused. This approach upholds professionalism and consideration for others’ schedules.
Avoiding Common Pitfalls When Rescheduling
To navigate the rescheduling process smoothly, here are some pitfalls to avoid:
- Last-minute Changes: Try to give attendees as much notice as possible to prevent disruptions to their schedules.
- Lack of Context: Always provide a reason for the change to maintain clarity and keep everyone informed.
- Forgetting to Confirm: Don’t presume everyone will see the automatic update. Ask for a RSVP to the new time.
- Overlooking Details: Ensure the rescheduled invite includes all the previous details such as agenda, necessary documents, and dial-in information.
- Failing to Double-check Schedules: Use Outlook’s Scheduling Assistant to make sure the new time works for all attendees.
Being mindful of these potential issues can help you maintain effectiveness and respect for everyone’s time.
Managing Participants and Responses Post-Rescheduling
Adding Additional Attendees After Rescheduling
If you need to add more people to your meeting after it has been rescheduled, the process is straightforward:
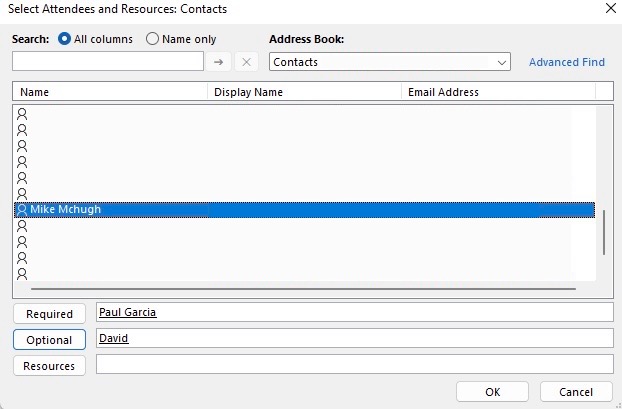
STEP 1: In Outlook, open the updated meeting window and click on the “Invite Attendees” option under the “Options” tab.
STEP 2: Enter the contact information for the new attendees you want to add.
STEP 3: After adding the necessary contacts, click “OK” to include them in the meeting.
STEP 4: A key step is then to select “Send Update” to ensure that the invitation is extended to the new participants.
It’s considerate to inform the newly added attendees about the prior scheduling changes and provide them with the context they need to join the meeting effectively.
Tracking Acceptances and Declines in Updated Meetings
to keep tabs on who’s coming to your updated meeting, Outlook provides an easy way to track responses:
STEP 1: Open the meeting request in your Outlook calendar.
STEP 2: Go to the “Tracking” button under the “Meeting” tab to view a list of who has accepted, tentatively accepted, or declined.
STEP 3: If you’re the organizer, you’ll automatically receive responses in your inbox, which Outlook tracks and tallies.
Staying updated on this information helps with further planning, such as adjusting the meeting space and resources needed.
FAQ – Your Questions Answered
How do I reschedule a meeting without sending updates to everyone?
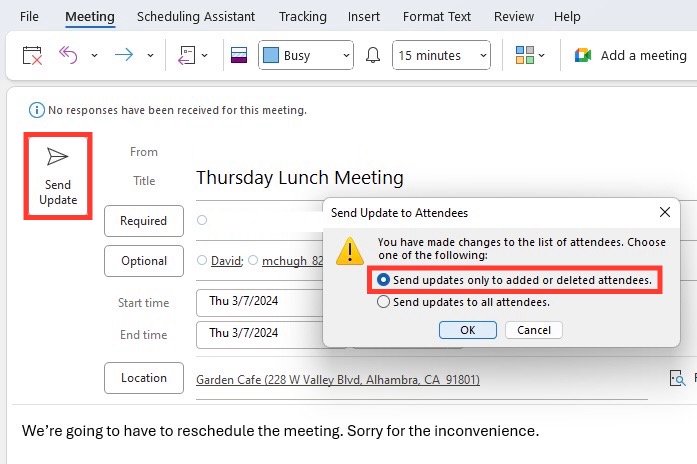
To reschedule a meeting without sending updates to everyone, follow these steps:
STEP 1: Open the meeting in your Outlook calendar.
STEP 2: Make the necessary changes to the date and time.
STEP 3: When you send the update, choose the option to “Send updates only to added or deleted attendees.”
This ensures that individuals who were already aware of the meeting details will not be overwhelmed with redundant notifications.
What if I need to cancel a meeting?
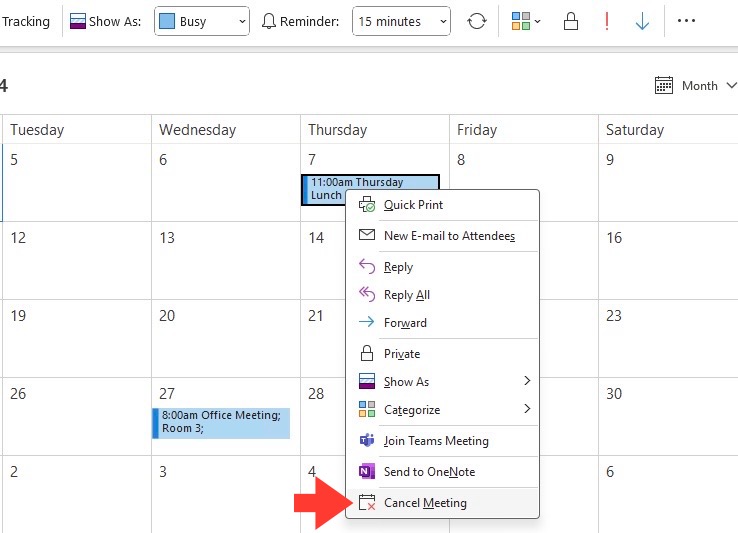
If you need to cancel a meeting:
STEP 1: Open the meeting in Outlook.
STEP 2: Click on “Cancel Meeting” in the Meeting tab.
STEP 3: Type a brief message explaining the cancellation, then select “Send Cancellation” to notify all attendees.
The meeting will be removed from everyone’s calendar once they accept the cancellation notice. Click here to learn how to uncancel a meeting!
Can I propose a new time for a meeting someone else organized?
Yes, you can propose a new time for a meeting someone else organized by:
STEP 1: Opening the meeting request in Outlook.
STEP 2: Clicking “Propose New Time” and then choose “Tentative and Propose New Time” or “Decline and Propose New Time.”
STEP 3: Suggesting an alternative time and sending your proposal back to the organizer for approval.
Note that this feature is subject to the organizer’s settings and might not be available for all meetings.
John Michaloudis is a former accountant and finance analyst at General Electric, a Microsoft MVP since 2020, an Amazon #1 bestselling author of 4 Microsoft Excel books and teacher of Microsoft Excel & Office over at his flagship MyExcelOnline Academy Online Course.

