Learn about Excel with our Free Microsoft Excel Online Course!
Key Takeaways
- To flip images in PowerPoint, utilize the PPT Productivity Format Toolbar which includes one-click feature buttons for flipping shapes horizontally or vertically at 180 degrees.
- Make use of customizable shortcut keys for efficient image manipulation: Ctrl+Alt+Shift+O[ to flip horizontally, Ctrl+Alt+Shift+I[ to flip vertically, Ctrl+Alt+Shift+>[ to rotate clockwise, and Ctrl+Alt+Shift+< to rotate counterclockwise.
- Rotate images easily in PowerPoint by clicking and dragging the rotation handle above the selected image, or for precise 90-degree rotations, use the feature buttons available on the PPT Productivity Format Toolbar.
Exploring the Basics of Image Rotation and Flipping
Getting a handle on the basics is your first step toward adding punch to your presentation. Image rotation allows you to spin pictures at any angle, either subtly for alignment and orientation or radically for stylistic effect. Flipping, on the other hand, is like looking in a mirror; you can turn an image upside down or back to front, which can be handy to correct images that were taken or scanned in the wrong direction or to create mirrored effects.
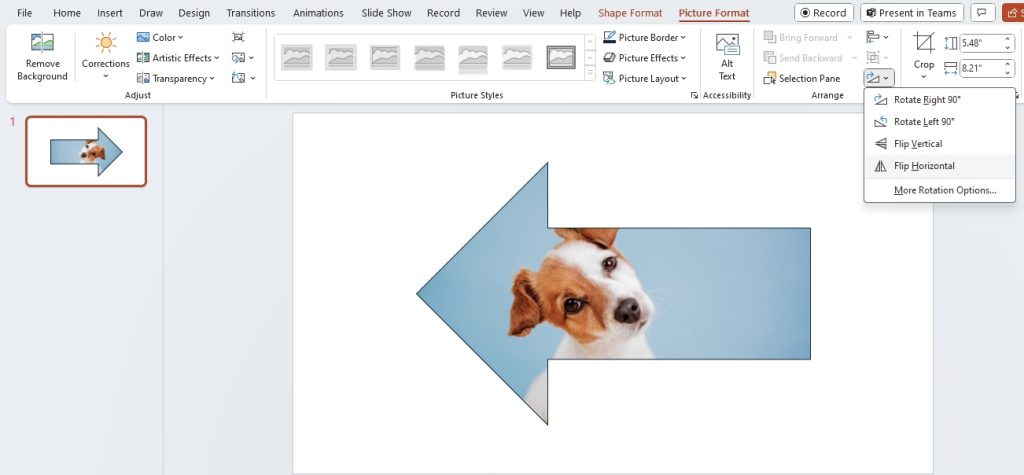
Think of these options as the PowerPoint equivalent of a swivel chair – with a twist or a turn, you can present your pictures from the perfect angle every time. It’s worth taking a moment to familiarize yourself with the Rotate button located in the Picture Tools Format tab. Here, you can access simple commands like “Rotate Right 90°” or “Flip Vertical” to promptly adjust your images.
Table of Contents
Step-by-Step Guide to Rotating Images in PowerPoint
Getting Started with The Rotation Tool
To give your images that perfect tilt or spin, begin by selecting the object you want to rotate. Once selected, you’ll notice a rotation handle appear at the top of the object. This is your key to effortless image manipulation. Place your cursor over the rotation handle, and it will change to a circular arrow icon indicating it’s ready to rotate.
Now, with a simple click and drag motion in the direction you want, you can give your image a whirl. Watching your image spin in real time helps you get that precise orientation you’re aiming for. If the rotation isn’t smooth, make sure you’re dragging the rotation handle and not the resizing handles located at the corners and sides of your image.
Remember, you can always undo an action with CTRL+Z if the result isn’t as expected, so feel free to experiment!
Precise Adjustments: Rotate to an Exact Degree
If you’re aiming for precision, the Shift key is your friend. By holding it down as you drag the rotation handle, you ensure your image snaps to 15-degree increments. This can be incredibly useful when you need your images to line up with other elements or when you’re aiming for a symmetrical layout.
For those times when even 15 degrees is too broad a stroke, you’ll want to delve into the Format tab and use the Size dialog box to specify an exact rotation angle. This way, you can fine-tune to the single degree, giving you total control over the rotation of your image.
Go ahead—try rotating your images by 45 degrees, 90 degrees, or any custom angle that suits your design. You’ll see that a few degrees’ adjustment can make a big difference in how professional and polished your presentation appears.
Simplifying the Art of Flipping Images
Quick Flip: Using Picture Tools for Immediate Results
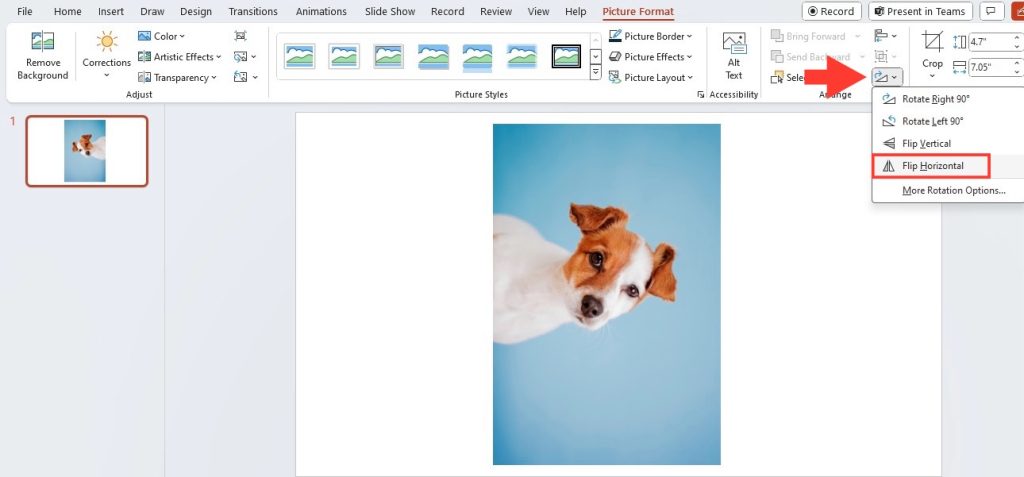
For an instant flip, head straight to the Picture Tools Format tab. Once there, locate the Arrange group where you’ll find the Rotate button—this harbors the quick flip options you’re looking for. Two clicks are all it takes to mirror your image: one on the Rotate button to open its drop-down menu, and another to select either ‘Flip Vertical’ or ‘Flip Horizontal’ depending on the direction in which you want to flip your image.
The magic happens immediately, and your image reflects the changes, showing you a mirror version of itself along the vertical or horizontal axis. This is ideal for correcting images or creating interesting symmetrical effects in your slides. It’s as simple as that—no dragging or additional adjustments necessary.
Beyond Basic Flips: More Picture Rotation Options
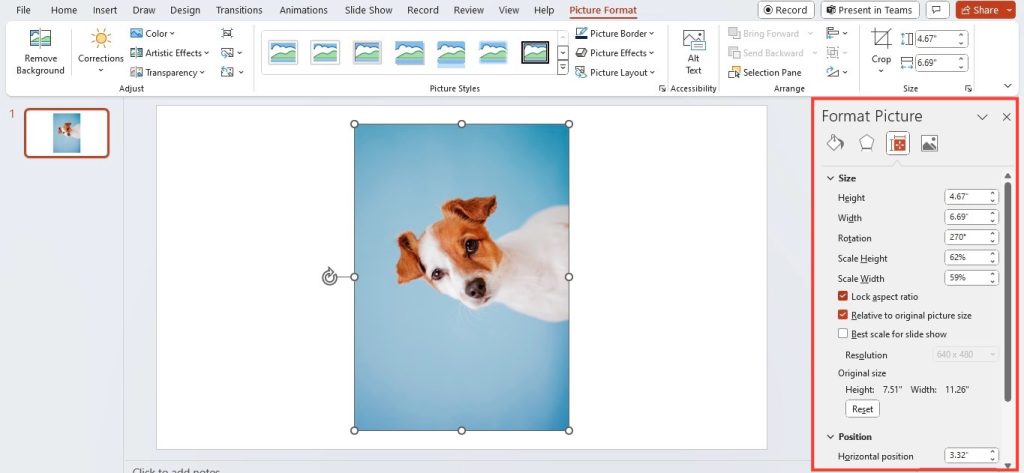
For those who want to go a step further than simple 90-degree turns and mirror flips, PowerPoint offers a realm of additional rotation options. Navigate to the Format tab, choose Rotate, then select ‘More Rotation Options…’ to reveal a menu brimming with custom settings.
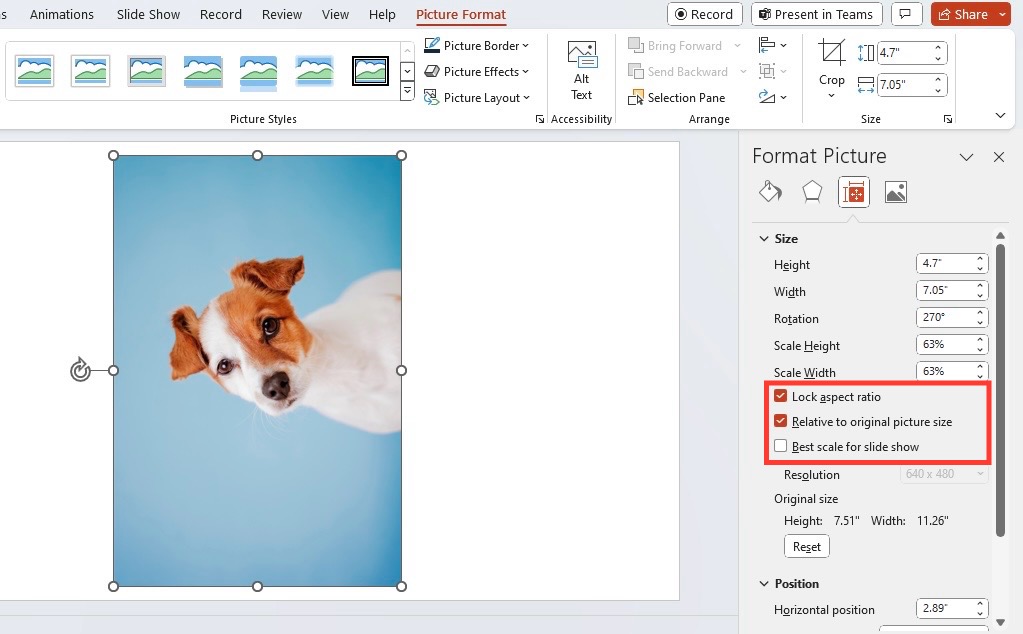
Here, you have the power to set your image’s height and width, lock the aspect ratio to maintain the image’s proportions, or input a specific angle for a custom rotation. These options give you the flexibility to manipulate your image with precision, aligning it perfectly within your slide’s design.
If you happen to go too far with your adjustments and lose track of the original dimensions, don’t fret. This advanced menu also includes the option to reset your picture, giving you a clean slate to start over.
Advanced Techniques and Tips
Perfecting Group Object Rotations for Unified Visuals
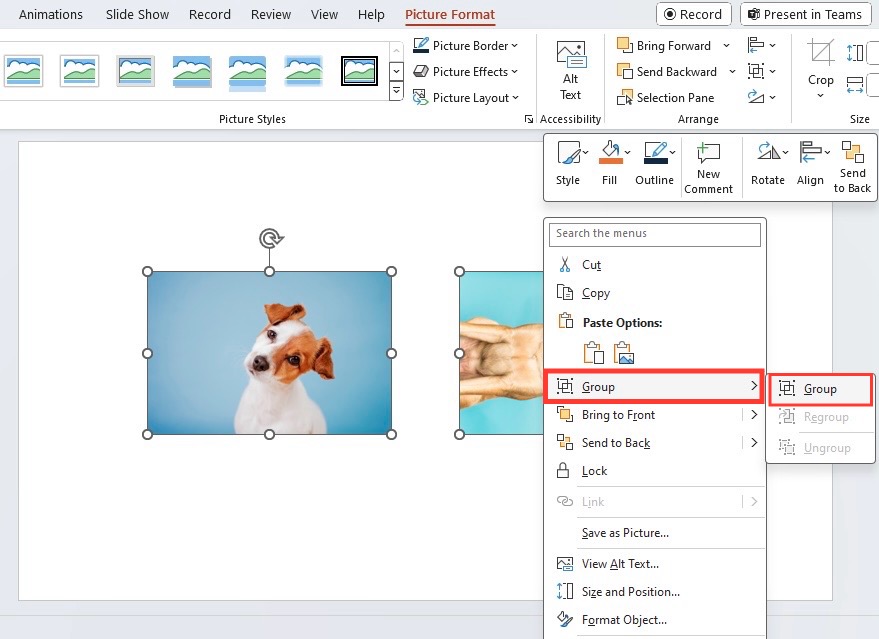
If you’ve ever tried to create a cohesive visual by combining multiple shapes or images, you know how essential it is to move them as one. Grouping objects allows you to rotate them together, ensuring they maintain their relative positions. Select the objects you wish to group by holding down ‘Ctrl’ and clicking each one. Then, right-click, hit ‘Group’ and select ‘Group’ from the dropdown.
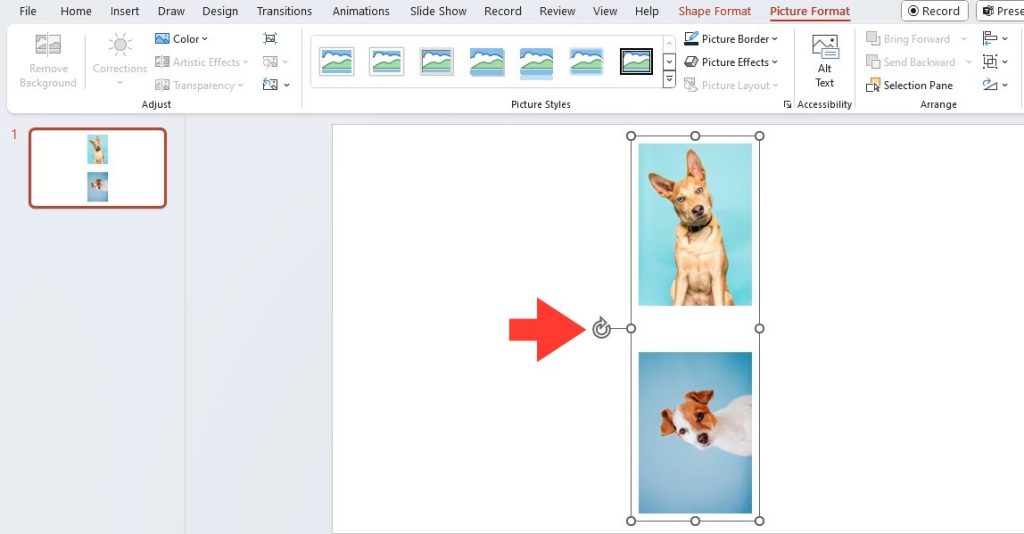
Now when you use the rotation handle on this newly unified group, every element within maintains its layout with respect to the others. It’s perfect for rotating complex diagrams or a set of images that needs to stay together.
If you need to make adjustments to a single object within the group later, simply ungroup, make your tweaks, and regroup. These features provide flexibility and precision during the design process, saving you time and ensuring a professional look.
Practical Applications for Rotated & Flipped Images
Crafting Eye-Catching Marketing Presentations
Rotated and flipped images are like the secret spices in the recipe for an unforgettable marketing presentation. They attract attention, add dynamism, and underscore your points with visual pizzazz. Use rotated text to accentuate headlines or captions, and flip images to create a reflective effect that suggests symmetry and balance—ideal for branding visuals or product showcases.
Moreover, unique image angles can convey movement and progression, which are compelling visual metaphors for growth and forward-thinking in marketing narratives. However, remember to keep your audience in mind and ensure that the creativity serves the purpose of communicating the message and not distracting from it.
Developing Engaging Educational Materials
In the realm of education, using flipped and rotated images can take learning materials from static to stimulating. Flipping an image might simulate a science concept like reflection, while rotating diagrams can help illustrate the cycle of seasons or the revolution of celestial bodies. The visual shift grabs students’ attention and often makes the content more memorable.
Additionally, playful rotation of images can create interactive quizzes or matching games that engage students more deeply than traditional slides might. Think about an art history lesson where students have to match rotated paintings to their artists or a geometry quiz featuring various angles of shapes. Engaging visuals cater to different learning styles and can make complex ideas more accessible.
Saving and Sharing Your Enhanced Presentation
Locking in Your Changes: How to Save Properly
Once you’ve nailed the perfect layout with your rotated and flipped images, saving your PowerPoint presentation is crucial to lock in all those modifications. The process is simple: click the “File” tab located in the upper-left corner, then select the “Save” option. If you’re saving the file for the first time, PowerPoint will prompt you to choose a save location and file name.
But it’s not just about hitting save; it’s also a good habit to frequently save while you work. Regular saves reduce the risk of data loss and keep your changes up to date. And if you’re collaborating with others, consider saving your presentation to a cloud-based service like OneDrive or SharePoint for easy sharing and version control.
Always double-check that your changes are saved before closing PowerPoint. A quick look at the title bar will reassure you; if it shows the name of your presentation without ” (unsaved changes)” next to it, you’re all set.
Tips for Presenting Flipped and Rotated Images Effectively
Presenting your slides with flipped and rotated images can pack a real visual punch, but it’s important to ensure that these effects enhance rather than detract from your message. First, consider the pacing: introduce rotated or flipped elements slowly, so your audience has time to absorb the change. It helps to use transitions and animations wisely; they can guide the viewer’s eye and make complex rotations or flips seem smooth and logical.
Also, provide context. Make it clear why an image is rotated or flipped—this could be through accompanying text or verbal explanation during the presentation. This way, the visual tactic serves to reinforce the content rather than simply showcase a design trick.
Lastly, test your presentation on the same type of equipment that you’ll be using during the actual event to ensure that the effects render correctly and the images appear as intended.
FAQs about Flipping and Rotating Images in PowerPoint
Can You Flip or Rotate Multiple Objects at Once?
Absolutely, you can flip or rotate multiple objects simultaneously in PowerPoint. Just select all the objects you want to modify by holding down the ‘Ctrl’ key and clicking each one, or by dragging your mouse to encompass them all within a selection box. Then, proceed with the rotation or flip command as you would with a single object. They’ll all move in unison, saving you precious time and ensuring consistent results.
How Do You Maintain Aspect Ratio When Rotating an Image?
To maintain an image’s aspect ratio in PowerPoint when rotating, ensure the ‘Lock aspect ratio’ checkbox is ticked. You can find this option by clicking on the image, going to the Format tab, then clicking on Size to open the Size and Position dialog box. Checking this box before rotating will keep your image’s proportions intact, avoiding any distortion.
John Michaloudis is a former accountant and finance analyst at General Electric, a Microsoft MVP since 2020, an Amazon #1 bestselling author of 4 Microsoft Excel books and teacher of Microsoft Excel & Office over at his flagship MyExcelOnline Academy Online Course.

