Navigating Microsoft Excel‘s ‘Save As’ feature is more than just a basic task—it’s a crucial skill for anyone looking to ensure their data’s safety and versatility. Understanding and utilizing different saving techniques and shortcuts can not only protect your work from potential data loss but also enhance accessibility and efficiency in your workflow.
Key Takeaways:
- Diverse File Formats: Learn about Excel’s array of file formats (e.g., .xlsx, .csv, .pdf) to choose the best fit for your data’s purpose and audience.
- ‘Save As’ for Versioning: Use the ‘Save As’ function to manage versions and formats, creating distinct files for backups or specific requirements.
- Efficiency with Shortcuts: Master keyboard shortcuts like F12 for ‘Save As’ and Ctrl + S for quick saving, speeding up your Excel navigation significantly.
- Advanced Saving Options: Explore special save options like password protection and read-only recommendations to secure your work appropriately.
Introduction to Excel ‘Save As’ Essentials
The Importance of Proper Saving Techniques
Proper saving techniques in Excel are crucial as they safeguard your work against data loss from unforeseen events, such as power outages or system crashes. Mastering different saving methods allows for ease of access across devices through cloud services and enables secure sharing with others. Additionally, frequent saving ensures that all the effort and time invested in creating and manipulating data within Excel workbooks is preserved.
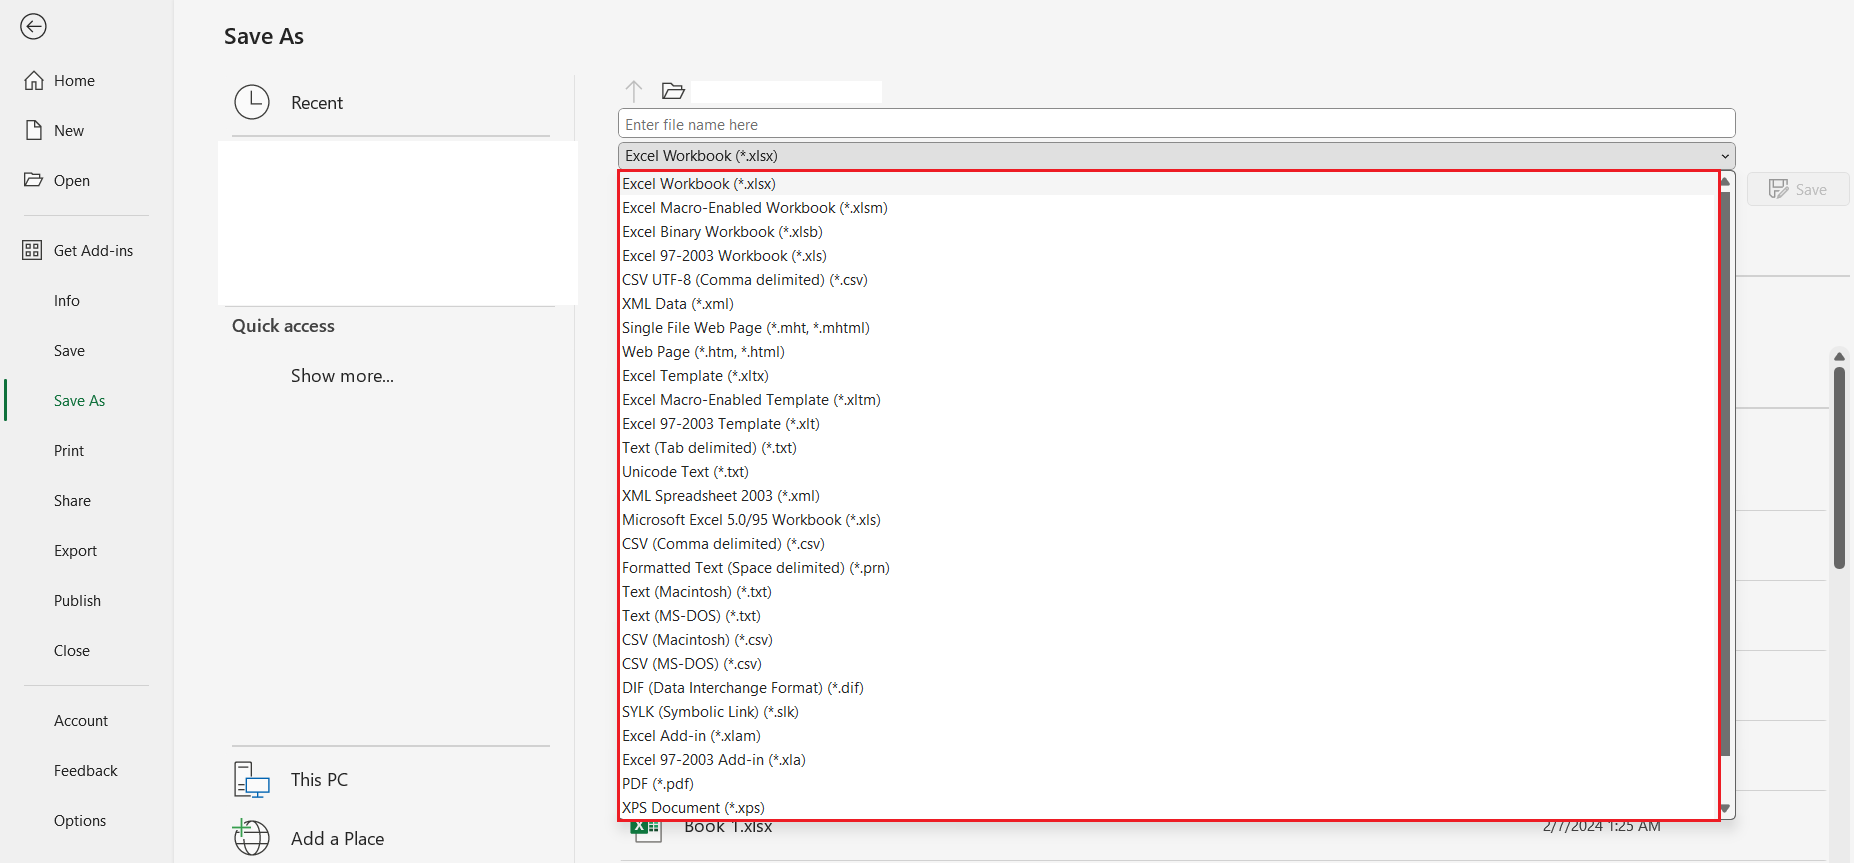
Understanding Different Excel File Formats
Understanding different Excel file formats is vital for optimal data management and sharing. Excel offers a variety of file types, each serving unique purposes, and recognizing when to use each can greatly improve your productivity.
CSV (.csv):
- A lightweight, comma-delimited text file ideal for data interchange.
- Lacks support for multiple sheets and advanced formatting.
Excel Workbook (.xlsx):
- The standard file format for modern Excel versions, supporting advanced features.
- Great for rich data sets, formulas, and charts, while maintaining backward compatibility.
Excel 97-2003 Workbook (.xls):
- Catered to users with older versions of Excel, ensures compatibility.
- Limits usage of newer functionalities and larger data sizes.
Excel Macro-Enabled Template (.xlsm):
- Allows embedding macros for automation, useful for repetitive tasks.
- Requires careful handling since macros can include security risks.
Excel Template (.xltx):
- Streamlines the creation of consistently formatted workbooks.
- Lacks inclusion of macros but great for standardized document structures.
PDF (.pdf):
- Ensures documents appear the same across all devices and software.
- Non-editable, making it perfect for final distributions of reports.
Web Page (.html):
- Converts Excel sheets into HTML, allowing them to be viewed in browsers.
- Useful for publishing tables and data on the web, but may lose complex elements.
By understanding these file formats, you can make educated decisions on how best to save and share your work.
Maximize Efficiency with Quick Save Tips
Using the ‘Save As’ Feature Effectively
Excel’s ‘Save As’ function is a powerful tool for managing your data effectively. By using ‘Save As’, you’re able to create distinct versions of your workbooks, convert data into various formats, and ensure compatibility with different software or user needs.
Here’s how to harness the ‘Save As’ feature like a pro:
- For Version Control: Each time you hit ‘Save As’, you have the opportunity to create a new file with a unique name, helping you maintain historical versions of a document.
- For Format Conversion: Whether you need a PDF for sharing a report or a CSV for data import/export, ‘Save As’ quickly transforms your file into the required type.
- For Organization: Use ‘Save As’ to save files into specific project folders, keeping your workspace structured and navigable.
- For Template Creation: Save your layout as a template with ‘Save As’, so you have a starting point for future workbooks, saving time and effort.
- For Accessibility: Ensure your files are accessible by saving in formats compliant with other platforms or software, thus broadening your document’s reach.
To use ‘Save As’ effectively, simply follow the steps below:
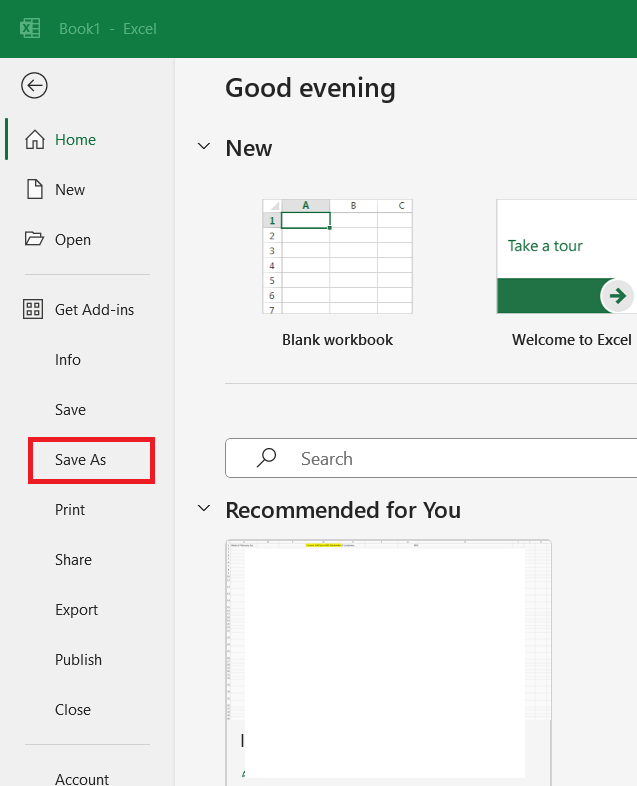
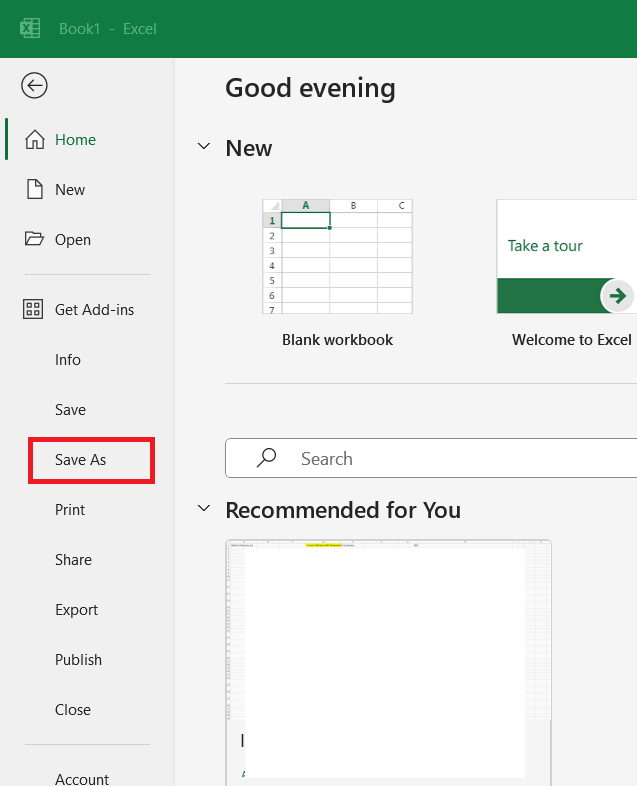
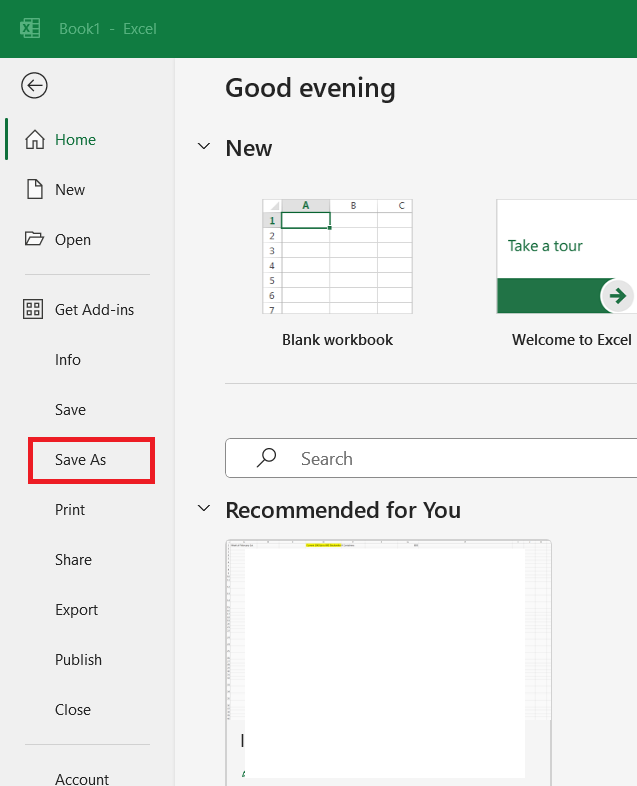
STEP 1: Go to the File tab.
STEP 2: Choose ‘Save As’.
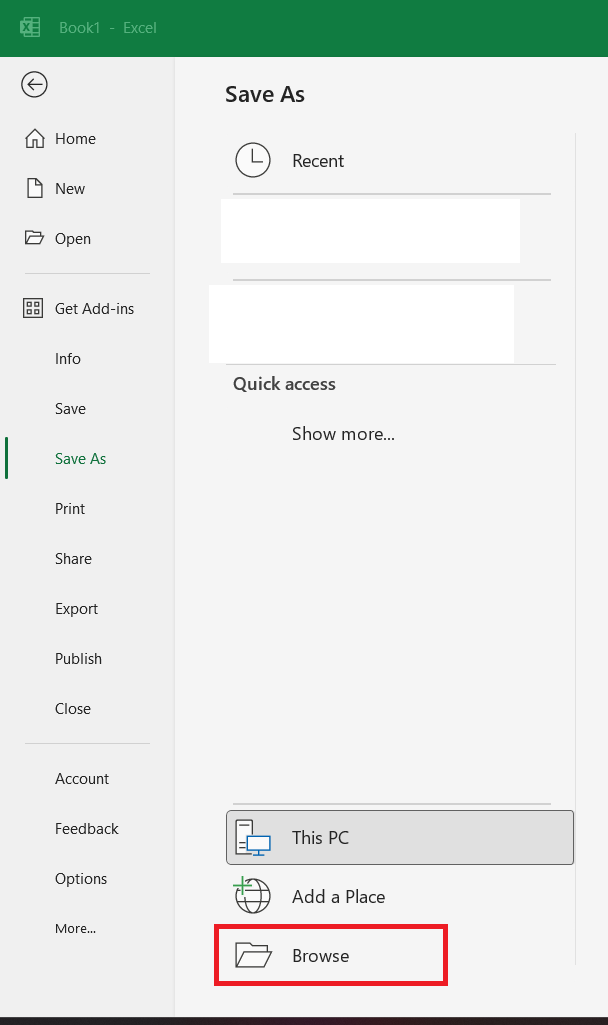
STEP 3: Click Browse and select where you’d like to save the file.
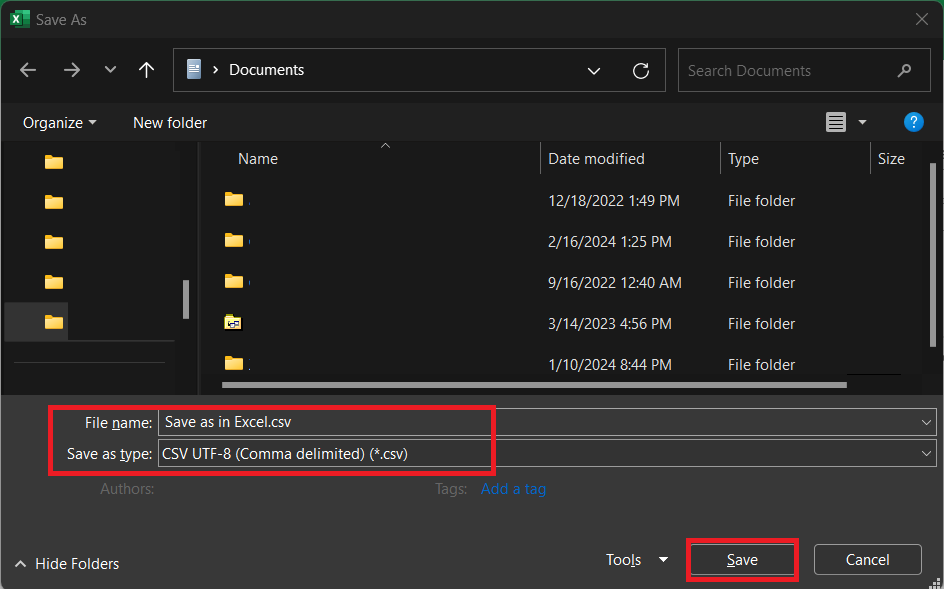
STEP 4: Choose the desired format from the ‘Save as type’ dropdown. Name your file appropriately and click ‘Save’.
Remembering these tips will help you utilize ‘Excel Save As’ feature to its fullest potential.
Keyboard Shortcuts for Saving Time
In Excel, time is of the essence, and keyboard shortcuts are the secret sauce to efficiency. Let’s dive into some must-know shortcuts that can drastically cut down on the clicks and help you save time:
Ctrl + S (Save):
- Quickly saves your progress, overwriting the existing file.
- It’s handy to frequently save to prevent data loss.
F12 (Save As):
- Opens the ‘Save As’ dialog box, allowing you to save a new version or in a different format.
- Use it to create backups or when starting a new branch of work.
Alt + F, A (Save As via Menu):
- If you prefer navigating menus without a mouse, this combination accesses the ‘Save As’ through the File menu.
- Perfect when ‘Save As’ needs to be accessed alongside other file operations.
Ctrl + Shift + S (Save As in some Add-ins):
- Some Excel add-ins introduce this shortcut for ‘Save As’. Check your add-in documentation for specific shortcuts.
By internalizing these shortcuts, you ensure your hands seldom leave the keyboard, propelling you towards more fluid and uninterrupted workflow.
Remember, pressing these shortcuts habitually can save you from the heartache of lost data during sudden application or system crashes. So go ahead, give your mouse a break, and let your keyboard take the strain!
Beyond Basic Saving: Advanced Techniques
Save As Different Formats with Ease
Converting your Excel files into different formats is a breeze with the ‘Save As’ feature. Whether you need to distribute a file widely or import data into another program, Excel covers you with its flexible saving options.
To convert your file:
STEP 1: Select the File tab and choose ‘Save As’.
STEP 2: In the dialog box, locate the ‘Save as type’ dropdown.
STEP 3: Here, you can pick from diverse formats such as PDF, CSV, older Excel versions, or even HTML.
STEP 4: Choose your format depending on the intended use or recipient’s requirements.
Use Cases for Different Formats:
- PDF: Perfect when you need a static representation of your spreadsheet for presentations or sharing with individuals who may not have Excel.
- CSV: Ideal for data transfer between different database management systems or importing into applications that require plain text files.
- Old Excel Versions: Necessary when collaborating with others who have not updated their Excel software.
- HTML: Useful if you’re looking to publish your spreadsheet’s data online.
Understanding when and why to convert your files to these different formats is crucial for ensuring that your data is usable and accessible wherever it’s needed.
Protecting Your Work with Special Save Options
When you’ve put considerable effort into your Excel workbooks, safeguarding them becomes essential. Excel offers special saving options to ensure your work remains secure and intact.
Password Protection:
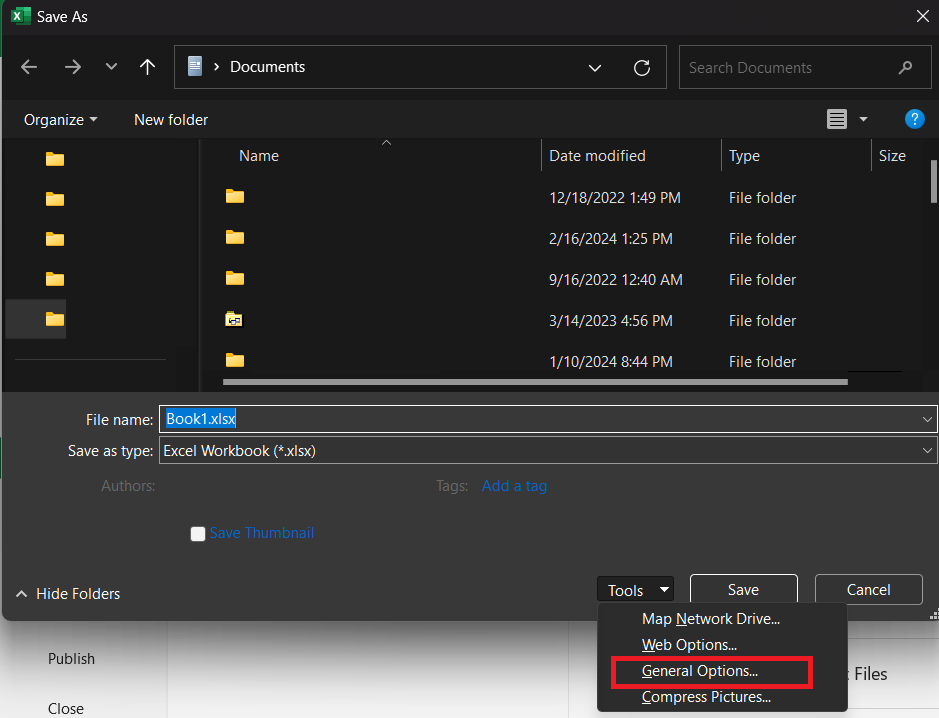
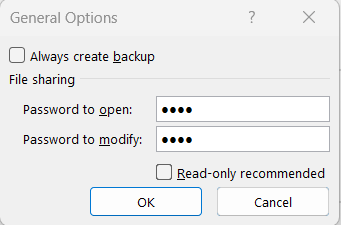
Prevent unauthorized access by setting a password upon saving. Follow the steps below to add a password –
STEP 1: Go to ‘File’ > ‘Save As’.
STEP 2: In the Save as dialog box, select ‘Tools’ > ‘General Options’.
STEP 3: Set a password and click OK.
This is ideal for sensitive or personal information.
Read-Only Recommendation:
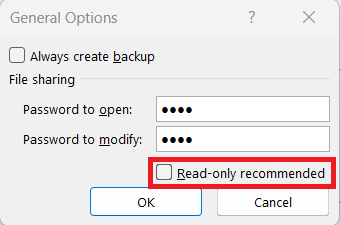
- Suggest to users that the workbook should be opened in a read-only mode.
- Again, found in ‘General Options’. It’s a non-enforced, gentle nudge for users to avoid altering the original file.
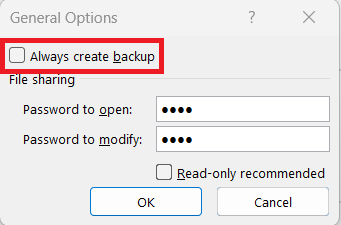
Always Create Backup:
- Excel can maintain a backup copy of your file. If any mishap occurs, there’s a fallback.
- This option, also located in ‘General Options’, is crucial for important documents where data loss would be particularly problematic.
File Sharing Options:
- If collaboration is integral, ‘Save As’ lets you save in a shared format that is optimal for multiple users to access and edit simultaneously.
- Techniques like track changes can keep edits organized.
AutoRecover:
- Not exactly within ‘Save As’, but by setting up AutoRecover options, Excel can automatically save versions of your work at specified intervals.
- In the case of crashes, you’re likely to recover unsaved changes.
By leveraging these special save options, you can control who interacts with your file and to what extent, providing peace of mind and preserving the integrity of your data.
Common Pitfalls and How to Avoid Them
AutoSave vs. Save As: What’s the Difference?
AutoSave and ‘Save As’ serve different, but equally important purposes in Excel. Understanding their differences ensures you use them appropriately to protect your work.
AutoSave:
- AutoSave is an automatic feature that saves your document at regular intervals (by default, every 10 minutes).
- It’s designed to protect against data loss from sudden crashes or closeouts.
- Works seamlessly in the background but is only available when files are saved to OneDrive, SharePoint, or similar cloud services.
Save As:
- ‘Save As’ is a manual process, giving you control over where to save the file and under what name.
- It’s essential when creating a new version of a document, or when saving files for the first time.
- Allows you to save in multiple formats, and can be accessed with keyboard shortcuts for efficiency.
Comparison:
- AutoSave keeps your current work secure without any required action, while ‘Save As’ requires your input but allows for organization and version control.
- ‘Save As’ helps you structure your files and manage different iterations, whereas AutoSave is like a safety net, catching your in-the-moment changes.
By understanding when to rely on AutoSave and when to opt for ‘Save As’, you can work confidently, knowing your Excel data is secure and well-organized.
Troubleshooting Common Save Errors
If you encounter issues while trying to save in Excel, don’t panic. Save errors can be common, but they’re often easy to fix. Let’s look at some troubleshooting steps for common save errors:
Disk Space Errors:
- Ensure your computer or cloud storage has sufficient space. Try deleting unnecessary files or moving them to an external drive.
File Path Length Errors:
- Excel and Windows have limits on file path lengths. If your file won’t save, try shortening the file name or saving it to a location with a shorter path.
File In Use Errors:
- If Excel claims the file is in use, make sure it’s not open on another computer or in another program. Sometimes restarting Excel or your computer can release the lock.
File Corruption Errors:
- Occasionally, files get corrupted. You can try opening a previous version or using Excel’s ‘Open and Repair’ feature to attempt a fix.
Permission Errors:
- If saving to a network or shared folder, ensure you have the correct permissions. You may need to ask a system administrator for access.
Compatibility Errors:
- When working with older Excel versions, saving in a compatible format, like .xls instead of .xlsx, can overcome compatibility issues.
Remember that regular saving and backing up can prevent many errors, and keeping your software up-to-date can solve others that result from bugs.
Creating Backup Versions with ‘Save As’
Using ‘Save As’ for creating backup versions is a smart strategy to prevent data loss and maintain the integrity of your Excel data. Here’s how to make it part of your workflow:
- Before Major Changes: Before undertaking significant modifications or updates, use ‘Save As’ to create a backup. This way, if something goes wrong, you can revert to the pre-change version.
- On a Regular Basis: Periodically save backup copies with date stamps. This practice can be a lifesaver when tracking changes over time or recovering data from a specific period.
- When Sharing Files: When you share files with others, keep a ‘master’ copy using ‘Save As’. This ensures you have the original data intact if the shared copy is altered or damaged.
- Using Different Storage Locations: Save backups in different physical or cloud storage locations. It reduces the risk of losing data due to device failure or loss.
- Archiving Purposes: For completed projects, ‘Save As’ helps create a final version for archiving, protecting your work’s history and achievements.
By establishing a routine of creating backups with ‘Save As’, you’ll have a robust system protecting your data against unforeseen events.
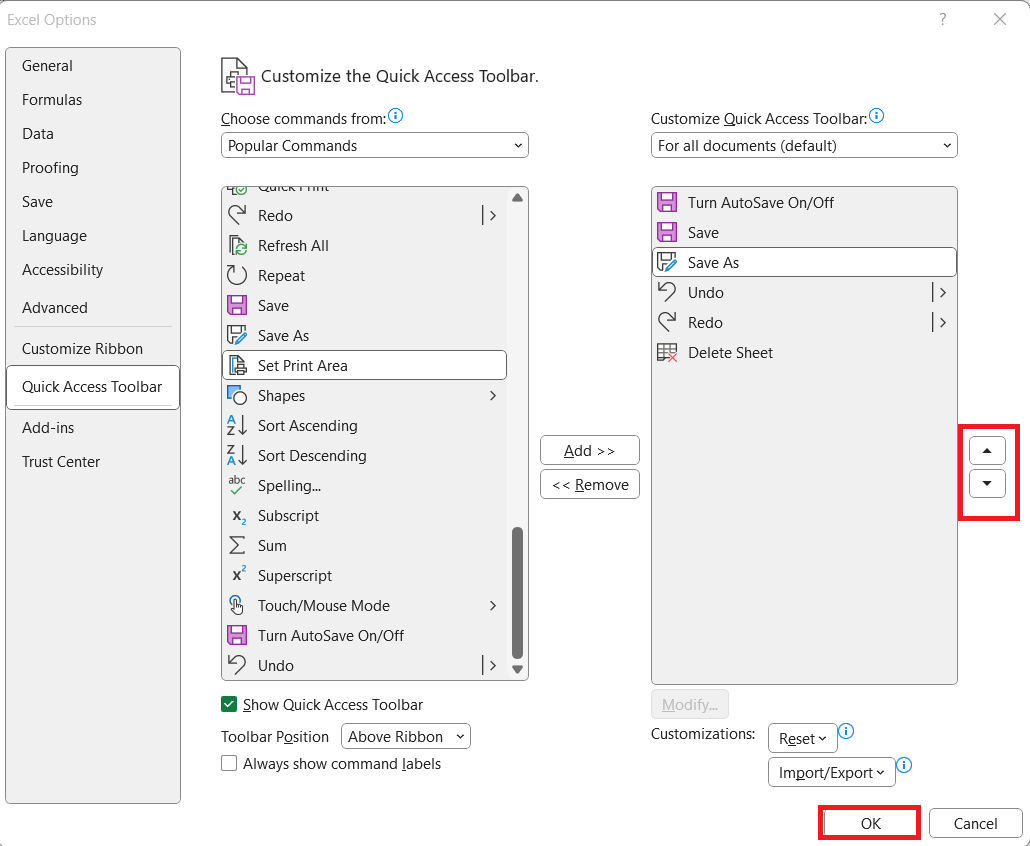
Customizing the Quick Access Toolbar for Saving
Customizing the Quick Access Toolbar in Excel is a beneficial hack for saving your files with speed and precision. Tailor it to suit your workflow and watch your productivity soar!
Here’s how you can customize the Quick Access Toolbar:
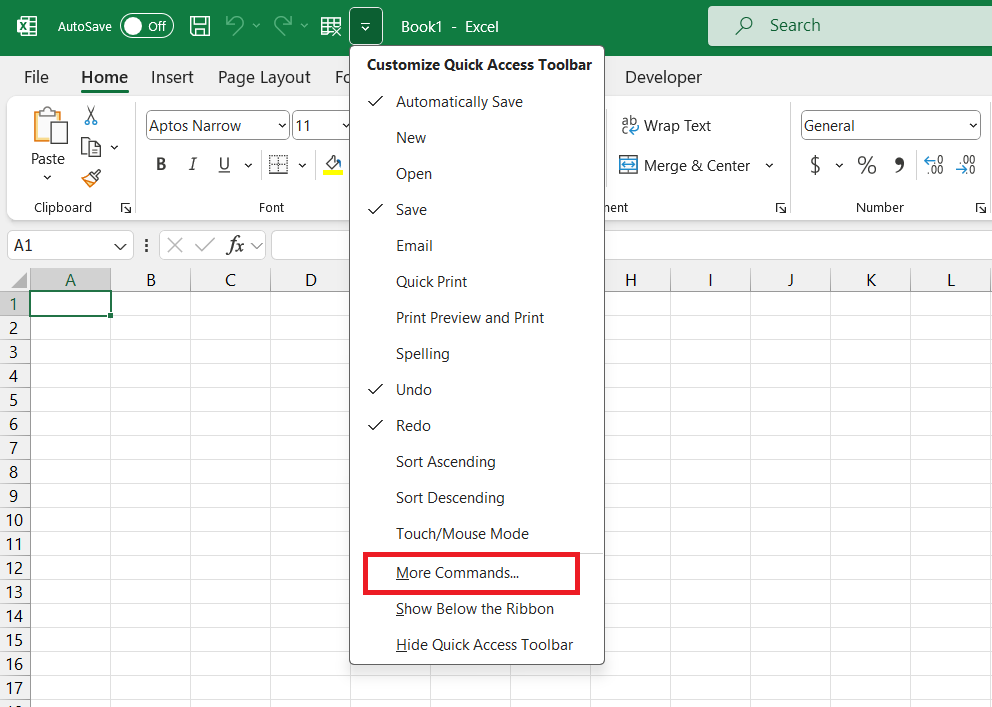
STEP 1: Find the Ribbon Display Options and select ‘Show Quick Access Toolbar’.
STEP 2: Click the dropdown for ‘Customize Quick Access Toolbar’ > ‘More Commands’.
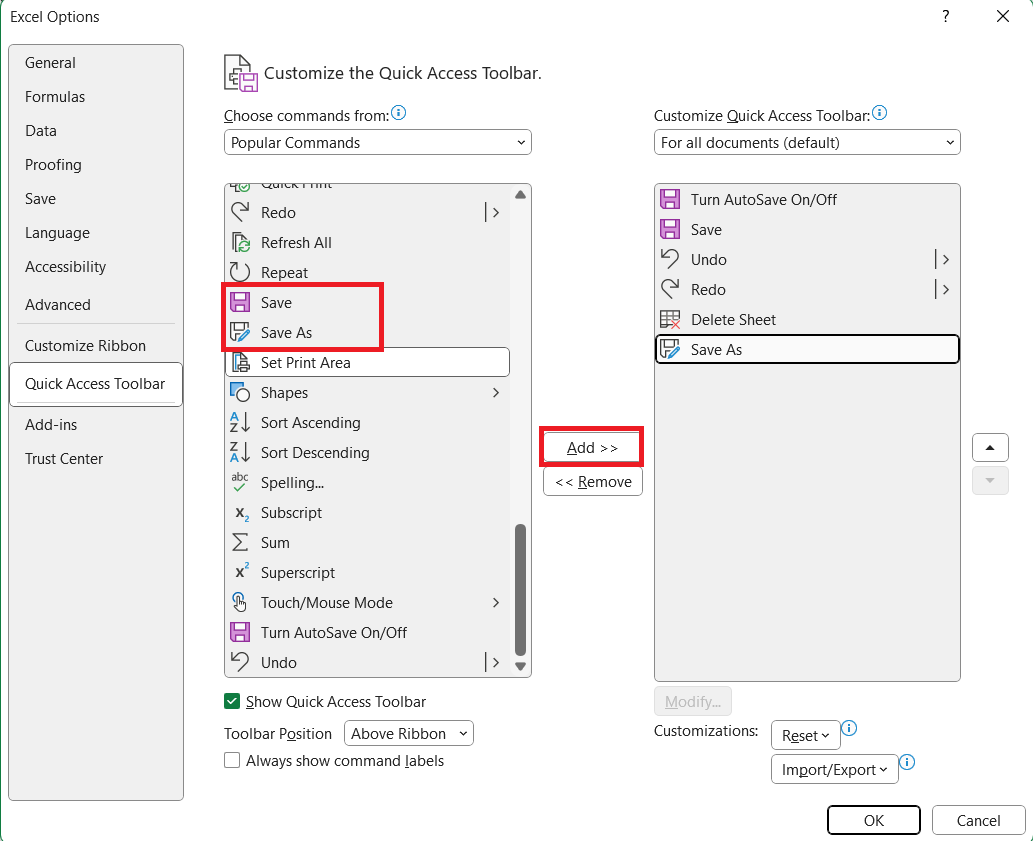
STEP 3: From the ‘Popular Commands’ list, add ‘Save’ and ‘Save As’.
STEP 4: Position your Save options for easy reach on the Quick Access Toolbar. Arrange them in a sequence that reflects your workflow. Click OK.
By having ‘Save’ and ‘Save As’ readily accessible, you avoid the hassle of navigating through menus, allowing you to instantly commit changes or version new files.
Remember, taking a moment to customize your Quick Access Toolbar can result in countless saved seconds over the course of your Excel usage.
Frequently Asked Questions
What is the quickest way to access the ‘Save As’ dialog in Excel?
The quickest way to access the ‘Save As’ in Excel is by pressing the F12 key on your keyboard. This shortcut immediately opens the ‘Save As’ window, allowing you to save your workbook as a new file or in a different format efficiently.
How do I save the Excel file in a different format?
To save an Excel file in a different format:
- Click the ‘File’ tab.
- Select ‘Save As’.
- Browse to your desired save location.
- Click on the ‘Save as type’ dropdown menu.
- Choose the format you need.
- Click ‘Save’.
Are there any shortcuts to save an Excel file in a specific format?
There are no direct keyboard shortcuts to save an Excel file in a specific format, but you can use the F12 key to open the ‘Save As’ dialog quickly. From there, select your desired format from the ‘Save as type’ dropdown menu and save. Custom shortcuts may be created through macros or add-ins.
How does ‘Save As’ help with version control of my documents?
‘Save As’ helps with version control by allowing you to save a new copy of your document with a different name, date, or version number. This creates separate instances of your workbook at various stages, making it easier to manage edits, track document evolution, and revert to earlier versions if needed.
How to save a copy of an excel file?
To save a copy of an Excel file, click ‘File’ then ‘Save As’. Choose your location, enter the file name, select a format if necessary, and click ‘Save’. This creates a duplicate of the workbook, preserving the original.
John Michaloudis is a former accountant and finance analyst at General Electric, a Microsoft MVP since 2020, an Amazon #1 bestselling author of 4 Microsoft Excel books and teacher of Microsoft Excel & Office over at his flagship MyExcelOnline Academy Online Course.


