If you’re like me, working in Excel on a Mac can sometimes feel a little different from the usual Windows experience. But don’t worry—saving your work in Excel on macOS is simple once you get the hang of it. Whether you’re using Excel 365 or an older version, the process is pretty straightforward. Let me walk you through it step by step guide on how to save Excel on Mac.
Key Takeaways:
- Saving an Excel file on a Mac is simple using the “Save” or “Save As” options in the File menu, or by pressing Command + S.
- You can choose where to save the file, name it, and select the file format (like .xlsx or .xls) to match your needs.
- Enabling AutoSave in Excel for Mac helps prevent data loss by automatically saving your work to cloud services like OneDrive or SharePoint.
- If you encounter a “Cannot Save File” error, try saving under a different name, checking file permissions, or moving the file to a new location.
- Excel for Mac allows you to save files in different formats (CSV, PDF, HTML) to ensure compatibility across various platforms or preserve document formatting.
Table of Contents
Step-by-Step Guide to Save Excel on Mac
How to Save a File in Excel on Mac
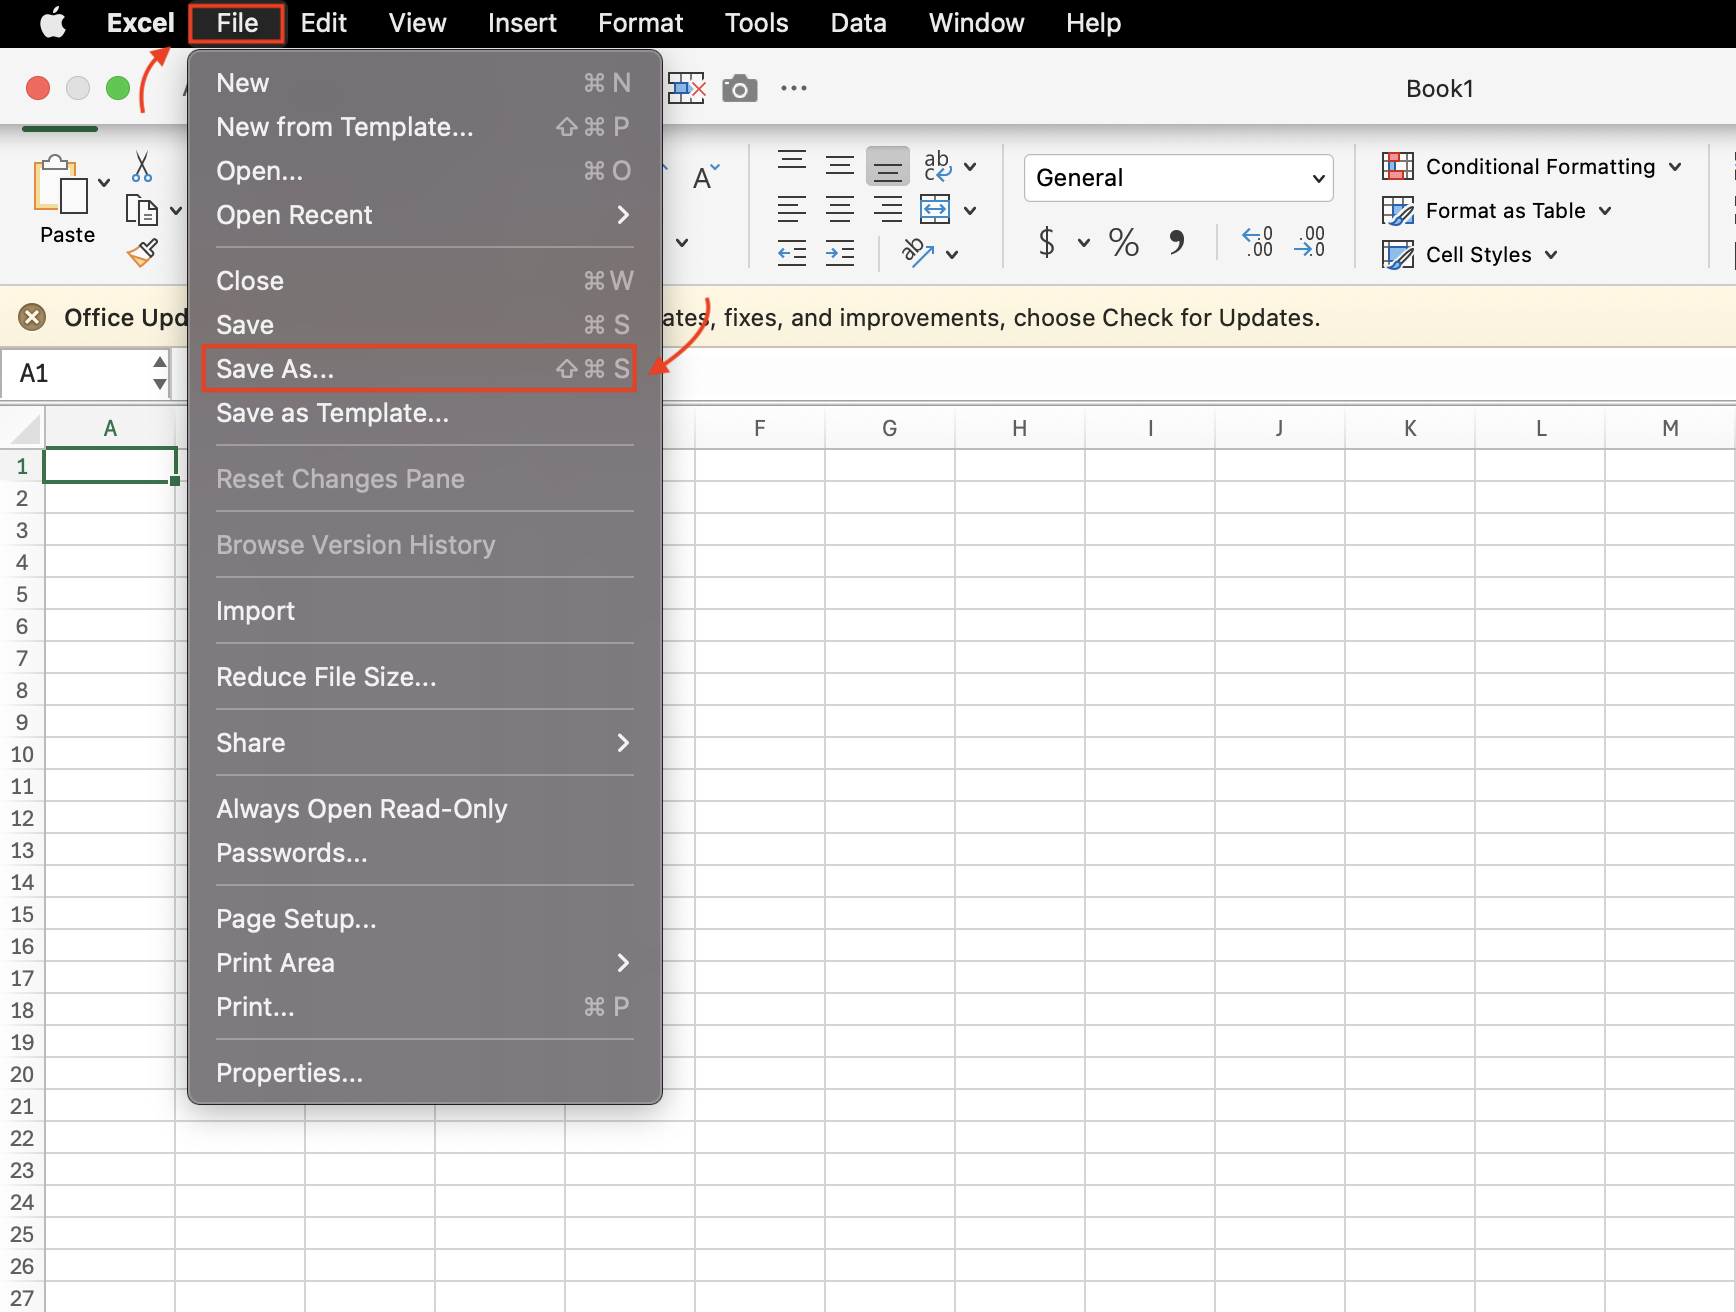
To save a file in Excel on a Mac, you can either use the traditional method through the menu or a quicker keyboard shortcut. Both options allow you to specify the file’s location, name, and format to suit your needs. Here’s a step-by-step guide to save your file:
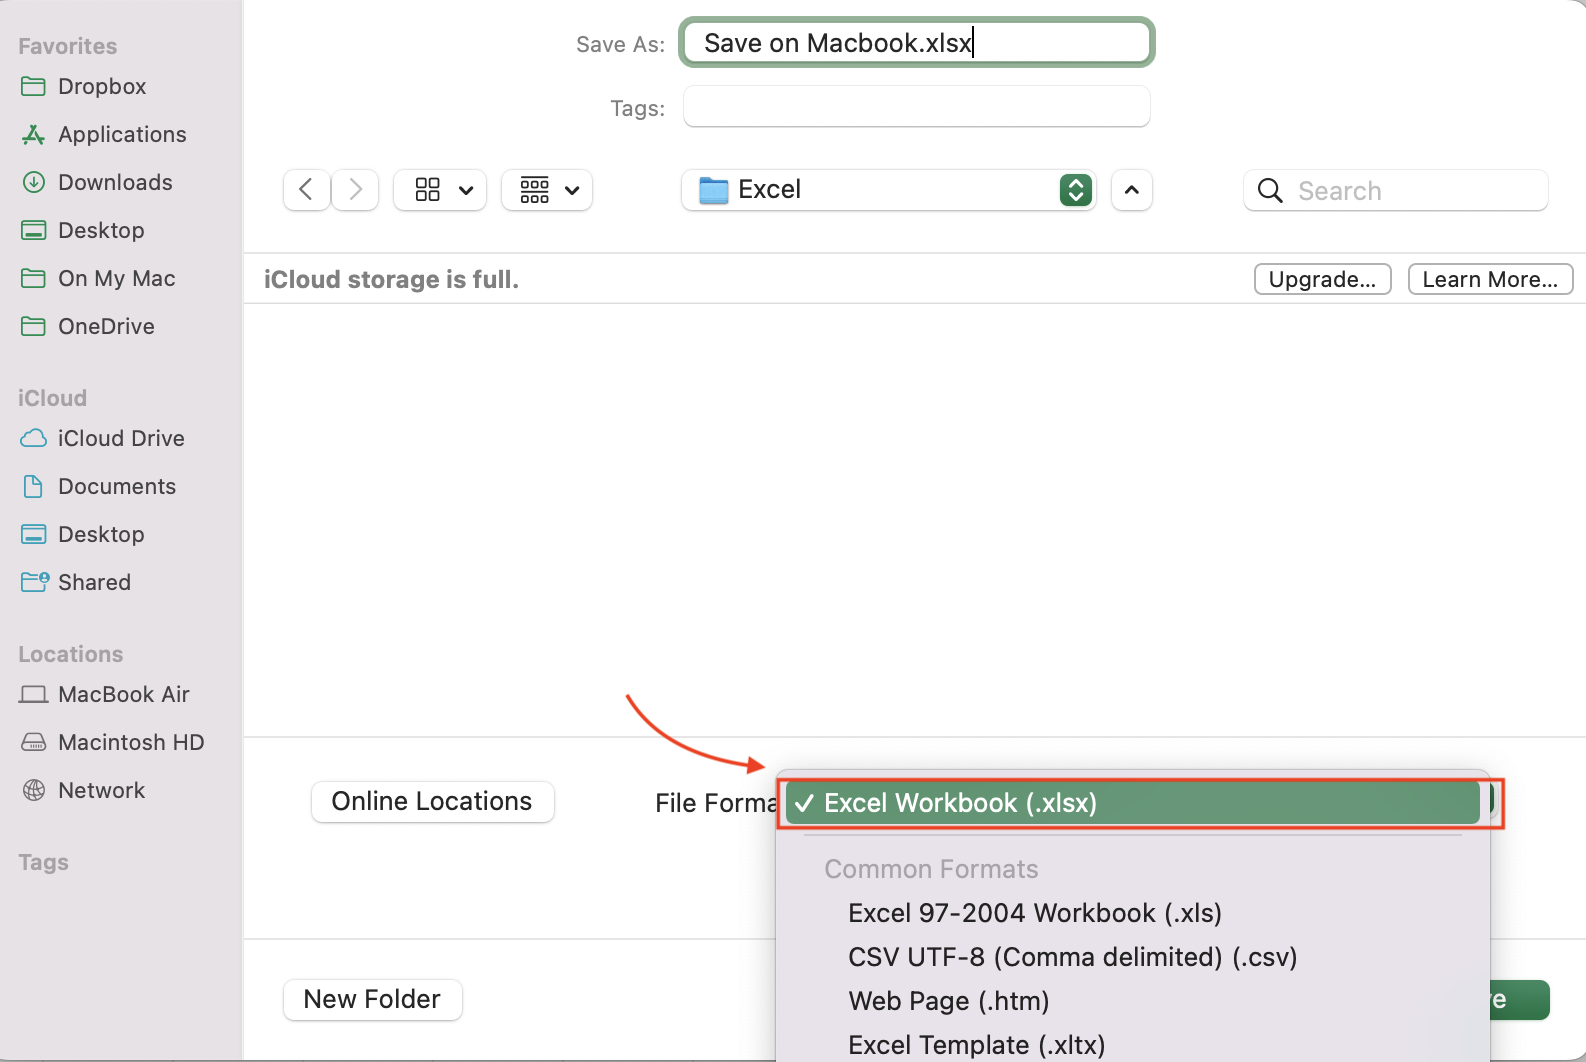
STEP 1: Click on “File” in the menu bar at the top of the screen and select “Save As” from the dropdown menu.
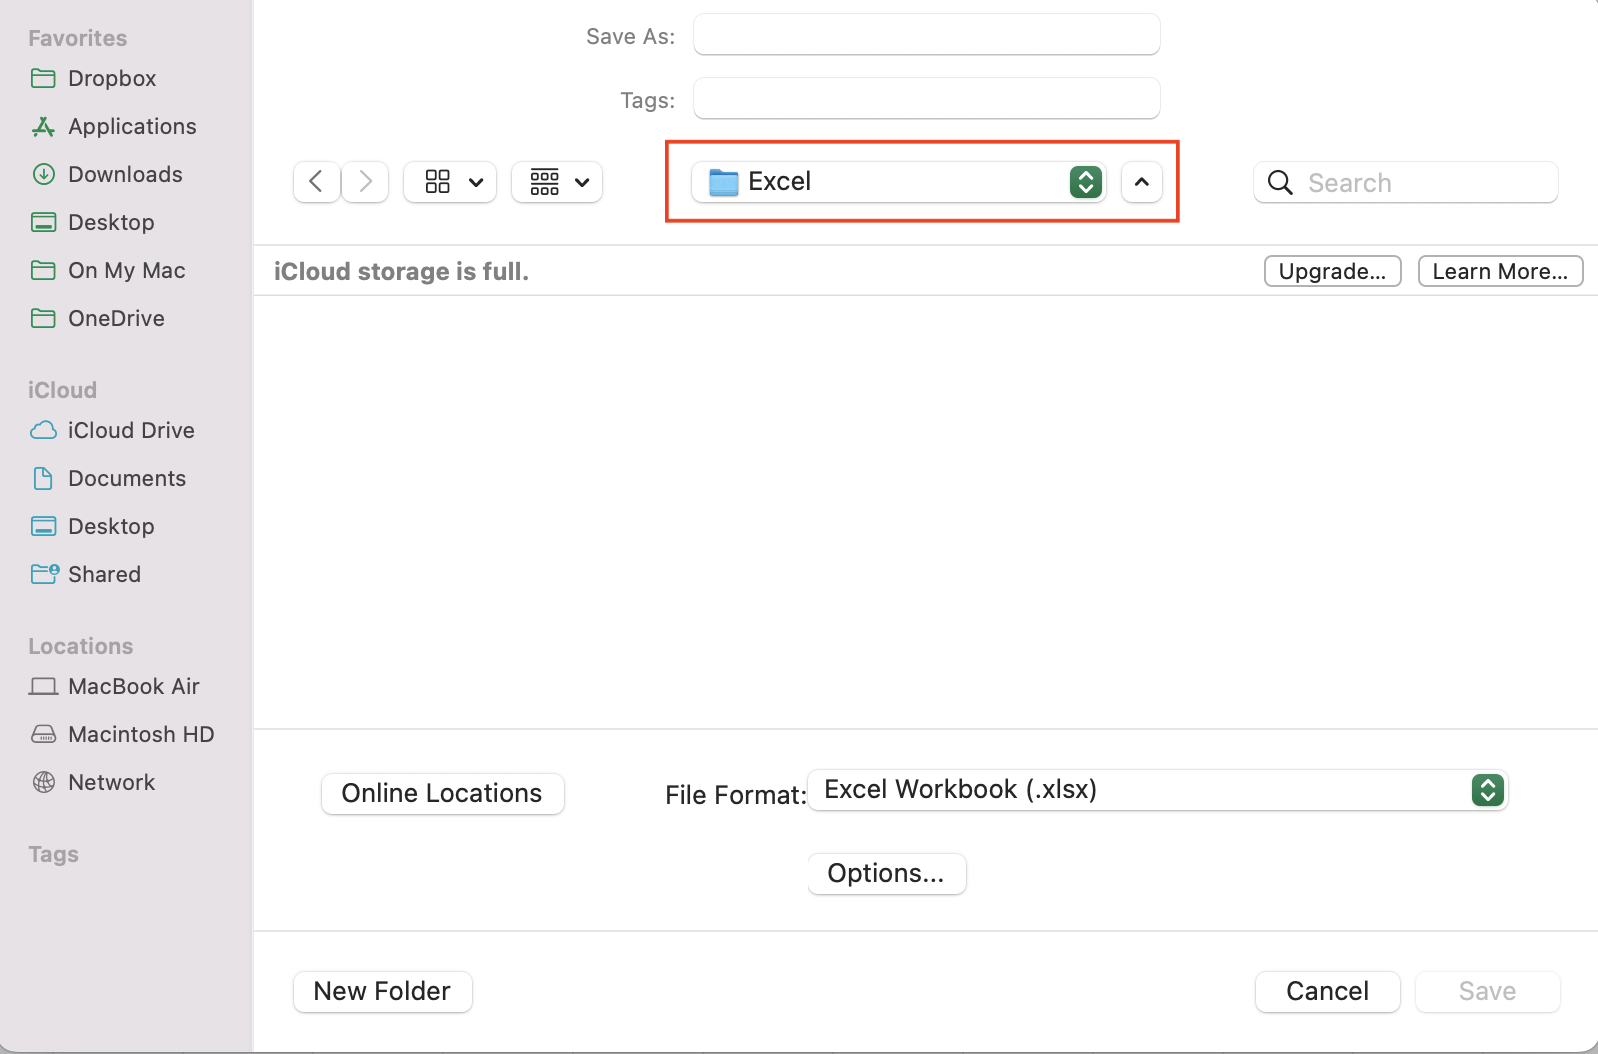
STEP 2: Choose the location on your Mac where you want to save the file, such as the Desktop or a specific folder.
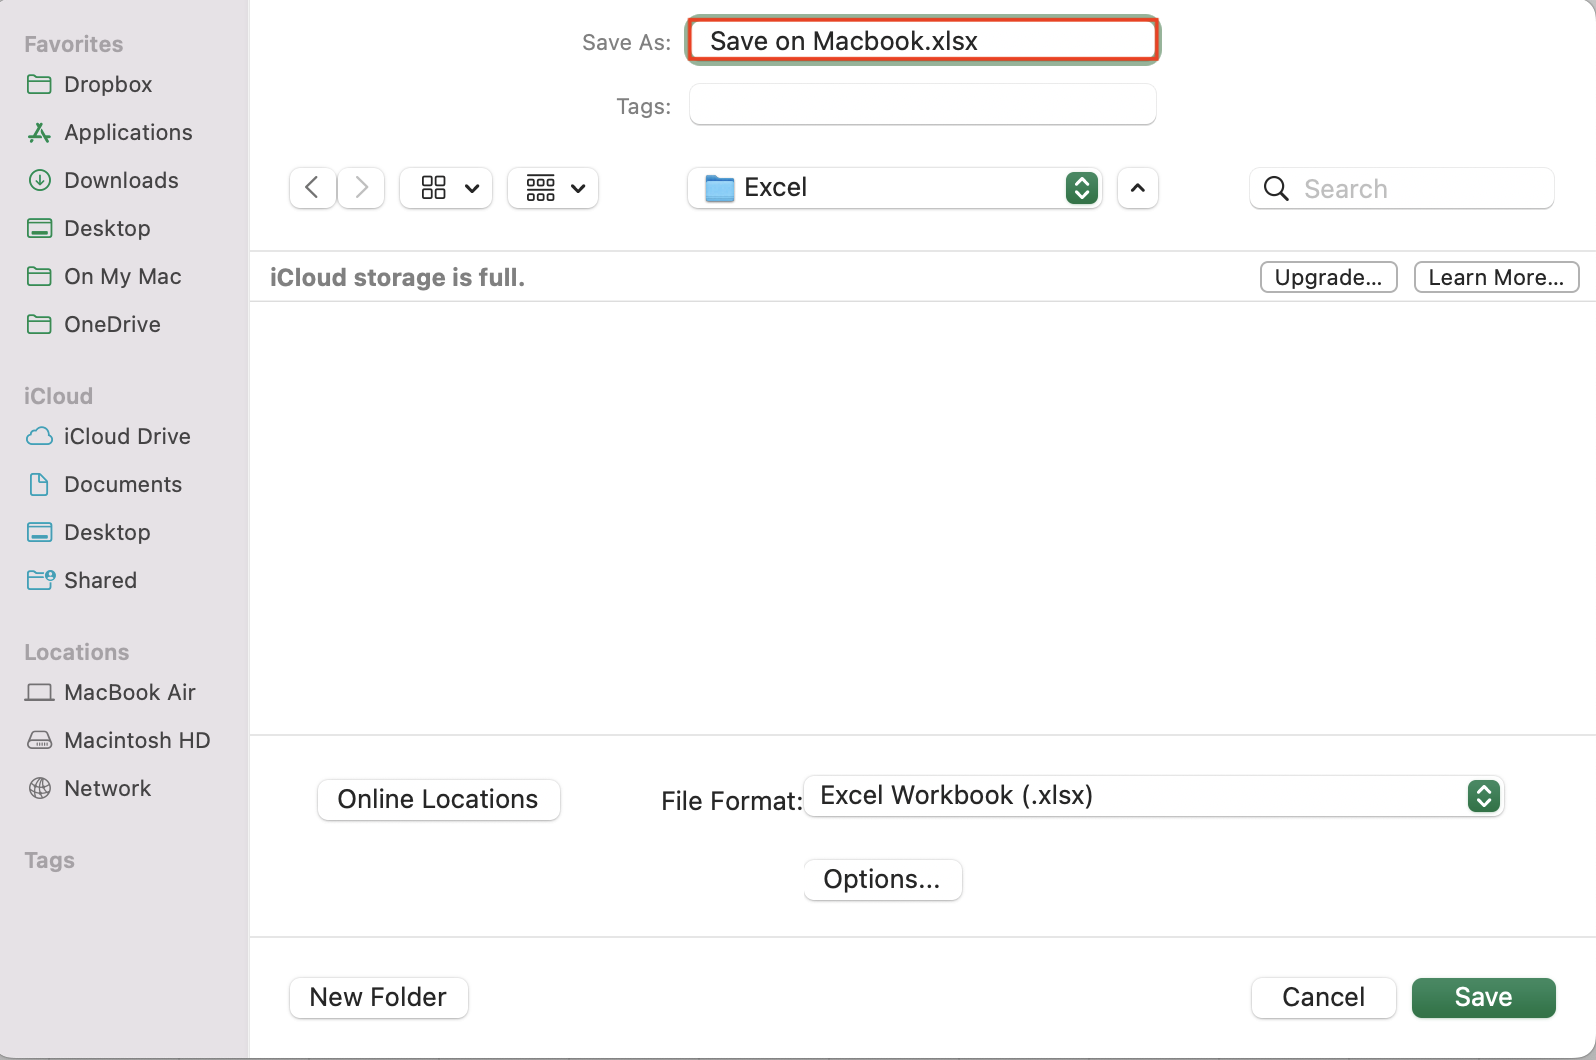
STEP 3: Give the file a descriptive name that will make it easy to identify later.
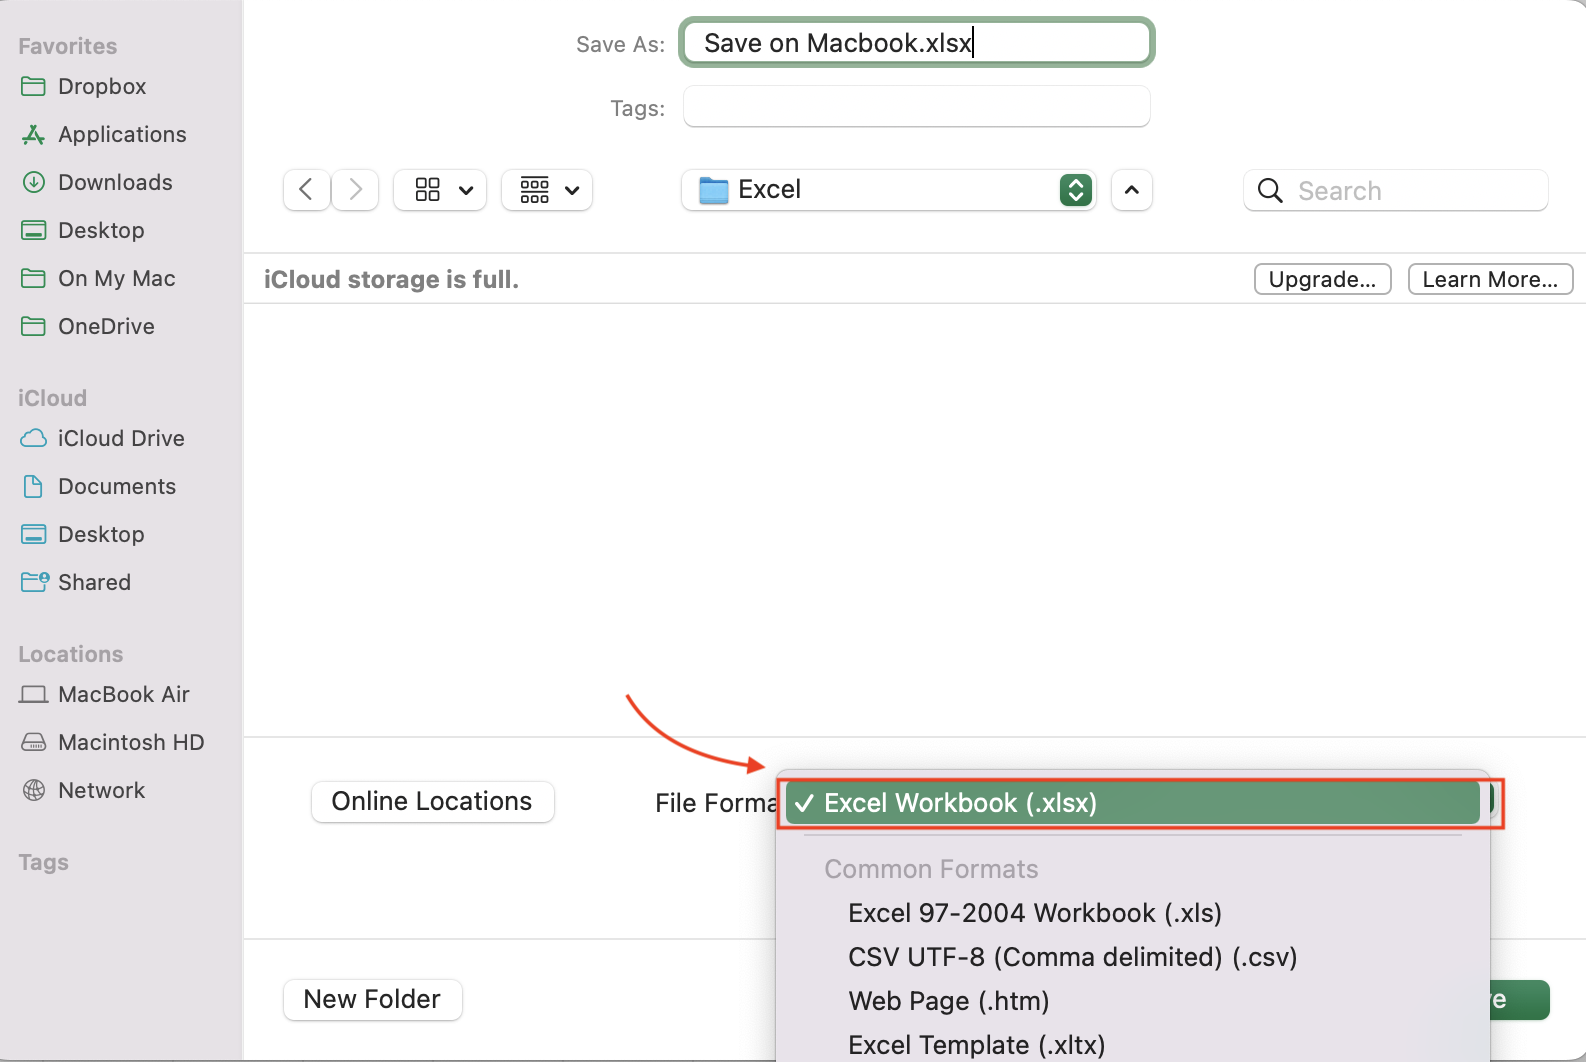
STEP 4: From the ” File Format” dropdown menu, select the appropriate Excel file format (e.g., .xlsx for modern versions or .xls for older ones).
For a quicker option, press the keyboard shortcut “Command + S” to save changes to an already named and located file without going through the menu.
Configuring Autosave Options for Optimal Performance
Configuring AutoSave in Excel on a Mac can be a valuable tool for protecting your data and ensuring that you don’t lose any progress due to unexpected shutdowns or crashes. By enabling AutoSave, Excel automatically saves your work at regular intervals, so you don’t have to worry about manually saving your file. Here’s how to set it up:
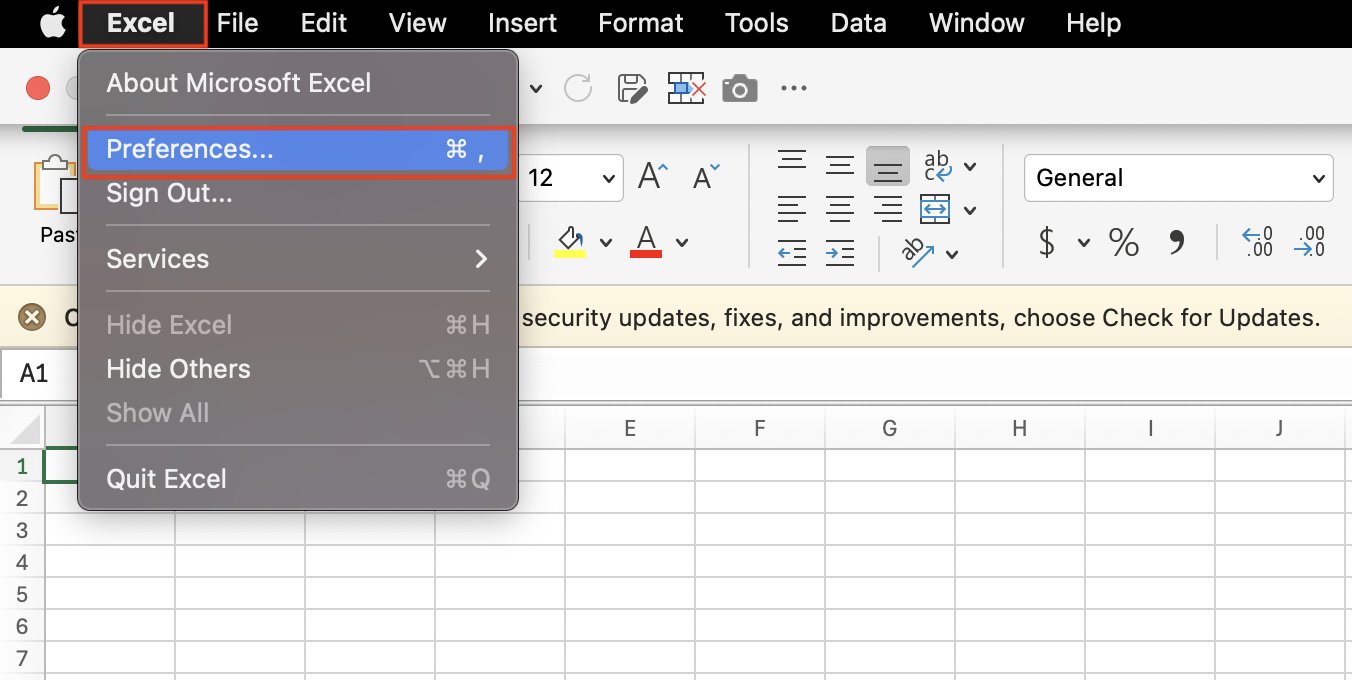
STEP 1: Click on the “Excel” on the top-left and click on .”Preferences”.
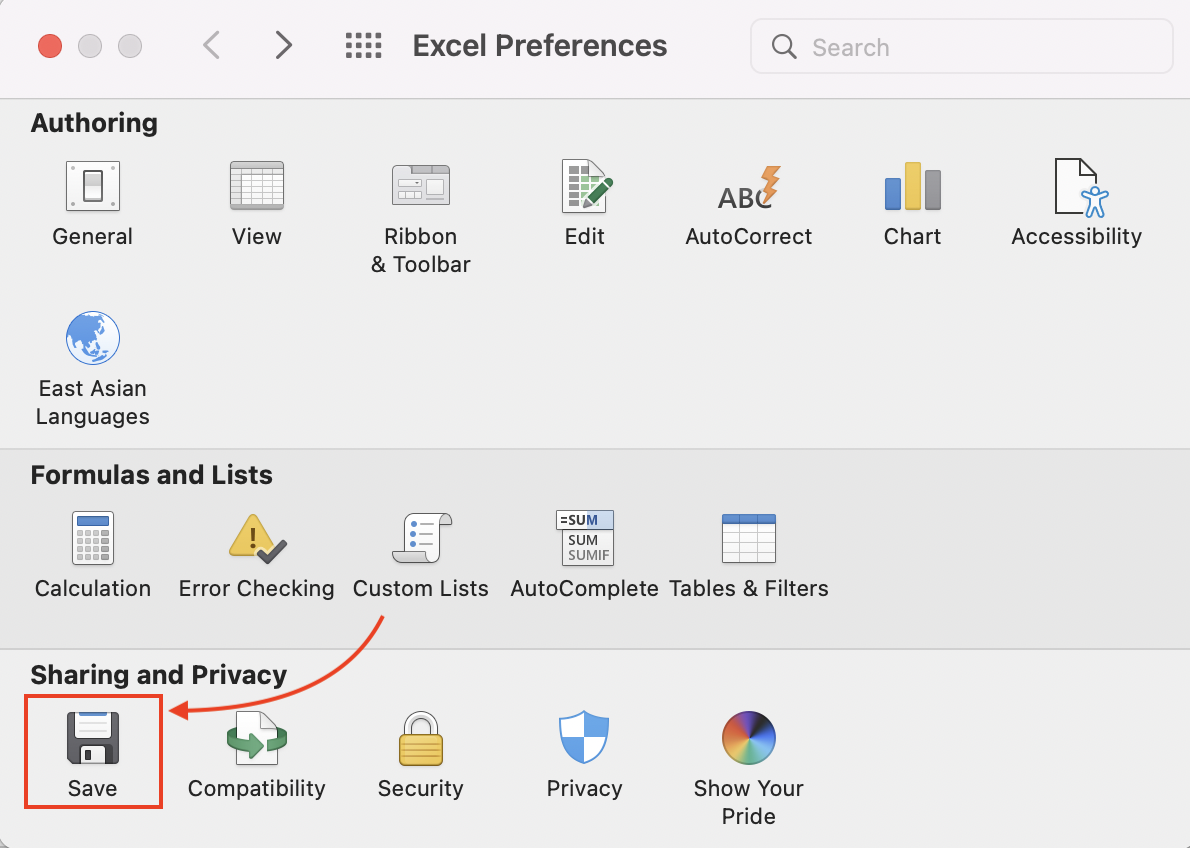
STEP 2: In the “Excel Preferences” dialog box, click on “Save” under the “Sharing and Privacy” row.
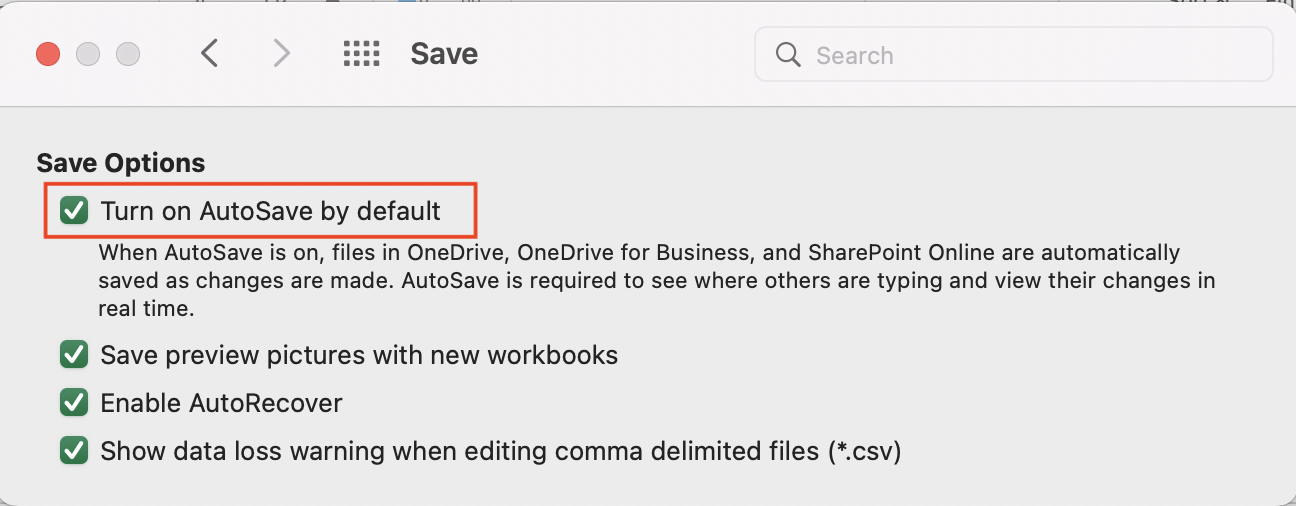
STEP 3: Check the box next to “AutoSave” to enable the feature.
Keep in mind that AutoSave works best when your files are stored on cloud services like OneDrive or SharePoint as part of Microsoft 365, allowing for real-time synchronization.
Troubleshooting Common Save Issues in Excel on Mac
Dealing with the “Cannot Save File” Error
Facing a “Cannot Save File” error can be daunting, but there are practical steps to resolve it. To start, we can save the document under a different name or file format by selecting “Save As” from the File menu — this sometimes bypasses the hiccup. If that doesn’t do the trick, checking the file’s permissions is the next step; ensuring we have the rights to make changes is critical.
Should the issue persist, transferring the file to another location on the Mac, such as a different folder or even an external drive, can help isolate if the problem is with the original location’s permissions or disk errors.
Still encountering the loop of errors? It might be time to delve deeper — removing Excel’s cache and configuration files can reset the application’s state. Though this is more advanced, it often clears persistent issues. Just remember to save any unsaved work in other Excel files before attempting it.
Advanced Saving Techniques
Saving Excel Files in Different Formats
Saving Excel files in various formats caters to differing needs and compatibility considerations. For instance, saving a file as CSV (Comma Separated Values) is excellent for importing data into other applications, while PDF format preserves the layout and is ideal for sharing professional documents that shouldn’t be edited.
Choosing a format such as .xlsx ensures compatibility with modern Excel versions, while .xls is suitable for backwards compatibility with older software.
When we save our Excel files in one of the numerous available formats, we repurpose data for diverse applications and audiences. For example, exporting a file as an HTML document makes it readily accessible on a web browser, while saving it as .xml allows for data exchange across various platforms and services that support XML formats.
Protecting Your Work
Tips to Ensure Your Excel Data Remains Secure
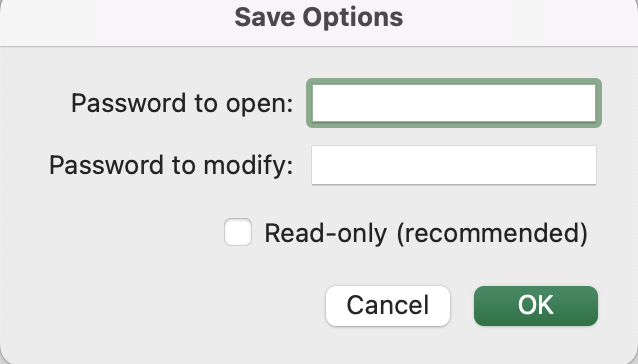
Protecting the integrity and confidentiality of our Excel data should be a top priority. We can ensure its security with some astute practices. First, let’s be proactive in setting passwords for sensitive documents. This can be done by choosing “File”, then “Password Protect,” and selecting “Encrypt with Password” within Excel. Creating strong, complex passwords that combine letters, numbers, and symbols can fortify the file against unauthorized access.
Another safeguard involves controlling permissions when sharing Excel files. Options to restrict editing or to make the document read-only help preserve data integrity when multiple hands are in the pot. And let’s not forget the importance of regular backups. Saving copies of critical files to secured locations such as encrypted external drives or trusted cloud services can act as a safety net against data loss or corruption.
Lastly, staying updated with software patches and security updates for Excel is critical—a step often overlooked yet essential for closing any vulnerabilities that could be exploited.
FAQ
How do I save an Excel file on a Mac?
To save an Excel file on a Mac, click File in the top menu and select Save As. Choose your desired location, provide a file name, and select the file format (e.g., .xlsx or .xls) before clicking Save.
Can I use a keyboard shortcut to save in Excel on Mac?
Yes, you can press Command + S to quickly save your Excel file without going through the menu. This shortcut works for both new and existing files.
How can I enable AutoSave in Excel on a Mac?
To enable AutoSave, go to Excel in the top-left corner, select Preferences, then click on Save under Sharing and Privacy. Check the box next to AutoSave to activate this feature, which works best when your files are stored on cloud services like OneDrive or SharePoint.
What should I do if I receive a “Cannot Save File” error?
If you encounter a “Cannot Save File” error, try saving the file under a different name or format using Save As. Additionally, check the file’s permissions to ensure you have the necessary rights to save it. If the issue persists, try moving the file to another location or clearing Excel’s cache.
Can I save my Excel file in formats other than .xlsx?
Yes, Excel for Mac allows you to save files in various formats like CSV, PDF, HTML, or XML. This flexibility ensures compatibility with different applications and platforms, depending on your needs.
John Michaloudis is a former accountant and finance analyst at General Electric, a Microsoft MVP since 2020, an Amazon #1 bestselling author of 4 Microsoft Excel books and teacher of Microsoft Excel & Office over at his flagship MyExcelOnline Academy Online Course.

