Key Takeaways
- To send an encrypted email through Office 365 or Outlook, you can simply add “[encrypt]” at the beginning of the subject line when composing a new message.
- In Outlook on the web, use the “Encrypt” button in the message editor to choose between two encryption options: “Encrypt,” which encrypts the email content, and “Encrypt & Prevent Forwarding,” which encrypts the email and prevents recipients from forwarding the email or accessing unencrypted attachments in other email clients.
- It is essential to encrypt emails in Outlook to ensure the privacy of your communications and protect sensitive information from unauthorized access, with options available for both personal privacy and professional secrecy.
Overview of Outlook Email Encryption
Outlook offers integrated solutions designed to provide users with secure email communication channels. Whether you’re using the Outlook desktop client or Outlook.com, there are multiple layers of protection to choose from. Encrypting emails can safeguard your information from unauthorized access, as each message is scrambled into an unreadable format that only the intended recipient can decode.
Table of Contents
Setting the Stage for Encryption in Outlook
Prerequisites for Sending Encrypted Emails
Before you can start securing communications, there are a couple of boxes you’ll need to tick off. Understandably, you need to have an active Outlook account.
Also crucial is making sure that you and your recipients have encryption capabilities set up. This may involve obtaining digital certificates for Secure/Multipurpose Internet Mail Extensions (S/MIME) or making sure everyone has access to Microsoft 365 for Office 365 Message Encryption (OME). These certificates and subscriptions act like digital passports, granting each other’s servers the permission to unlock the contents within.
S/MIME vs. Office 365 Message Encryption
Comparing S/MIME and Office 365 Message Encryption (OME) is like comparing apples and oranges—both fruit, both nutritious, but distinctly different.
S/MIME relies on a system of public and private keys unique to each user. It requires the installation and exchange of certificates. It’s best for organizations looking for granular control over their encryption and who can manage the complexity of certificates.
OME, meanwhile, is built into Office 365 and does not require the same level of setup. It’s more user-friendly and allows you to send encrypted messages to any recipient, regardless of their email provider. This flexibility makes OME a convenient option for businesses that need a straightforward solution for secure communication with external partners.
Step-by-Step Guide to Sending Encrypted Emails in Outlook
How to Use S/MIME for Email Encryption in Outlook
To send an S/MIME encrypted email in Outlook, you’ll first need to ensure you have the proper certificates. Here is the quick guide to getting started:
STEP 1: Access the Outlook desktop app.
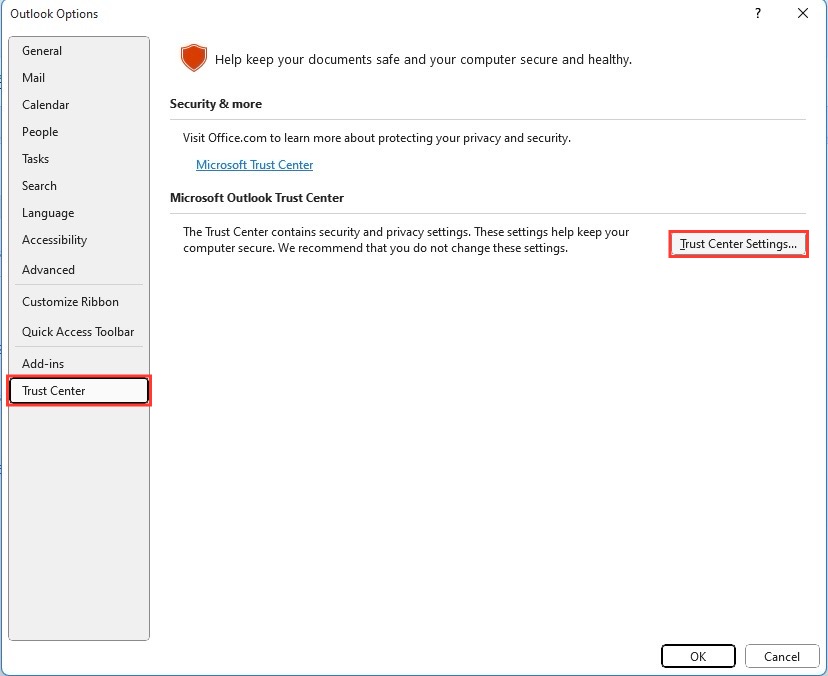
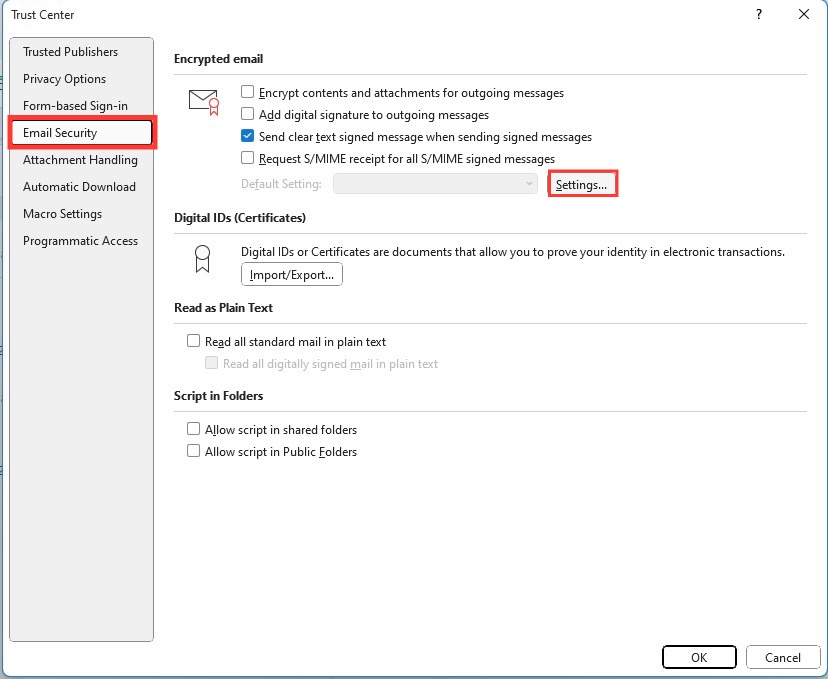
STEP 2: Click on ‘File’ in the top left corner>’Options’>’Trust Center’>’Trust Center Settings’>’Email Security.’
STEP 3: Under ‘Encrypted email’, choose ‘Settings’.
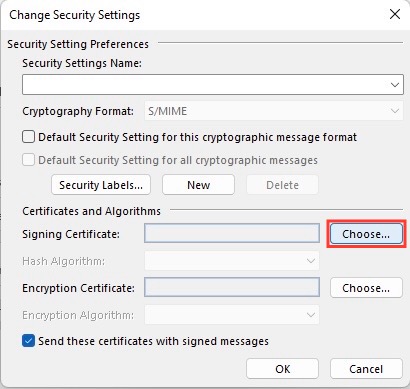
STEP 4: Select ‘Choose’ beside the Encryption Certificate and select your S/MIME certificate.
STEP 5: Click ‘OK’ to set the certificate.
STEP 6: Create a new email by clicking ‘New Email’.
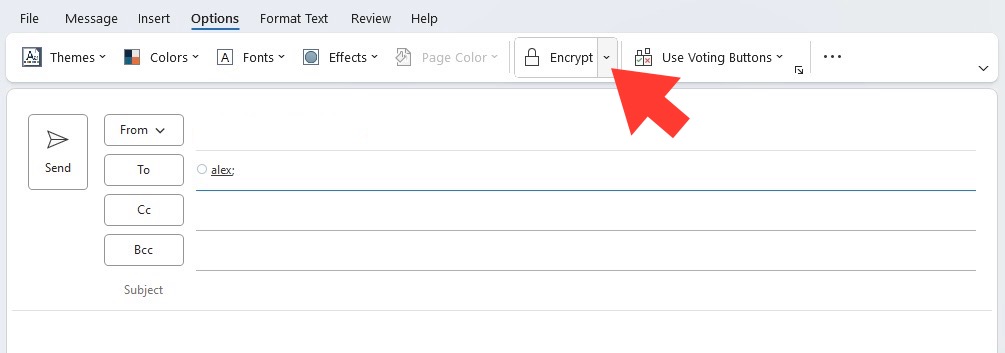
STEP 7: In the new message window, select ‘Options’.
STEP 8: Click on ‘Encrypt’, and choose ‘Encrypt with S/MIME’.
STEP 9: Finish drafting your email and click ‘Send’.
By following these steps, your message will be encrypted, and only the recipient with the corresponding private key will be able to decrypt and read your email.
Encrypting Emails with Office 365 Message Encryption (OME)
Encrypting emails with Office 365 Message Encryption (OME) is a more streamlined process that helps you send encrypted emails without the technicalities of S/MIME. Here’s how to do it:
STEP 1: Verify that your Office 365 subscription includes OME capabilities. Plans such as Microsoft 365 Business Premium, E3, or E5 will have this feature.
STEP 2: OME requires Azure Rights Management to be turned on. This is usually activated by default for eligible subscriptions, but it’s good to confirm.
STEP 3: In the Outlook desktop app or web app, compose a new email as you normally would.
STEP 4: Type your message and add recipients.
STEP 5: Click on the ‘Encrypt’ button on the ribbon (or under the ‘Options’ tab in the web app).
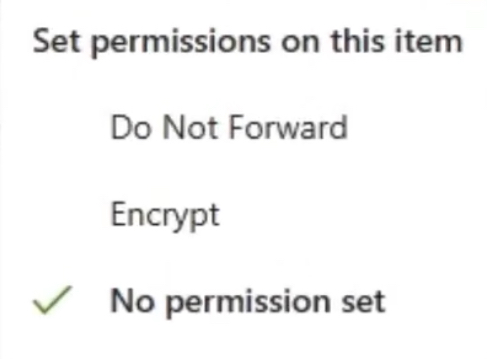
STEP 6: Choose ‘Encrypt-Only’ or ‘Do Not Forward’ based on the level of restriction you want to place on the email.
STEP 7: Hit ‘Send’.
With OME, your recipient will receive the encrypted email and can view it by signing in with their email credentials, or by obtaining a one-time passcode sent to their email. This process circumvents the need for traditional encryption certificates, making it more accessible for recipients outside of your organization.
Tips for Seamless Email Encryption Experience
Ensuring Recipient Compatibility
Ensuring the recipient’s email system is compatible with your encryption method is vital for successful communication. If your recipient uses Outlook and is within the same organization, and both of you have the necessary certificates or subscriptions, there should be no issue. However, for recipients outside your organization or those using different email clients, the process requires attention:
- For S/MIME, confirm that the recipient has the encryption certificate installed.
- For OME, it works across various email platforms – recipients will receive instructions on how to view the encrypted message securely.
- Remind recipients to check their spam or junk folder if they’re expecting an encrypted email that hasn’t appeared in their inbox.
Communicating the necessary steps ahead of sending your first encrypted email improves the chances of a trouble-free experience.
Managing Digital Certificates and Public Keys
Navigating the nuances of digital certificates and public keys is crucial to maintaining your secure email ecosystem. Here’s how to manage them effectively:
- Storing Certificates: Keep your digital certificate in a secure yet accessible location. Outlook will store the certificate associated with your email account, but it’s wise to have a backup.
- Sharing Public Keys: You need to share your public key with contacts for encrypted email exchange. You can do this by sending a digitally signed (not encrypted) message to your contacts. Upon receipt, they can add your certificate to their address book.
- Updating Contacts: Encourage your contacts to send you a digitally signed message as well, which will allow you to store their certificate and thus exchange encrypted emails.
- Revoking or Renewing Certificates: Be aware of the expiration dates on your certificates, and know the process for renewing them or revoking them if there’s a security concern.
- Regular Checks: Periodically check the certificates within Outlook to ensure they are valid and update as necessary.
By keeping on top of certificate management, you ensure continuous protective measures for your email communications.
Navigating Common Hurdles and Solutions
Dealing with Encrypted Attachments
When you send an encrypted email through Outlook, the handling of attachments varies depending on the encryption method. Here’s what you and your recipients need to know:
- For emails encrypted with the ‘Encrypt’ option, recipients can download attachments without special measures if they use Outlook.com, the Outlook mobile app, or the Mail app in Windows 10.
- Recipients using different email clients may need a temporary passcode from the Microsoft 365 Message Encryption portal.
- Microsoft Office attachments remain encrypted after downloading, safeguarding against unauthorized opening.
- Attachments that are not Microsoft Office files can be downloaded without encryption.
Keep these points in mind to avoid confusion regarding attachment accessibility for your recipients.
Troubleshooting Encryption Issues in Outlook
Even the most secure systems can encounter hiccups. If you or your recipients are facing issues with encrypted emails in Outlook, consider the following solutions:
- Check if your digital certificates are correctly installed and updated.
- Make sure both sender and receiver have granted each other’s certificates permission to decrypt messages.
- Verify that the recipient’s email client supports the encryption method used.
- For OME, ensure the recipient knows how to access the secure message and one-time passcode.
- Confirm there are no network restrictions preventing the decryption process.
- Make sure both parties have the latest version of Outlook or Microsoft 365 for optimal performance.
- If the above steps fail, contact Microsoft Support or your IT department for advanced troubleshooting.
Most encryption issues stem from overlooked details or outdated software. A careful review often brings a quick resolution.
Harnessing Advanced Features and Customization
Exploring Advanced Encryption Options in Outlook
For those who want to go beyond the basics, Outlook and Office 365 deliver a suite of advanced encryption options:
- Fine-tune who can read and interact with your email by adding custom permissions for specific recipients.
- A flexible feature that allows recipients to read and forward your email but keeps the message encrypted throughout the process.
- Prevents your email from being forwarded, printed, or copied, adding an extra layer of control over your sensitive information.
- Customize encryption templates to align with your company’s brand and regulatory compliance needs.
- Advanced users can further configure OME rules in the Azure portal to automate protection based on content, sender, or recipient.
Taking advantage of these advanced options can enhance your organization’s email security posture and data protection strategy.
Customizing Encryption for Branding and Compliance
Tailor your encrypted emails to mirror your company’s brand and meet compliance standards with these customization steps:
- Replace the default Office 365 logo with your organization’s logo to maintain a consistent brand image.
- Align the background color of the encryption message with your company’s color scheme for a seamless branding experience.
- Implement custom disclaimer text for legal compliance or to reiterate confidentiality notices at the bottom of encrypted emails.
To achieve these customizations, you’ll typically navigate to the Office 365 Security & Compliance Center and use PowerShell commands to apply your branding elements, ensuring that secure communications still feel personal and professional.
FAQs: Your Encryption Questions Answered
How do I know if my Outlook email was sent encrypted?
You can verify the encryption of your Outlook email by looking for the padlock icon next to the email’s subject line in your Sent Items folder. If the encryption was successful, this icon will be present, indicating that the message has been secured. Additionally, the recipient will receive instructions on how to view the message securely if their email client requires it.
Can I send encrypted emails to recipients not using Outlook?
Absolutely, you can send encrypted emails to recipients who don’t use Outlook. With Office 365 Message Encryption (OME), your message is securely delivered regardless of the email service the recipient uses. They’ll receive instructions on how to open the message via a web interface that works with virtually any email service.
What should I do if my recipient can’t open an encrypted email?
If your recipient can’t open an encrypted email, advise them to check their spam or junk folder first. If it’s not there, suggest that they use Outlook on the web or ensure their email client supports the encryption type used. For OME-encrypted messages, they can use the one-time passcode sent to their email if prompted. They could also clear their browser’s cache and cookies if they face issues with the web interface.
John Michaloudis is a former accountant and finance analyst at General Electric, a Microsoft MVP since 2020, an Amazon #1 bestselling author of 4 Microsoft Excel books and teacher of Microsoft Excel & Office over at his flagship MyExcelOnline Academy Online Course.

