Splitting names in Excel is a valuable skill for organizing and managing large datasets, particularly when dealing with personal information. Mastering this technique enhances productivity by allowing you to efficiently separate first and last names, and even handle middle names or initials. This capability is crucial for tasks such as sorting, filtering, and preparing data for communication or analysis.
Key Takeaways
- Use Text-to-Columns to quickly split names into first and last names by specifying delimiters.
- Apply formulas like
=LEFT(A2, FIND(" ", A2) - 1)and=RIGHT(A2, LEN(A2) - FIND(" ", A2))for custom name extraction. - Handle middle names or initials with formulas that use
SEARCHandMIDfunctions for more complex splits. - Use the TRIM and SUBSTITUTE functions to manage names with extra spaces or punctuation.
- Flash Fill can automate name separation by detecting patterns as you type, making it a quick solution for consistent data.
Introduction to Excel’s Splitting Capabilities
Why Splitting Names in Excel is a Useful Skill
Splitting names in Excel is an invaluable skill that immensely boosts our productivity and data management capabilities. When we work with extensive databases, especially ones containing personal details like full names, being adept at swiftly segregating these into first and last names is crucial.
This skill facilitates easier sorting, filtering, and analysis, tailoring data organization to the nuanced requirements of various tasks or reports we generate. Mastering this also allows us to manage large datasets more efficiently, paving the way for streamlined communication strategies such as personalized email campaigns.
Moreover, in data processing and cleansing, the ability to split names ensures that our reports and insights are accurate and reliable, preventing any confusion that might arise from mismatches or misinterpretations of data.
The Mechanics of Separating Names in Excel
Utilizing Text-to-Columns for Basic Splits
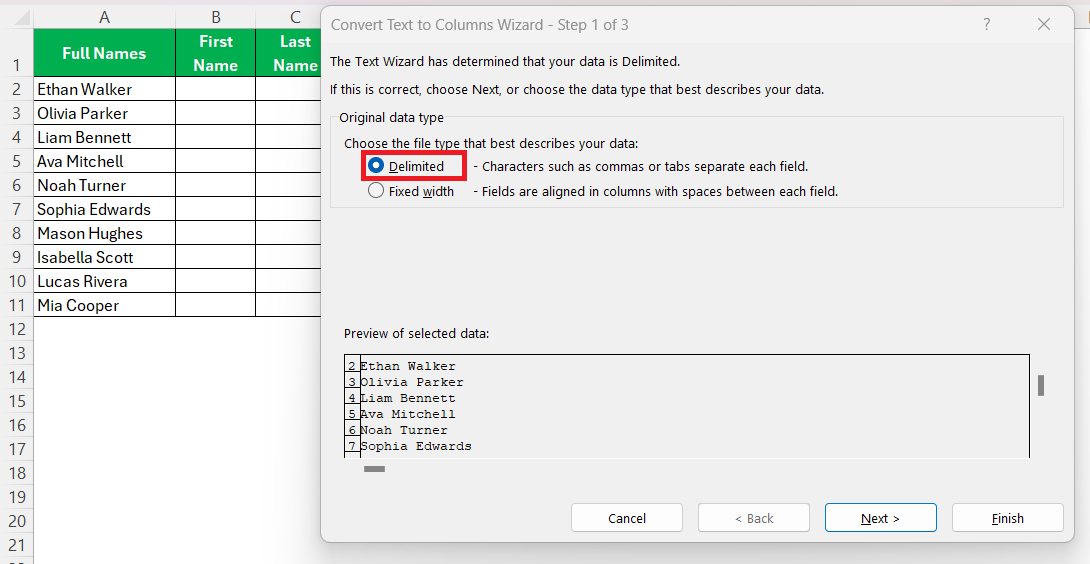
To get started with Text-to-Columns in Excel, we first need to pinpoint the cell range that contains the full names. Once selected, we head over to the Data tab and find the Text to Columns button within the Data Tools group.
After clicking it, a wizard pops up and guides us through the process. We choose ‘Delimited’ to specify that our data is separated by a delimiter, such as a space, and then proceed to the next step.
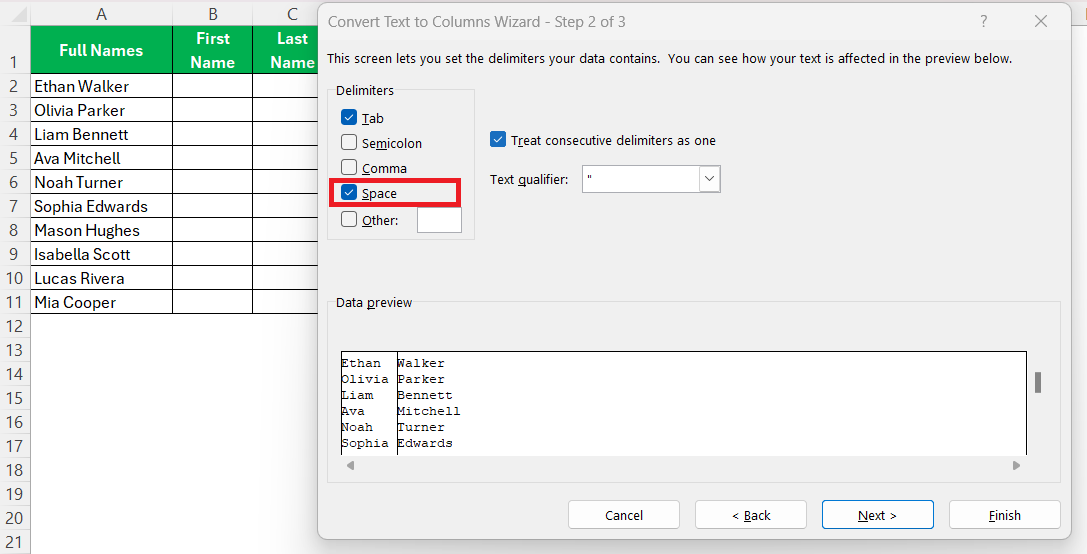
Here, we select our delimiter, which, in the case of names, is typically a space, though we could also opt for commas or other characters if that’s how our data is structured.
After hitting next, Excel shows us a preview of how our data will be split.
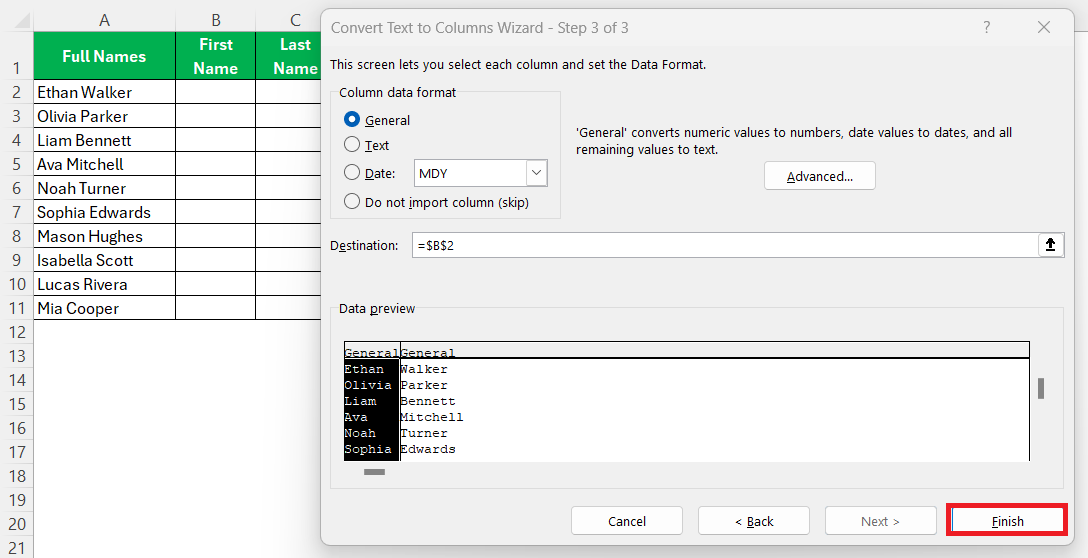
It’s a crucial step because it allows us to ensure everything looks correct before we proceed. We can then specify where we want the newly split columns to appear in our worksheet, helping us prevent the accidental overwriting of existing data.
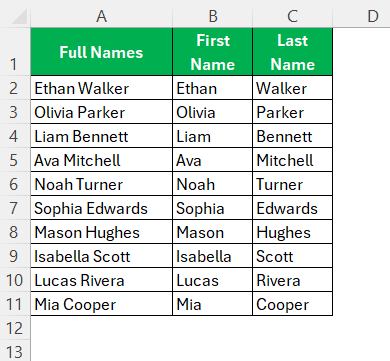
Finally, by clicking ‘Finish,’ Excel performs the operation, and voilà, full names are now neatly separated into individual columns for first and last names, making data more organized and readily actionable.
Crafting Formulas to Extract First and Last Names
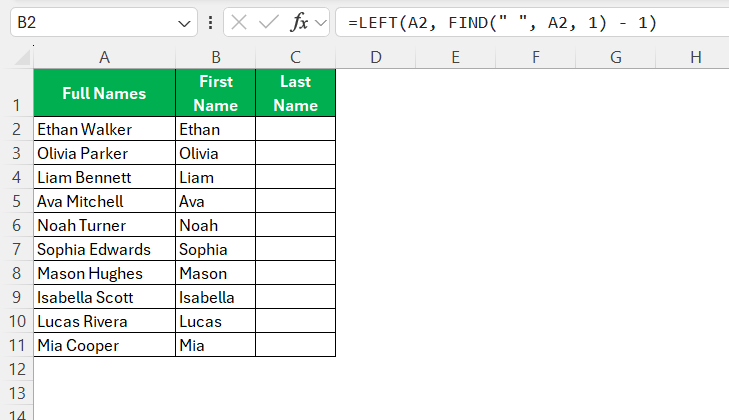
Crafting formulas to extract first and last names from a single cell in Excel requires a bit of function wizardry, but once mastered, it grants us immense control over how we parse our data. For starters, to snatch the first name, we engage the LEFT function along with FIND, positioning the formula “=LEFT(A2, FIND(” “, A2, 1) – 1)” in a neighboring cell.
By determining where the first space appears in the full name, this formula cleverly calculates how many characters to return, effectively isolating the first name.
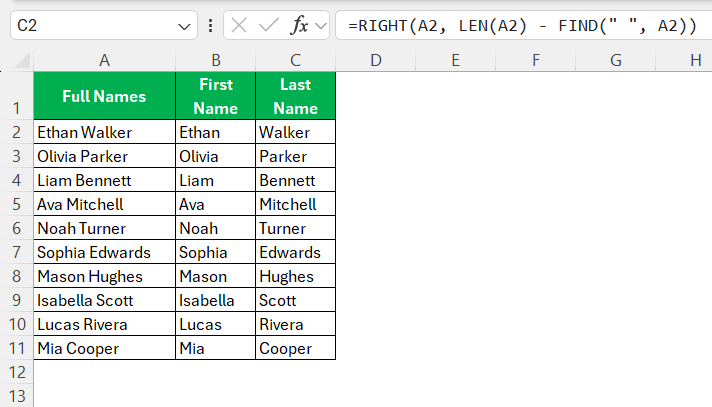
For the last name, the RIGHT function comes into play, inverting the process to pull characters from the end of the string. The formula “=RIGHT(A2, LEN(A2) – FIND(” “, A2))” considers the space once more, but in conjunction with the total length of the string to extract the surname.
These formulas can be replicated down the columns with a simple drag or copy-paste action, instantly splitting a list of full names into separate columns. It’s a quick method, though it requires precision to ensure that the formulas accommodate various name lengths and structures.
Advanced Tips and Tricks for Complex Splits
Dealing with Middle Names or Initials
Dealing with middle names or initials in Excel requires a modicum of finesse, as we nudge our formulas to accommodate an additional segment within the names. For instance, if we have a list with the format First name Middle name Last name, we have formulas tailored for such a scenario.
Here’s a trio of formulas that can separate these names into their respective columns:
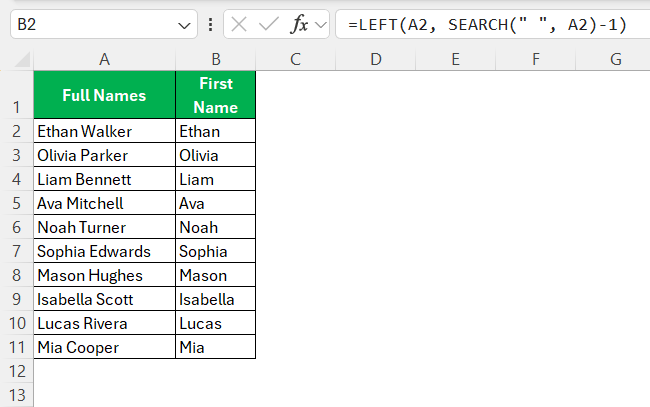
- To extract the first name:
=LEFT(A2, SEARCH(" ", A2)-1)
- To seize the middle initial or name:
=MID(A2, SEARCH(" ", A2) + 1, SEARCH(" ", A2, SEARCH(" ", A2)+1) - SEARCH(" ", A2) - 1)
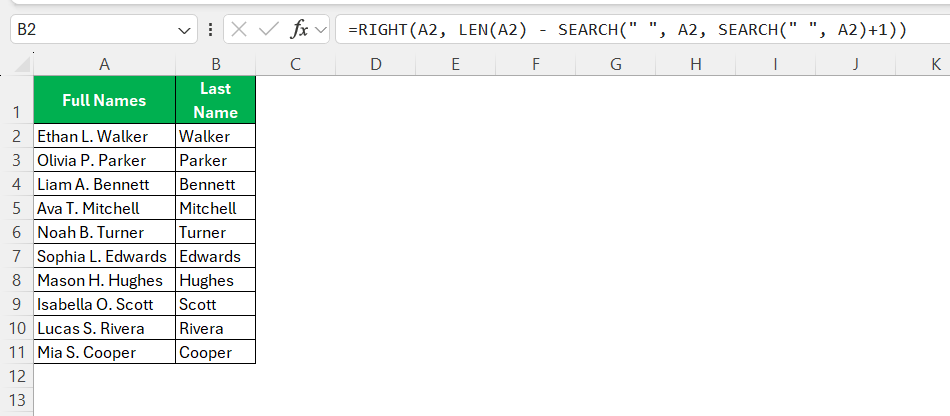
- For isolating the last name:
=RIGHT(A2, LEN(A2) - SEARCH(" ", A2, SEARCH(" ", A2)+1))
When executed, these formulas deploy the SEARCH function to identify space positions delicately, framing the names while leveraging LEFT, MID, and RIGHT functions to draw out each name part.
It is essential to consider edge cases where a double space or additional characters might appear, and prepare our formulas accordingly to avoid any accidental omissions or inclusions of unwanted characters.
Handling Special Cases with Punctuation and Spaces
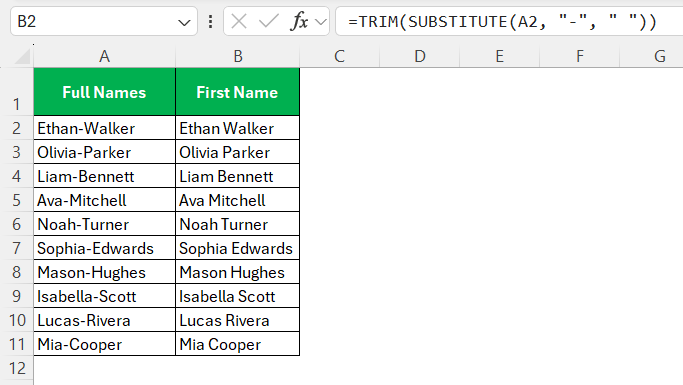
When encountering special cases with extra punctuation and spaces within names in Excel, we must elevate our approach to ensure accuracy. For names with additional spaces, one can invoke the TRIM function, which strips out any superflity, leaving just a single space between words. This function simplifies our data before we apply more specialized splitting techniques.
In the case of punctuation, like hyphens in double-barreled surnames or apostrophes in names like O’Neil, we can adapt our formulas slightly. By incorporating the SUBSTITUTE function, we can replace these characters with spaces or handle them as separate delimiters in the Text to Columns wizard, ensuring every part of the name is recognized and accounted for during the split.
An example formula that integrates SUBSTITUTE and TRIM might look like this: =TRIM(SUBSTITUTE(A2, "-", " ")), which then paves the way for subsequent splitting using either Text to Columns or further formula-based extractions.
As we aim for seamless splits, remembering to select the correct combination of delimiters and checking the “Treat consecutive delimiters as one” box in Text to Columns is a powerful way to tackle names with commas, spaces, and other punctuation marks.
Flash Fill: Excel’s Smart Solution for Name Separation
How Flash Fill Works and When to Use It
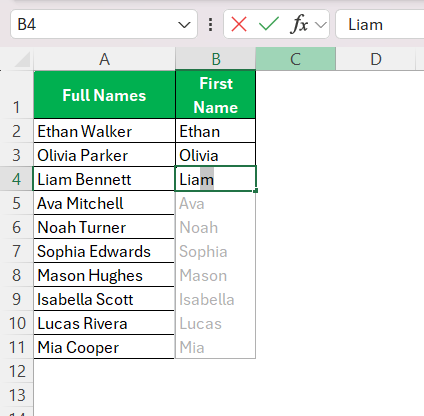
Flash Fill in Excel is akin to a smart assistant that observes our input patterns and automates the rest of the task accordingly. It springs into action when we manually start typing the pattern of data we want in a cell adjacent to the source data.
Let’s say we have a list of full names and start typing the first name in a new column; Excel’s Flash Fill feature will detect this pattern and suggest filling the remaining cells for us. By simply pressing Enter, we accept and apply the suggestion.
We should reach for Flash Fill when we’re handling data that follows a consistent pattern and we desire a quick solution without diving into complex formulas or the Text to Columns feature. It’s ideal for tasks such as separating first and last names, formatting numbers or dates, and fixing capitalization issues.
Keep in mind, that Flash Fill may not always trigger automatically. When it doesn’t, we can prompt it by selecting the cells we wish to fill, and then either clicking on the Flash Fill button located in the Data tab or pressing the keyboard shortcut – typically Ctrl + E.
Flash Fill shines in scenarios where we have clear and consistent patterns in the data, saving us time and streamlining our workflow.
FAQs
Can I Separate Names in Bulk Using These Strategies?
Yes, all these strategies—Text to Columns, formulas, and Flash Fill—are appropriate for separating names in bulk. They can save a lot of effort and time, especially when handling massive lists or databases. The choice of method depends on the dataset’s size and complexity.
Text to Columns is ideal for quick, uniform splits, while formulas grant precision for varied data. Flash Fill works well with consistent patterns, even on a large scale. It’s about choosing the right tool for the job to handle bulk separation efficiently.
What if I Have a List of Names in a Single Cell?
If you have a list of names in a single cell, you’ll need to start by using the Text to Columns feature to split them into separate cells. Choose the delimiter that your names are separated by, such as a comma or semicolon.
After they are in individual cells, you can utilize the methods we’ve discussed, like Flash Fill or formulas, to isolate first and last names in bulk. For intricate lists with various name formats, specialized tools like the AbleBits add-in can deftly handle such tasks within Excel.
Which Delimiter Should I Use With Text to Columns?
The delimiter you choose with Text to Columns in Excel should match the character that separates the first names from the last names within your data. Commonly, this is a space, but if your list includes names with commas, semicolons, or other punctuation, select those as delimiters.
If your names are separated by multiple spaces or different delimiters, check the ‘Treat consecutive delimiters as one’ option to ensure accurate data parsing.
How do I separate the last character in Excel?
To separate the last character in Excel, one can use the RIGHT function, which is designed to extract a specified number of characters from the end of a text string. For instance, if you want to separate the last character from a cell in column A, the formula would be =RIGHT(A2, 1).
This tells Excel to grab just one character, starting from the right-most end of the string in cell A2. Drag or copy this formula down the column to apply it to other cells.
How to get first name from full name in Excel?
To get the first name from a full name in Excel, you can use the built-in LEFT function in combination with the SEARCH or FIND function to locate the first space in the full name. The formula resembles =LEFT(A2, SEARCH(" ", A2, 1) - 1), where A2 contains the full name.
This formula extracts characters from the beginning of the string up to (but not including) the first space, effectively isolating the first name. Apply this formula to the rest of your list by dragging the fill handle down the column.
John Michaloudis is a former accountant and finance analyst at General Electric, a Microsoft MVP since 2020, an Amazon #1 bestselling author of 4 Microsoft Excel books and teacher of Microsoft Excel & Office over at his flagship MyExcelOnline Academy Online Course.


