Download our 101 Advanced Excel Formulas & Functions Examples!
Key Takeaways
- Share an Outlook calendar easily on the web by logging into Outlook, clicking the Calendar icon, adding a new calendar, then using the sharing and permissions option to invite others by entering their email and selecting the access level before clicking Share.
- Creating and sharing an Outlook event involves opening Outlook, navigating to the calendar section, clicking Share, entering the recipient’s email address, and setting desired preferences before confirming.
- For broader access, it’s possible to make an Outlook calendar public, allowing for seamless collaboration and scheduling with team members, external users, and through integration with tools like Calendly to manage availability.
The Benefits of Calendar Sharing for Efficient Meetings
To share calendars in Outlook is about more than just showing others when you’re busy; it’s a strategic tool that can elevate efficiency and help streamline work processes. When you share your calendar, you’re enabling teammates to schedule meetings more effectively, reducing the back-and-forth communication that typically precedes setting a meeting time. By granting access to your availability, you help optimize meeting planning, allowing everyone involved to focus on their core tasks and responsibilities.
- Saves Time: Avoids the constant exchange of emails or messages to find suitable meeting times.
- Increases Transparency: Fellow team members can see your availability, fostering a culture of openness.
- Enhances Coordination: Facilitates the process of aligning multiple schedules for group meetings.
- Reduces Conflicts: Minimizes scheduling conflicts by displaying real-time availability.
- Promotes Accountability: Shared calendars can act as a record of scheduled commitments and availability.
These benefits not only make scheduling meetings faster and more convenient but also contribute to improved communication and collaboration within teams or with clients.
Table of Contents
Exploring Calendar Sharing Options
Basic Permissions and Accessibility
When you share your Outlook calendar, you’re in control of how much others can see and do. Microsoft provides predefined permissions that can be tailored to your needs. At a glance, here are some you might assign:
- Free/Busy Time: Others can see when you are available or busy, but they cannot view event details.
- Reviewer: Individuals can view all details of your calendar events but cannot create or edit them.
- Author: This level allows viewing of all details and the ability to create new events, without the capacity to edit or delete events not created by them.
- Editor: Offers the ability to view all details, create new events, and also edit or delete existing events.
These options let you fine-tune the level of access based on your relationship with the other person, whether they are a teammate, manager, or external partner.
Step-by-Step Guide to Share Your Outlook Calendar
How to Share Your Outlook Calendar on a PC
To share your Outlook calendar on a PC, just follow these easy steps:
STEP 1: Open the Outlook app on your computer.
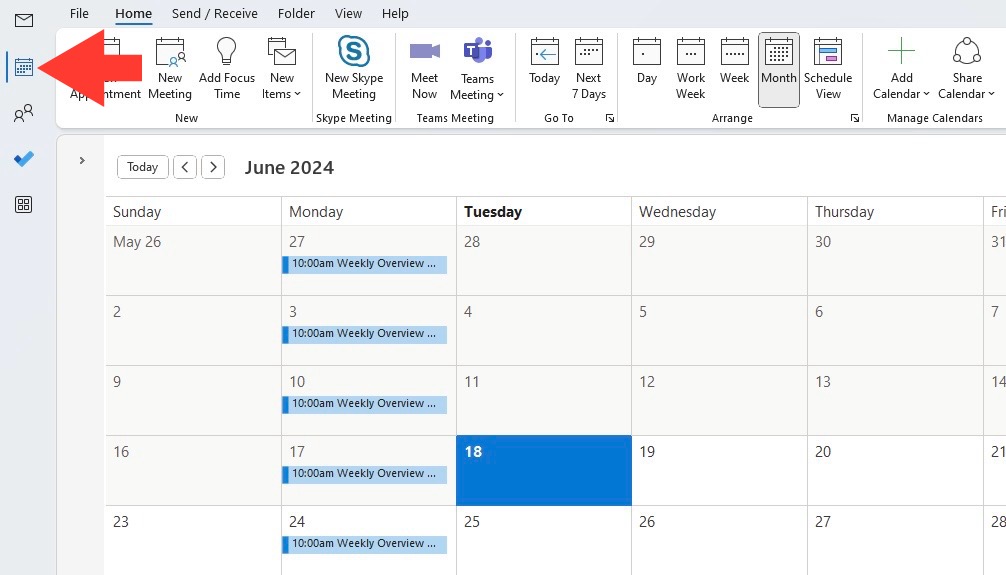
STEP 2: Click on the Calendar icon, usually at the bottom left of the screen.
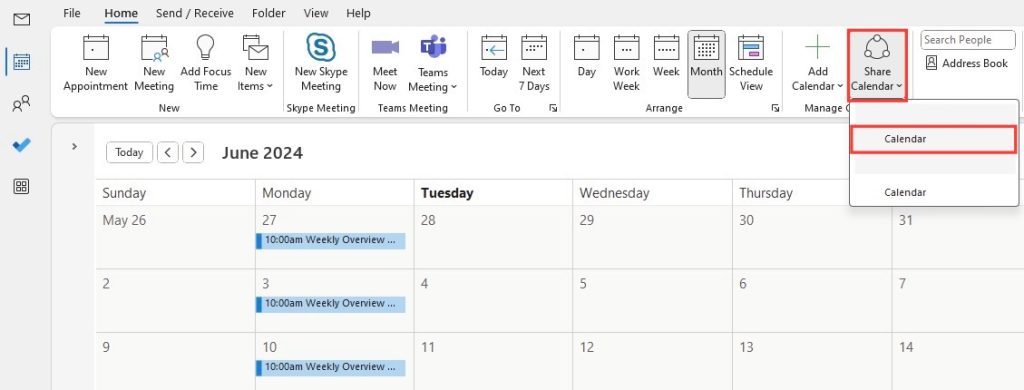
STEP 3: From the Home tab, click on the Share Calendar button, then the calendar you want to share, finally choose ‘Permissions.’
STEP 4: In the new window, click ‘Add’ to select someone from your contacts or enter their email directly.
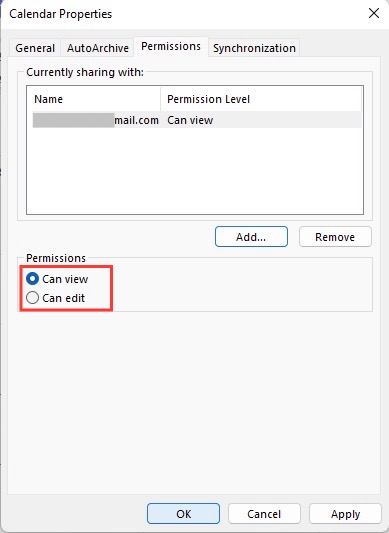
STEP 5: Decide on the appropriate permission level and click ‘Add.’ You can choose from viewing only availability to allowing full edit rights.
STEP 6: Once you’re done setting permissions, click ‘OK’ to finish.
Keep in mind that those you’re sharing with need to have compatible software, typically Microsoft Outlook, to view or edit shared calendars.
How to Share Your Outlook Calendar on Mobile Devices
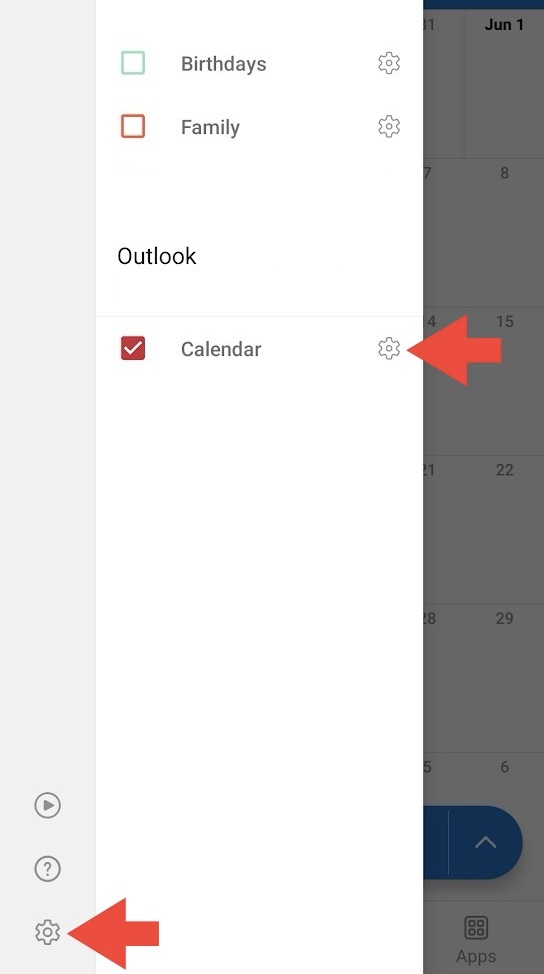
To share your Outlook calendar from a mobile device, you’ll be happy to know that the process is quite straightforward:
STEP 1: Open the Outlook app on your iPhone or Android device.
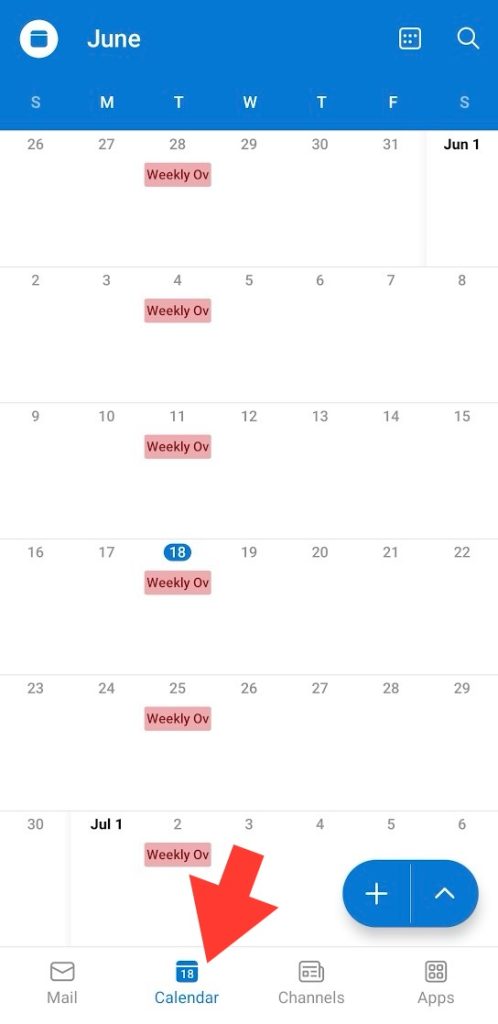
STEP 2: Navigate by tapping the calendar icon, usually found in the menu at the bottom.
STEP 3: Access settings with the gear icon, often in the upper left or right.
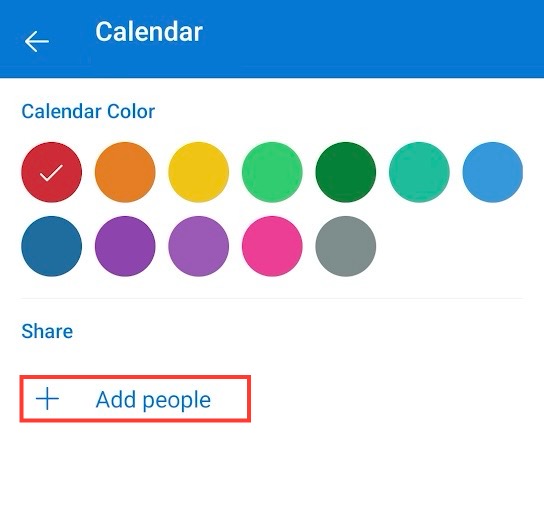
STEP 4: Select ‘Add People’ to choose contacts you want to share with or input their email addresses.
STEP 5: Customize their permission levels, deciding what they can see and do with your calendar.
STEP 6: Finalize the process by tapping the checkmark or ‘Done’ to save these settings.
This method allows for flexible sharing while you’re away from your desk, ensuring you stay connected and productive no matter where you are.
Managing Shared Calendar Permissions
Adjusting Access Levels for Individuals
If you’ve already shared your calendar and need to adjust individual access levels afterward, it’s a pretty simple process. Here’s how you do it:
STEP 1: Navigate to your calendar within Outlook and right-click on the calendar you’ve shared.
STEP 2: Select ‘Properties’ followed by the ‘Permissions’ tab.
STEP 3: You’ll see a list of people who have access. Click on a name to adjust their permissions.
STEP 4: Customize their permission level using the dropdown menu or the individual checkboxes for specific rights.
STEP 5: Click ‘OK’ to apply the new settings.
This flexibility allows for dynamic collaboration without compromising control, as you can easily fine-tune someone’s access as your working relationship evolves.
Revoking Access and Stopping Calendar Sharing
For times when you need to revoke someone’s access or stop sharing your calendar altogether in Outlook, the process is equally user-friendly. Here’s what you need to do:
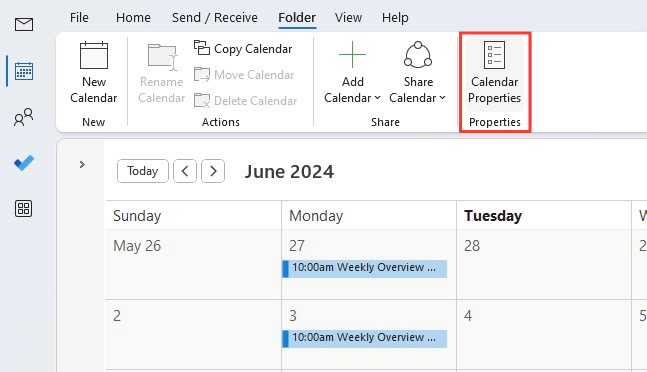
STEP 1: Go to your Calendar in Outlook, and on the ribbon, access the Folder tab.
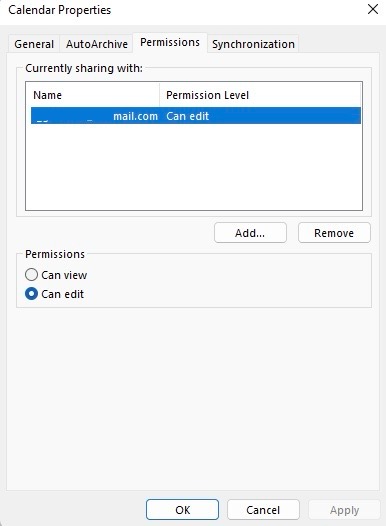
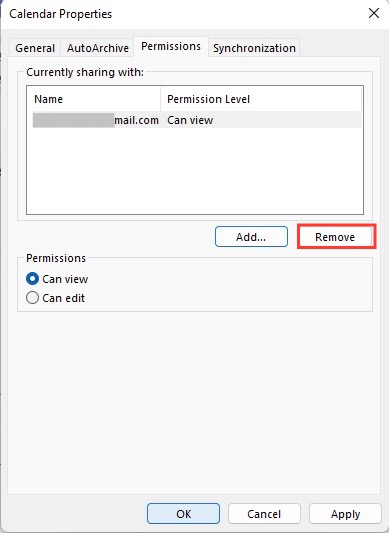
STEP 2: Click on ‘Calendar Properties,’ then navigate to the ‘Permissions’ tab.
STEP 3: You will see a list of users currently sharing your calendar under ‘Currently sharing with.’
STEP 4: Select the person you wish to remove and click ‘Remove.’ Confirm the removal by clicking ‘OK,’ then save your changes.
Remember, it might take a short while for the changes to synchronize across Microsoft 365 and the Outlook applications of the users. Your quick action here ensures that you maintain privacy and control over your schedule.
Troubleshooting Common Sharing Issues
Resolving Free/Busy Information Display Problems
If others are having trouble seeing your free/busy information, there are a couple of steps you can take to resolve it:
- Check your permission settings to ensure that you’ve granted the proper access level that allows others to see your free/busy information.
- If permissions are set correctly, try refreshing your calendar or asking others to refresh theirs, as sometimes synchronization issues may cause display problems.
- For more persistent issues, it may be necessary to remove and then re-share the calendar with the specific individual, ensuring a reset of the sharing permissions.
If troubles persist even after these steps, you might need to reach out to IT support, as the issue could be related to deeper configuration settings within your organization’s messaging infrastructure.
Fixing Errors When Sharing an Outlook Calendar
When encountering errors during the sharing process, such as the notorious “This calendar can’t be shared” message, it can be frustrating. However, there are methods to troubleshoot and fix these issues:
- Verify the email address: Make sure the address you’re sharing with is correct and that it doesn’t belong to a Microsoft 365 Group or an external user not part of your organization.
- Check for duplicates: Look at the Permissions list for your calendar within Outlook. Remove any duplicate entries that might be causing the error.
- Restart Outlook: Sometimes, a simple software refresh can resolve sharing glitches.
If these steps don’t clear up the problem, seek assistance from your IT department as the issue may involve network permissions or server-related complications.
Coordinating Shared Resources Using Scheduling Assistant
Scheduling Assistant in Outlook goes a step beyond just sharing calendars; it’s designed to help coordinate shared resources, like meeting rooms or equipment. Here’s how to maximize its potential:
- When setting up a meeting, open the Scheduling Assistant in your Outlook Calendar.
- Add people as you would normally, and then search for available resources like conference rooms.
- You can see everyone’s availability in one view, making it straightforward to find a time slot that works for all—including the needed resources.
- Review the details, and once satisfied with the time and resources, send out your meeting invite.
By using this feature, you avoid double-booking and ensure that you’re not just gathering people, but also securing the necessary physical or digital resources for a productive meeting.
Best Practices for Outlook Calendar Sharing
Choosing the Right Level of Sharing
Selecting the right level of sharing in Outlook depends largely on your specific needs and the nature of your work relationship with the person you’re sharing with:
- With team members working on the same project: You’ll likely grant more access, perhaps to edit or add events, helping foster a collaborative environment.
- For your manager: Access to all details might be necessary for oversight and planning without the need to modify events.
- When liaising with clients: Usually, limited access such as ‘Free/Busy’ information is appropriate to maintain professionalism and privacy.
When setting sharing levels, consider what’s necessary for the task at hand, balancing the need for transparency and collaboration with security and privacy concerns.
Ensuring Privacy While Sharing Calendars
When sharing your Outlook calendar, prioritizing privacy is crucial. Use these practices to maintain confidentiality:
- Default to minimum necessary access: Start with the lowest level of access necessary for someone to perform their role.
- Regularly review permissions: Conduct periodic audits of who has access to your calendar and adjust as needed.
- Be mindful with external sharing: Use ‘Publish Calendar’ sparingly, as it can expose your schedule publicly.
By thoughtfully managing permissions and staying aware of who has access to your calendar details, you can effectively share your schedule without compromising your privacy.
FAQ: Frequently Asked Questions about Calendar Sharing in Outlook
How Can I See Who Has Access to My Outlook Calendar?
To see who has access to your Outlook calendar, open your calendar in Outlook, right-click on the calendar you’re interested in, and select ‘Properties.’ From there, click on the ‘Permissions’ tab, and you’ll see a complete list of individuals with their respective access levels.
Can I Unshare My Calendar After Granting Access?
Absolutely! You can unshare your calendar anytime. Simply go to Calendar Properties, head to the Permissions tab, select the user’s name, and hit Remove. Don’t forget to save your changes to revoke access effectively.
Why Can’t I Share My Outlook Calendar With Someone?
If you’re unable to share your Outlook calendar, it could be due to an incorrect email address. Double-check the recipient’s address for any typos. Also, ensure there are no duplicate permissions for that person in your calendar’s settings – this can cause sharing to fail.
John Michaloudis is a former accountant and finance analyst at General Electric, a Microsoft MVP since 2020, an Amazon #1 bestselling author of 4 Microsoft Excel books and teacher of Microsoft Excel & Office over at his flagship MyExcelOnline Academy Online Course.

