Ever been faced with the task of understanding or auditing an Excel spreadsheet filled with seemingly endless rows and columns of numbers? You might know that behind those numbers lie the powerful formulas working their magic. But how do they all fit together? Being able to view these formulas directly within their cells can be a game-changer for you.
Key Takeaways:
- Utilizing the ‘Show Formulas’ option in Excel’s ribbon or pressing CTRL+` (grave accent key, not apostrophe) on your keyboard are quick and efficient methods to display formulas within cells instead of the calculated values. This function is particularly useful when reviewing or troubleshooting spreadsheets to ensure that the correct formulas are being applied.
- To simultaneously view a formula and its result side by side, one can use the =FORMULATEXT(reference) function. This can be entered in a cell adjacent to the one containing the formula, enabling users to easily compare the formula with the outcome it produces without having to toggle the ‘Show Formulas’ option on and off.
- Displaying formulas in Excel can be particularly informative when analyzing the calculations behind certain results, such as ratio computations between sales data from different sources. As observed in the example provided, revealing the formulas behind the sales ratios allows for more transparent data analysis and validation of the calculations involved.
Table of Contents
The Importance of Seeing Behind the Cells
When working with Excel, appreciating the power of formulas is critical to leveraging the application’s full capabilities. Seeing the formulas within the cells they reside in provides a greater insight into the logic and structure of your spreadsheet. It allows for a better understanding of the data flow, makes troubleshooting errors easier, and ensures that consistent and correct calculations are utilized across your dataset. Think of it as peeking under the hood of a car – it gives you the comfort and assurance that everything’s running as it should.
Navigating Through Excel’s Show Formula Features
Shortcut Tricks: Immediate Formula Visibility
For those swift moments when you need to reveal the wizardry behind your values, Excel’s got you covered with a handy shortcut. All it takes is a simple key combination. If you’re a Windows user, hold down CTRL and press ' (grave accent). macOS users, you’re not left out – use Command + Option + '. This little shortcut is a real time-saver: no clicks through menus, no fuss, just immediate transparency with your formulas.
Remember, if you have custom shortcuts configured, this might override the default, so you’ll want to remove any conflicting shortcuts first.
STEP 1: Press on your keyboard the following keys: Ctrl + `
The (`) key is usually located on the upper left part of your keyboard. This will show all your Excel formulas in your worksheet!

Press the Ctrl + ` combination again to hide the formulas.
STEP 2: If you prefer to set this via Excel Options, another way is to go to File > Options

STEP 3: Go to Advanced> Display Options for this Worksheet > Show formulas in cells instead of their calculated fields
Ensure this is checked.

The formulas are all shown now too! You can uncheck it to hide the formulas again.

Piece-by-Piece: Displaying Formulas in Specific Cells
If your goal is precision rather than blanket formula revelation, Excel accommodates this too. When only certain cells require their formulas to be visible, you can turn them into textual representations. Start by selecting the cells where you desire to showcase the formulas. Then, use the Find & Select feature with a twist in the Replace dialogue: you’ll be swapping the equal sign ‘=’ with a text-friendly version like ”’=’ or similar. This little trick transforms your formula into a string that’s visibly a formula, yet remains inert as far as calculations are concerned. It’s like having coded messages that only savvy Excel users can understand!
Advanced Tips for Managing Formula Display
Keeping Your Formulas and Results Straight
Balance and clarity are key when you’re juggling between formulas and their outcomes. To keep things organized, consider displaying your formulas in a parallel column or row adjacent to your results. This way, you can compare and contrast with a quick glance. It’s effortless to set up: just select the cell next to your result, type ‘=’ followed by the address of the cell with the formula you want to display, and hit Enter. Add an ampersand and quotation marks (“”) to concatenate your result with its formula for even clearer insight.
Remember, it’s all about keeping those calculations transparent and your workflow streamlined. You’ll thank yourself when it comes time to review or share your Workbook – there’s no guesswork, just clear data and logic on display.
Protecting Your Work: Hide and Reveal Tactics
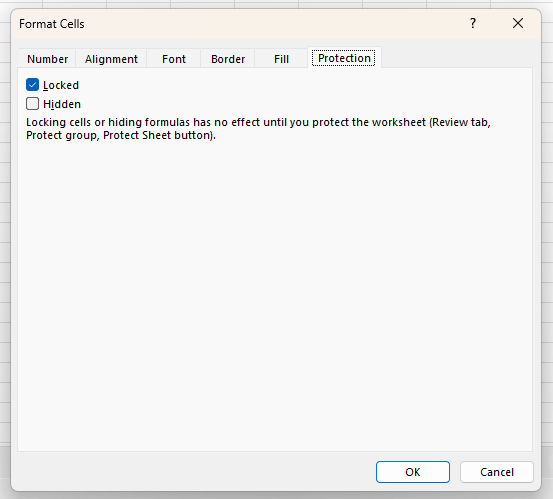
Protecting the integrity of your work often means keeping your formulas out of sight while making sure the results are accessible. To do this, you can lock down these formulas by marking them as hidden within the cell formatting options. Here’s the lowdown on how it works:
- Highlight the range of cells with formulas you wish to conceal.
- Head to ‘Format Cells’ from the ‘Home’ tab, and tick the ‘Hidden’ checkbox under the ‘Protection’ tab.
- Secure your selection by activating the worksheet protection via ‘Review’ > ‘Protect Sheet’.
But remember, safeguarding your formulas isn’t about keeping them hidden forever. When it’s time to make changes or perform reviews, you can swiftly unprotect the sheet, reverse the ‘Hidden’ setting, and bring your formulas back into the spotlight. This dynamic hide-and-reveal approach means your secrets are safe, yet completely under your control.
Troubleshooting Common Formula Display Issues
Solving the Puzzle: When Excel Shows Text Not Results
You’ve meticulously crafted your formula, but Excel insists on displaying it as text, not the result—what gives? This mix-up usually occurs when cells are formatted as text. This small oversight tells Excel to treat your formula like a string of characters rather than a command to be executed.
To crack this code, first double-check your cell’s format. If it’s set to ‘Text’, switch it back to ‘General’ or the appropriate number format. You may also need to trigger Excel to reevaluate the formula by hopping into cell edit mode with F2, then pressing Enter.
And what if your formula is still stubbornly masquerading as plain text? Give it another go. Re-enter or copy-paste the formula fresh once the cell format is adjusted. This nudge often does the trick and your formula will transform from an inert text string into a live result before your eyes—just like the number-crunching chameleon you intended.
Avoiding Mistakes: Why Editing Can Cause Formulas to Text Transform
Ever had that sinking feeling when a tried-and-true formula unexpectedly turns into text right after you edited it? This perplexing situation often boils down to a simple trigger – inadvertently adding unwanted characters before the equal sign. That’s right, even a seemingly harmless space or an apostrophe can be the culprits here.
When you’re in the thick of editing, pressing space before typing ‘=’ or adding an apostrophe for a note could convert your dynamic formula into static text. Excel interprets these characters as signals that what follows is meant to be taken literally, rather than evaluated for a result.
To avoid this pitfall, be mindful while editing. Ensure your cursor is positioned correctly and that no additional characters sneak in before the equal sign. This keeps your formula as an active part of your spreadsheet’s ecosystem, ready to update and react just as you expect it to.
Ensuring Effective Formula Printing Practices
From Screen to Paper: Getting Your Formulas Print-Ready
Sure, your spreadsheet sings on screen with dynamic formulas and vibrant results. But when you want to study your work on paper, or need to share it in a physical format, getting those formulas print-ready is essential. To do this, first make the formulas visible using the keyboard shortcut “Ctrl + " for Windows or "Command +” for macOS. The on-screen transformation is immediate, with all formulas appearing right within their respective cells.
Next, it’s just a stone’s throw to the finish line. Double-check the print preview – this is your failsafe step to ensure that what you see is what gets printed. The print view must show formulas, not results. Adjust your settings if needed, and then proceed to print your document, formulas at the forefront just as planned.
Remember, preserving your formulas on paper is preserving the blueprint of your spreadsheet’s functionality. It’s like giving someone the recipe, not just the finished dish.
Maintaining Clarity: Best Practices for Printing Excel Formulas
When transferring the digital precision of Excel to paper, clarity is king. Follow these best practices to keep your printed formulas as legible and useful as the screen version. Start by scaling your worksheet to fit the page—the aim is a layout that avoids cutting off any essential data. Use page layout view to finetune the appearance. Selecting the ‘Print Gridlines’ option may also enhance readability, drawing clear lines between each piece of data.
For an extra layer of detail, consider printing row and column headings to provide context for each formula. And before hitting print, guard against any surprises by previewing your document one last time, ensuring that every formula is accounted for and properly displayed.
Printing your formulas from Excel isn’t just about transferring data; it’s about crafting a document that is as informative and functional on paper as it is on your screen.
FAQ: Mastering Formula Displays in Excel
How do I quickly toggle between showing formulas and results?
Toggling between showing formulas and results is a cinch with a quick tap of a keyboard shortcut. Press “Ctrl + " (that's the grave accent key) on your Windows keyboard, or "Command +” on a Mac. This shortcut is the light switch for visuals in Excel – off for results, on for formulas – facilitating seamless switching in the blink of an eye.
Is there a way to display only the formulas in a specific range?
Yes, to display formulas in a specific range, select the desired cells, then go to the ‘Formulas’ tab and click on ‘Show Formulas’. Alternatively, format the cells to show formulas as text using the ‘Find & Select’ ? ‘Replace’ feature. Replace ‘=’ with ‘=’.
What are the common reasons for Excel displaying the formula instead of the result?
Common reasons for Excel displaying the formula instead of the result include the cell being formatted as ‘Text’, accidentally activating ‘Show Formulas’ mode, using a space or an apostrophe before the equal sign ‘=’, or missing the equal sign at the beginning of the formula.
How can I prevent others from seeing my formulas while still allowing them access to the cell data?
To conceal formulas from others while granting access to cell data, use Excel’s cell protection features. First, format the cells with formulas to be ‘Hidden’ through ‘Format Cells’ and the ‘Protection’ tab. Then, protect the sheet under ‘Review’ > ‘Protect Sheet’. This hides formulas but keeps cells accessible for viewing and inputting data.

John Michaloudis is a former accountant and finance analyst at General Electric, a Microsoft MVP since 2020, an Amazon #1 bestselling author of 4 Microsoft Excel books and teacher of Microsoft Excel & Office over at his flagship MyExcelOnline Academy Online Course.


