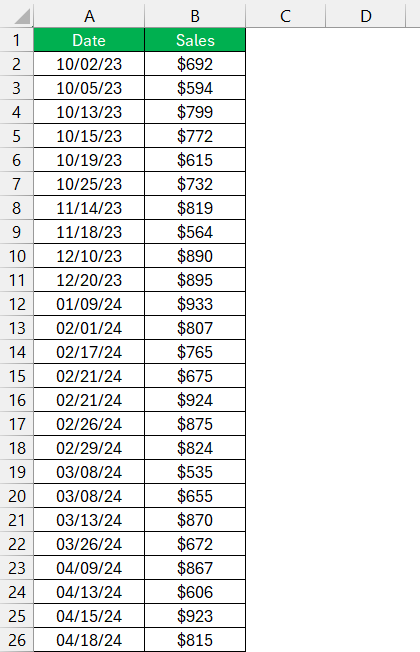
Sort by date in Microsoft Excel is a fundamental skill for organizing tasks, tracking events, and making sense of data. Understanding how to arrange dates chronologically transforms a disordered set of information into valuable insights. However, users often encounter challenges due to format inconsistencies or dates entered as text, complicating what should be a straightforward process.
5 Key Takeaways:
- A fast and straightforward method to sort by date: right-click within the date column, select ‘Sort’, and choose your desired order. Ideal for simple datasets and swift organization.
- Offers comprehensive control over sorting, allowing for intricate arrangements in larger or more complex datasets. It’s perfect for tailoring data presentation according to specific needs.
- Implementing a VBA macro automates the sorting process, especially useful for dynamic datasets that frequently change. This ensures data remains organized without manual intervention.
- Utilizing helper columns with MONTH() or YEAR() functions enables sorting data based on a single time component, invaluable for seasonal analysis or identifying yearly trends.
Table of Contents
Introduction to Date Sorting in Excel
The Essentials of Organizing Data by Dates
Sorting dates in Excel is foundational for managing tasks, tracking events, and analyzing trends. Mastering how to sort data chronologically can turn a jumble of dates into actionable insights.
Common Challenges with Date Sorting
You might have faced a head-scratching situation where Excel just won’t sort your dates properly. Sometimes, dates behave like stubborn text that refuses to get in line – literally. The most common hiccup occurs when there’s a mix of formats, such as when some dates are in the American format (MM/DD/YYYY), while others follow the European style (DD/MM/YYYY). Another issue comes up when dates are entered as text, preventing Excel from recognizing them as sortable date values.
Let’s not forget the conundrum you face when different date formats are jumbled together in the same dataset. Or the confusion when dates spanning multiple years are to be sorted by month and day but not by year – think of sorting anniversaries or recurring events. It’s these little gremlins that can turn a simple task into an Excel escapade.
Step-by-Step Guides to Sort by Date
Method 1: Right-Clicking for a Quick Date Sort
Sometimes you need a quick fix, and here’s the perfect shortcut for sorting dates in a jiffy. Right-clicking provides you with a fast-track to data organization without needing to navigate the ribbons and tabs of Excel.
Follow these steps to become a right-click sort aficionado:
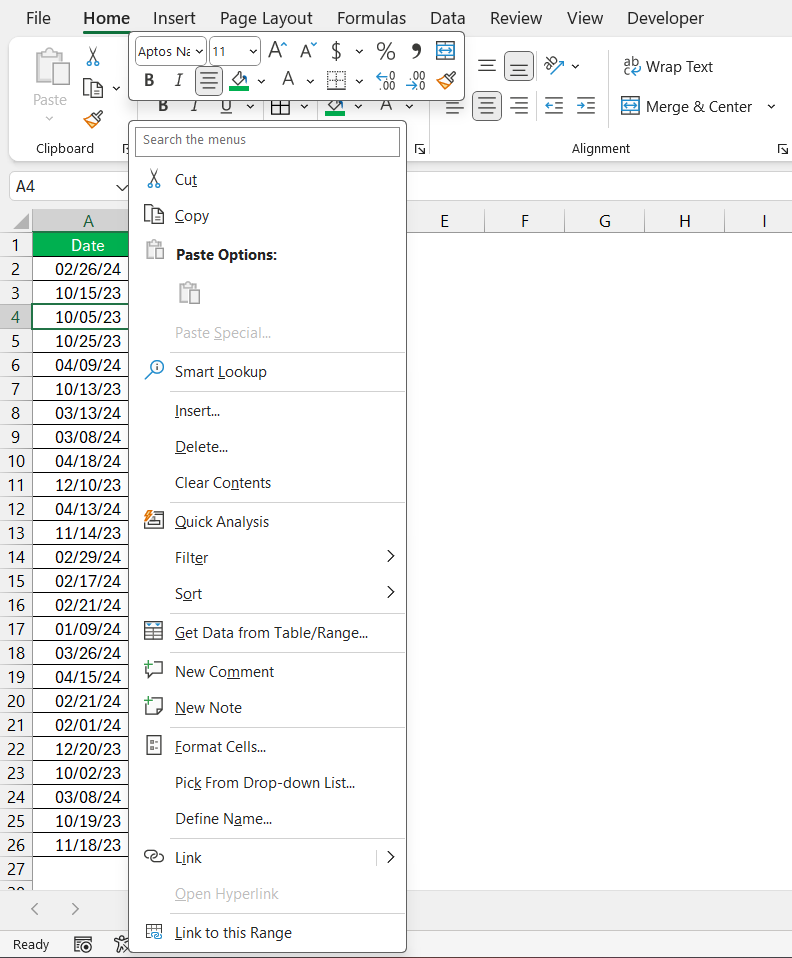
STEP 1: Firstly, right-click on any cell within the column that contains your dates.
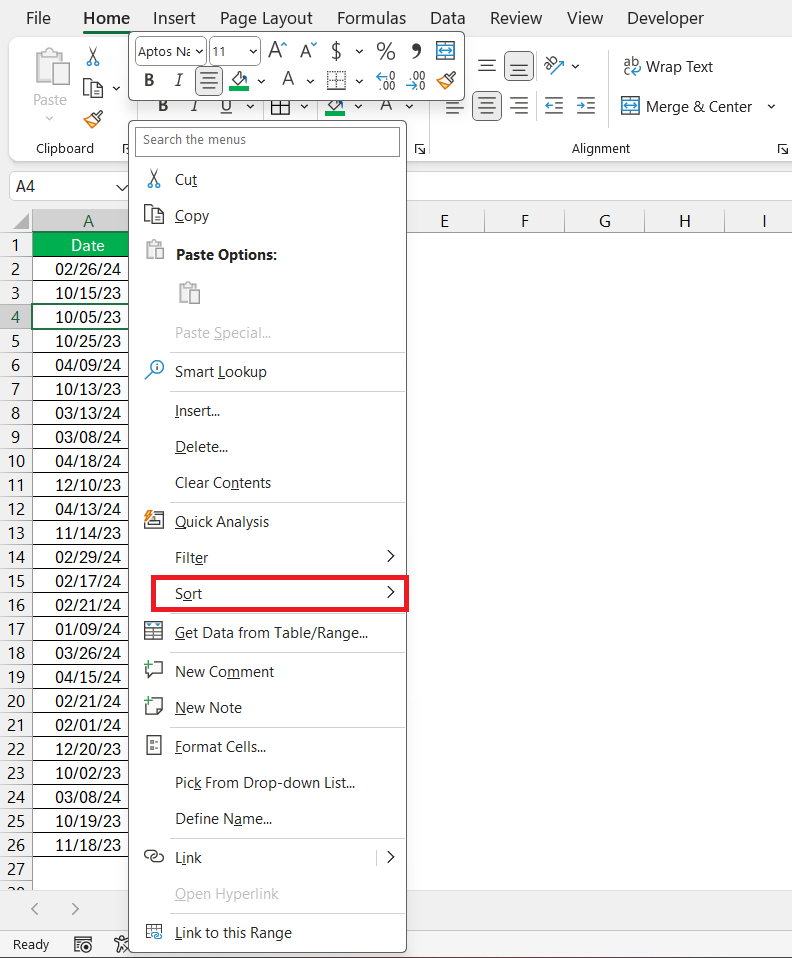
STEP 2: From the pop-up menu, hover over ‘Sort’.
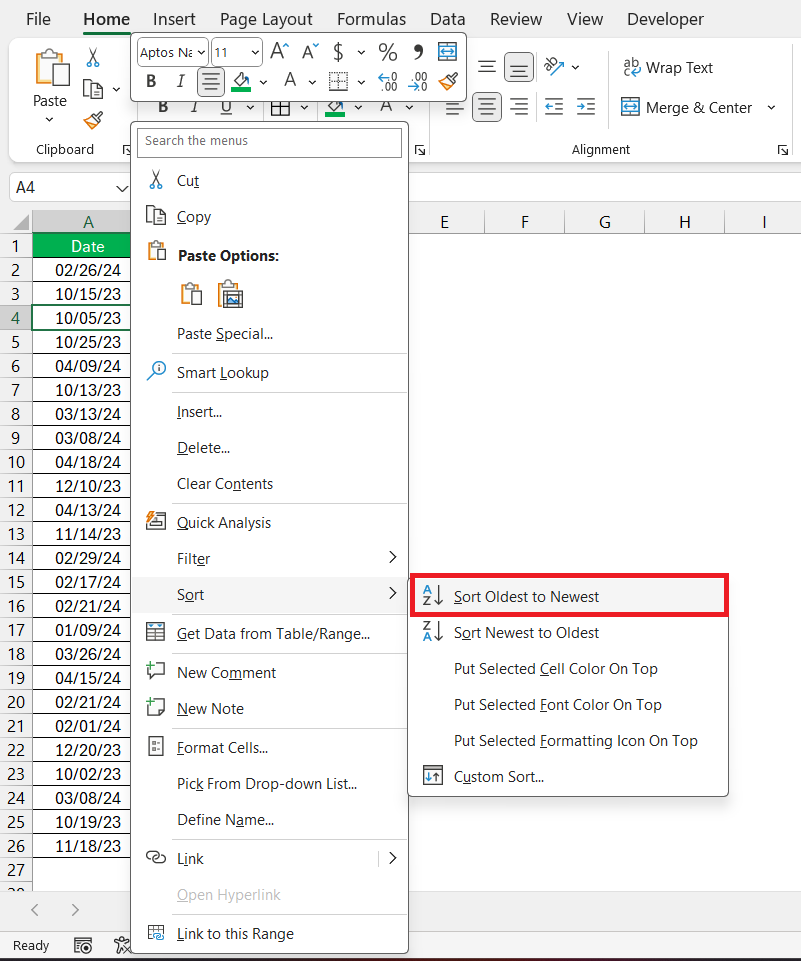
STEP 3: Select ‘Sort Oldest to Newest’ to arrange the dates in ascending order, or ‘Sort Newest to Oldest’ for descending order.
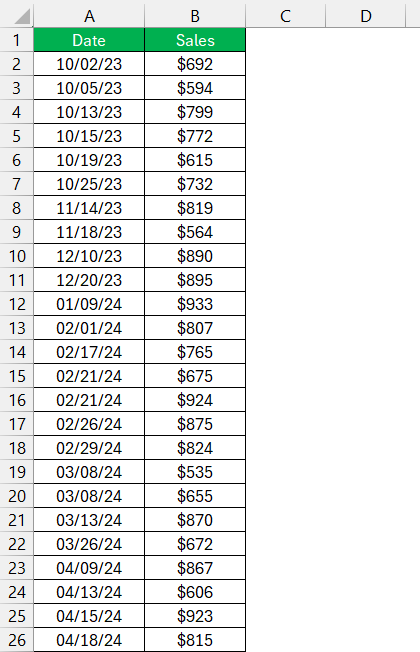
Voilà! Your data is poised and polished in chronological order, just like that.
This method’s beauty lies in its simplicity and speed, making it the go-to for quick data arrangements. It’s best suited for those instances when you’re in a rush or when the dataset isn’t overly complex.
Method 2: Utilizing Excel’s Custom Sort Feature
When you want full control over how your dates are sorted – especially if you’re grappling with a larger or more complex dataset – Excel’s Custom Sort feature is your secret weapon. It allows you to be the master of your data, dictating exactly how and what gets sorted.
Let’s walk through the custom sort crusade:
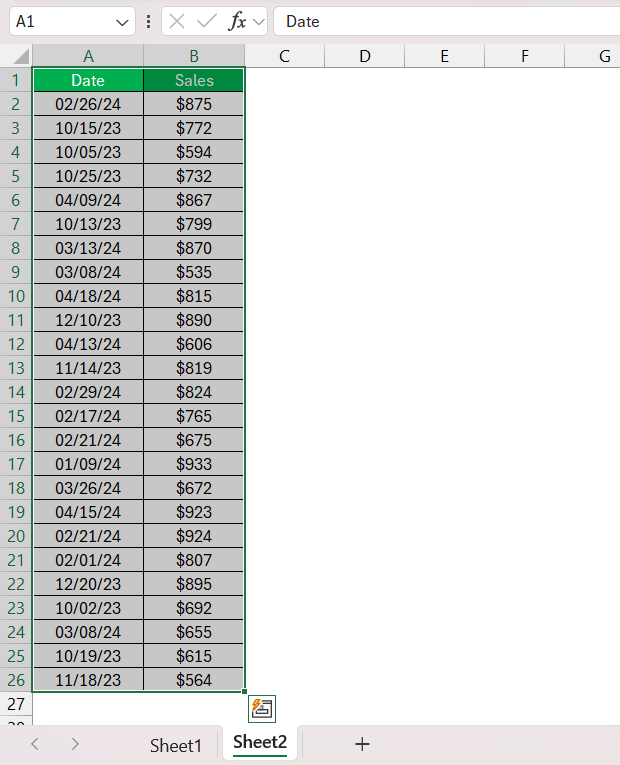
STEP 1: Begin by selecting the full range of data that includes the date column(s) you need to sort.
STEP 2: Click on the ‘Data’ tab and select ‘Sort’, or use the ‘Sort & Filter‘ command under the ‘Home’ tab.
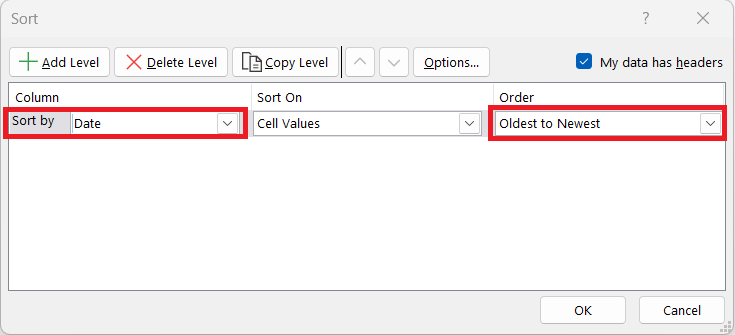
STEP 3: In the ‘Sort’ dialog box, kick things off by choosing the date column under ‘Sort by’. Specify the sort order – whether you want to see your data from ‘Oldest to Newest’ or ‘Newest to Oldest’.
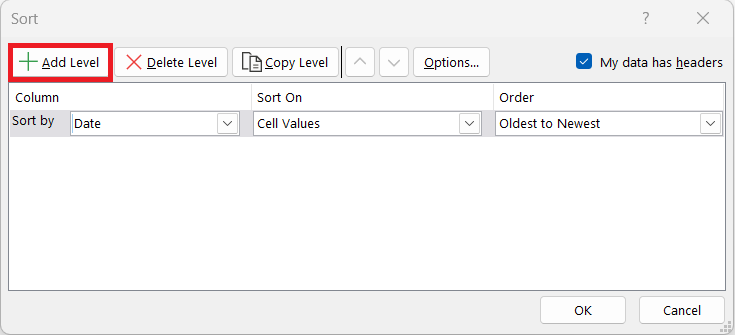
Add levels if you’re managing multiple date columns or criteria.
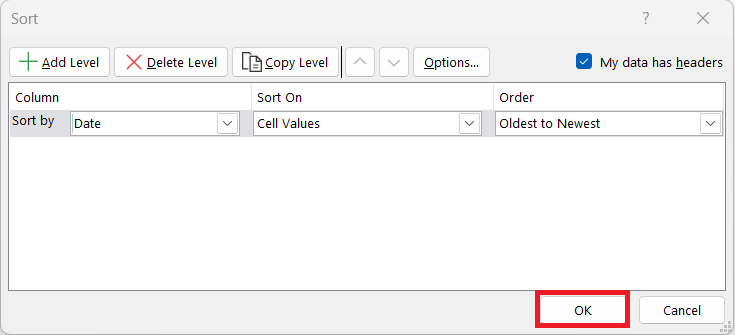
STEP 4: Hit ‘OK’, and your dates will fall in line, obeying your custom commands.
The data will be sorted by date.
Custom sorting boasts a flexible toolkit that’s ideal for:
- Multi-faceted data arrangements
- Datasets that don’t conform to standard sorting scenarios
- When you need a sort order that standard shortcuts can’t provide
Remember, the Custom Sort feature is best for when you need that extra ounce of customization for your data storytelling to make complete sense.
Method 3 – Writing a Macro for Auto-Sorting Dates
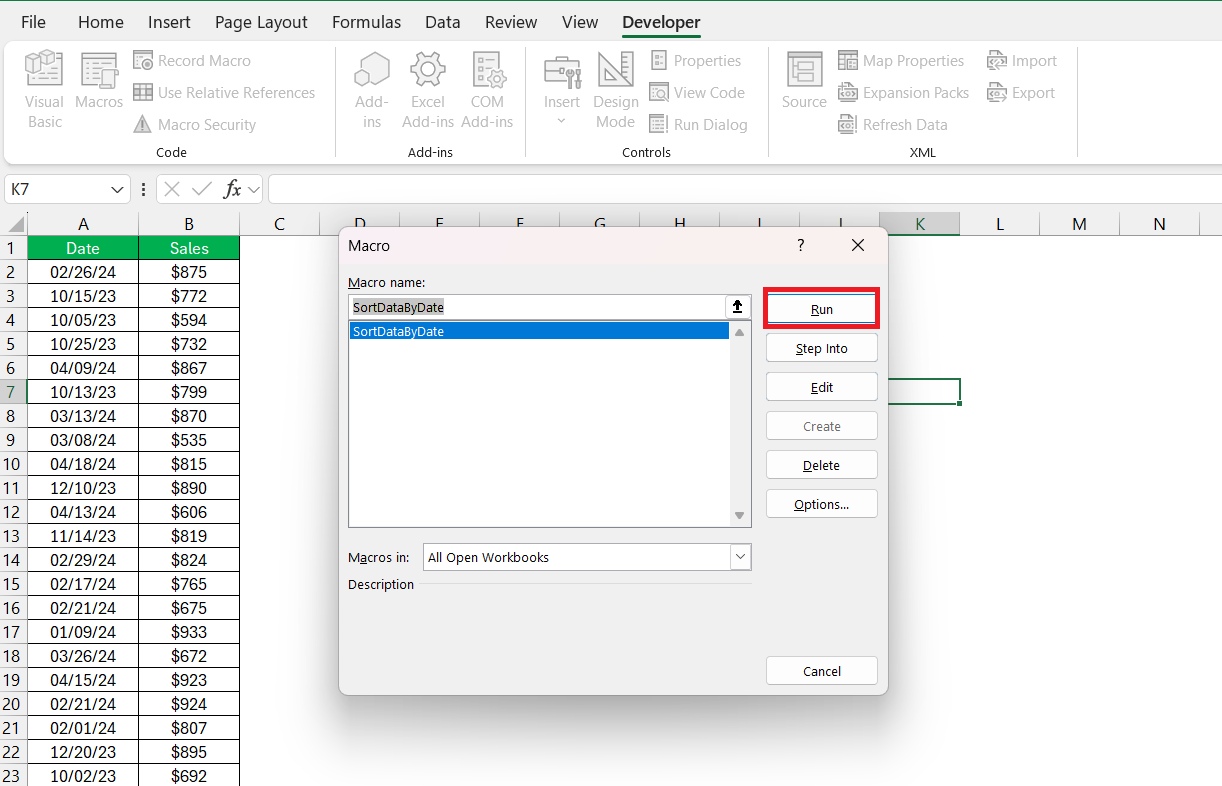
Looking to streamline your workflow in Excel? A macro that auto-sorts dates can be a lifesaver, particularly for those large, dynamic datasets you might be wrestling with. Once set up, this little snippet of VBA code will keep your data perpetually organized every time a change occurs.
Here’s a simple guide to writing this handy macro:
STEP 1: Start by pressing ALT + F11 to open the Visual Basic for Applications (VBA) editor.
STEP 2: Go to Insert > Module.
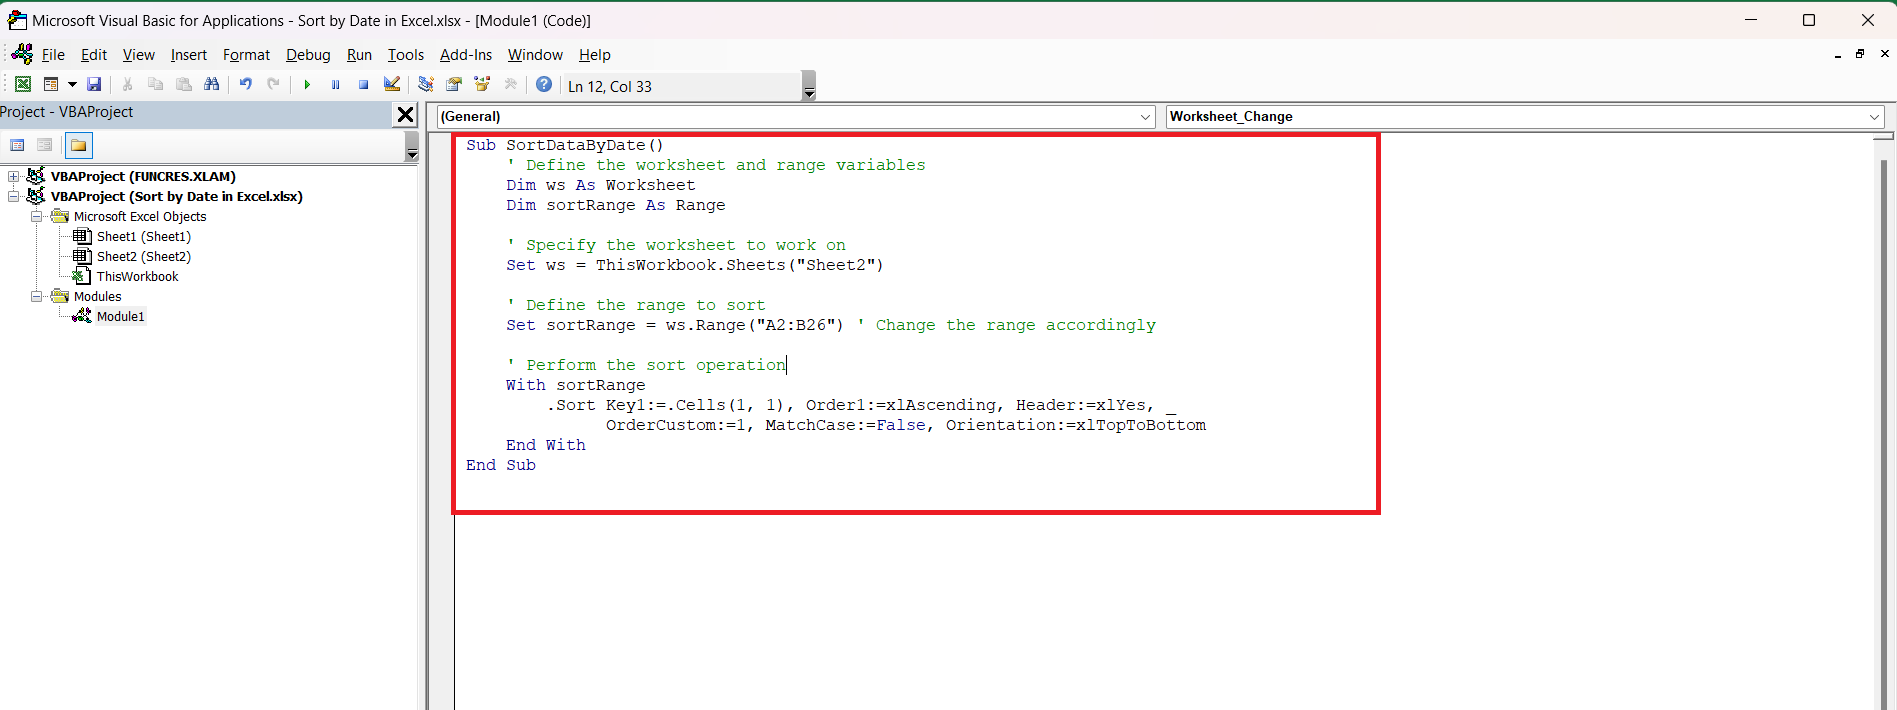
STEP 3: Copy and paste the following code into the editor:
Sub SortDataByDate()
' Define the worksheet and range variables
Dim ws As Worksheet
Dim sortRange As Range
' Specify the worksheet to work on
Set ws = ThisWorkbook.Sheets("Sheet2")
' Define the range to sort
Set sortRange = ws.Range("A2:B26") ' Change the range accordingly
' Perform the sort operation
With sortRange
.Sort Key1:=.Cells(1, 1), Order1:=xlAscending, Header:=xlYes, _
OrderCustom:=1, MatchCase:=False, Orientation:=xlTopToBottom
End With
End Sub
STEP 4: Run the macro and the data will be sorted.
By having a macro automatically sort dates, you ensure that your spreadsheet is always up-to-date, no pun intended, saving you the hassle of repeatedly using sort functions.
Best Practices and Tips to Remember
Formatting Cells Properly Before Sorting
Proper cell formatting isn’t just about making your spreadsheet look pretty; it’s a critical step to ensure that sorting functions correctly. It’s akin to teaching Excel how to ‘read’ your data properly before asking it to organize it.
Here’s how to polish your cells for sorting success:
- Befriend the Format Cells Dialog: Click on your date column, right-click, and select ‘Format Cells…’ or press
Ctrl+1to open the formatting options. - Choose Your Date Ally: Navigate to the ‘Number’ tab, click ‘Date’, and select the format that matches your data. Consistency is key – make sure all your dates play by the same format rules.
- Double-Check Alignment: Dates recognized correctly as dates by Excel will naturally align to the right. If they’re not, they might be masquerading as text, which will disrupt your sort.
- Embrace Uniformity: Select your entire dataset and ensure uniform number formatting to prevent any rogue cells from causing chaos during sorting.
- Test the Waters: After formatting, sort a small selection to confirm that everything aligns as expected: oldest to newest or vice versa.
Tips to hang onto:
- When in doubt, the ‘Short Date’ format is often a safe bet for sorting.
- Preview your data after formatting adjustments to nip any sorting issues in the bud.
As you perfect your formatting skills, you’ll find that sorting by date becomes a breeze, making for smoother sailing through your Excel endeavors.
Points to Consider When Sorting by Partial Date Values
Sorting by partial date values, like months or days, without the year, is a maneuver that requires a touch of finesse. It’s perfect for when you’re pinpointing cycles or patterns that aren’t year-specific.
Here’s your tactical approach:
- Beware of Misleading Defaults: With incomplete dates, Excel’s default sorting might lead to a chronological conundrum. It may interpret January 5 as earlier than March 3, without regard to the years involved.
- Create Helper Columns: Excel thrives on clarity. Use
MONTH()orDAY()functions to pull out these elements into new columns and sort by these instead. - Understand Sort Order Implications: Recognize that sorting by month or day alone detaches the date from its yearly anchor, potentially jumbling yearly sequences.
- Ensure Comprehensive Sorting: If you’re using helper columns, remember to include these in your data range when sorting to maintain row integrity.
- Accentuate Your Data: Highlight or conditionally format the partial values to distinguish them from complete dates and avoid confusion.
Benefits of mastering this technique include simplifying birthday lists, tracking holiday trends, or organizing recurring events without the clutter of year data.
Remember, sorting partial date values has its place and should be wielded wisely to maintain the relevance of your insights.
FAQs
How to Sort Birthdays in Excel Without Affecting the Year?
To sort birthdays by month and day, preserving their celebratory essence without getting entangled in the years, follow these steps:
- Create a helper column titled ‘MonthDay’.
- Insert the formula
=TEXT(date_cell,"MMDD")to extract month and day. - Apply the custom sort on this column to get your birthdays in order.
This method focuses on what truly matters: the dates people blow out their candles!
What Can I Do If My Dates Won’t Sort in Chronological Order?
If dates won’t line up chronologically, convert them to a proper date format first using Text to Columns or the DATEVALUE function. Then, try sorting again.
Is There a Way to Sort Dates by Weekday?
Yes, create a helper column with the WEEKDAY(date_cell) formula to assign numbers to weekdays. Then, sort by this column.
Can You Automatically Sort Dates as New Data Is Entered?
Use a macro or a table with structured references to auto-sort dates. Macros require VBA knowledge while tables offer a simpler, built-in solution.
Why can’t I sort by date in Excel?
If sorting by date fails in Excel, the cells may be formatted as text, or there could be inconsistent date formats. Convert text to dates and ensure uniform formats to fix.
John Michaloudis is a former accountant and finance analyst at General Electric, a Microsoft MVP since 2020, an Amazon #1 bestselling author of 4 Microsoft Excel books and teacher of Microsoft Excel & Office over at his flagship MyExcelOnline Academy Online Course.

