The TEXTSPLIT function in Microsoft Excel is a powerful tool designed to extract specific segments of text based on a delimiter or separator. This function enables users to split text from a single cell into multiple cells, each containing a different segment of the original text. It is particularly useful for organizing and parsing data imported from other sources or consolidating information into a more structured format within Excel spreadsheets.
Key Takeaways:
- Efficient Data Organization: TEXTSPLIT transforms jumbled text in Excel into neatly organized data by splitting it based on specified delimiters.
- Versatile Data Manipulation: It’s a versatile tool for parsing and managing imported data, offering flexibility in how text is divided across cells.
- Syntax and Parameters: Mastering its syntax and optional parameters like row delimiters and handling empty cells empowers precise data handling.
- Advanced Techniques: Beyond basic splitting, TEXTSPLIT excels in handling complex strings with multiple delimiters and organizing data across rows and columns.
- Compatibility and Alternatives: Available in Excel for Microsoft 365, it enhances data workflows; alternatives like ‘Text to Columns’ and formula-based approaches are viable for older Excel versions.
Table of Contents
Introduction to TEXTSPLIT in Excel
Revolutionizing Data Organization
If you’ve ever stared at an Excel spreadsheet with a sinking feeling due to poorly organized data, prepare to bid those days farewell. TEXTSPLIT is here to turn chaos into clarity. Luxury isn’t just for cars and vacations. With Excel’s TEXTSPLIT function, luxury finds its way into data management as well. Imagine the hours saved and errors avoided—all thanks to this sleek feature.
The Basics of TEXTSPLIT
Diving into the nitty-gritty, TEXTSPLIT is a dynamic feature; a kind of Swiss Army knife for data manipulation in Excel. It earns its stripes by dividing text strings into bite-sized pieces that can be selectively placed into separate cells, all powered by your choice of delimiter.
Think of it as a digital scalpel for precise cuts, or a clever magician that turns one piece of data into an array with a simple wave of the Excel wand. Don’t worry, you’ll soon be wielding this tool with fines.
Getting Started with TEXTSPLIT
Understanding TEXTSPLIT Syntax
Let’s crack the code of TEXTSPLIT’s syntax. It’s the roadmap that guides Excel in dividing text exactly how you need it. Here’s what you’ll need to tell Excel:
=TEXTSPLIT(text,col_delimiter,[row_delimiter],[ignore_empty], [match_mode], [pad_with])
- Text: Identify your data subject by selecting the cell with the string to split.
- col_delimeter: Define your cutting line. What text or character signals Excel to make a split?
- [row_delimeter]: Not mandatory, but if you crave vertical organization, introduce a row delimiter.
- [ignore_empty]: Choose whether to acknowledge or ignore the silent empty strings that can appear.
- [match_mode]: This tells Excel whether to look for exact matches of your delimiters or just partial ones.
- [pad_with]: If the split leaves uneven rows, you get to decide what goes in the gaps.
By mastering these parameters, you place the reins of TEXTSPLIT firmly in your hands.
First Steps to Splitting Cells
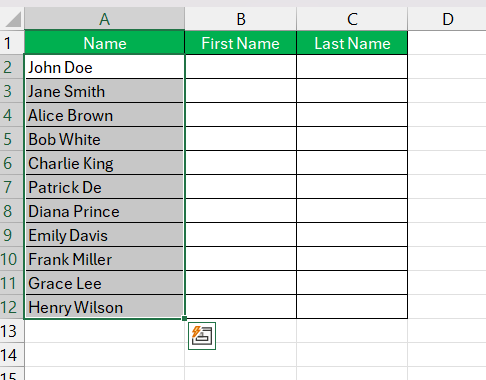
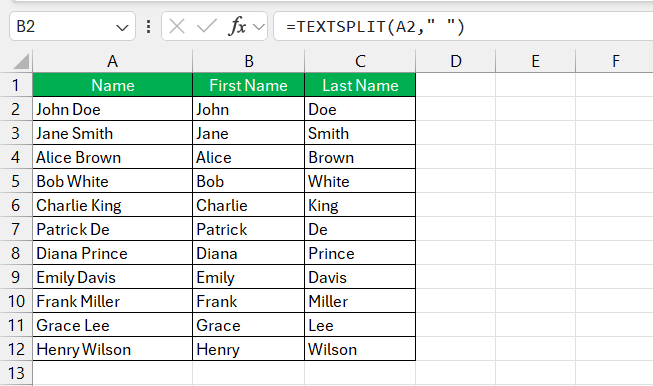
To embark on your journey with TEXTSPLIT, start small and start smart. Select the cell—or range of cells—that’s causing you a headache due to its jumbled content. Whether it’s a list of full names needing separation or dates longing to be parts of their own, TEXTSPLIT is your go-to.
Then, it’s as simple as typing =TEXTSPLIT(A2, " ") into a cell—where A2 is the location of your tangled text, and the space is your desired delimiter. Hit enter and watch as Excel unfolds the data into neatly organized cells before your eyes.
Just like that, you’re not just splitting cells; you’re conquering data!
Advanced Techniques for Text Manipulation
Dealing with Dates: Split into Day, Month, and Year
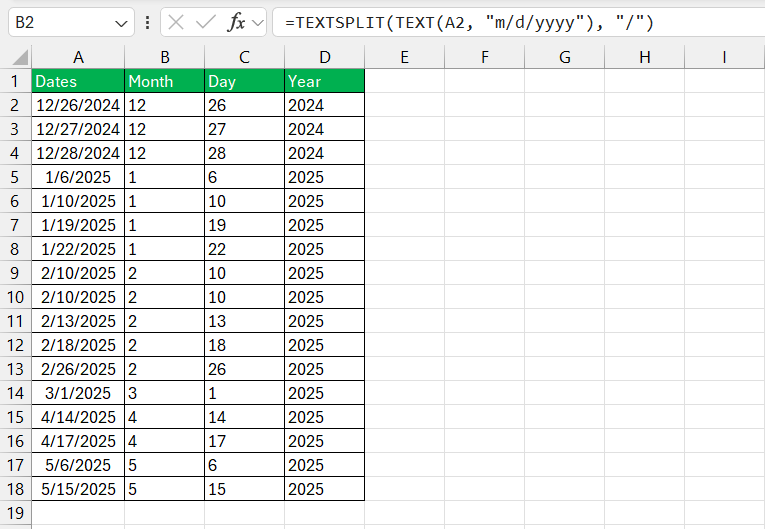
Untangling dates in Excel can sometimes feel puzzling, but TEXTSPLIT offers a straightforward solution. Got dates lumped together in a single cell? No problem. Use TEXTSPLIT in combination with the TEXT function to convert the date to text and set it up for the split.
With the formula =TEXTSPLIT(TEXT(A2, "m/d/yyyy"), "/"), your dates will be efficiently carved into discrete day, month, and year cells.
Handling Complex Strings: Multiple Delimiters and Substrings
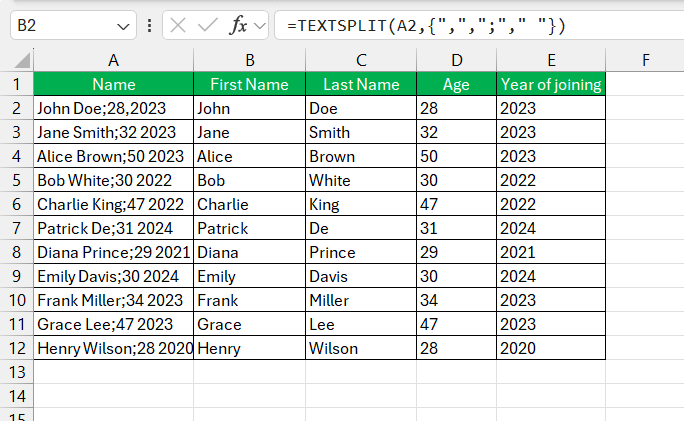
When your data comes adorned with multiple delimiters, TEXTSPLIT doesn’t flinch. It handles complexity with grace. Suppose your string is speckled with commas, semicolons, and who-knows-what-else. TEXTSPLIT can navigate through this with an array of delimiters like so: =TEXTSPLIT(A2, , {",",";"," "}). This tells Excel to look for each of these characters and split accordingly.
Organizing Split Data Across Rows and Columns
Once you’ve mastered the art of splitting text strings, the next step is to sculpt your data across the Excel canvas. TEXTSPLIT doesn’t confine you to one dimension; it lets you paint rows and columns. For instance, you might have a single cell filled with various attributes of an item—size, color, price, and material. With TEXTSPLIT, you can drape each attribute over its own column or cascade them down rows for a panoramic view of your data.
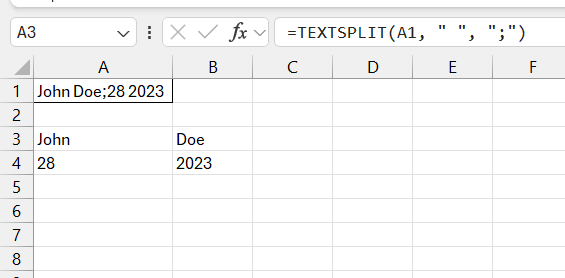
A touch of finesse with =TEXTSPLIT(A1, " ", ";") separates the space-separated attributes into columns and the semicolon-separated entries into rows. The result?
A well-organized grid, clear for the human eye and primed for any Excel wizardry you choose to perform next.
Overcoming TEXTSPLIT Limitations
Alternatives When TEXTSPLIT Is Unavailable
If you’re using an Excel flavor where TEXTSPLIT is just a distant dream, don’t throw in the towel just yet. There’s more than one way to skin a data cat. The ‘Text to Columns‘ wizard will be your compatriot, venturing through menus to bring order to your text strings. It lacks TEXTSPLIT’s finesse, but it gets the job done.
For a dash more finesse, you can wield functions like LEFT, MID, RIGHT, SEARCH, and FIND to dissect text, crafting formulas with surgical precision. They take a little more elbow grease, but like a jigsaw puzzle, once the pieces fit, you’ll unveil the big picture.
FAQ: Frequently Asked Questions
How do you split text in a cell in Excel?
To split text in a cell in Excel, enter =TEXTSPLIT(A1, ",") in a new cell, replacing A1 with the target cell and the comma with your desired delimiter. Press Enter, and Excel will parse the text into separate cells based on your specified delimiter.
How do I ensure TEXTSPLIT works with all versions of Excel?
TEXTSPLIT function is exclusive to Excel for Microsoft 365. For versions without TEXTSPLIT, use the ‘Text to Columns’ wizard or formulas combining LEFT, MID, and RIGHT with SEARCH or FIND to split text in cells.
Can TEXTSPLIT handle text strings with varying lengths?
Yes, TEXTSPLIT can handle text strings of varying lengths. It dynamically adapts to the size of each substring, ensuring each piece of split data populates the cells correctly, regardless of length.
Are there any tips for avoiding common errors when using TEXTSPLIT?
To sidestep errors with TEXTSPLIT, ensure your delimiters match the text exactly, watch out for leading/trailing spaces, and use the ignore_empty parameter wisely to manage empty cells that might result from splitting.
Is text split function available in Excel?
Yes, the text split function, known as TEXTSPLIT, is available in Excel for Microsoft 365 (Windows and Mac) and Excel for the web. It’s not in older versions, but similar actions can be done with ‘Text to Columns’ or formulas.
John Michaloudis is a former accountant and finance analyst at General Electric, a Microsoft MVP since 2020, an Amazon #1 bestselling author of 4 Microsoft Excel books and teacher of Microsoft Excel & Office over at his flagship MyExcelOnline Academy Online Course.

