Download our 141 Free Excel Templates and Spreadsheets!
Key Takeaways
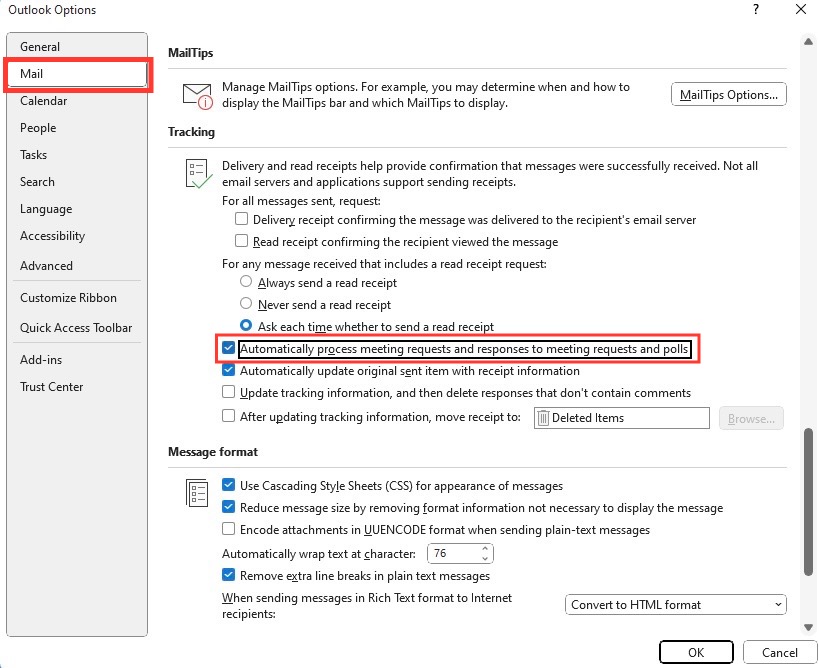
- To stop meeting notifications, navigate to File > Options > Mail, then in the Tracking section uncheck “Automatically process meeting requests and responses to meeting requests and polls.”
- Disable meeting acceptance notifications by customizing tracking settings in Outlook, allowing for a less disrupted email workflow and fewer distractions.
- Enable the option to automatically dismiss reminders for past events via File > Options > Advanced, by selecting “Automatically dismiss reminders for past events,” avoiding outdated reminders after being away.
Table of Contents
Step-by-Step Instructions to Alter Meeting Alert Settings
Accessing the notifications menu in Outlook
Diving into Outlook’s settings to access the notifications menu is your first step to regaining control over your alerts. Here’s how you can get there:
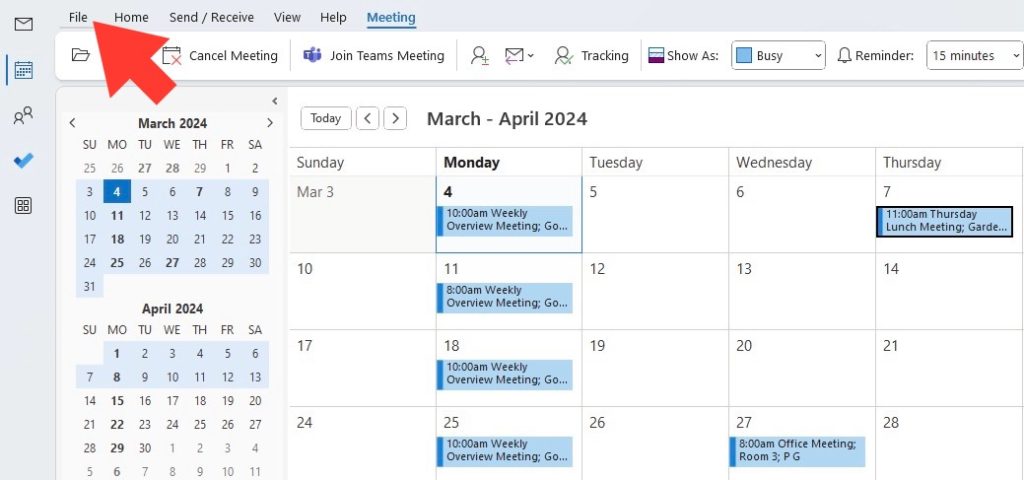
STEP 1: Open Outlook and click on the ‘File’ tab at the top left corner of the screen.
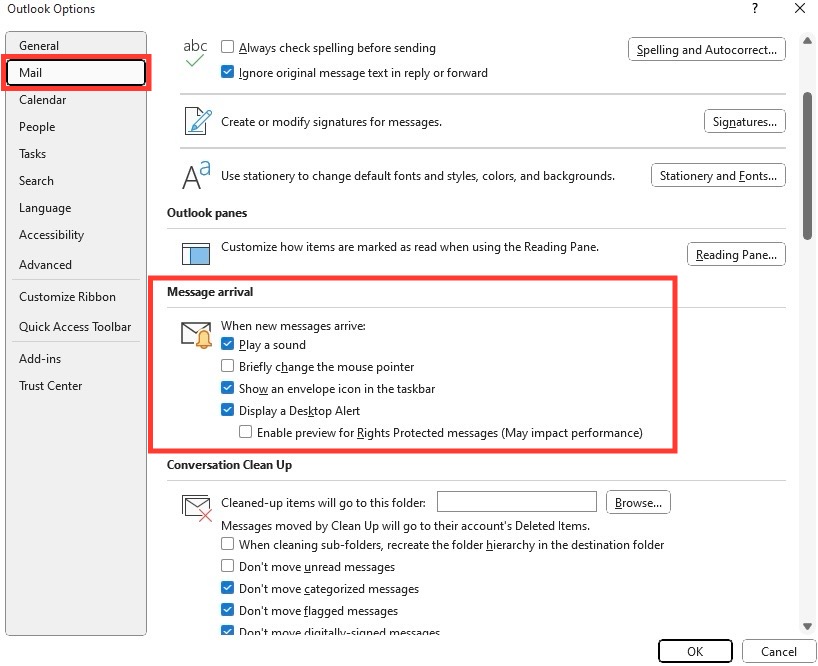
STEP 2: In the backstage view, find and click on ‘Options’ to open the Outlook Options dialog box.
STEP 3: In the dialog box, look to the left-hand menu and click on ‘General’ (or ‘Mail’ in some versions).
STEP 4: From there, navigate to the ‘Message arrival’ section to start customizing your alert preferences.
Customizing your preferences for meeting reminders is just a few clicks away after you’ve accessed this menu. You’ll be able to decide which alerts are necessary and when they should appear.
Insider Tips for Outlook Calendar Management
Customizing your preferences for meeting reminders
Taking control of your meeting reminders in Outlook starts with understanding how to customize your preferences to suit your specific needs. Here’s a user-friendly process to guide you:
STEP 1: Once in the ‘Notifications’ menu, look for settings related to calendar alerts or meeting reminders.
STEP 2: You’ll see options to modify the delivery of notices. Choose the method that works best for you—visual pop-ups, sounds, the delegation of emails, or a combination of these.
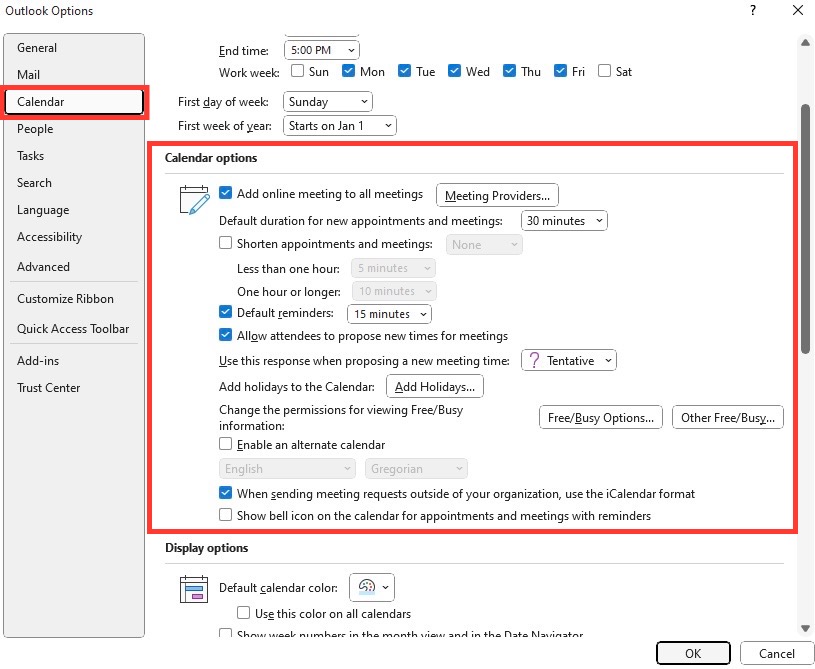
STEP 3: Go to the ‘Calendar’ settings to fine-tune how far in advance you want the reminders. You can set different reminders for each meeting, or a default time for all calendar events.
STEP 4: If you have recurring meetings, these can have their own separate alert times. Simply open the series and select your preferred reminder from the drop-down menu.
By mastering these settings, you tailor your Outlook to work for you, not against you, helping to ensure you’re alerted to the meetings that matter most without being bombarded by unnecessary noise.
Dismissing, Snoozing, and Managing Recurring Reminder Alerts
Dismissing, snoozing, and managing recurring meeting alerts in Outlook ensures you’re reminded of your commitments in a way that best fits your workflow. Here’s how you can manage them:
- Dismissing alerts: When a reminder pops up, you’ll have the option to dismiss it if you no longer need it. This stops future notifications for that particular event.
- Snoozing reminders: If you want to be reminded again in a bit, you can snooze the alert. Choose from preset times or customize your own snooze duration.
- Managing recurring alerts: For meetings that occur regularly, you can set specific rules. Either follow the default reminder you’ve set for all calendar events or customize the series individually.
These tools in Outlook give you the flexibility to maintain awareness of your meetings without interrupting your focus unnecessarily.
Additional Tweaks for Optimized Outlook Usage
Strategically setting reminders for critical meetings only
Harnessing your Outlook calendar effectively includes being selective with your reminders. To ensure your attention is directed to high-priority items, consider these strategies:
- Evaluate Importance: Before setting a reminder, assess the meeting’s importance. Is it a high-stake client meeting, or just a weekly check-in that could be covered with a quick email?
- Set Strategic Reminders: For those critical meetings, set reminders that give you ample time to prepare. You might select a 15-minute reminder for brief, internal meetings and a one-hour reminder for more substantial engagements.
- Reminders for Prep Time: If a meeting requires pre-reading or preparation, set an additional, earlier reminder specifically destined for that purpose.
These strategies will not only reduce the volume of your meeting notifications but also ensure that your attention is drawn to those that are non-negotiable or require significant preparation.
Dismissing, Snoozing, and Managing Recurring Reminder Alerts
Managing your calendar reminders shouldn’t be a hassle. Outlook provides flexible options that allow you to dismiss, snooze, or handle recurring reminders efficiently. Here’s what you need to know:
Dismissing Reminders:
- Click on the reminder window.
- Choose ‘Dismiss’ to clear a single reminder or ‘Dismiss All’ to clear all reminders at once.
Snoozing Reminders:
- In the reminder window, click on the ‘Snooze’ button.
- Select the time frame for which you want to snooze the reminder.
Managing Recurring Reminder Alerts:
- Open the recurring meeting details from your calendar.
- Adjust the reminder for the entire series of events or for individual occurrences.
By dismissing reminders you no longer require, snoozing alerts for more appropriate times, and fine-tuning reminders for recurring meetings, you can keep your schedule organized while avoiding unnecessary interruptions.
Additional Tweaks for Optimized Outlook Usage
Turning off default reminders for new calendar items allows you to customize alerts for each meeting’s importance. Here’s how you can do it:
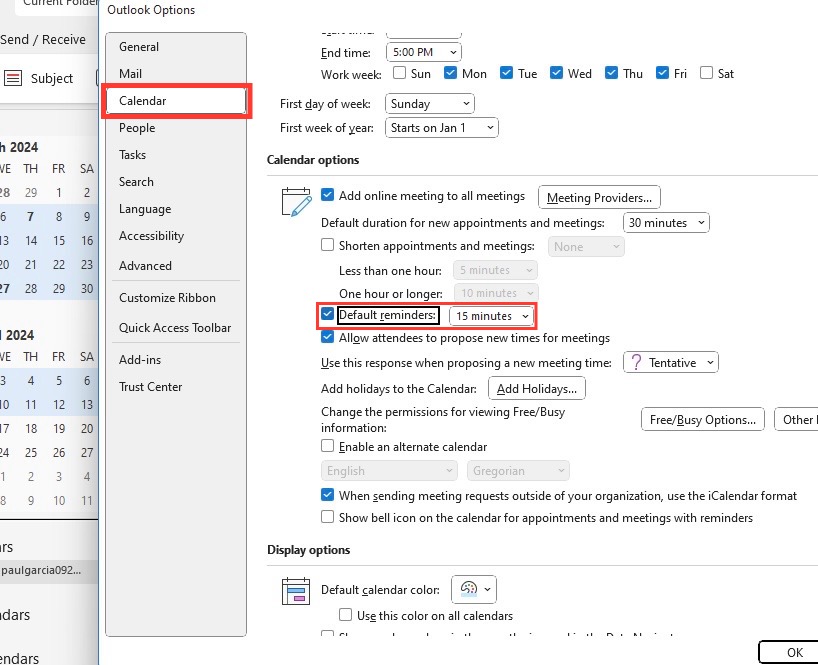
STEP 1: In ‘Calendar’ settings, look for ‘Default Reminders’ and deselect it.
STEP 2: When creating a new calendar item, manually set a reminder if it is necessary.
This ensures you only receive alerts for meetings that genuinely require your attention, keeping your notification feed purposeful and manageable.
Handling Special Cases and Options
Turning off default reminders for new calendar items
Sometimes less is more, and that’s exactly the case when it comes to managing your schedule. Turning off default reminders for new calendar items in Outlook can help you maintain a clear head and an uncluttered calendar. Here’s how to do it:
STEP 1: Open the ‘Calendar’ from the Outlook Navigation pane.
STEP 2: Navigate to ‘File’>’Options’>’Calendar’.
STEP 3: Look for the ‘Default reminders’ option. Uncheck the box to turn off the automatic reminders for any new calendar entries you create.
Remember, with this setting turned off, no automatic reminders will be set for your new events. You can still add reminders manually for those mustn’t-miss appointments.
Handling Special Cases and Options
Stopping Outlook from auto-adding calendar invites to your schedule
Maintaining authority over your schedule includes controlling what automatically gets added to it. To prevent Outlook from automatically adding calendar invites to your schedule, you can adjust the settings to better reflect your preferences:
STEP 1: Go to ‘File’ and click ‘Options’ in the Outlook navigation pane.
STEP 2: Navigate to the ‘Mail’ section, and then scroll down to the ‘Tracking’ area.
STEP 3: Here you’ll find the option that says “Automatically process meeting requests and responses to meeting requests and polls.” Uncheck this box.
With this change, Outlook will stop booking time slots as ‘Tentative’ on your calendar and leave you to manually respond to invites. This puts the power back in your hands, allowing you to review and decide which events make it onto your daily agenda, ensuring you only commit to what aligns with your priorities.
Configuring exceptions for VIP meetings and contacts
Establishing protocols for prioritizing key meetings and contacts can help you seamlessly integrate critical commitments into your schedule. For VIPs whose invitations you never want to miss, try these steps:
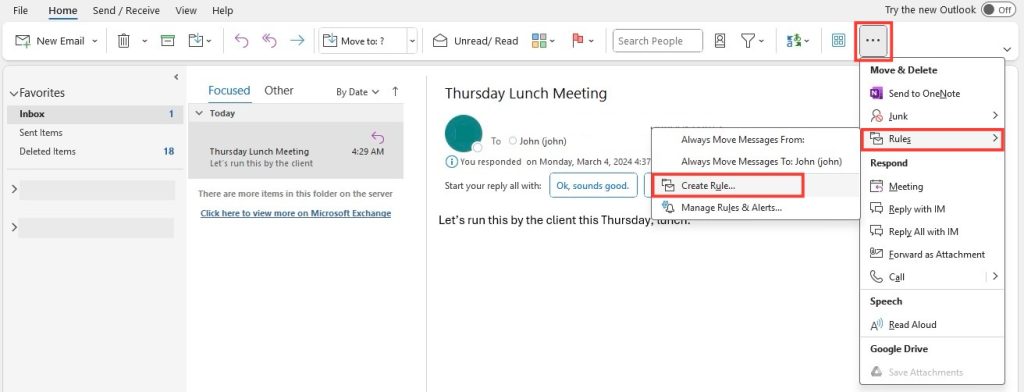
STEP 1: Use the ‘rules’ feature in Outlook to create a custom rule for specific people.
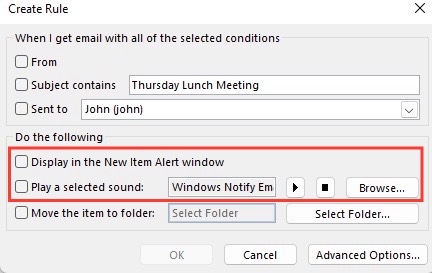
STEP 2: Set it up so that invites from select contacts will trigger a specific action, such as a distinct notification sound or moving the invite to a priority folder.
STEP 3: Ensure that these invitations are set to bypass the settings that prevent auto-adding to your calendar.
By fine-tuning these exceptions, you can balance the benefit of not having your calendar automatically cluttered by every invitation while still maintaining responsiveness to critical contacts and meetings.
FAQs About Managing Outlook Meeting Notifications
Can I selectively stop notifications for certain meetings? Yes, you can adjust the reminder settings for individual meetings by opening the event and changing its reminder setting, or disable reminders altogether for new events.
Can you turn off Outlook calendar acceptance notifications? To turn off automatic acceptance notifications, go to ‘Options,’ then ‘Mail,’ and under ‘Tracking,’ uncheck “Automatically process meeting requests and responses to meeting requests and polls.
How do I handle notifications for group calendars? For group calendars, you can manage your own alert settings or work with your team to establish uniform notification rules tailored to the group’s needs.
Configuring exceptions for VIP meetings and contacts
When it comes to VIP meetings and contacts, ensuring that you’re always in the loop is key. Here’s how to configure exceptions in Outlook so that you never miss a beat:
STEP 1: Head over to the ‘Rules’ section under the ‘Home’ tab in Outlook.
STEP 2: Create a new rule by selecting ‘Manage Rules & Alerts’ and choose ‘New Rule’.
STEP 3: Tailor your rule to specific contacts by selecting conditions such as “from people or public group” and defining who those VIPs are.
STEP 4: Determine the action Outlook should take when you receive emails from these contacts, like displaying an alert or playing a specific sound.
This way, even if you’re cutting down on the general influx of notifications, you’re safeguarding access to critical communications from select contacts or regarding exclusive meetings.
Can I selectively stop notifications for certain meetings?
Yes, you certainly can selectively stop notifications for certain meetings in Outlook. Simply follow these steps:
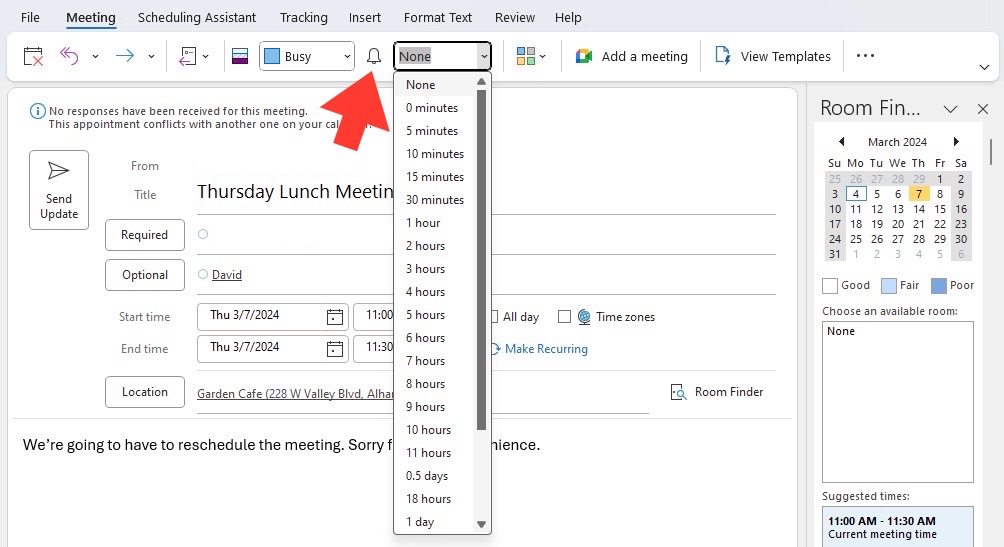
STEP 1: Open the calendar event for which you want to stop notifications.
STEP 2: In the event details, look for the ‘Reminder’ drop-down menu.
STEP 3: Select ‘None’ to stop any reminders for that particular event.
This setting ensures you won’t receive pop-up reminders for meetings you choose, allowing you to focus on alerts only for meetings that require your attention.
Can you turn off Outlook calendar acceptance notifications?
Yes, to turn off Outlook calendar acceptance notifications, follow these instructions:
STEP 1: Click ‘File’>’Options’>’Mail’>’Tracking.’
STEP 2: Uncheck the options “Automatically process meeting requests and responses to meeting requests and polls.”
This action disables the automatic acceptance of meeting responses, so your inbox won’t be cluttered with RSVPs from attendees.
How do I handle notifications for group calendars?
Managing notifications for group calendars in Outlook requires coordination and customization:
STEP 1: Access your group calendar and go to the ‘Calendar Properties’ by right-clicking on the calendar name.
STEP 2: Navigate to the ‘Permissions’ tab to set the notification options according to the group’s preference.
STEP 3: Individually, within your own settings, click on ‘File’ > ‘Options’ > ‘Calendar’ and customize how you receive and view group calendar notifications.
Keep the group’s needs in mind when adjusting these settings to ensure everyone stays informed without being overwhelmed by notifications.
John Michaloudis is a former accountant and finance analyst at General Electric, a Microsoft MVP since 2020, an Amazon #1 bestselling author of 4 Microsoft Excel books and teacher of Microsoft Excel & Office over at his flagship MyExcelOnline Academy Online Course.

