When you open a document and are greeted by a clear Table of Contents (TOC), it immediately sets the stage for a professional and well-structured read. This organization tool not only provides a snapshot of the material that awaits but acts as a navigational aid—allowing you to jump right to the information you need. Think of it as a polished introduction that says, “This document is ready for business.”
Download our 141 Free Excel Templates and Spreadsheets!
Overview of the Table of Contents Feature in Microsoft Word
Microsoft Word‘s Table of Contents feature is a powerhouse for enhancing document readability and professionalism. It systematically outlines your content, guiding readers through your headings and subheadings at a glance. The TOC also creates hyperlinked titles, so you can navigate to different sections with a simple CTRL+click. Whether for academic papers, business reports, or lengthy proposals, this feature is essential for any comprehensive document.
Key Takeaways
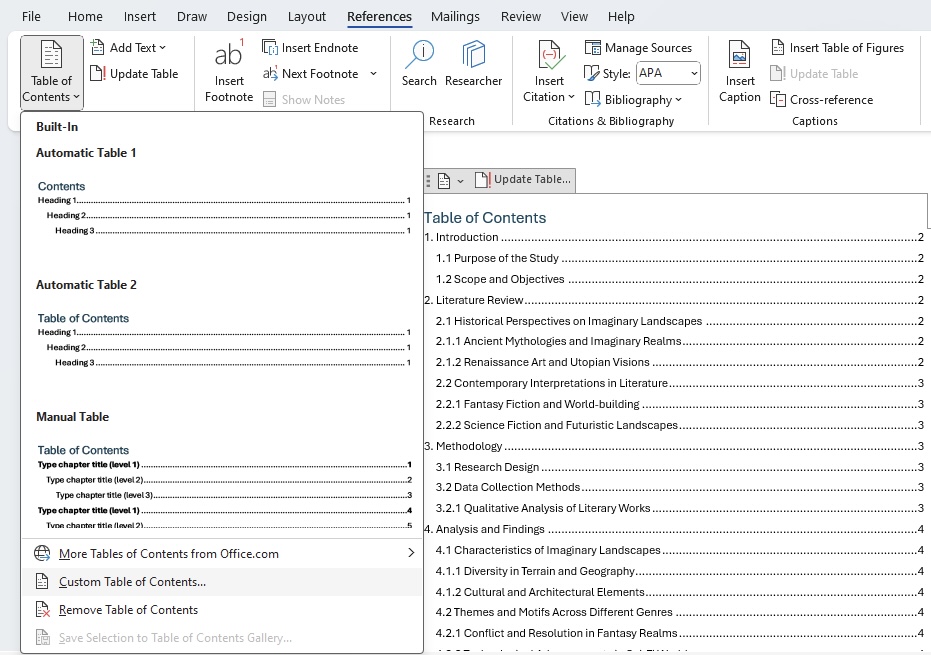
- To quickly generate a table of contents, use the “References” tab and click “Table of Contents” to choose a preferred style, which automatically generates one based on existing headings.
- Ensure your document uses Word‘s built-in heading styles like Heading 1, Heading 2, etc., before automatic creation; then go to Insert > Reference > Index and Tables > Table of Contents, adjust settings, and click OK.
- For longer, complex documents, utilize Word’s automatic table of contents feature to facilitate navigation; update it with just a few clicks by using the built-in heading styles and the multilevel list option.
Table of Contents
Understanding the Basics
What You Need to Know Before Starting
Before diving into creating a Table of Contents, you’ll need to get your ducks in a row. Start by structuring your document with the right heading formats. Headings are the foundation your TOC is built on. Microsoft Word uses heading styles like Heading 1, Heading 2, and so on to identify section titles and create the TOC structure. You’ll want to apply these styles throughout your document consistently. Keep in mind, the TOC tool won’t pick up any text that isn’t formatted with these heading styles, so be thorough!
Creating a Basic Table of Contents with Heading Styles
Crafting a basic Table of Contents starts with using heading styles effectively. Here’s how you bring your TOC to life with a few simple steps:
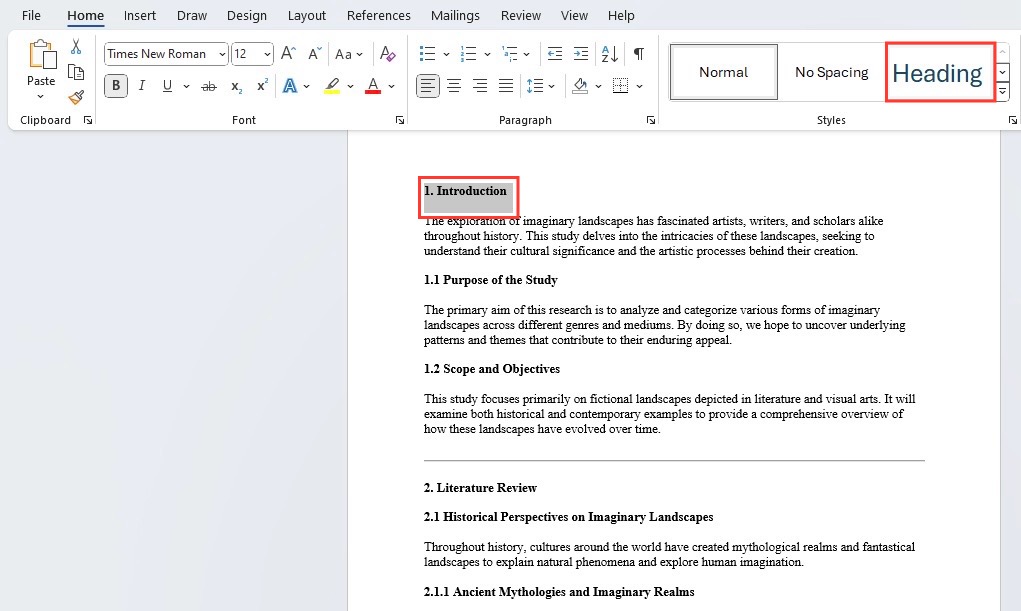
STEP 1: Scroll through your document and pinpoint the main section titles. Highlight each of these and head to the ‘HOME’ tab.
STEP 2: Look for the ‘Styles’ group and apply the ‘Heading 1’ style to these titles. These will be the top tiers of your TOC.
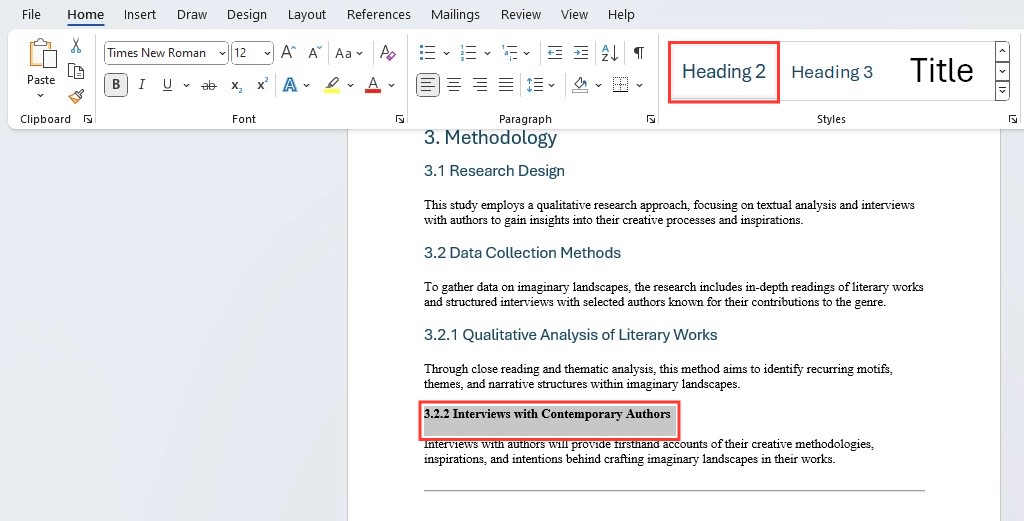
STEP 3: For subsections within these main sections, select and apply the ‘Heading 2’ style. They’ll nest neatly under your ‘Heading 1’ titles in the TOC.
STEP 4: Continue with ‘Heading 3’ for even more detailed subsections if needed.
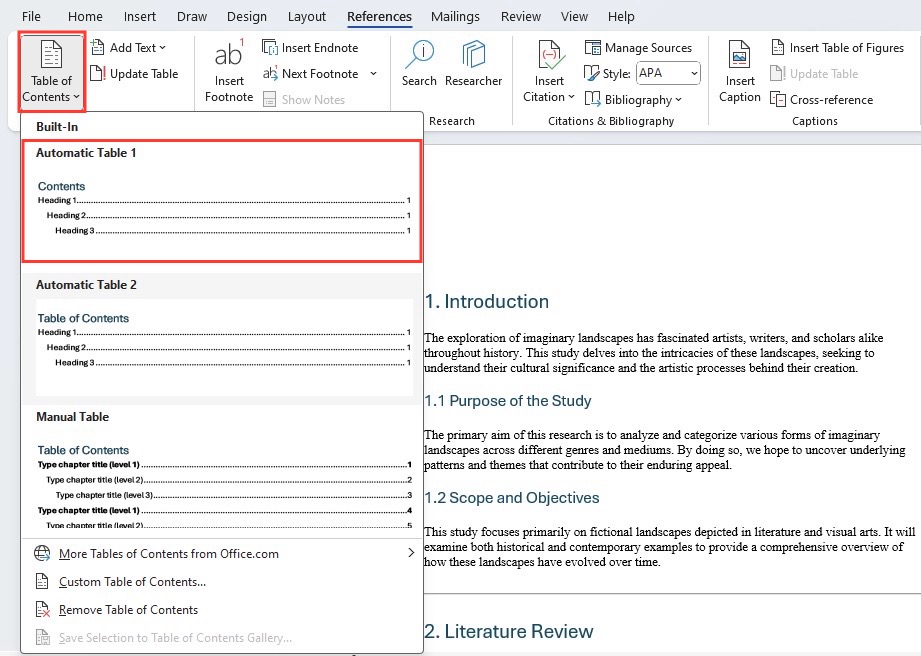
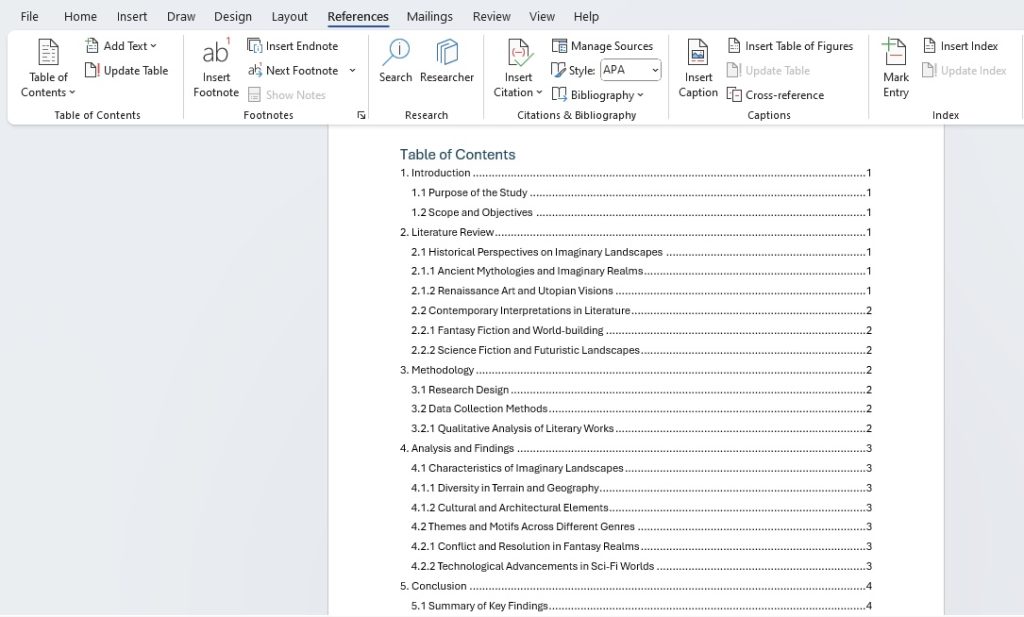
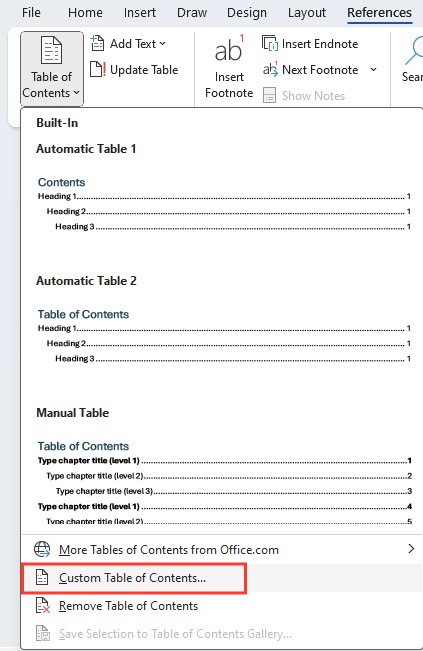
STEP 5: Once your headings are in place, place the cursor where you want your TOC to go, navigate to the ‘REFERENCES’ tab, and click ‘Table of Contents’. Choose a style, and voilà, your list is generated!
Keep this process going, and you’ll have a TOC that’s both functional and scaled to the depth of your content.
Customizing Your Table of Contents
Table of Contents Customization Options
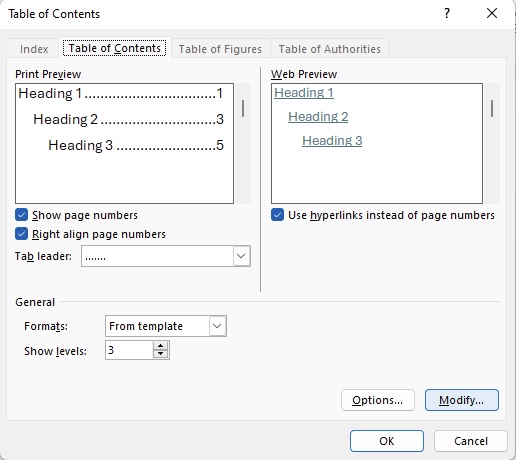
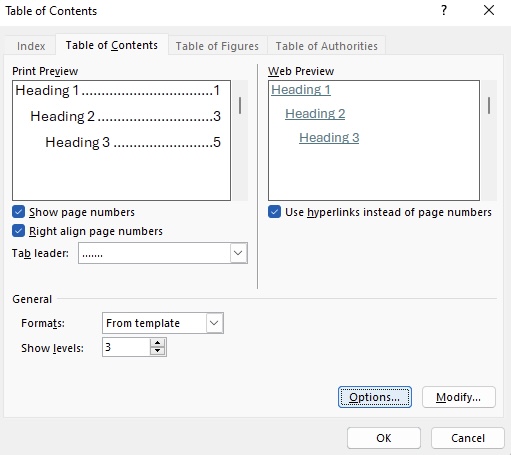
Customize your Table of Contents to ensure it suits the exact look and feel of your document. You’re not stuck with the defaults; Word offers a variety of options:
- Decide if you want page numbers to show and whether they should be right-aligned.
- Change the tab leader between the heading text and page numbers for a unique touch.
- Choose whether your TOC reflects the document’s theme or pick a new style from the Formats list.
- Determine the number of heading levels to display—go as deep as you need for your document’s complexity.
Adjust these options while previewing the changes in real time until you get just the right design.
Modifying the Format for a Personal Touch
Adding a personal touch to your Table of Contents can make your document stand out. Here’s how to tweak the formatting to reflect your personal or brand style:
STEP 1: Click on the ‘References’ tab, then ‘Table of Contents’, and finally ‘Custom Table of Contents’.
STEP 2: Hit ‘Modify’. If it’s grayed out, change Formats to ‘From template‘.
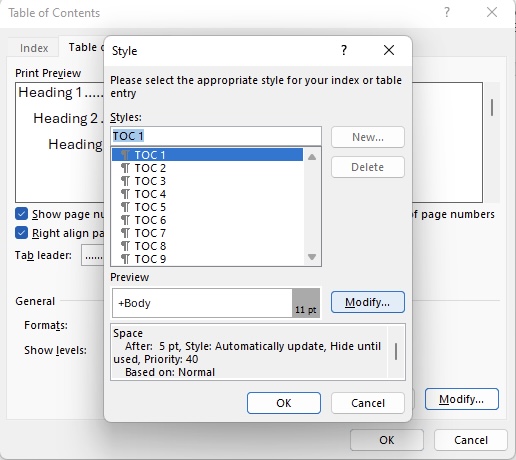
STEP 3: Select the TOC level you wish to change, for example, TOC 1 correlates with Heading 1 in your document, then click ‘Modify’.
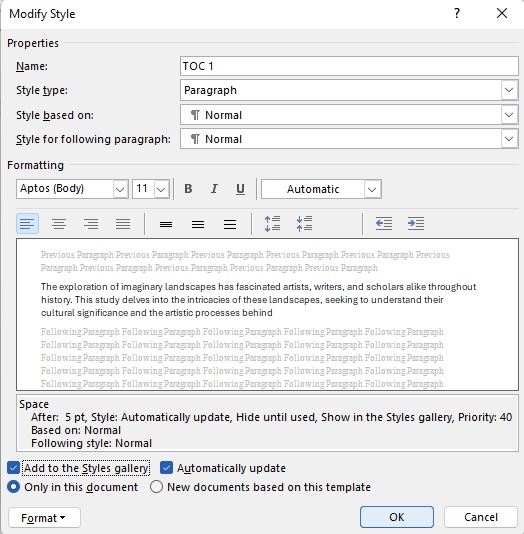
STEP 4: In the ‘Modify Style’ dialog box, unleash your creativity—adjust the font type, size, color, or add bold and italics for emphasis.
STEP 5: You can also change the spacing and indentation here. Tailor away until it matches your vision.
STEP 6: Once satisfied, decide if you want these style changes to apply to the current document or all future documents by checking ‘Add to the Styles gallery’.
With these steps, you can truly make your TOC an extension of your document’s personality.
Advanced Table of Contents Techniques
Utilizing Multilevel Listing for Complex Documents
For long or complex documents, a multilevel list in your Table of Contents can be a game-changer. Here’s a streamlined guide to do just that:
STEP 1: First, ensure each section and subsection in your document is tagged with an appropriate heading style, from Heading 1 onwards.
STEP 2: Go to your document where you plan to insert your TOC and click on the ‘References’ tab. Click the ‘Table of Contents’ button and select ‘Custom Table of Contents’.
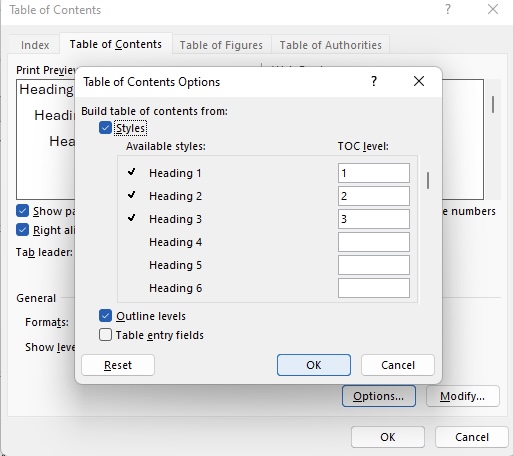
STEP 3: In the dialog box, click ‘Options’. Make sure that the ‘Outline levels’ option is selected.
STEP 4: Specify which heading styles correspond to which levels in your multilevel TOC. You can set, for example, Heading 1 for level one, Heading 2 for level two, and so on.
STEP 5: Hit OK, adjust any further appearance options, then ‘OK’ again to insert your TOC.
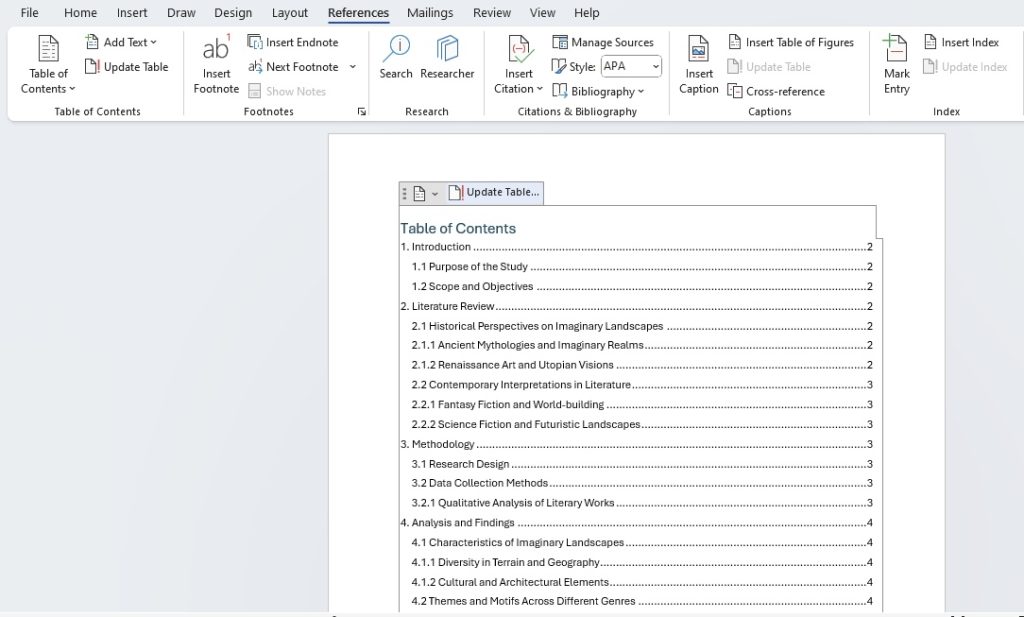
Your document will now have a clear hierarchy, showing sections and subsections with indented levels, perfect for dense reports, manuals, or theses.
Automatic vs. Manual Tables of Contents: Which is Right for You?
When deciding between an automatic or manual Table of Contents, consider the complexity and the likelihood of revisions to your document.
An automatic TOC is perfect if your document is a work in progress, will be long, or is subdivided into many sections that will frequently be updated. It updates page numbers and headings with just a few clicks, saving you substantial time during revisions.
On the other hand, a manual TOC is best for documents that are less likely to change, as any alterations necessitate manual page number and heading updates—an arduous task for longer documents.
In essence, choose automatic for convenience and dynamic editing, or manual for static documents where control over every detail is essential.
Troubleshooting and Maintenance
Updating Your Table of Contents with Ease
Updating your Table of Contents doesn’t have to be a chore. If you’ve made changes to the headings or pages in your document, refreshing your TOC is just a few clicks away:
STEP 1: Click anywhere inside your TOC to activate it. A tab saying ‘Update Table’ should appear at the top.
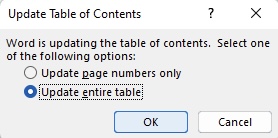
STEP 2: Press F9 or click ‘Update Table’ to bring up the update options.
STEP 3: Choose to update the page numbers only if that’s all you’ve changed, or select ‘Update entire table’ if you’ve also made adjustments to the text of headings.
STEP 4: Confirm with ‘OK’ and your TOC will be refreshed to mirror your document’s current layout.
Always remember to update your TOC before sharing or printing your document to ensure that readers have the latest navigation information.
Solving Common Issues with Table of Contents in Word
If you’re experiencing trouble with your Table of Contents in Word, you’re not alone. Here are quick solutions to common issues:
- Incorrect page numbers: Update your TOC to reflect the right pages. Press F9 or go to the ‘References’ tab and click on ‘Update Table’.
- Missing entries: Make sure all intended headers use the correct style formats (Heading 1, Heading 2, etc.). Only text with these styles will be included.
- Format inconsistencies: Modify the TOC styles to ensure uniformity. Head to ‘References’, ‘Table of Contents’, then ‘Custom Table of Contents’, and click ‘Modify’.
By troubleshooting these common snags, your Table of Contents will be back on track, creating a seamless experience for any reader.
Enhancing Document Navigation
Inserting Lists of Tables or Figures for Comprehensive Guides
In a document rich with visuals, including a list of tables or figures is just as important as a TOC for text. Here’s how to insert these lists in your Word document:
- Caption your tables and figures. Highlight the table or figure title and then go to the ‘References’ tab and select ‘Insert Caption’.
- Make sure to set the correct label (either ‘Table’ or ‘Figure’) in the pop-up window before clicking ‘OK’.
- Once all captions are added, place your cursor at the desired location for your list.
- Back under the ‘References’ tab, select ‘Insert Table of Figures’ to bring up the dialog.
- Ensure the correct caption label is selected for what you’re listing; either “Tables” or “Figures”.
- Customize the appearance as needed, then click ‘OK’.
You’ll now have a neatly organized list, making it easier for readers to find and reference your document’s visual data.
How to Remove or Modify an Existing Table of Contents
Removing or making changes to an existing Table of Contents in Word is straightforward:
- To remove the TOC, click anywhere inside it to highlight. Navigate to the ‘References’ tab, click ‘Table of Contents’, and at the bottom of the drop-down menu, choose ‘Remove Table of Contents’.
- To modify, again click within the TOC to select it, then head to the ‘References’ tab, and click ‘Table of Contents’. Choose ‘Custom Table of Contents’ to alter settings like styles, levels, and formats.
Remember, any changes you make to the document structure will necessitate updating or reinserting the TOC to reflect those changes accurately.
FAQ: Mastering Microsoft Word’s Table of Contents
Why should I use the heading styles when creating a table of contents?
Using heading styles in Word enables the Table of Contents to automatically detect and organize your document’s structure. It streamlines the creation and updating process, keeping your TOC accurate and saving you time in manual editing.
How do I update a table of contents after making changes to my document?
After making changes to your document, update the Table of Contents by clicking inside it, then either press F9 or select ‘Update Table’ in the pop-up menu. Choose ‘Update page numbers only’ or ‘Update entire table’, then click ‘OK’.
How do I link headings to a table of contents in Word?
To link headings to a Table of Contents in Word, apply the built-in heading styles—Heading 1, Heading 2, etc.—to the text you want included. These linked styles help Word automatically populate and navigate your TOC.
John Michaloudis is a former accountant and finance analyst at General Electric, a Microsoft MVP since 2020, an Amazon #1 bestselling author of 4 Microsoft Excel books and teacher of Microsoft Excel & Office over at his flagship MyExcelOnline Academy Online Course.

