As a seasoned user of Microsoft Teams, I’ve come to value its integrated file management system. When we engage in the multitude of conversations, meetings, and collaborative projects within Teams, every file we share becomes a piece in the intricate puzzle of our digital workflow. Navigating these files can be as straightforward as selecting “OneDrive” from the left side of Teams, giving us immediate access to a well-organized list of our documents. Here, we can efficiently search, sort, and filter our own files, files shared with us, and even mark favorites for quick retrieval. My advice? Make the most of browsing options by tracking shared files by contributor or by meeting context, turning the hunt for documents into a hassle-free task.
Key Takeaways
- Files downloaded are by default saved in the Teams Download folders on the user’s device.
- Users can adjust their Microsoft Teams settings to select a preferred download location for future files, but this does not affect files already downloaded.
- A toggle switch is available within the Teams settings that, when enabled, prompts users to choose a location for each file they download from that point onward.
Understanding Download Folders
Getting to grips with the download folders in Microsoft Teams is crucial to maintaining an organized workspace. By default, any document or file downloaded from Teams is saved in the “Downloads” folder on either a Mac or Windows computer, which has historically been the standard procedure. This central repository allows for a unified and predictable location to retrieve downloaded items. However, we might prefer to keep our workspace meticulously organized; having all your downloads in one container can become cluttered.
The good news is Microsoft has introduced settings for a more customized approach. We can now change our default download destination and even opt to be prompted for a location with each new download, which ensures files end up exactly where we want them, the very moment we receive them. This is a flexible and user-centric enhancement that echoes the customization we’ve grown accustomed to in web browsers.
Table of Contents
Accessing Files and Channels
How to Locate Your Documents
Identifying where our documents are stored in Microsoft Teams is as critical as keeping them organized. To locate documents, we can either browse the ‘Files’ tab within a specific channel, or we can delve into the OneDrive section housed within Teams itself. Once there, a treasure trove of files awaits, neatly organized into categories that include ‘My Files’, ‘Recent’, ‘Microsoft Teams Chat Files’, and ‘Downloads’. To make our search even more efficient, Teams provides an intuitive search bar, giving us the capability to track down documents by name or content within moments.
Moreover, we have the power to locate files shared during a meeting by simply viewing the meeting chat or details. It streamlines the process, ensuring that every file we’ve interacted with is at our fingertips, ready to be revisited as needed.
Syncing with OneDrive for Seamless Access
Integrating OneDrive with Microsoft Teams is like bridging the gap between collaboration and personal productivity. The beauty of this synergy is the seamless access it offers us to our files. Syncing with OneDrive isn’t just about having our files available in Teams; it’s about ensuring they are always up to date across all devices—desktop, iOS, or Android. We’re talking about real-time synchronization that keeps our collaborations fresh and dynamic.
With a simple configuration, files uploaded to a channel automatically reside in our team’s SharePoint folder, while those shared in private chats land in the Microsoft Teams Chat Files in OneDrive. This means we can work on files in Teams, then later find the updated versions waiting for us in OneDrive—whether we’re offline on a plane or online at a café.
This seamless sync offers a host of benefits: 24/7 file access, offline availability, and the continuity of work across all our devices. It’s an approach that elevates our productivity, ensuring no moment is wasted and no file is ever out of reach.
Downloading Files Made Easy
Step-by-Step Guide to Downloading Files
To download files from Microsoft Teams is a straightforward process. Whether it’s a document from a fellow team member or a file I need to review offline, here’s how I do it:
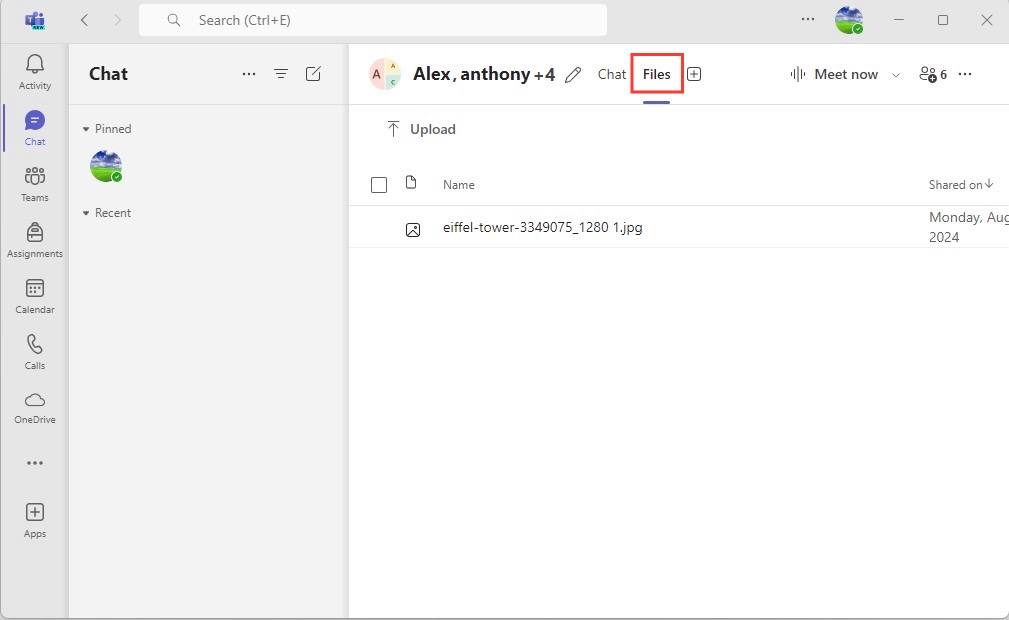
STEP 1: Navigate to the channel where the file is located and click on the ‘Files’ tab.
STEP 2: Browse or search for the file in question.
STEP 3: Once I’ve found the file, I click on the ‘More actions’ (three dots) beside the document.
STEP 4: From the dropdown menu, I select ‘Download.’
The file then conveniently saves to my default download location, typically the “Downloads” folder on my computer. If I’ve tailored my settings, the chosen destination folder would pop up instead, helping me maintain an organized file system.
Change Your Default Download Settings
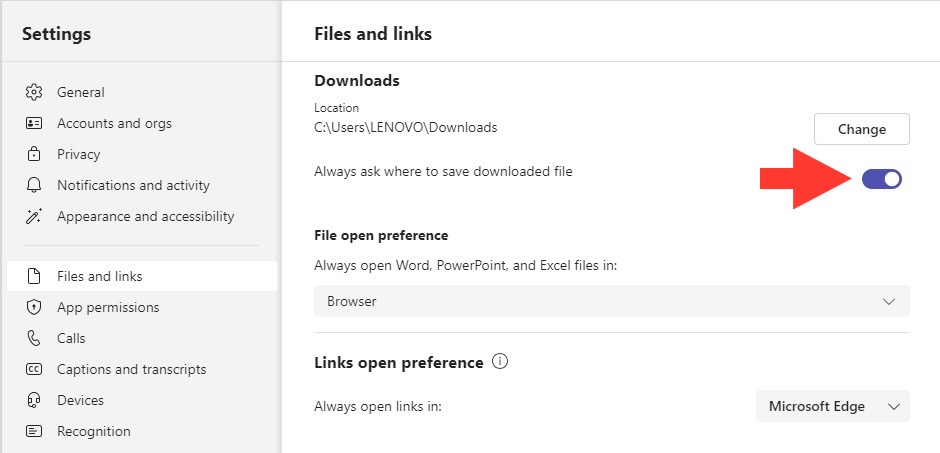
Switching up the default download settings in Microsoft Teams is a breeze—and it’s a game-changer for personal file management. Here’s how I do it:
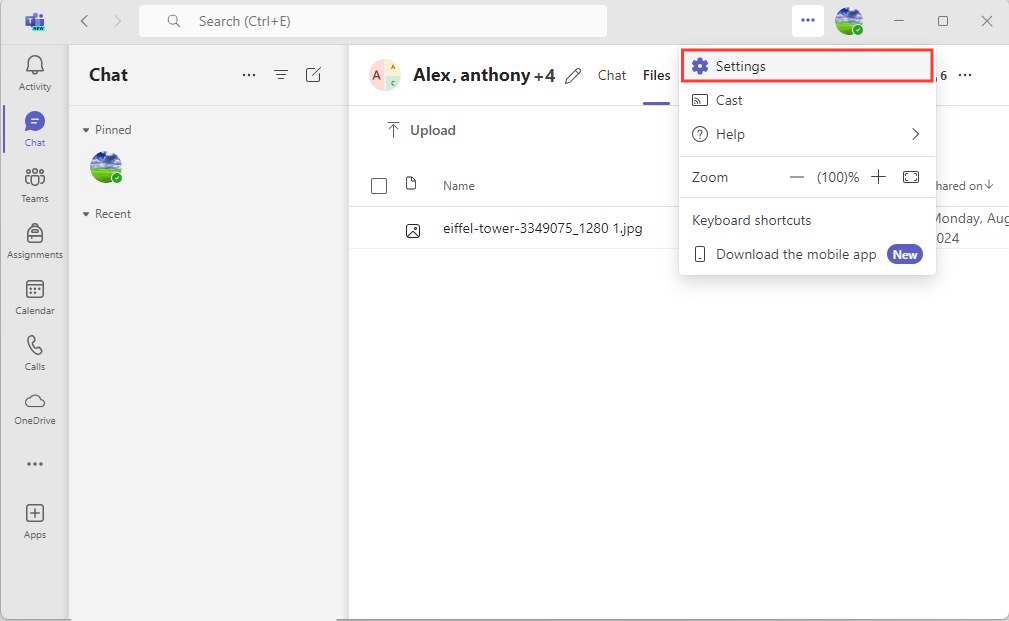
STEP 1: I click on my profile picture at the top of the Teams window to access ‘Settings.’
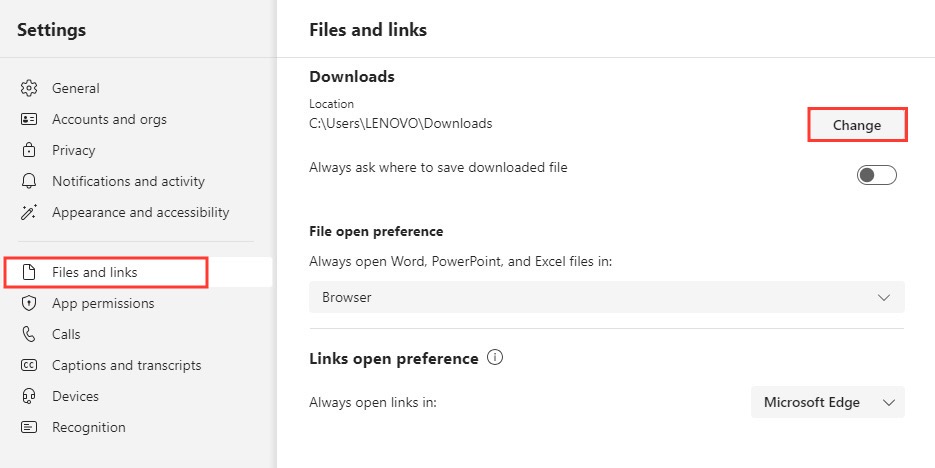
STEP 2: I then select ‘Files’ from the menu to spot the download settings.
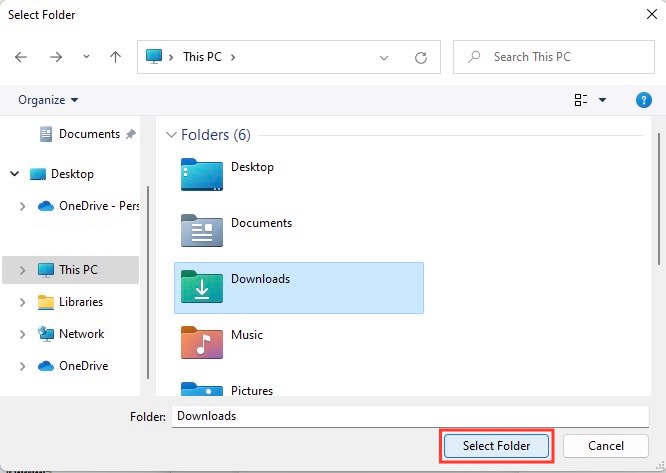
STEP 3: Here, I have the option to change the ‘Downloads’ folder. I can browse to my preferred location and set it as the new default.
STEP 4: For more control, I enable the toggle that asks me where to save each file before downloading.
Now, every time I download a file, Teams respects my preferences. It either saves to my designated download folder or prompts me to decide the destination on the spot. This update to the Teams application clearly illustrates Microsoft’s commitment to user feedback, enhancing my daily workflow considerably.
Troubleshooting Common Download Issues
Resolving Permission Errors
Permission errors in Microsoft Teams usually pop up when I’m trying to access files I don’t have the right privileges for. To resolve this, I first ensure that I’m within the correct team and have the necessary permissions assigned by the team owner. If everything seems to be in order on that front, but I’m still facing issues, I check with the file owner to see if they’ve set specific permissions that are preventing access.
If the problem persists, I consider reaching out to my IT admin, as there could be organizational policies at play affecting my access. Remember, it’s always a good idea to keep communication open with team members and IT support to troubleshoot these issues as efficiently as possible.
Overcoming Technical Glitches
Addressing technical hitches within Microsoft Teams, especially when downloading files, might seem daunting, but I’ve found a few tips that generally clear the way:
- Restart Teams: Sometimes the age-old advice of turning it off and on again works wonders.
- Clear Cache: I clear the Teams cache to remove any corrupted data that may be causing issues.
- Update Teams: Ensuring the latest version of Teams is installed can fix a host of bugs, including download problems.
- Check Network: Simple but crucial, verifying my internet connection can often be the fix needed.
- Consult IT: If all else fails, reaching out to the IT department can unearth more deep-seated technical issues that might be affecting Teams’ functionality.
These steps have been my first line of defense against technical glitches and usually, one of them does the trick to restore smooth operations.
FAQ Section
How can I find downloaded files from Microsoft Teams?
To locate downloaded files from Microsoft Teams, usually, I head straight to the “Downloads” folder on my device, as that’s where Teams saves files by default. If I’ve customized my download settings, the files will be in the folder I’ve specified. Remember, checking the ‘Save As’ location when downloading can also help pinpoint exactly where your file is saved.
Can I change where my Teams files get downloaded?
Yes, absolutely. I can change the default download location for files in Microsoft Teams by going to Settings > Files and selecting a new destination folder under the Downloads section. Also, for each download, I can choose to be asked where to save it by toggling on the relevant option in the same settings menu.
Where do Microsoft Teams download files go?
Microsoft Teams typically directs any files I download to the “Downloads” folder on my device. However, to suit my preferences, I have the flexibility to designate a specific folder as the new default for downloaded files via Teams’ settings. This folder will then house all future downloads post the adjustment of settings.
John Michaloudis is a former accountant and finance analyst at General Electric, a Microsoft MVP since 2020, an Amazon #1 bestselling author of 4 Microsoft Excel books and teacher of Microsoft Excel & Office over at his flagship MyExcelOnline Academy Online Course.

