Imagine integrating the connectivity of Microsoft Teams with the organizational prowess of Outlook – that’s what happens when you combine the two for your meeting needs. Teams meetings can be seamlessly scheduled and managed right from the Outlook interface, ensuring all your planning is in one central location. This integration provides an easier way to collaborate, share agendas, and synchronize calendars to avoid conflicts, all of which are the cornerstone of efficient team planning.
Download our 141 Free Excel Templates and Spreadsheets!
Key Takeaways
- To send Microsoft Teams meeting invites, first input all relevant meeting information including date, title, and purpose, then add the email addresses or names of the attendees and click the “Send” button.
- For a meeting currently happening, use an email client or service to send invites; external participants should check their inbox or junk mail to find the invitation.
- It’s essential to ensure that the meeting is appropriate for external participants and not confidential before sending out invites to individuals outside of the organization.
Table of Contents
Unveiling the Secrets of Efficient Team Planning with Outlook
The Symbiosis of Outlook and Teams for Streamlined Meetings
Imagine blending the organizational prowess of Microsoft Outlook with the collaborative spirit of Microsoft Teams. You have a powerful duo that streamlines the entire process of arranging and conducting meetings. By harmonizing Outlook’s robust calendaring features with Teams’ dynamic conferencing capabilities, you create an environment where planning becomes nearly effortless and meetings are more productive. You can send invites, track RSVPs, and integrate your schedule all in one place, ensuring that every team member is on the same page.
Embracing the Future: What’s New in Meeting Invites
The landscape of meeting invites is ever-evolving, and recent updates have made them more intuitive and feature-rich than ever. For starters, Outlook now allows you to create a Teams meeting directly from the calendar view, complete with a unique link for each session. Integration improvements mean changes to meeting details in Outlook are automatically synced with Teams. Additionally, you can choose to send updates exclusively to new or changed attendees, minimizing email clutter. With enhanced functionality like the Scheduling Assistant, finding an agreeable time for all participants is a walk in the park. Meeting invites have truly embraced the future, offering seamless coordination and communication for your team.
Step-by-Step Guide to Creating an Outlook Teams Meeting Invite
Getting Started with Your Outlook Calendar
STEP 1: Open Outlook (desktop or web app).
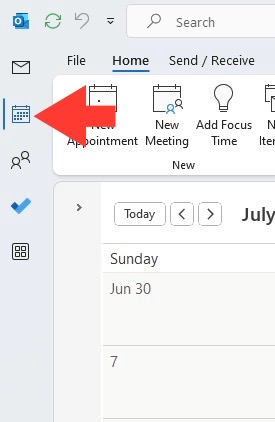
STEP 2: Select the calendar icon (desktop) or click the Calendar view icon (web).
STEP 3: View your Outlook Calendar to visualize your availability.
STEP 4: Begin scheduling your meeting.
Step 2: Crafting Your Teams Meeting Details from Outlook
Now that your Outlook Calendar is open, it’s time to get down to detail. Here are the steps to set up your Teams meeting:
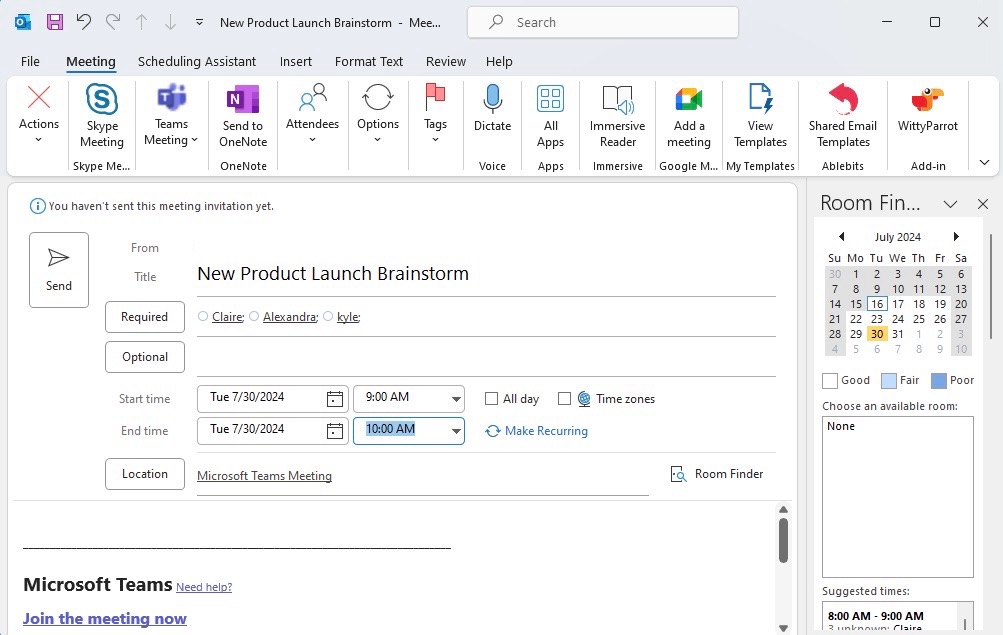
STEP 1: Click or tap ‘New Event’ or ‘New Teams Meeting’.
STEP 2: Add a concise, descriptive title.
STEP 3: Add attendees by typing their names or email addresses.
STEP 4 : Select the date and start/end times (this activates the Teams meeting option).
To give attendees a headsweep of what’s in store, add a detailed description or attach files that might be helpful context for the discussion. Keep in mind, the link to join the Teams meeting, dial-in information, and phone conference ID will magically appear in the invite only after you’ve sent it out to participants. With details magnificently laid out and a click on ‘Send’, your invite whizzes into inboxes and the event neatly stakes a claim in both your Outlook and Teams calendars.
Tips for a Hassle-Free Microsoft Teams Meeting Invitation Process
Ensuring Attendee Availability: Finding the Perfect Time Slot
Navigating everyone’s schedules can be tricky, but finding that sweet spot where all attendees are available is crucial for a successful meeting. And that’s where the Scheduling Assistant in Outlook can be a lifesaver.
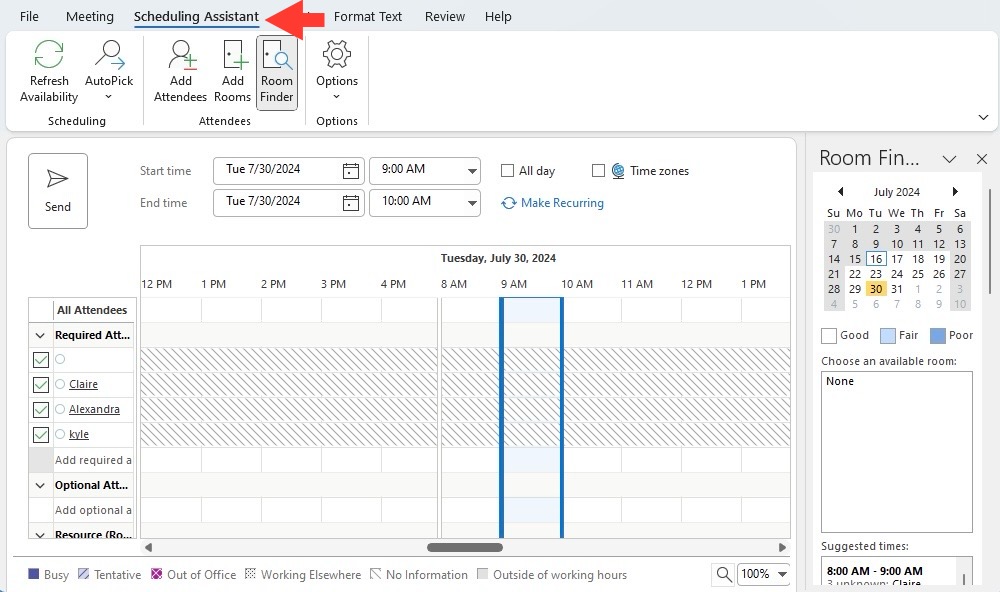
STEP 1: Click on the “Scheduling Assistant” tab.
STEP 2: Add attendees by typing their names or email addresses.
STEP 3: View the availability of all attendees.
STEP 4: Adjust the meeting time to find a slot when everyone is available.
Once finalized, return to the meeting details and send the invitation. Remember, flexibility is key. And, if you’re wrangling a large group, aim for the time when the majority can attend. Once you’ve settled on a time that works for all, lock it in and proceed to finalize the meeting details.
Clear Communication: Entering Comprehensive Meeting Details
Clear communication starts with comprehensive meeting details. When you’re setting up a Teams meeting via Outlook, craft an agenda that’s as clear as the day. In the detail box, articulate the purpose of the meeting, topics of discussion, objectives, and expected outcomes. Include anything and everything that will help attendees come prepared: objectives, a list of topics, and any pre-read documents.
Embrace the formatting tools provided to make your invite pop and ensure important information stands wisely. Bullet or numbered lists can break down the agenda, while hyperlinks can whisk attendees off to relevant documents and resources without cluttering the invite. Consider using color coding to highlight sections for easy navigation. Before hitting send, put yourself in the attendees’ shoes—confirm that if you received this invite, you’d have everything you need to know what this meeting is all about.
What to Expect After Sending Your Teams Meeting Invite
Tracking Attendance: Managing Responses in Outlook
Once your Teams meeting invite is out in the digital world, you’ll want to keep an eye on who’s in and who’s out. Good news: Outlook has got your back. Each response to your invite—be it an accept, tentative, or decline—will be neatly tallied within the meeting item in your calendar. You can check who’s responded and, just as importantly, who hasn’t. This way, you can follow up with any stragglers and ensure you have the right audience for your meeting.
Managing these RSVPs is straightforward. Just open the meeting in your Outlook calendar and head to the ‘Tracking’ section. Here you’ll see a list of all the invited attendees and their responses. Use this info strategically—maybe you need to reschedule if a key participant can’t make it, or maybe you can breathe easier knowing your must-haves are locked in.
Staying Prepared: Updating Meeting Details and Handling Changes
Once invites are out, changes are almost inevitable—whether that’s a rescheduled time, an updated agenda, or an additional attendee. Outlook is adept at handling this; just go back into the invite in your calendar, make the necessary tweaks, and Outlook will ask if you want to notify all attendees or just the ones affected by the changes.
It’s best practice to keep updates to a minimum to avoid confusion, but when they’re necessary, make them as soon as you know. Adding a brief explanation for the updates in your message to attendees will help curb any frustrations. And finally, if you have documents or other prep material that needs to be reviewed beforehand, update these resources well in advance so your attendees can come prepared and ready to contribute.
Troubleshooting Common Challenges with Teams Meeting Invites in Outlook
Solving Synchronization Issues Between Outlook and Teams
Nothing derails meeting prep like a snafu in synchronization between Outlook and Teams. If you notice discrepancies, a few tips can get things back in harmony. Firstly, check your internet connection—sometimes it’s as simple as that. If all is well there, log out of both Outlook and Teams, then log in again; a quick refresh can often do the trick.
If sync issues persist, delve into your account settings to ensure you’re logged into both with the same Microsoft 365 account. Inconsistent accounts are a common culprit behind sync mishaps. As a last resort, clear the cache from Teams or consider removing and re-adding your account in Outlook. Remember, timely troubleshooting not only restores order to your workflow but also prevents the ripple effect of confusion among your team.
Addressing Problems with External Invites Outside Your Organization
Inviting external participants to a Teams meeting should be as smooth as an in-house affair. However, if those outside your organization are hitting roadblocks, double-check that your meeting settings allow external guests. Sometimes, it’s an administrative setting that needs tweaking, so touch base with your IT department to verify that guests can join.
External participants might need to check their inbox or even their junk mail for the invitation—it can sometimes end up there. Remind them to lookout for an email from Microsoft Teams. Don’t forget to mention that they don’t need Teams to join; they can participate via a web browser if necessary. Keeping an open line of communication is vital to ensure that everyone is on board and able to connect without a hitch when it’s go-time for your meeting.
FAQs: Mastering Outlook Teams Meeting Invites
How can I invite someone to a Teams meeting using Outlook?
To invite someone to a Teams meeting using Outlook, create a new event in your Outlook calendar, add the meeting attendees, and then use the option to make it a Teams meeting. This will generate a join link that’s automatically included in the invite. Once you’ve filled out the meeting details and agenda, simply send the invitation. The recipients will receive the invite in their email, making it easy for them to join the meeting when it’s time.
Can I send Teams meeting invites to people outside my organization through Outlook?
Absolutely! You can send Teams meeting invites to external participants through Outlook. While crafting your meeting invitation, just enter the email addresses of the individuals outside your organization into the attendees section. Once you send the invite, they’ll receive all the necessary information to join your Teams meeting—even if they don’t have a Teams account, they can join via a web browser.
What should I do if participants can’t join the Teams meeting from the Outlook invite?
If participants can’t join the Teams meeting from the Outlook invite, advise them to check their internet connection first, and then try accessing the meeting link in a different web browser. Also, ensure they are checking the correct email, as invites can sometimes end up in spam folders. If problems persist, share the meeting link directly via another mode of communication, like a direct email or chat. For recurring issues, consulting your IT department to check if there are broader issues at play can be helpful.
John Michaloudis is a former accountant and finance analyst at General Electric, a Microsoft MVP since 2020, an Amazon #1 bestselling author of 4 Microsoft Excel books and teacher of Microsoft Excel & Office over at his flagship MyExcelOnline Academy Online Course.


