Formatting time in Excel can be crucial for effectively managing and analyzing time-based data. Excel offers a variety of tools and functions to display time in different formats, enabling users to customize how time information appears in their spreadsheets. This article will guide you through the steps to time format in Excel, ensuring your data is both visually appealing and functionally useful. Whether you’re tracking project hours, scheduling tasks, or analyzing time intervals, mastering time formatting in Excel will enhance your productivity and data clarity.
Key Takeaways:
- Grasp Time Basics: Excel treats time as fractions of a day, enabling precise calculations.
- Custom Formatting: Users can tailor time formats to suit specific needs, such as showing only hours and minutes.
- Handling Over 24 Hours: Use custom formats like
[h]:mmto display durations exceeding 24 hours. - Efficient Calculations: Adding and subtracting times is straightforward, but custom formats ensure correct display.
- Time-saving Shortcuts: Mastering shortcuts like Ctrl + ; for current date and Ctrl + Shift + ; for current time boosts productivity.
Table of Contents
Introduction
The Challenge of Time Formatting in Excel
Understanding time formatting in Excel can often be tricky for many users. We come across scenarios where transforming raw data into a comprehensible format is imperative. If you’ve ever struggled with time values in Excel, confused by the AM/PM distinction, or trying to represent duration beyond the 24-hour mark, you’re certainly not alone. The complexity arises from Excel’s flexible yet sometimes enigmatic ways of handling time data.
Making It Effortless: A Step-by-Step Guide
To make the process of working with time formats in Excel a breeze, I’ll be guiding you through a series of steps. These steps are designed to simplify the complexity and convert what seems like daunting tasks into manageable ones. From basic entries and formatting to customizing and calculating time, you’ll learn how to capitalize on Excel’s functionalities to meet your formatting needs. Whether you’re a beginner or someone who’s looking to refine their skills, these steps will be your ladder to efficiency.
Understanding Excel’s Time Mechanics
The Basics of Excel Time Format
Excel time format is based on a decimal system. To grasp the basics, remember that Excel interprets any time as a fraction of one day. For instance, midnight is treated as 0, and midday as 0.5. Understanding this is key to controlling how time is displayed and used in calculations.
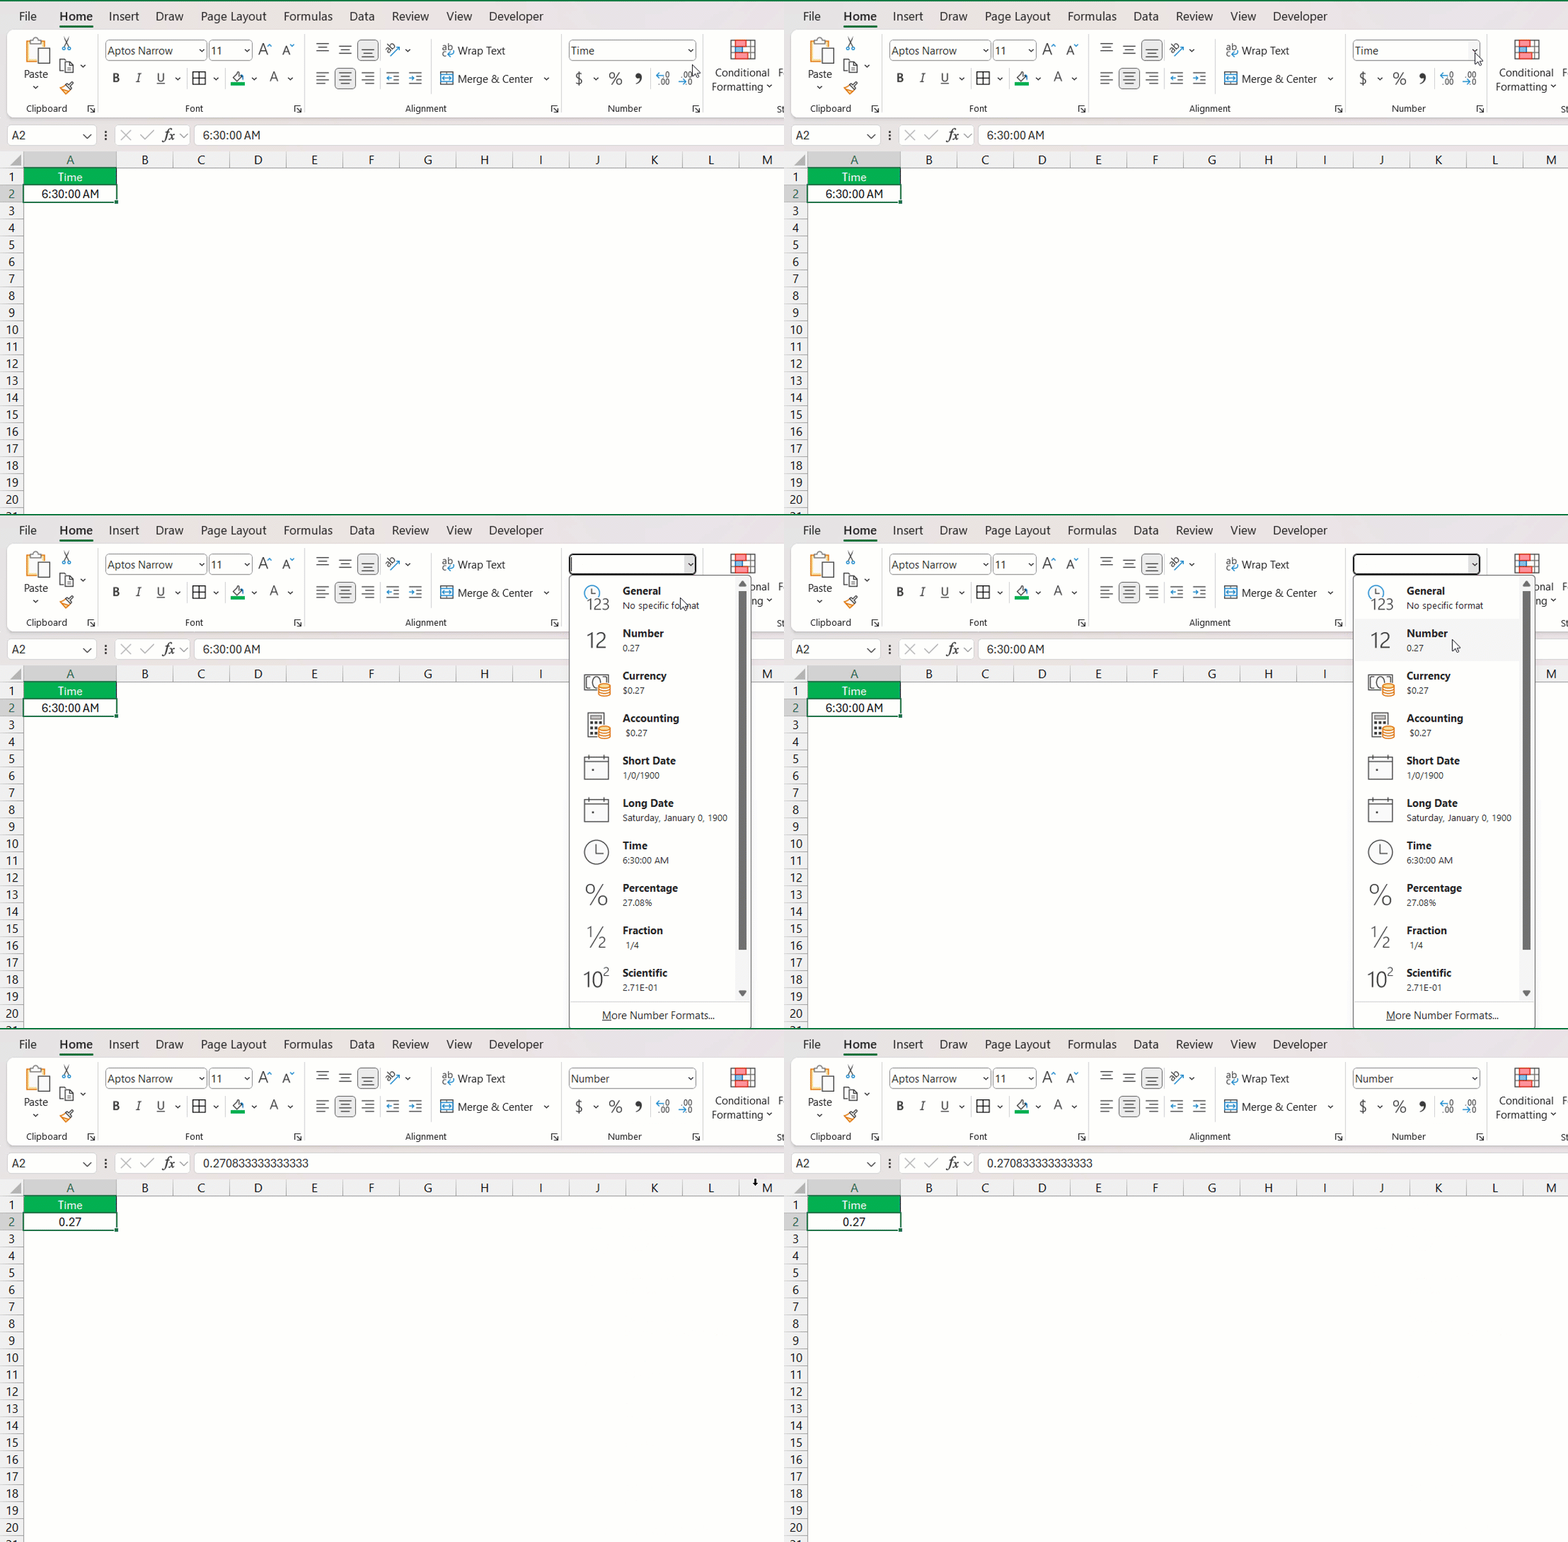
When you input a time, say 6:30 AM, Excel converts it into a decimal, which represents the fraction of the day.
This allows Excel to perform precise calculations with time as it does with any other number. This conversion from a time to a decimal is automatic; however, formatting these decimals as human-readable time is where the formatting features of Excel come into play.
Recognizing Excel’s Time Calculations
In recognizing Excel’s time calculations, it’s vital to understand that Excel handles times as a part of the day. From this perspective, one hour is equivalent to 1/24, one minute is 1/1440, and one second is 1/86400. Excel cleverly manages these proportions to allow calculations across days, weeks, or even milliseconds.
For calculations, adding and subtracting times are straightforward, the same as with any numbers. But how this appears in your spreadsheet is reliant on the time format you’ve selected for the particular cells. Keep in mind that Excel is not just storing those times as display values, but as serial numbers that represent a specific point in time since January 1, 1900.
Step-by-Step Simplification
Entering and Combining Dates with Time
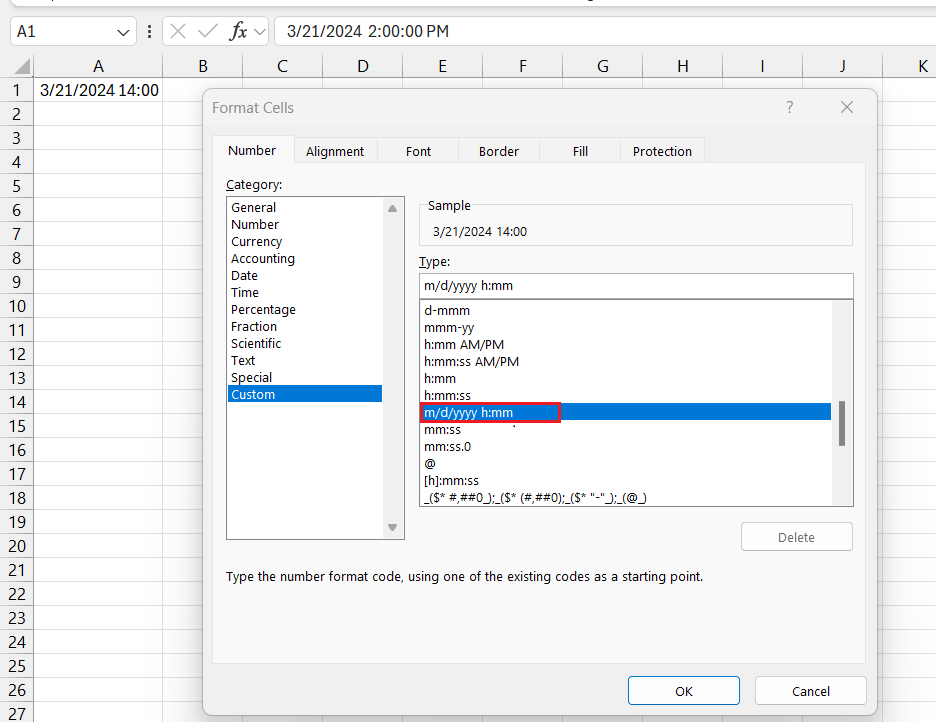
Entering dates and times in Excel can be as simple as typing them into a cell. You can enter the date and time together in one cell, and Excel is smart enough to recognize both. For example, if I write “3/21/2024 2:00 PM” into a cell, Excel will parse this into a date-time serial number format.
However, should you prefer the reverse, typing the time before the date, Excel will assist by reformatting it correctly for you. Just remember that while Excel defaults to a 24-hour clock, you can override this preference with a custom number format if you wish to see an AM/PM designation.
Tailoring Time Formats to Your Needs
Excel’s preset time formats may not always suit your data presentation requirements. Luckily, customizing these formats is straightforward. For instance, you might want to display time only in hours and minutes without the seconds, or perhaps you’re dealing with an international audience that uses different time standards.
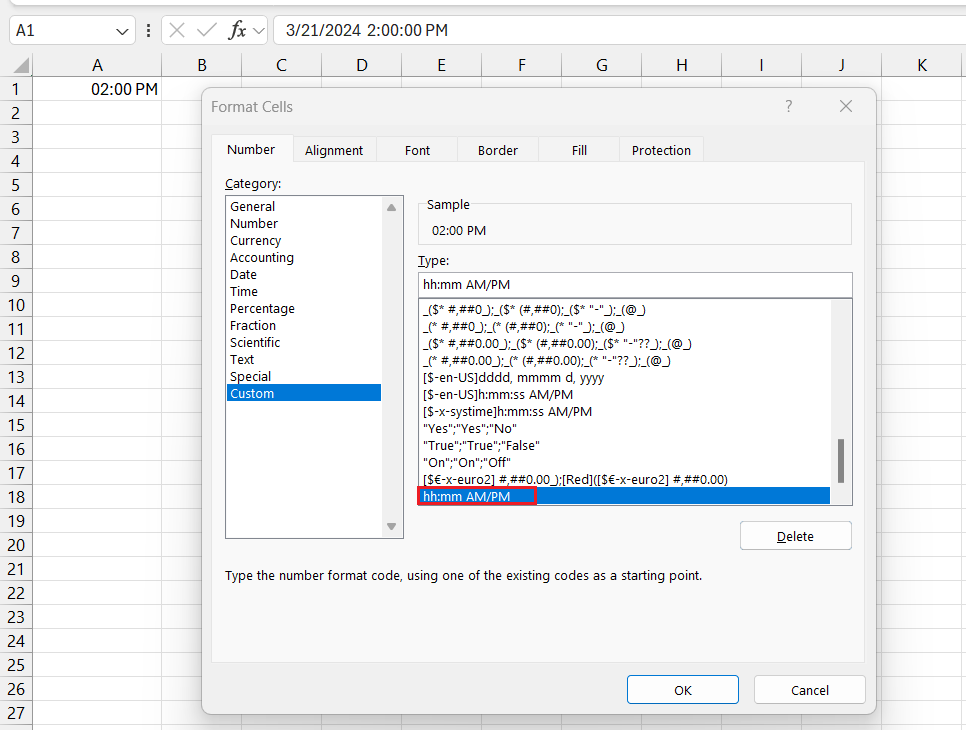
Here’s how I tailor time formats in Excel: I select the cells I want to format, press Ctrl + 1 to bring up the Format Cells dialog, and under the Custom category, I enter my desired time format, such as “hh:mm AM/PM” for hour and minute with an AM or PM suffix.
After crafting the format, don’t forget to look at the Sample box within the dialog to ensure it matches your expectations. Once satisfied, I click OK to apply this format to my selected cells.
Advanced Time Format Customization
Custom Time Format for Over 24 Hours
For those times when you’re dealing with durations that exceed the 24-hour mark – such as tracking the total hours worked on a project over multiple days – you’ll need to employ a custom time format. Excel defaults to a 24-hour cycle, so it’s on us to modify the format to our needs.
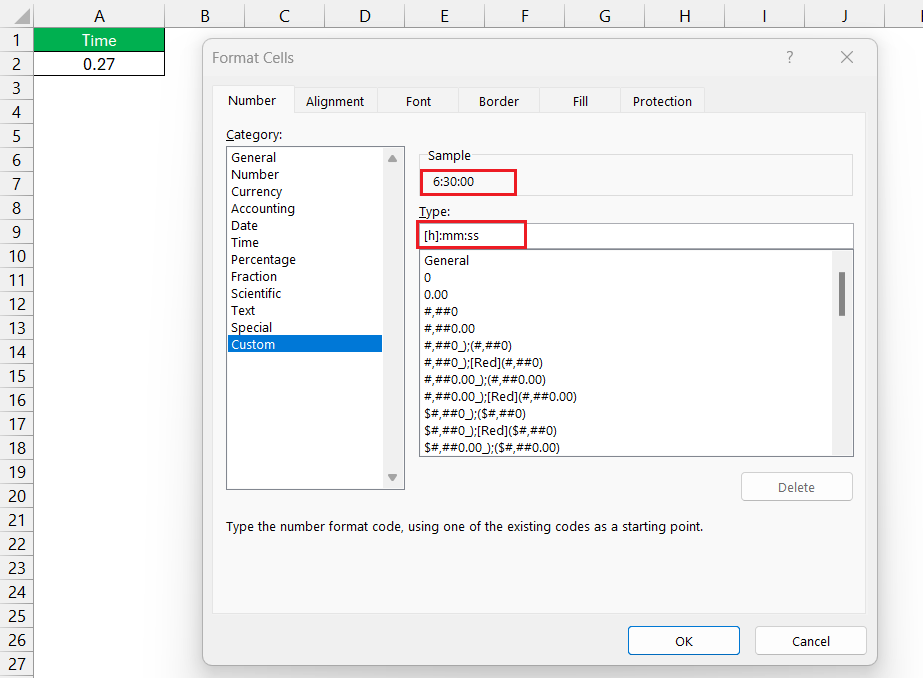
I do this by selecting the cell or range of cells that will display the duration and then pressing Ctrl + 1 to open the Format Cells dialog box. From there, I navigate to the Custom category and use the format code “[h]:mm” for hours and minutes, or “[h]:mm:ss” for hours, minutes, and seconds. The square brackets around the hour code signal Excel to calculate the total number of hours not just those within a single day.
Time Calculation Tricks for Pro Users
Adding and Subtracting Time with Ease
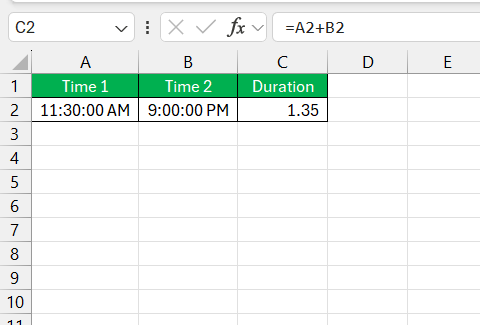
Adding and subtracting time in Excel is as simple as any arithmetic operation. To add time, I enter a formula like “=A2+B2” if I’m combining the times in cells A2 and B2. =
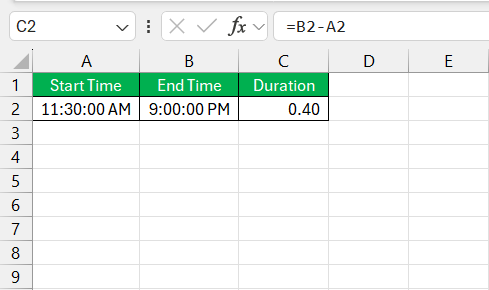
For subtracting time which might involve finding the time difference between two events, I use a similar approach, a formula like “=A2-B2.”
It’s crucial to consider that when subtracting, ensuring the end time is greater than the start time will avoid negative time values. If the calculation involves time spans that roll over midnight, remember Excel will understand this as long as the corresponding format is applied – a cumulative format with square brackets if total hours exceed 24.
Must-Know Shortcuts for Date and Time Data Entry
For pro users, mastering keyboard shortcuts is a game-changer, accelerating data entry and formatting. A noteworthy shortcut is Ctrl + ; (semicolon key), which instantly inserts the current date into a selected cell. When it comes to time, pressing Ctrl + Shift + ; inserts the current time.
Another gem is using Ctrl + ‘: This copies the value from the cell above without using the fill handle. When working with date-time combinations, these shortcuts can be combined (press Ctrl + ; then space, then Ctrl + Shift + 😉 to insert both the current date and time swiftly.
FAQs
How do you format Excel to hours and minutes?
To format Excel to display hours and minutes, I select the cells with time data, press Ctrl + 1 to open the Format Cells dialog, choose the Time category, and then select a format that includes hours and minutes, such as “13:30” or “1:30 PM”. If these don’t suit my needs, I switch to Custom and enter “hh:mm” or “h:mm AM/PM” as the type. Click OK to apply this format.
How Do I Enter Both Date and Time in a Single Cell in Excel?
To enter both date and time in one cell in Excel, I simply type them together, for example, “4/12/2023 9:45 PM”. Excel understands this as a date-time combination. I can also first enter the time followed by the date; Excel will format it correctly. If Excel doesn’t automatically format as desired, I use the Format Cells dialog to apply my choice of date-time format.
What Is the Best Way to Format Time Duration Over 24 Hours?
The best way to format time duration over 24 hours in Excel is by using custom formatting. I select the cell or range, then press Ctrl + 1 to open the Format Cells dialog. In the Custom category, I input [h]:mm for hours and minutes, or [h]:mm:ss for hours, minutes, and seconds. The square brackets around the ‘h’ display cumulative hours beyond the 24-hour cycle. This is particularly useful for tracking total hours across multiple days.
Can I Automatically Update Timestamps Without Manual Input?
Yes, I can automatically update timestamps in Excel without manual input by using the NOW() function. By typing =NOW() into a cell, Excel will insert the current date and time, which updates automatically whenever the worksheet recalculates. For static timestamps that don’t need to be updated, I use keyboard shortcuts or VBA macros to insert the current date and time as fixed values.
How Can I Subtract Time on Excel Without Getting Negative Values?
To subtract time in Excel without getting negative values, I ensure that the start time is always less than the end time. If the result ends up being negative, I subtract the start time from 24 hours and then add the end time. Alternatively, I switch Excel to the 1904 date system to handle negative time calculations. To do this, I click File > Options > Advanced, scroll down, and check the ‘Use 1904 date system’ box.
John Michaloudis is a former accountant and finance analyst at General Electric, a Microsoft MVP since 2020, an Amazon #1 bestselling author of 4 Microsoft Excel books and teacher of Microsoft Excel & Office over at his flagship MyExcelOnline Academy Online Course.

