Transparency can be the ace up your sleeve during a presentation. Utilizing transparent pictures in Powerpoint can elevate your slide aesthetics, making your message not only clear but also visually engaging. Imagine being able to layer information seamlessly with images, so viewers are captivated, not distracted. Whether for a corporate boardroom or a casual meetup, mastering transparency in PowerPoint will give your slides that extra finesse!
Learn our Top 7 Interview Questions to Land Your Dream Job!
Understanding Image Transparency in PowerPoint
Understanding image transparency in PowerPoint involves recognizing the difference it can make in your presentations. By adjusting the transparency of an image, they can blend in subtly with your slides, providing a professional backdrop that doesn’t overshadow the content. Microsoft Office 365 has simplified this process, giving you the power to swiftly change the opaqueness of pictures, making them less intrusive and more harmonious with your text and other elements.
By making images transparent, you can achieve a remarkable balance between the visual and the verbal, enhancing the readability and aesthetic appeal of your slides. Let’s explore how you can leverage this feature to turn good presentations into great ones.
Key Takeaways
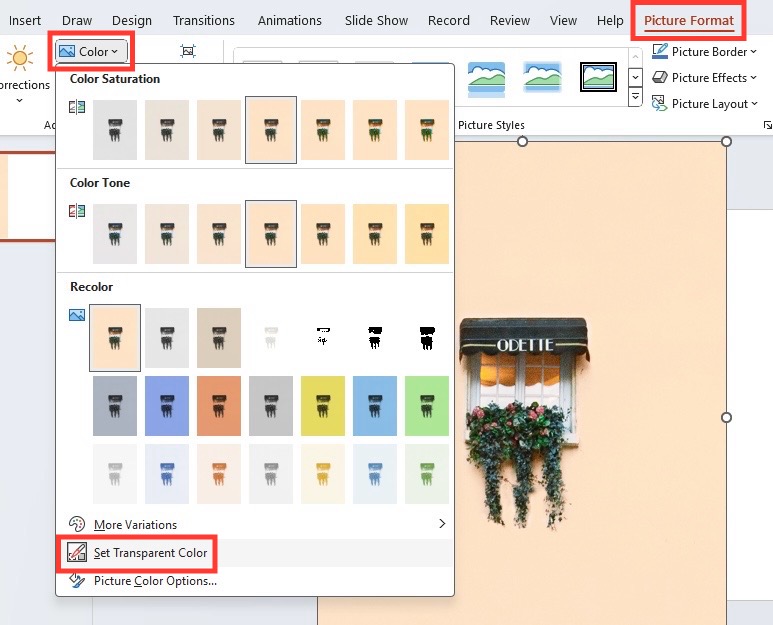
- To make an image transparent in PowerPoint, select the image and then choose the “Picture Format” tab. Under the “Adjust” group, click on “Color” and then select “Set Transparent Color.” Click on the part of the image you want to become transparent.
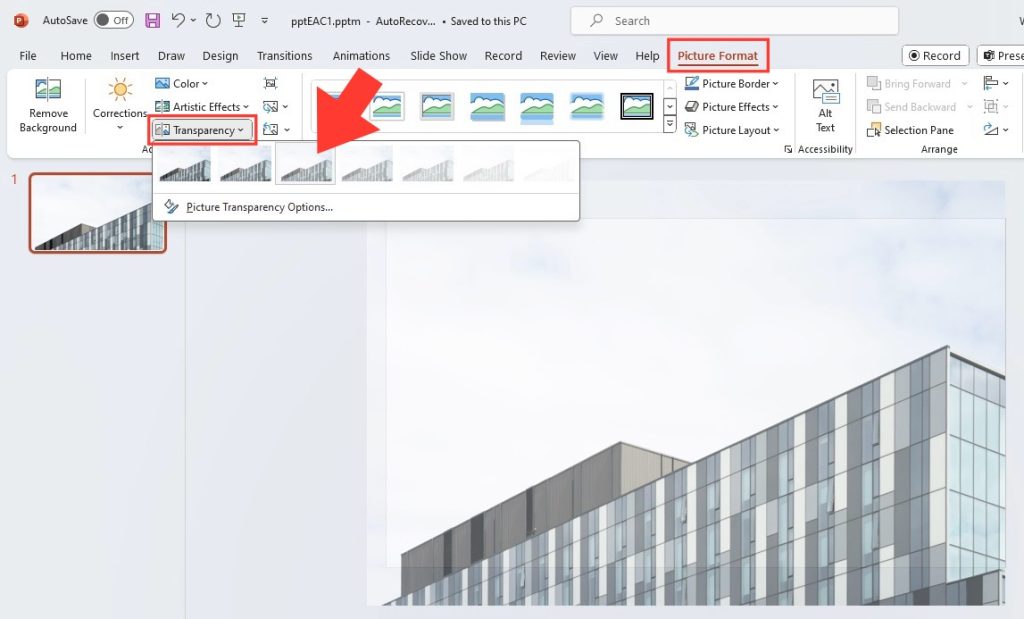
- Another method is to use the transparency slider for finer control. After selecting the image, go to the “Picture Format” tab and click on “Transparency.” Here, you can use the slider to adjust the image’s transparency to your preference.
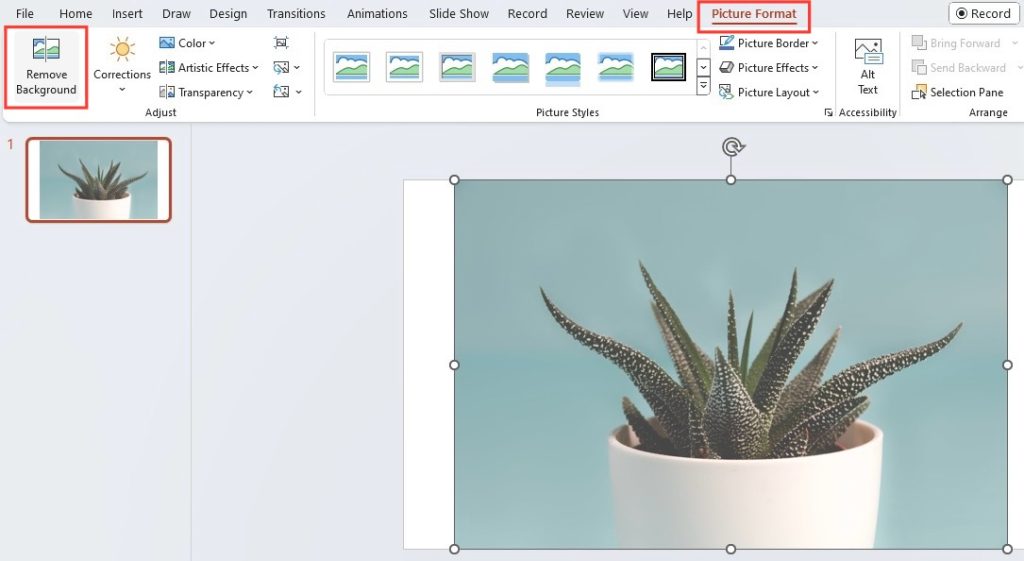
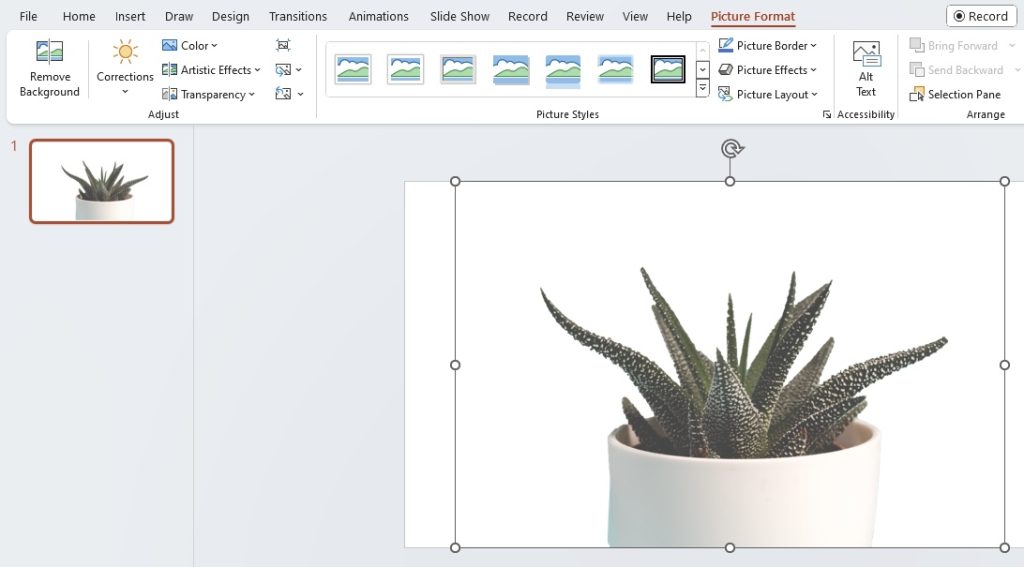
- For more complex images or if you need to adjust only a part of the image, you can use the “Remove Background” tool under “Picture Format.” After clicking on “Remove Background,” PowerPoint will try to determine the background to remove, but you can use the mark areas to keep or remove to adjust it manually. Once satisfied, apply the changes to make the specific parts of the image transparent.
Table of Contents
Getting Started with Transparent Pictures
Choosing Suitable Images for Transparency
When you’re considering which images to make transparent, keep this in mind: not all images will work well. You want to select images that complement your message without becoming a distraction. Ideal images for transparency typically have simple, uncluttered backgrounds and distinct, recognizable subjects. This allows text or other overlaid content to stand out against the image after you adjust its transparency.
Moreover, images with solid color areas or those that can be easily isolated from their backgrounds are also suitable candidates for transparency. Remember, the goal is to enhance your message, not to compete with it.
Primary Tools for Creating Transparency
PowerPoint offers a variety of tools to create transparency in your images, making it easier for you to emphasize the right aspects of your presentation. The main features at your disposal include:
- Set Transparent Color: This tool allows you to make a specific color in an image completely transparent. It’s especially handy for images with a solid background color.
- Transparency Slider: Found under Picture Format options, the slider lets you adjust the overall transparency of an image with precision.
- Background Remover: This advanced tool is excellent for isolating the subject from its background and can be used to make the backdrop of an image transparent.
- Transparency Grid: Useful for visualizing the transparent areas of your image, as it provides a checkered background against which transparent sections become evident.
These tools cater to different needs – whether you’re tweaking the transparency of specific colors or managing the overall opacity of an image. Familiarize yourself with these, and you’ll be better equipped to create the perfect transparent images for your slides.
Basic Steps to Create Transparent Pictures
Using ‘Set Transparent Color’ Tool
The ‘Set Transparent Color’ tool in PowerPoint is straightforward yet incredibly powerful when you want to remove a particular color from your image. Here’s how you can use it:
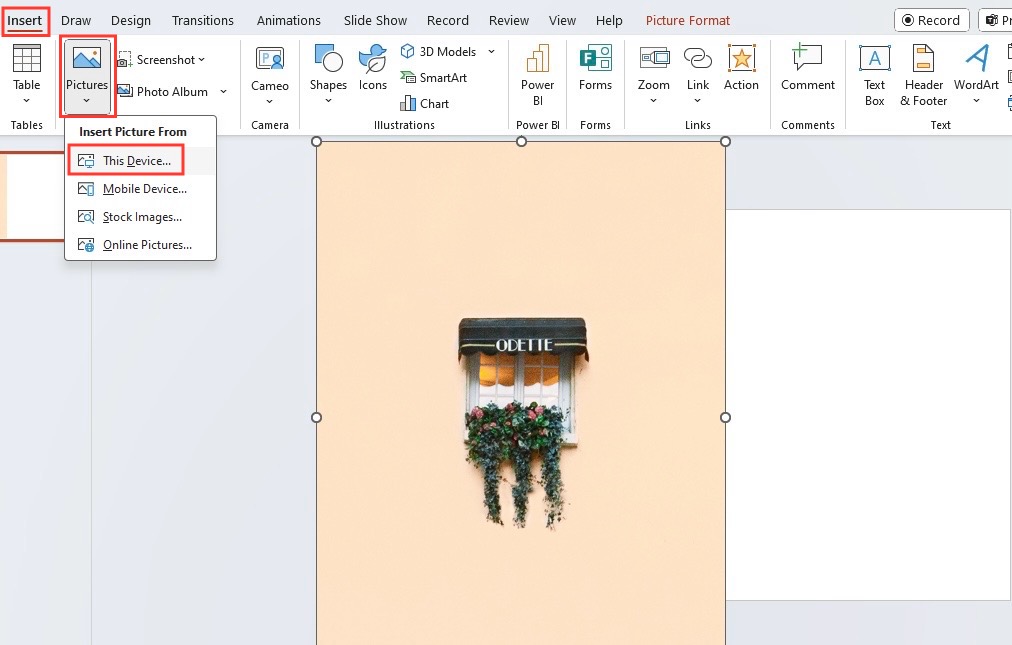
STEP 1: Open your PowerPoint presentation and insert the desired image into a slide. You can do this by clicking Insert and then Pictures.
STEP 2: Select the image by clicking on it, which will enable the Picture Format tab on the ribbon.
STEP 3: Within the Picture Format tab, find the Adjust group, and click on Color. From the drop-down menu, select Set Transparent Color.
STEP 4: Your cursor will change to a pen with an arrow. Hover over the image to the color you wish to make transparent and click on it.
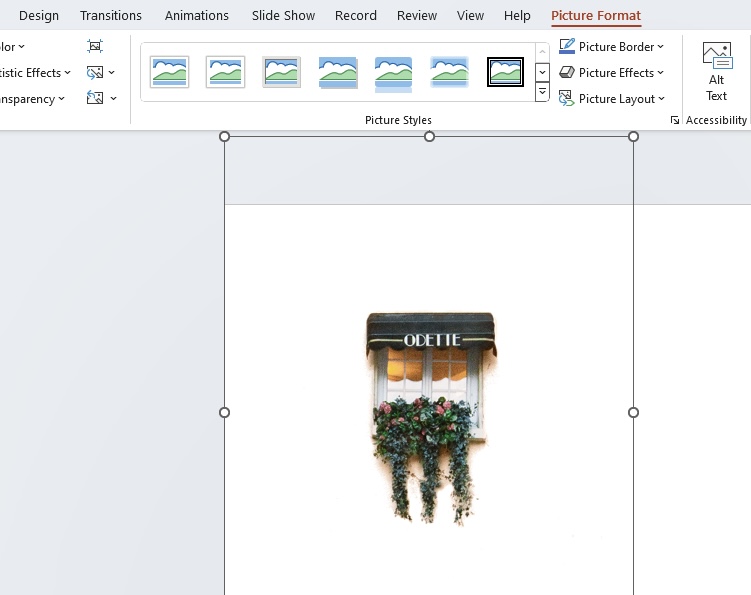
Once done, the color you clicked will become transparent. Areas of the image that shared that exact color will now show the background of the slide, or other images layered beneath.
Note: This tool is best suited for images with high contrast and non-complex color schemes. If the image has similar colors or varying shades, you may find it challenging to achieve the desired effect.
Remember, this tool does not work well with images containing gradients or intricate patterns. It’s advisable to test the effect, as you may need to undo and retry selecting a slightly different shade if the first attempt doesn’t yield perfect results.
Leveraging the Background Remover Feature
The Background Remover feature in PowerPoint is a more advanced tool that allows for sophisticated editing and is particularly useful for images with complex details. To leverage this powerful feature, you’ll want to:
STEP 1: Navigate to the slide holding the image you wish to modify in your PowerPoint presentation.
STEP 2: Click to select the image, which will bring up the Picture Format tab on the ribbon.
STEP 3: On the Picture Format tab, go to the Adjust group and select Remove Background.
STEP 4: PowerPoint will try to guess which part of the image is background but don’t worry if it’s not accurate yet. Use the Mark Areas to Keep and Mark Areas to Remove tools to adjust the selection manually until only the parts you want to make transparent are highlighted in purple.
STEP 5: Once you’re satisfied, click ‘Keep Changes’ to remove the selected background areas.
PowerPoint’s AI helps in detecting the background, but manual adjustments can significantly improve the precision of the cutout. Using this feature, you can isolate the subject in your image with a clean edge, perfect for creating professional-looking transparent elements in your presentation.
It’s important to zoom in and work slowly around the edges for a smooth result. If there’s a complex area like hair or fur, take your time with the tool to capture it as accurately as possible.
After mastering Background Remover, you’ll find yourself able to place subjects onto any new backdrop or simply let your slide’s background color or patterns shine through—transforming an ordinary presentation into an engaging visual experience.
Advanced Techniques for Custom Transparency
Mastering the Transparency Slider for Precise Control
To fine-tune your image’s transparency with granular control, the Transparency Slider tool is your best ally. You can achieve just the right level of translucency, whether for subtle background images or to soften the edges of a striking visual. Here’s how to master it:
STEP 1: Click to select the image you’ve added to your slide.
STEP 2: Open the Picture Format tab at the top of PowerPoint.
STEP 3: Click on the Transparency button, and you’ll see a small menu with preset transparency options.
STEP 4: To manually adjust the transparency level, select Picture Transparency Options at the bottom of the menu. This will display a slider in the sidebar.
STEP 5: Drag the Transparency Slider left or right to decrease or increase the image’s transparency. You’ll be able to watch the changes in real-time to ensure you achieve the desired result.
It is this type of detailed control that allows for a seamless integration of images into your slides. Whether you’re overlaying text, combining multiple images, or simply looking to add some flair to your design, the Transparency Slider opens up a world of creative potential.
Remember that a slight adjustment can sometimes make all the difference. For instance, a transparency setting between 10% to 30% often strikes a good balance, allowing for readability while retaining visual interest.
Experiment with different levels of transparency on a variety of slides to get a feel for the most effective settings for your presentation’s design.
Employing Picture Format Options for Enhanced Effects
For those who want to delve deeper into customization, the Picture Format options in PowerPoint offer an array of artistic twists and tuning knobs for your images. Here’s how to utilize these features for enhanced effects:
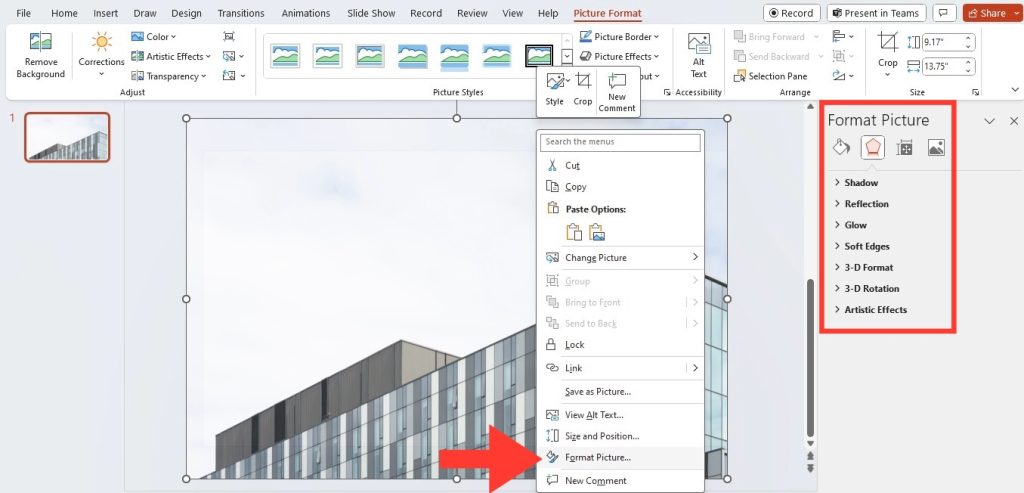
- Brightness, Contrast, and Sharpness Settings: By right-clicking on the image and selecting
Format Picture, you can access sliders to adjust brightness, contrast, and sharpness, fine-tuning the image to blend perfectly with your slide’s theme.
- Artistic Effects: Want to add some texture or perhaps a brushstroke look to your image? The
Picture Formattab provides various artistic effects that can transform your images into works of art with just a few clicks. - Color Settings: Under
Colorin theAdjustgroup, you can alter your image’s color saturation and tone. This will influence how the image’s colors interact with the transparency effect, potentially highlighting or subduing certain hues. - Picture Corrections: Here, you can take precise control over an image’s fidelity and softness, shaping the visuals to suit the context of your slide.
- Transparency Settings: For pinpoint adjustments, the
Picture Transparency Optionsoffer a slider to manually set the degree of transparency for your entire image.
These options empower you to go beyond mere transparency, enabling a stylization that aligns your images with the overall narrative of your presentation. Keep in mind that less is often more; subtle changes can significantly enhance visuals without becoming overpowering.
Remember to preview your modified images in slideshow mode, as effects may look different when projected or displayed on larger screens.
Tips and Tricks for Perfect Transparency
Avoiding Common Pitfalls in Transparency Editing
Navigating transparency editing in PowerPoint requires a keen eye for detail and a bit of know-how to avoid common mistakes. Keep these tips in mind to steer clear of typical transparency pitfalls:
- High-Resolution Images: Using low-resolution images can lead to pixelation when transparency is adjusted. Make sure to start with high-quality images for a crisp, clean finish.
- Over-Editing: It’s easy to get carried away with adjustments. Striking a balance is key; too much transparency can make your image irrelevant, while too little can overwhelm the text.
- Color Considerations: Be mindful of the slide’s color theme. Certain colors may not work well together when transparency is applied. Preview your slides to ensure readability and aesthetic appeal.
- Complex Backgrounds: Whilst the Remove Background feature is powerful, it may struggle with highly complex patterns. Choose your background wisely to avoid tedious editing.
- Distorted Aspect Ratios: When inserting transparent images, maintaining the correct aspect ratio is critical. Distorted images can easily distract from your message.
By being aware of and avoiding these common issues, you can create polished, professional slides with beautifully integrated transparent images. Always double-check your work and preview the slides as you would present them to ensure the quality remains intact.
Selecting the Right Images to Maximize Visual Impact
Maximizing the visual impact of your presentation means selecting images that are not only high-quality but also reinforce your message. When choosing images:
- Relevance is Key: The content of the image should be directly related to the slide’s topic. This ensures that the transparency effect strengthens your message rather than deviating from it.
- Look for Simple Backgrounds: Images with solid or uncomplicated backgrounds are typically easier to work with and result in cleaner transparency effects.
When your selected image harmoniously aligns with your slide’s content, viewers can process information quickly and effortlessly. The result? Your presentation leaves a lasting impact.
Practical Applications of Transparent Images
Enhancing Your Slides with Transparent Logos and Icons
Transparent logos and icons can add a polished, professional look to your slides without stealing the spotlight from your main content. When incorporating these elements:
- Consistency: Ensure that your logos and icons have the same level of transparency throughout the presentation for a coherent visual flow.
- Branding: Transparent logos are excellent for subtle branding, reminding your audience of your identity without overpowering your message.
Use transparency to create a watermark effect for your logos, which can be particularly effective for branded or proprietary presentations. With icons, consider the surrounding space; their transparency should allow for easy interpretation without clashing with other slide elements.
Creating Overlays and Compound Images for Sophisticated Designs
Creating overlays and crafting compound images can elevate the sophistication of your presentation designs. An overlay is when you stack images or text on top of a primary image without completely blocking the view beneath. Compound images involve merging multiple graphics to form a single cohesive picture.
- Use transparent images as overlays to add depth or highlight specific areas of your slides.
- Combine images with similar themes to create a compound image that tells a story.
When executed properly, these techniques can draw attention to your slide’s focal points while maintaining a clean and orderly design.
Remember to align each layer carefully and adjust transparency levels so that all elements are viewable and your slide doesn’t become too busy or confusing. These design strategies can turn a standard presentation into a memorable visual experience.
FAQs: Mastering Transparent Images in PowerPoint
Can You Make an Entire Picture Transparent or Only Parts of It?
Yes, you can either make an entire picture transparent or just parts of it in PowerPoint. To adjust the transparency of the whole image, use the Transparency Slider under the Picture Format tab. For specific parts, use the Set Transparent Color option or the Background Remover tool to isolate areas you’d like to make transparent.
Remember to choose the right tool based on your image’s complexity and desired effect.
What Should You Do If the ‘Set Transparent Color’ Option Doesn’t Work?
If the ‘Set Transparent Color’ option doesn’t work, try using the Background Remover tool for more complex images. Another option is to manually adjust the picture with the Picture Transparency Options under Picture Format. If shadows or similar colors are causing issues, try editing the image in a photo-editing program before importing it into PowerPoint.
Find alternative methods to achieve the desired transparency for your images.
How do you replace one color with another in PowerPoint?
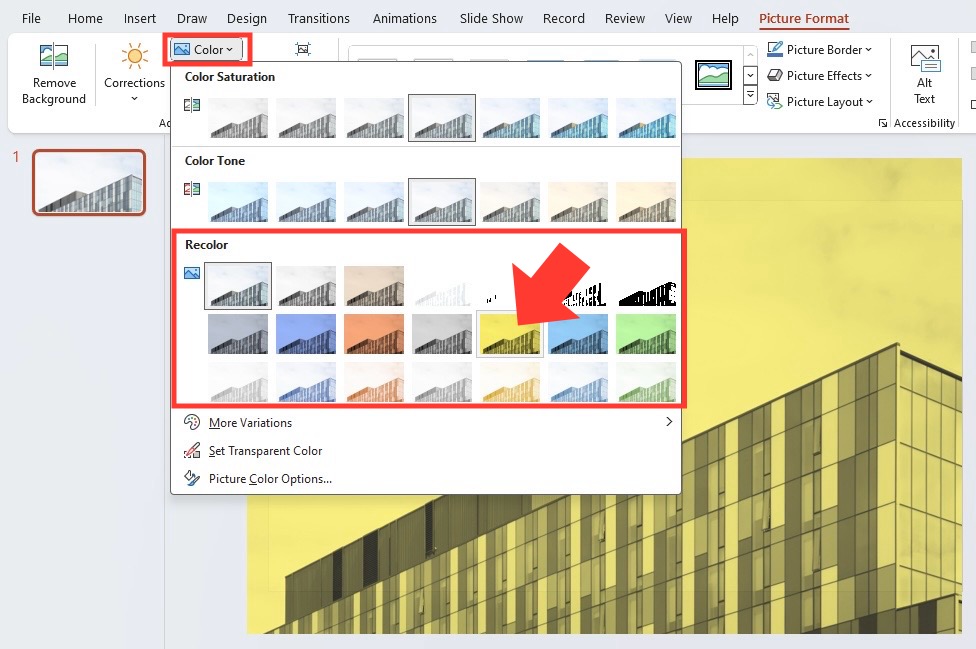
To replace one color with another in PowerPoint, use the Color tool under Picture Format. Click on your image, then select Color and choose Recolor. From there, you can pick a new color for your image from the theme’s color palette or customize your own.
John Michaloudis is a former accountant and finance analyst at General Electric, a Microsoft MVP since 2020, an Amazon #1 bestselling author of 4 Microsoft Excel books and teacher of Microsoft Excel & Office over at his flagship MyExcelOnline Academy Online Course.

