Learn about Excel with our Free Microsoft Excel Online Course!
Key Takeaways
- To unlink OneDrive from Windows 10, click the OneDrive icon on the taskbar, select “Help & Settings,” navigate to the “Settings” option, and then click on the “Account” tab where you can select “Unlink this PC” and confirm by clicking “Unlink account.”
- If the OneDrive icon is not visible, you can manually start OneDrive by running “%LocalAppData%\Microsoft\OneDrive\OneDrive.exe” and then follow similar steps to unlink your account.
- Prior to unlinking OneDrive, it is recommended to back up important files to an external drive to prevent potential data loss.
Reasons to Consider Unlinking Your OneDrive Account
OneDrive might be a cloud storage sweetheart for many, but it’s not a one-size-fits-all solution. Perhaps you’ve found a service that fits your workflow better, or privacy concerns are nudging you to keep your files strictly local. Maybe you’re just tidying up your digital life and stepping away from services you no longer use. Whatever the reason, knowing when and why to unlink OneDrive could be as crucial as using it in the first place.
Step-by-Step Instructions to Unlink OneDrive
How to Stop OneDrive Sync on Your PC
If OneDrive is syncing at an inconvenient time or you prefer not to have certain files in the cloud, there’s a straightforward way to pause or stop the syncing process:
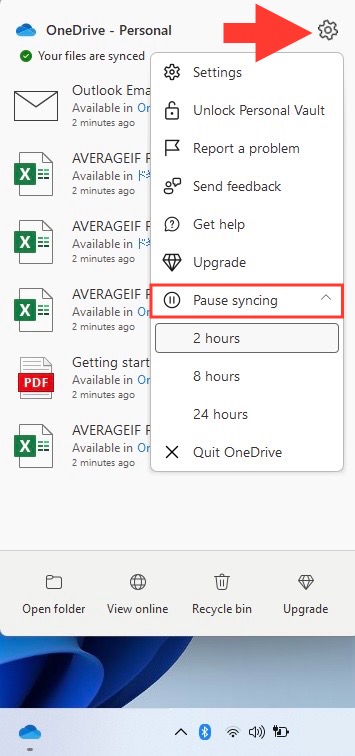
STEP 1: Click the OneDrive icon on your taskbar, hit “…More” or “Help & Settings,” and then choose “Pause Syncing.” You can pause it for a short duration like 2 hours if you need a temporary halt.
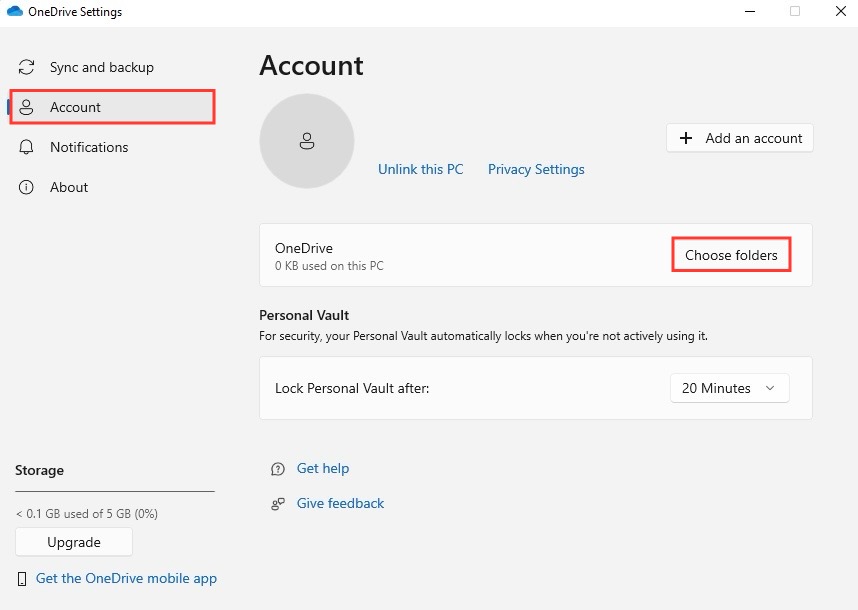
STEP 2: To cease the sync of specific folders, click on the OneDrive icon, select “Help & Settings,” then “Settings,” and navigate to the “Account” tab.
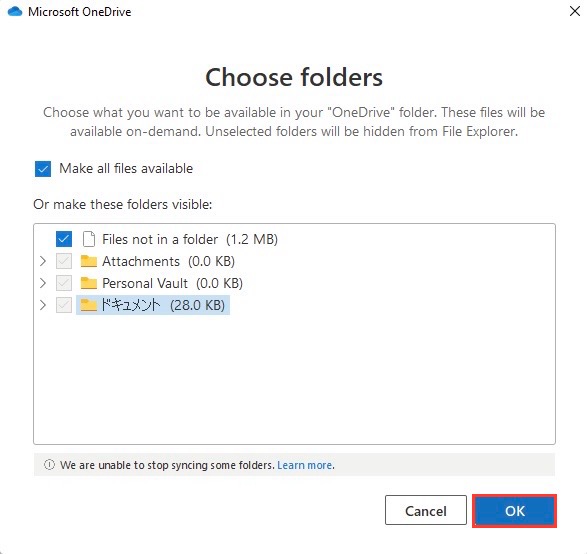
STEP 3: Click on “Choose folders.” In the window that follows, untick the folders you do not wish to sync, and confirm by clicking “OK.”
You’ve now tailored OneDrive to sync only what you need, when you need it.
Completely Removing OneDrive from Your Windows 10 System
Sometimes, pausing just isn’t enough, and you may decide that removing OneDrive completely from your system is the way to go. Just follow these steps, and you’ll have it off your PC in no time:
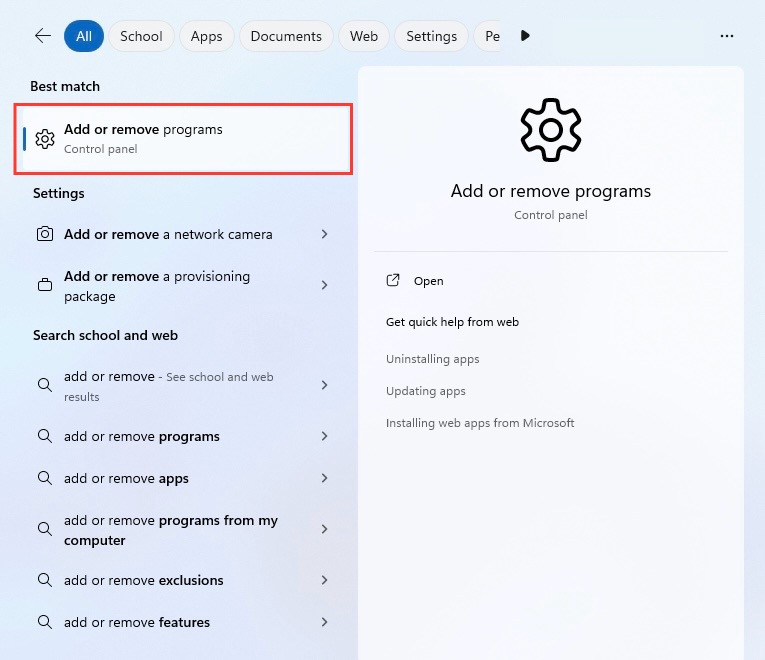
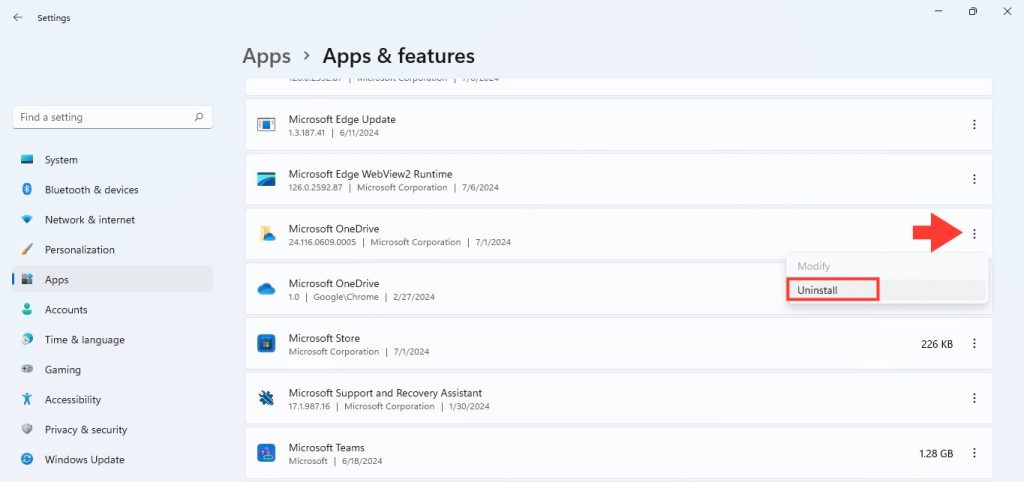
STEP 1: Type “Add or remove programs” in the search box on your Windows 10 taskbar. Click on the result to open the settings page.
STEP 2: Scroll down or use the search function to find Microsoft OneDrive.
STEP 3: Select Microsoft OneDrive, then click “Uninstall.” Follow the prompts to complete the process.
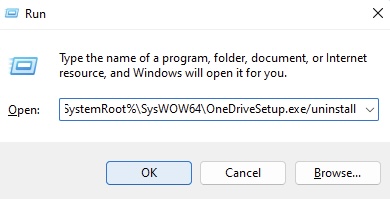
Alternatively, for those who are comfortable with command line instructions:
- For 32-bit Windows 10:
%SystemRoot%\System32\OneDriveSetup.exe /uninstall - For 64-bit Windows 10:
%SystemRoot%\SysWOW64\OneDriveSetup.exe /uninstall
Just like that, OneDrive is no longer part of your PC’s setup.
After Unlinking: Managing Your Files and Data
What Happens to Your Data After Unlinking?
Here’s the scoop: When you unlink OneDrive, your files stay where they are on your local device — if they’ve been downloaded. Anything marked as “Available when online” sails off into the digital horizon, remaining only in your OneDrive cloud account. In some ways, it’s like taking the bridge down after you’ve crossed the river; the data on the cloud stays put, and your local files stay on your device.
Key takeaways you should remember:
- Unlinking won’t plunge your data into the void; they’re just taking a small cloud vacation.
- Syncing stops, so your local files and the copies in the cloud will no longer mirror each other until you reconnect.
Best Practices for Data Management Post-Unlinking
Reflection on your data management practices after unlinking OneDrive is crucial. Here are some smart moves to ensure your files remain orderly and accessible:
- Backup Regularly: With OneDrive out of the picture, consider alternative backup solutions to safeguard your data.
- Local File Organization: Take the time to organize your files locally, since automatic sorting via OneDrive is no longer available.
- External Storage Usage: Employ external hard drives or USBs to maintain physical copies of your important files.
- Cloud Alternatives: Explore other cloud services to see if they align with your needs for accessibility and security.
- Stay Updated: Keep an eye out for updates or changes in your chosen method of data storage and adapt accordingly.
In short, treat your data like a digital garden — it thrives with a bit of attention and care.
Troubleshooting Common Issues When Unlinking OneDrive
Resolving Sign-In Problems After Unlinking
Encountered a sign-in hiccup with OneDrive after unlinking? Keep calm and follow these steps:
- Verify Credentials: Double-check your username and password. Often, the devil is in the details.
- Check Internet Connection: A spotty connection might be the culprit. Ensure you’re connected and the signal strength is strong.
- Clear Cached Credentials: Go to Credential Manager in the Control Panel, find stored OneDrive credentials, and remove them. A fresh start can help.
- Update OneDrive: Confirm you are running the latest version of the app. Updates can squash sign-in bugs.
- Contact Support: If all else fails, reaching out to your institution’s IT support or Microsoft support can provide additional troubleshooting.
Rest assured; these sign-up snafus are usually just a bump on the digital road.
Restoring Access to Lost Files Post OneDrive Unlink
It’s a heart-stopping moment when you think your files have vanished post-unlinking OneDrive, but there’s often a way to get them back:
- Check Local Storage: Begin by searching for your files in your local storage; they might still be there, just not in the usual OneDrive folder.
- Look in the OneDrive Cloud: Go online to the OneDrive website and check if your files are there. If you find them, you can download what you need.
- Recycle Bin and Version History: If you’ve accidentally deleted files, OneDrive’s Recycle Bin might have them. Additionally, you can use the Version History feature to recover previous versions of your files.
- Contact Support: If your own search doesn’t turn up your files, your school’s IT support or Microsoft’s customer service may be able to help recover them.
Remember, preemptive backups are your safety net for file recovery in situations like this.
FAQ: Navigating the OneDrive Unlink Process
Can I Unlink OneDrive Without Losing My Files?
Absolutely, you can unlink OneDrive without losing your files. Unlinking simply disconnects your PC from syncing with the cloud; it doesn’t delete what’s already on your device. However, this changes for files marked as “available when online” — you will need to download those to ensure they stay on your hard drive.
How Do I Reconnect My Account if I Change My Mind Later?
Changed your mind? Rejoining the OneDrive fold is pretty straightforward. Just open the OneDrive application on your Windows 10 system, sign in with your Microsoft account, and voilà – you’re ready to sync again. You’ll be prompted to choose which folders to sync, so you have control from the get-go.
What Are the Implications of Unlinking OneDrive for Shared Files?
Unlinking OneDrive could impact the collaborative flow of shared files. Anyone you’ve shared with can still access their copies, but no further changes will sync between your device and what’s shared until you relink. Think of it as pressing pause on a team project – you won’t see the latest edits until you press play again.
John Michaloudis is a former accountant and finance analyst at General Electric, a Microsoft MVP since 2020, an Amazon #1 bestselling author of 4 Microsoft Excel books and teacher of Microsoft Excel & Office over at his flagship MyExcelOnline Academy Online Course.

