When working with Excel, I often encounter protected sheets that restrict editing. Whether I set the protection myself and forgot the password or received a file that needs modifications, unprotecting an Excel sheet is a necessary skill. In this guide, I’ll walk you through the different ways to unprotect Excel sheet, whether you have the password or not.
Key Takeaways:
- Excel Protection Has Two Types – Sheet protection locks individual worksheets, while workbook protection restricts structural changes.
- Always Back Up Before Unprotecting – Creating a copy of your Excel file prevents accidental data loss.
- Unprotecting a Sheet Requires a Password – If known, the password can be used to unlock the sheet via the Review tab.
- VBA Can Help Unlock Sheets Without a Password – A simple VBA script can remove protection if no password is set.
- Reapply Protection Strategically – Protect only necessary cells, use strong passwords, and document them securely.
Table of Contents
Unlocking the Mystery of Excel Protection
The Need for Unprotecting Excel Sheets
When collaborating on a shared Excel workbook, safeguarding and controlling access to sensitive data is key to maintaining its integrity. However, we may encounter situations where a sheet’s password is lost or forgotten, possibly hindering progress. Understanding the necessity to unprotect sheets arises from scenarios such as needing to revise locked data or fixing a crucial error in a formula.
Understanding How Protection Works in Excel
Excel protection serves a dual role as both a shield and a monitor. It is crucial for preventing intentional or accidental alterations to critical worksheet contents. When I discuss protection with audiences, I convey its usefulness, especially when files are exchanged among various users—preserving specific sections or formulae becomes imperative.
Protection in Excel allows for granular control by the sheet’s creator who decides the range of cells subject to locking and what actions (if any) can be performed, like sorting data. A password typically governs access, restricting your interaction with the data to mere viewing without it.
We see two primary types of protection in Excel:
- Sheet Protection: Targeting individual worksheets, allows the locking of all or part elements, such as formulas or cells.
- Workbook Protection: It encompasses the entire workbook, restricting structural changes like inserting or deleting sheets.
A thorough understanding of these mechanisms is pivotal when determining the best approach to unprotecting a sheet.
Preparing to Unprotect Your Excel Sheet
Back Up Before You Crack Up
Before attempting to unlock any Excel document, backing up is a mantra I suggest everyone should adopt. This step is a preventive measure to safeguard against any mishap that might occur, like data loss or corruption—better to be safe than sorry.
Here’s a straightforward way to back up:
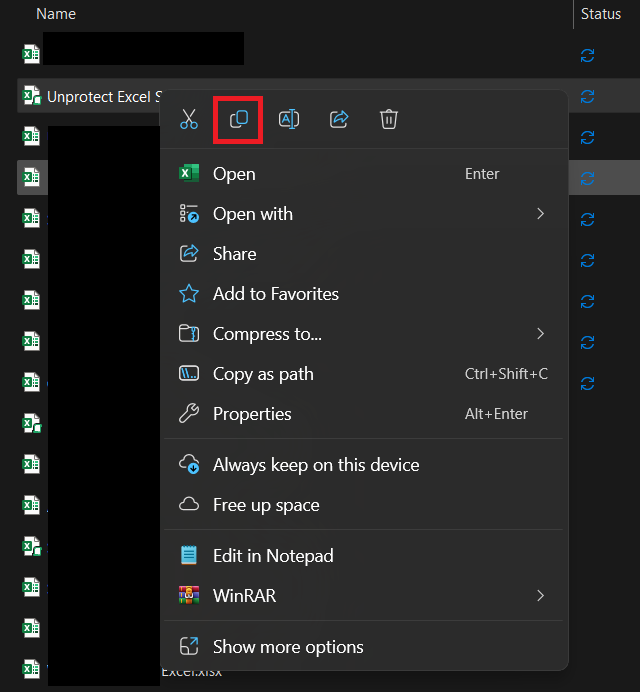
STEP 1: Right-click on the file and select “Copy”.
STEP 2: Paste the copy to a secure location, distinct from the original file.
This simple routine ensures that you always possess an untouched version to return to, should things go awry during the unprotection process.
Step-by-Step Guide to Unprotect Excel Sheet
Method 1: Unprotecting an Excel Sheet with a Known Password
If I have the password to the protected sheet, unprotecting it is a simple process:
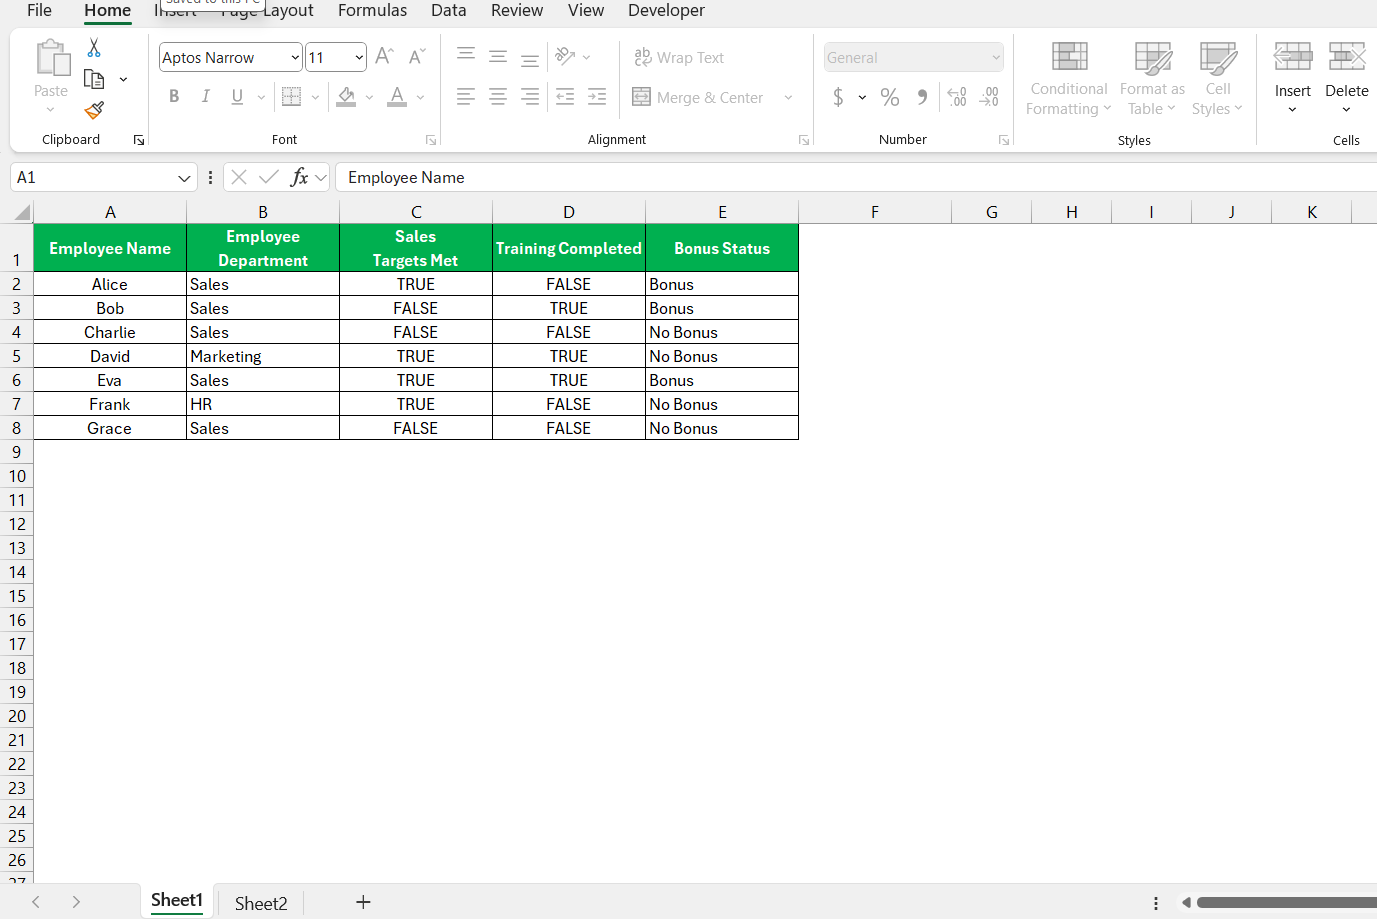
STEP 1: Open the Excel file and navigate to the protected sheet.
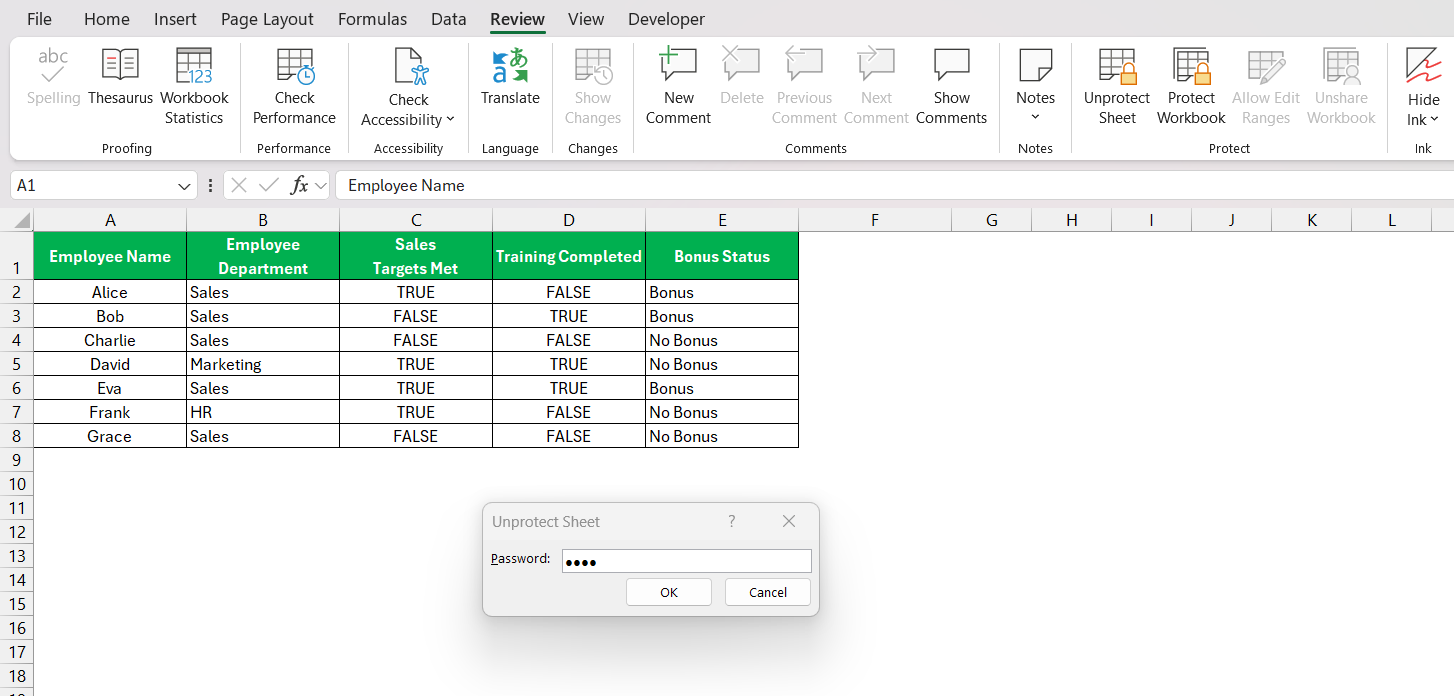
STEP 2: Click on the Review tab in the ribbon.
STEP 3: Select Unprotect Sheet from the options.
STEP 4: Enter the password when prompted and click OK.
Once I enter the correct password, the sheet is unprotected, and I can make edits as needed.
Method 2: Unprotecting an Excel Workbook
Sometimes, the entire workbook is protected rather than just a single sheet. In that case, I follow these steps:
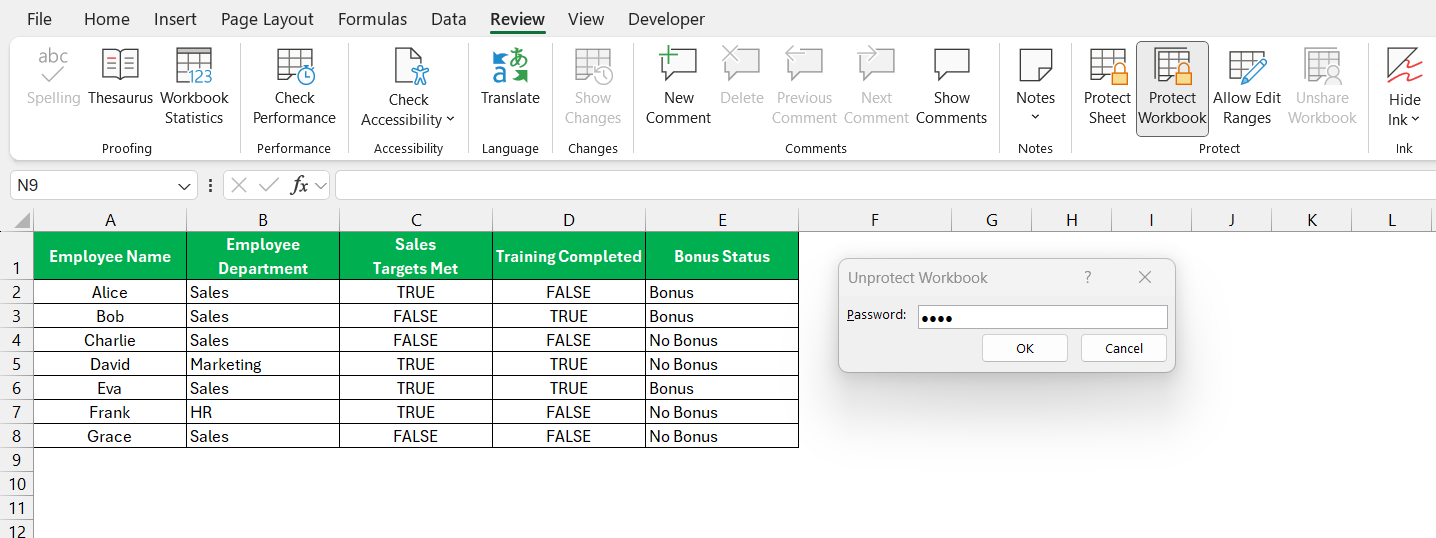
STEP 1: Click on the Review tab.
STEP 2: Select Protect Workbook (if it is highlighted, this means protection is enabled).
STEP 3: Enter the password and confirm.
This removes protection from the workbook, allowing me to make necessary changes.
Method 3: Using VBA to Unprotect a Sheet (If Password Is Unknown)
If I don’t know the password, VBA (Visual Basic for Applications) can help. Here’s how I use it:
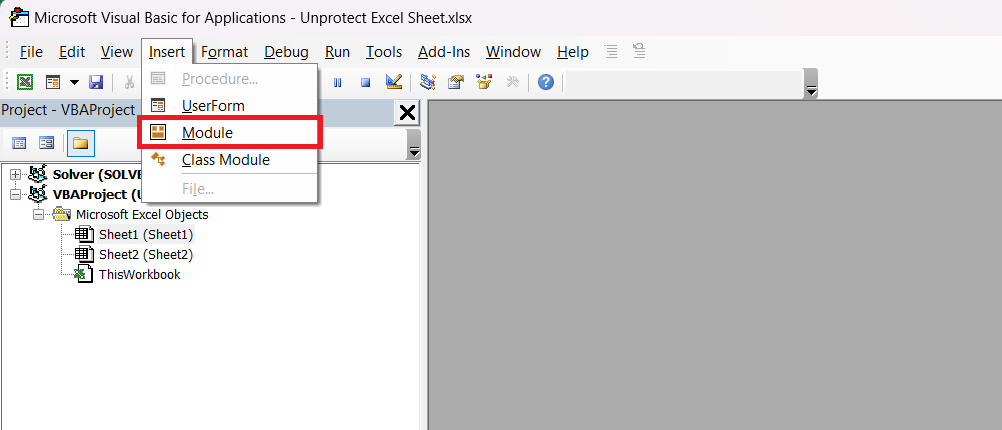
STEP 1: Press ALT + F11 to open the Visual Basic for Applications (VBA) editor.
STEP 2: Click Insert > Module.
STEP 3: Copy and paste the following code into the module:
Sub UnprotectSheet()
Dim ws As Worksheet
Set ws = ActiveSheet 'Change to a specific sheet if needed
' Provide the password if the sheet is protected with one
Dim password As String
password = "yourpassword" ' Change this to your actual password
' Try unprotecting with the given password
On Error Resume Next
ws.Unprotect Password:=password
If Err.Number <> 0 Then
MsgBox "Failed to unprotect the sheet. Incorrect password or another issue.", vbExclamation, "Error"
Else
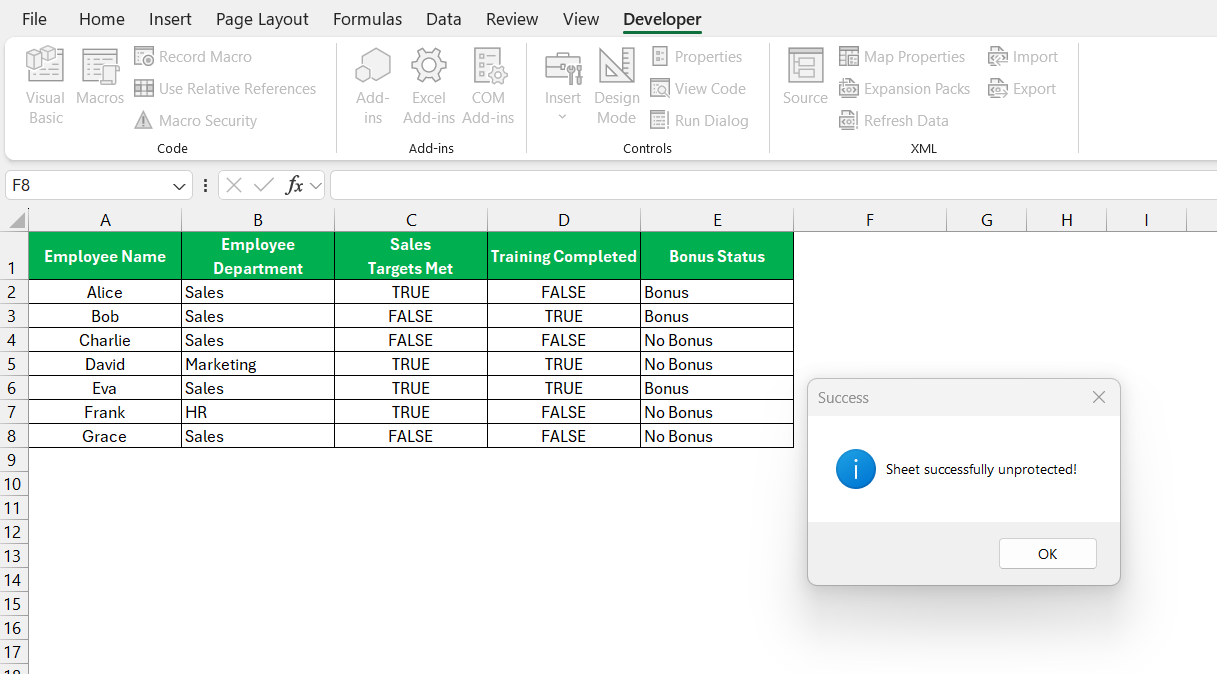
MsgBox "Sheet successfully unprotected!", vbInformation, "Success"
End If
On Error GoTo 0
End Sub
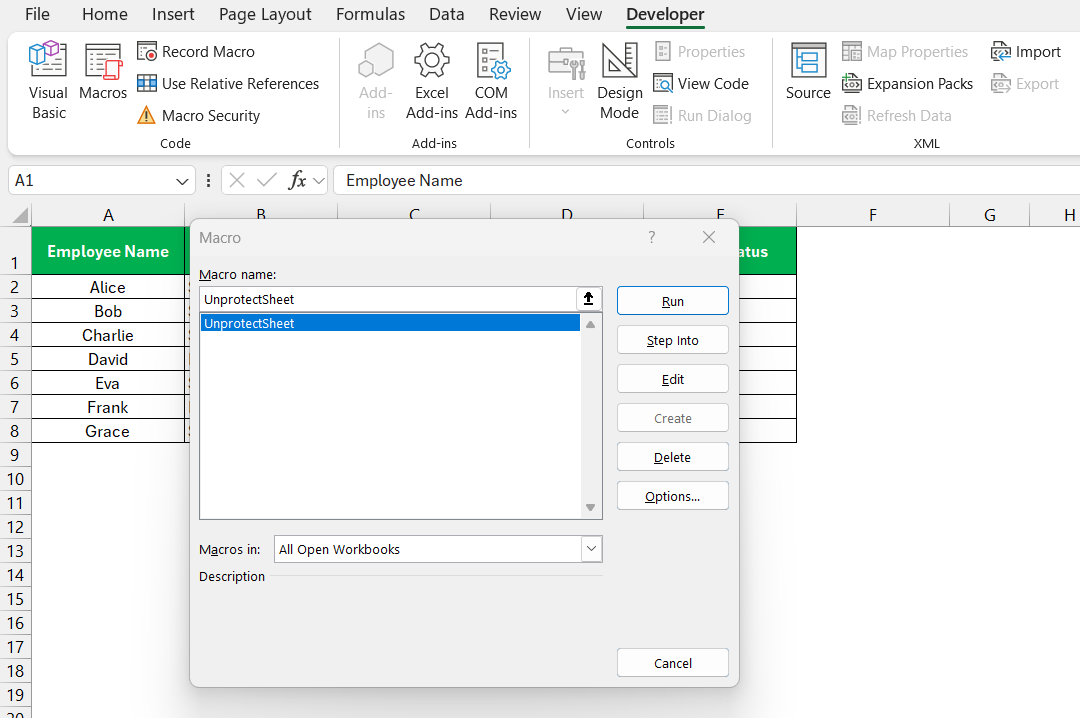
STEP 4: Press F5 to run the macro.
The password protection will be removed and the sheet will be ready for any edit.
Tips and Tricks
- Try Blank Passwords: Sometimes, the sheet was protected with an empty password. Simply pressing OK without entering anything might work.
- Check for Backup Files: If I have an older version of the file, I might be able to restore an unprotected version.
- Use Google Sheets: Uploading the Excel file to Google Sheets can sometimes remove protection, though this depends on the protection settings.
- Avoid Overwriting Data: Before unprotecting a sheet, I make sure I won’t lose any important formatting or formulas.
- Use Strong Passwords: If I need to protect a sheet again, I use a strong password and store it securely.
Safeguarding Your Excel Files Post-Unprotection
Best Practices After Unprotecting Sheets
Once the veil of protection is lifted from Excel sheets, the canvas is clear for updates, yet certain best practices will ensure the continued safety and functionality of your data. I advocate a balanced approach, guarding sensitive cells while leaving others open for collaboration.
Post-unprotecting, here are strategies I deploy enthusiastically:
- Documenting and securely managing the new protection passwords, possibly using a password manager.
- Methodically locking only the cells that host critical formulas or confidential information.
- Engaging in clear communication with team members about which sections are protected and the rationale behind it.
By employing these prudent practices, data security meshes perfectly with collaborative efficiency.
Reapplying Protection Without the Pitfalls
Reinstating Excel sheet protection after making the necessary tweaks requires a touch of finesse to avoid previously encountered pitfalls. I’ve learned to wear the hat of both the guardian and the gatekeeper, setting up defenses that are robust yet reasonable.
When reapplying for protection, I keep these guidelines close:
- Use memorable, secure passwords to shield the sheets, considering a combination of characters that won’t slip through the cracks of memory.
- Protect only the regions that demand it, like cells with vital formulas or sensitive data, leaving the rest free for user interaction.
- Consistently apply protection settings across similar worksheets for a harmonious user experience.
This delicate balance ensures that while data is defended against unwelcome alterations, the workflow for legitimate users is unimpeded.
FAQs: All About Unprotected Excel Sheets
How do I unprotect an Excel sheet if I forgot the password?
If you’ve forgotten the password, try entering a blank password first, as some sheets are protected without one. You can also use VBA (Visual Basic for Applications) to attempt unlocking the sheet by running a script that removes protection. If these methods don’t work, consider using a backup file or third-party password recovery tools. However, always ensure you have permission to modify the sheet before attempting these methods.
Can I unprotect a workbook without knowing the password?
If a workbook is protected with a password, you need the correct password to remove the restriction. Unlike sheet protection, workbook protection cannot be bypassed easily using VBA. You may try restoring an earlier, unprotected version of the file if a backup is available. Otherwise, specialized password recovery software may be needed, though success is not guaranteed.
What’s the difference between sheet and workbook protection?
Sheet protection restricts changes to specific cells, formulas, or formatting within a single worksheet, allowing for controlled edits. Workbook protection, on the other hand, prevents changes to the structure of the entire file, such as adding, deleting, or renaming sheets. Both types of protection serve different purposes and can be used together for enhanced security. Knowing which one is enabled helps determine the best way to unlock or modify the file.
Does Google Sheets remove Excel sheet protection?
In some cases, uploading a protected Excel file to Google Sheets may strip away the sheet protection. However, this depends on how the protection was applied in Excel—if the protection includes strong encryption, Google Sheets won’t remove it. You can try opening the file in Google Sheets and checking if edits are allowed. If protection remains, alternative methods like VBA or password recovery tools may be necessary.
How do I prevent losing access to a protected sheet?
To avoid losing access, always document passwords securely in a password manager or a safe location. Creating a backup copy before applying protection ensures you have an unprotected version available if needed. Additionally, only lock essential cells or formulas to minimize the need for frequent unprotection. If collaborating with others, communicate protection details clearly to prevent accidental lockouts.
John Michaloudis is a former accountant and finance analyst at General Electric, a Microsoft MVP since 2020, an Amazon #1 bestselling author of 4 Microsoft Excel books and teacher of Microsoft Excel & Office over at his flagship MyExcelOnline Academy Online Course.


