In Excel, you are equipped with a tool that can help you fill values in neighboring cells. This is known as a fill handle Excel and it can fill adjoining cells with subsequent data following a certain pattern. For example, cells A1, A2, and A3 have the values 1,2, and 3. So using the fill handle, you can fill all the cells below with values that follow in the series, like 4,5,6…. And so on. You can easily learn how to use fill handle in Excel by following the steps below:
Key Takeaways:
- The Fill Handle in Excel may stop working if the feature is not activated in the Excel settings. Users experiencing issues should check if the option “Enable fill handle and cell drag-and-drop” is selected under the ‘Preferences’ menu and specifically within the ‘Edit’ section. Ensuring this setting is enabled can often resolve the problem.
- A common reason for the Fill Handle not functioning in Excel for Mac is the variation in the user interface, particularly in the ‘File’ tab, which may lead to confusion when trying to access options related to this feature. Users who are accustomed to a different layout or following guides based on another version of Excel might experience difficulty locating the correct settings without proper directions.
Table of Contents
How to Use Fill Handle in Excel
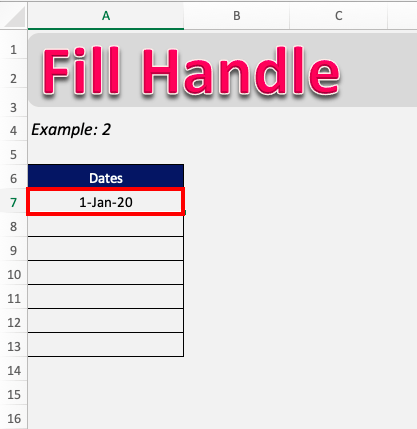
STEP 1: Enter the starting values of your sequence in a range of cells.
STEP 2: Select the cells in which you have entered the values.
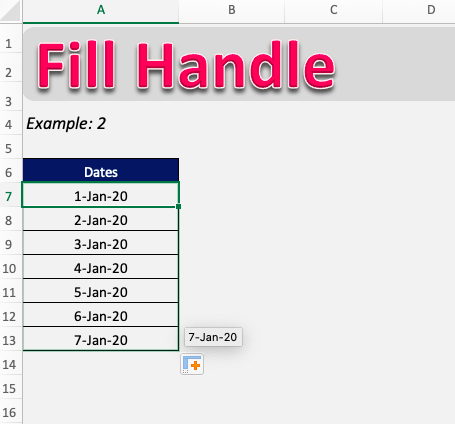
STEP 3: Go to the bottom right of your selection, you can drag the fill handle Excel to copy data or to fill adjacent cells with a series of data.
STEP 4: After using the Excel fill handle, your values will be filled, like so!
Fill Handle Excel – not visible
If you are unable to use this function, you can simply fix it using the steps below:
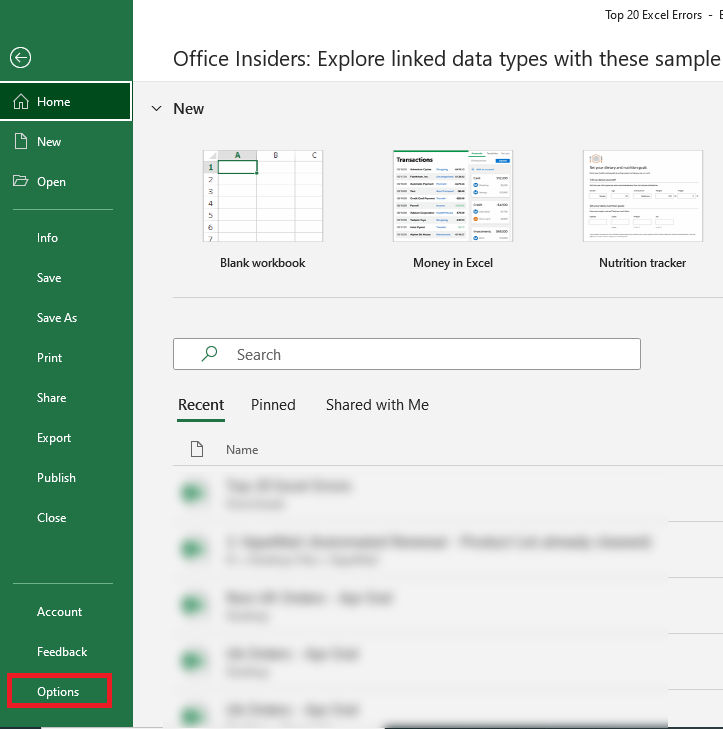
STEP 1: Select the File tab.
STEP 2: Click Options from the menu on the left side
STEP 3: In the Advanced category, under Editing options, select the Enable fill handle and cell drag-and-drop check box.
Once you have enabled this, you can easily use Excel Fill handle feature!
Not selecting all values
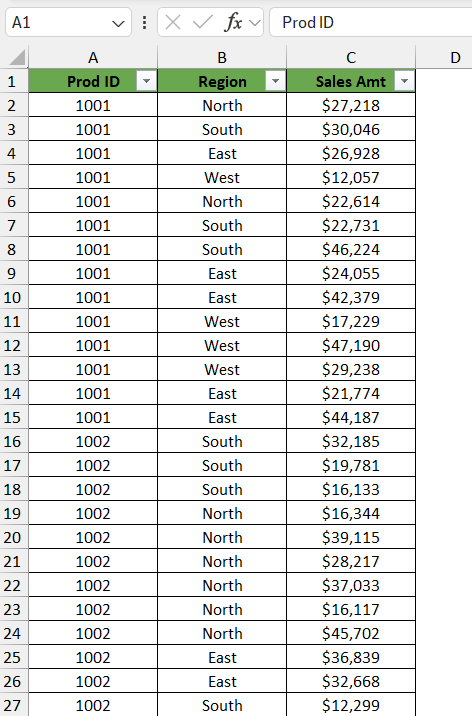
It can even be that you have not selected the entire range that has your sequential values. Just selecting the last cell will fill only that value in the cells where you drag the fill handle in Excel.
For example, if we drag the fill handle after only selecting cell B8, the entire range is filled only with the value “1002”.
Selecting the entire range and then using the fill handle will fill the new cells in sequential order.
Selecting B7 and B8 will help Excel recognize the pattern and correctly fill the subsequent cells.
Auto Fill options
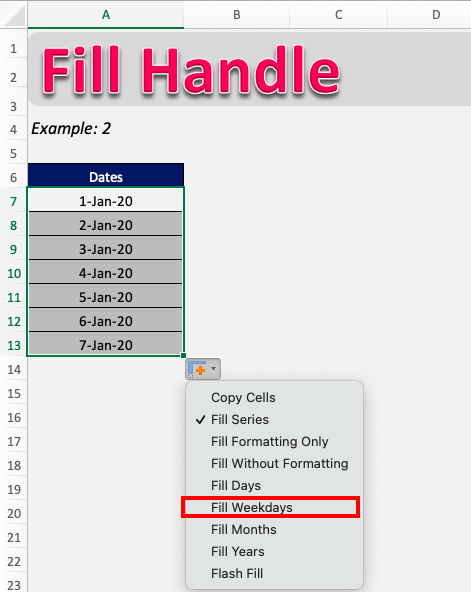
Suppose you have entered the date and you want to use the fill handle to get only weekdays. If you use the fill handle like before, it will just add the next dates in adjacent cells.
You can use the AutoFill option to get dates that are only falling on weekdays!
STEP 1: Select the entered values.
STEP 2: Go to the bottom right of your selection, you can drag the fill handle to fill dates below.
This will fill the dates one after the other!
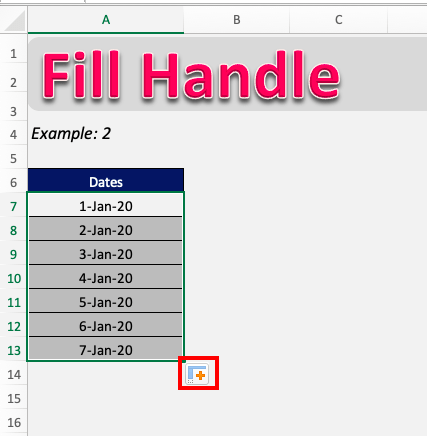
STEP 3: Click on the Fill Handle button at the bottom right.
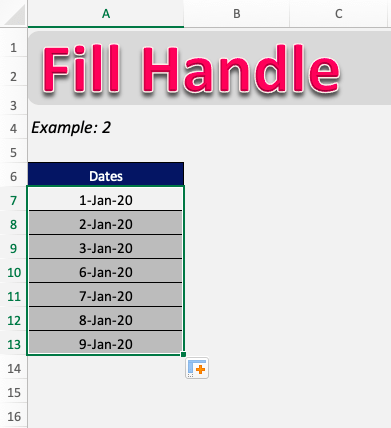
STEP 4: Select Fill Weekdays.
This will just include the weekdays and ignore the weekends like 4-Jan-20 and 5-Jan-20.
You can use other options as well like Fill Formatting only, Fill Months, Flash Fill, etc.
Expert Tips to Get Autofill Working Again
Removing Unnecessary Filters and Pressing Shortcuts Correctly
Getting the Autofill function back on track might be as simple as tidying up your workspace—specifically by removing filters that may be stifling its capabilities. Autofill doesn’t always play well with filtered data because it can’t accurately predict what you want to do. Here’s a quick fix: try hitting Ctrl + Shift + L to swiftly banish any filters on your table. Once the coast is clear, give Autofill another go using the fill handle. If you need those filters back later, no sweat—just use the same keyboard combo to bring them back.
Additionally, remember how you use shortcuts can make or break the Autofill experience. For instance, pressing and holding Ctrl or Command can change the game, causing Autofill to duplicate data instead of continuing a sequence. If Autofill isn’t behaving as expected, check if you’re accidentally pressing these keys. And, if you suspect your keyboard might be going rogue and pressing keys on its own, consider a cleaning session, or in extreme scenarios, a keyboard remapping to keep those keys in check.
Using Automatic Calculation to Ensure Up-to-Date Data
For your data to be fresh and the Autofill to flow seamlessly, syncing your calculations to update automatically is essential. Excel, by default, should have this enabled, but if you find yourself stuck with outdated information, you probably need to double-check the settings. Here’s a painless way to get back on track:
First, venture to the Formulas tab and locate the Calculation group. Within, you shall find Calculation Options; click it and choose Automatic. This ensures real-time updating as you modify the cells, including those magical Autofill moments. If your workbook has myriad formulas and massive data sets, switching to ‘Automatic except for Data Tables’ can speed things up. This option keeps things up-to-date while letting data tables wait their turn, preventing slowdowns during calculation-heavy sessions.
Prevention Strategies for Future Autofill Hiccups
Regular Maintenance and Updates for Excel
To keep your Excel humming along and head off potential Autofill obstacles, regular maintenance and timely updates are your best allies. Microsoft routinely releases updates to enhance functionality and zap bugs out of existence. Staying current with these updates ensures you’re working with the latest and greatest version.
Keep in the loop by enabling automatic updates. In Excel, click on ‘File’, go to ‘Account’, and under ‘Product Information’, you’ll find ‘Update Options’. Choose ‘Enable Updates’ if it’s available, or ‘Update Now’ to manually initiate an update check.
While you’re at it, occasionally clear your temporary files and perform a quick health check-up of your system’s hardware. It’s surprising how a bit of digital spring cleaning can perk up Excel’s performance.
Best Practices to Avoid Disruption in Autofill Function
To keep the Autofill feature running without a hitch, adopt a few best practices in your Excel routine. Consistency is key, so develop habits that foster a disruption-free environment for Autofill to thrive.
One crucial step is checking your workbook structure. Keep your datasets neat and organized, with clear headers and no mixed data types in single columns. This ensures that Excel’s pattern recognition works efficiently, which is integral to Autofill’s precision.
Another tip is to be mindful of the types of data you’re working with. When dealing with dates or sequences, confirm that the pattern is unambiguous to Excel. For example, a sequence of 01, 02, 03 can be interpreted as days or something else entirely. The more explicit the pattern, the better Excel will perform.
Regularly save copies of your Excel files, especially before making bulk changes with features like Autofill. This acts as a safeguard against accidental data loss or overwriting useful information.
Lastly, invest time in learning keyboard shortcuts and Excel formulas. They not only speed up your workflow but also minimize your reliance on the mouse, which can inadvertently lead to Autofill errors.
Frequently Asked Questions
Why Does Autofill Not Work Even with Correct Settings?
Even with the correct settings in place, Autofill might not work if there’s inconsistency in the data pattern, making it tough for Excel to detect what comes next. Additionally, hidden rows or columns, and filtered lists, can interrupt the sequence and confuse the feature. Moreover, Excel might be set to manual calculation mode, which would require a manual update for Autofill to process the pattern recognition. Lastly, a corrupt Excel installation could also hinder Autofill’s functionality. Remember, Excel’s a bit like a sharp-witted friend – they can only help when they clearly understand the task at hand!
Can Autofill Issues Be Linked to Specific Versions of Excel?
Absolutely! Autofill issues could be representative of compatibility snags, especially when working with older Excel versions. Newer features and bug fixes are usually reserved for recent iterations of the software. Consequently, if your version is outdated, it could lack the necessary updates that smooth out the Autofill kinks. Thus, it’s always a good idea to ensure your Excel is up-to-date — this not only resolves potential Autofill hiccups but also keeps your software fortified with the latest security patches and improvements. Consider this the digital equivalent of skipping the “vintage” vibes and keeping things current and classy.
Why isn’t my AutoFill working in Excel?
Your Excel Autofill might go on strike due to various reasons, such as inconsistent data patterns that confuse its logic, incorrect Autofill settings where the fill handle feature is turned off, or even a corrupted Excel installation. Sometimes, the solution might be as simple as making sure you’ve started your series correctly or ensuring no filters are blocking Excel’s ability to see the full picture. Oh, and occasionally, Excel just needs a quick restart or an update to jog its memory and get things working again. Remember, tech quirks can happen to anyone; it’s all about knowing the little tricks to coax them back into action!
John Michaloudis is a former accountant and finance analyst at General Electric, a Microsoft MVP since 2020, an Amazon #1 bestselling author of 4 Microsoft Excel books and teacher of Microsoft Excel & Office over at his flagship MyExcelOnline Academy Online Course.


