Key Takeaways:
- Dopdowns can smooth workflow and increase efficiency.
- It minimizes manual errors and users have to select from the available options.
- It can be created easily by following the stepwise instructions.
- Add an input message to provide clarity and proper instructions to users.
- Dependent dropdowns can be used for complex hierarchical data.
Table of Contents
Introduction to Yes No Dropdowns
What is a Yes/No Dropdown?
A Yes No dropdown is a data validation option in Excel that enables users to select a value from a range of options. This prevents users from manually typing a value, hence minimizing the chance of any error and maintaining uniformity.
Why use Dropdown?
Dropdown allows you to optimize workflow and minimize the chance of error. It provides the user with a list of a standard set of values like ‘Yes’ or ‘No’. This also speeds up the data entry process and make data uniform and boost productivity.
Step-by-Step Guide
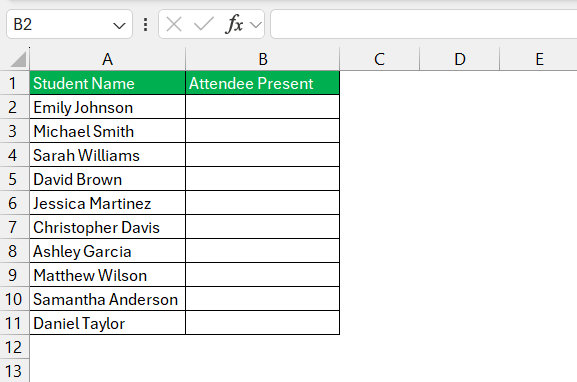
Step 1: Select the Cells where you want the dropdown
Seelct the cell or cells where you want the Yes/No dropdown list.
Step 2: Use Data Validation
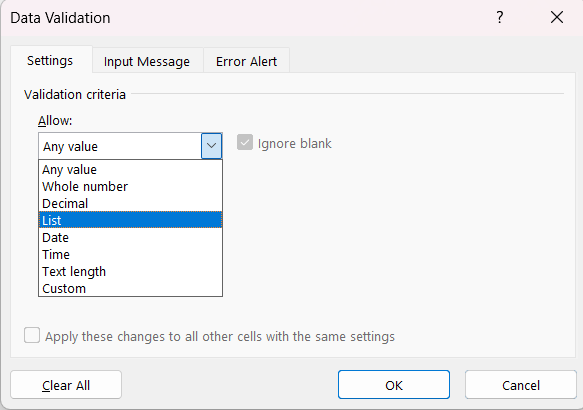
- Select the cell, go to the ‘Data’ > ‘Data Validation.’
- Select List.
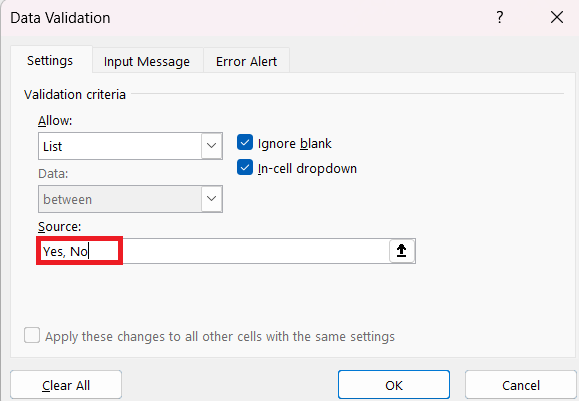
- In the ‘Source’ box, type the options manually or specify the range where the options are typed.
- Click ‘OK.
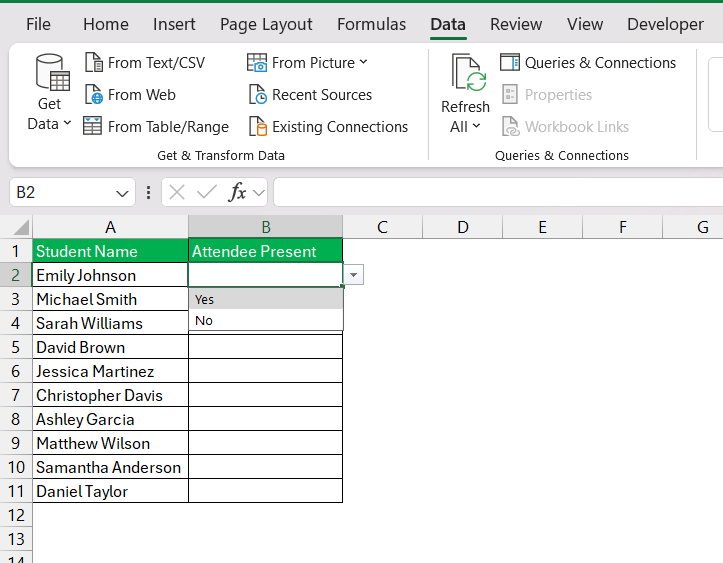
The dropdown list is now ready!
Advanced Functionality of Dropdown
Input Message in Data Validation
To include useful information in your dropdown, follow these steps:
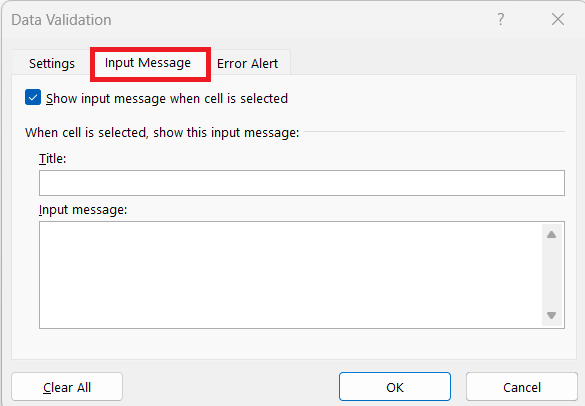
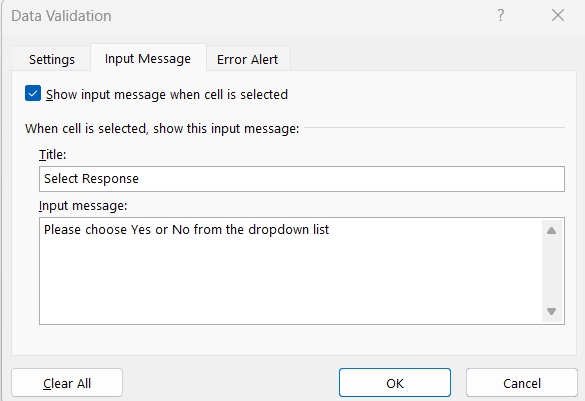
- In the ‘Data Validation’ dialog box, select ‘Input Message’.
- Here, you can add a title and an input message. This will show the users what they need to do, thereby making the input process easier.
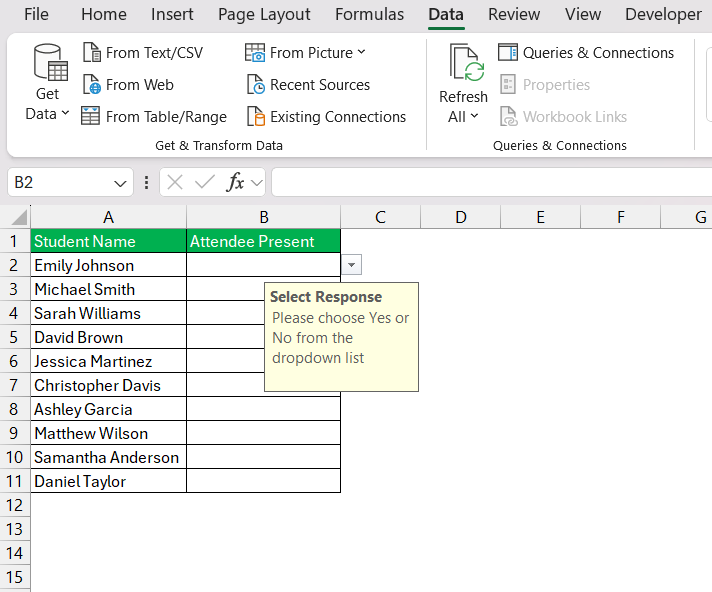
When the user selects the cell with the dropdown, a note will appear to tell them what to do.
Error Alerts
It is important to enable error alerts in data validation, as it will make the data entry process accurate. The following changes that be made to incorporate error alerts:
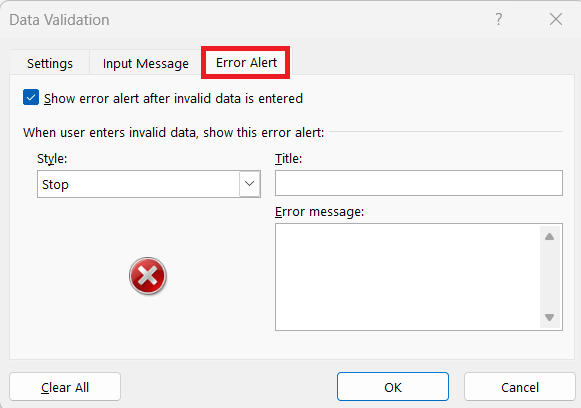
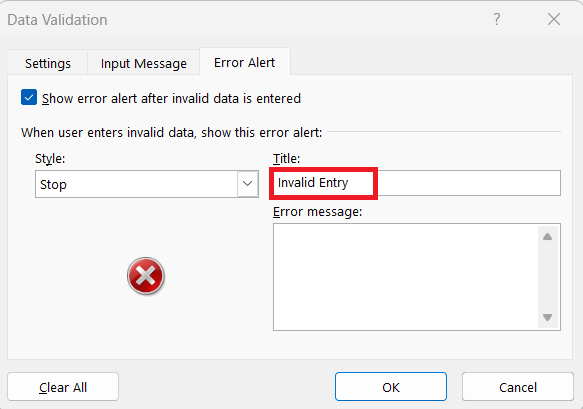
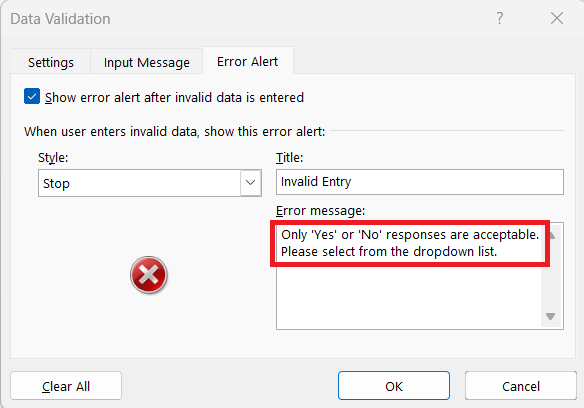
- In the ‘Data Validation’ dialog box, go to the ‘Error Alert’ tab.
- Tyoe a Title for your error message.
- Type a message to let users know what went wrong.
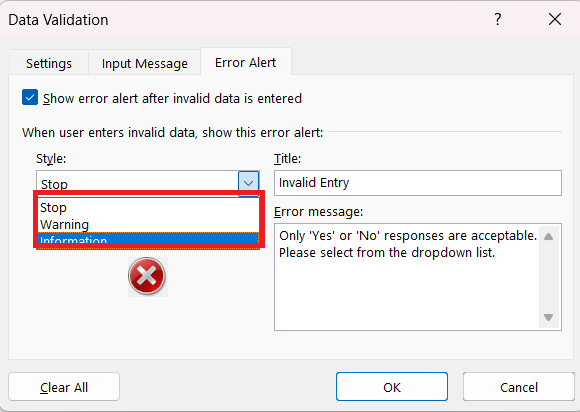
Deciding on the ‘Style’ of the alert is important, too:
- ‘Stop’ will block any incorrect entry outright.
- ‘Warning’ will ask for confirmation before accepting a wrong entry
- ‘Information’ will show a message for incorrect entry.
These options help you add restrictions, hence minimizing the risk of errors.
Advanced Techniques
Dependent Dropdowns
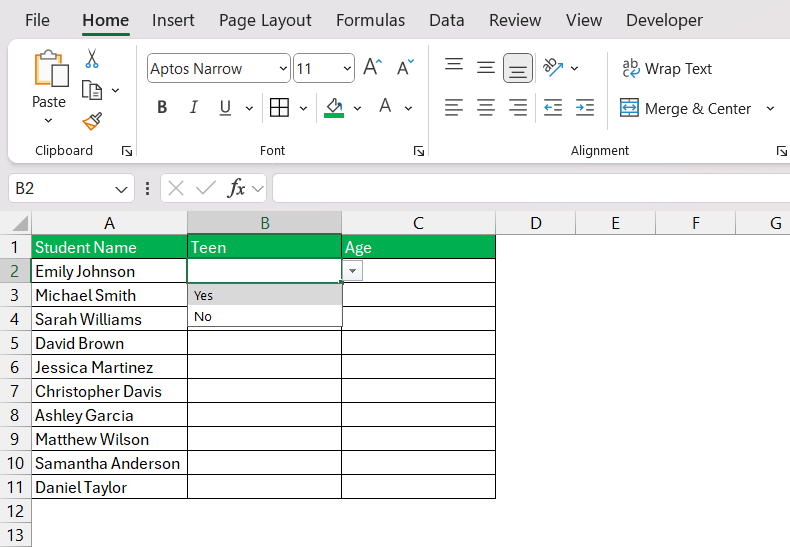
Expanding the utility of your Excel sheet is possible by setting up dependent dropdowns that change based on the selection in your Yes/No dropdown.
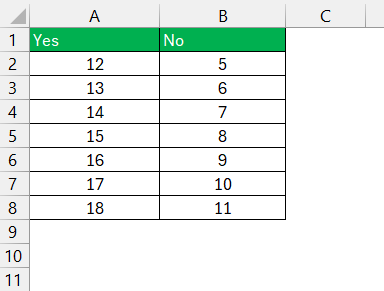
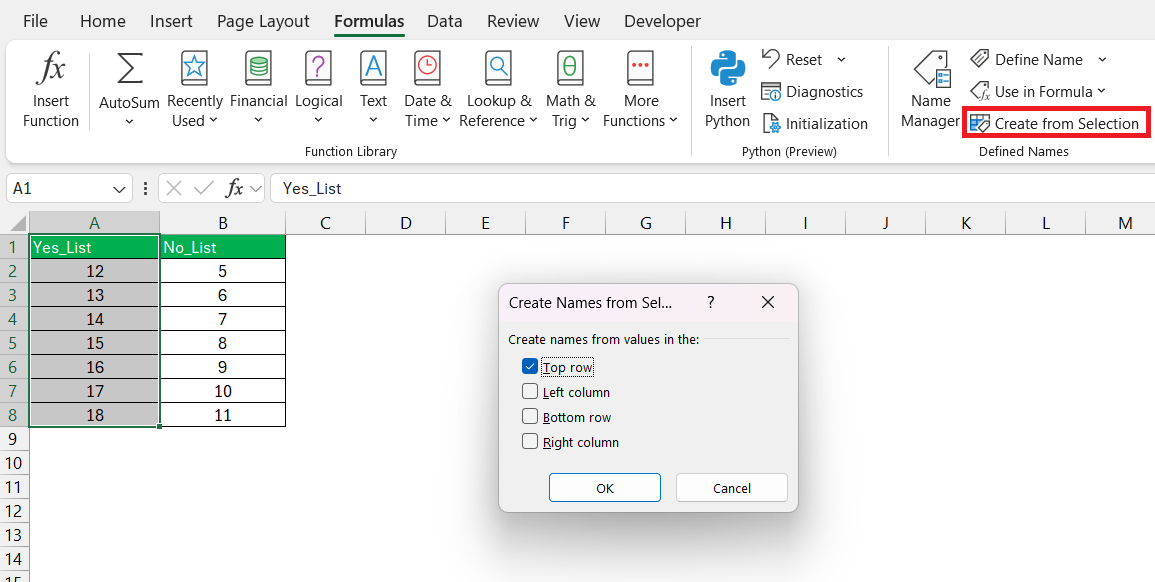
STEP 1: Define the entries for each scenario (Yes or No) in separate lists on your worksheet.
STEP 2: Select the Yes list with the header, go to Formulas > Create from Selection > Top Row.
STEP 3: In one of the cells, select an option using the Data Validation dropdown.
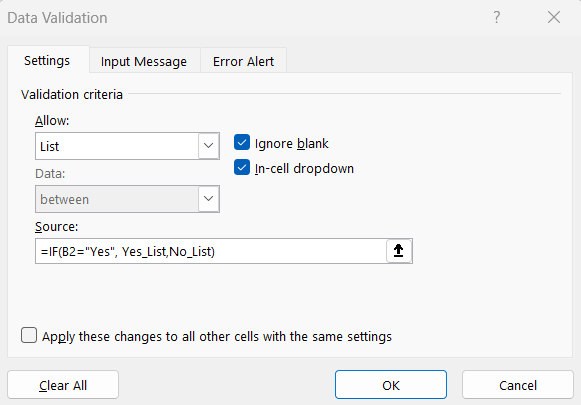
STEP 4: To create dependent cells, you can use an IF formula in the Source box.
=IF(B2="Yes", Yes_List, No_List)
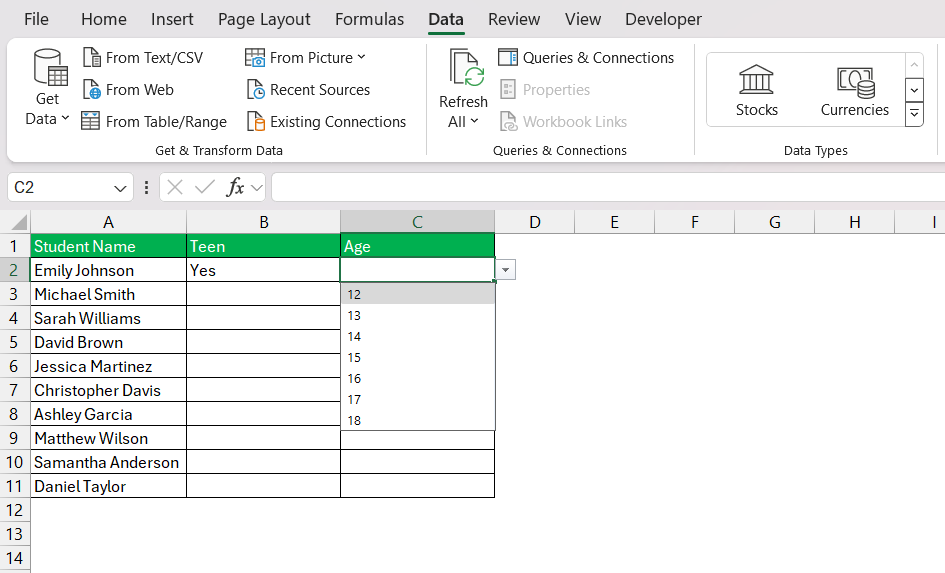
Once you select an item in the primary dropdown, the options in the secondary dropdown will update automatically.
FAQs
1. Explain what is a dropdown.
A dropdown is a data validation option in Excel that gives users a range of options from which they can select a value. This improves efficiency and minimizes the chance of error.
2. Mention the steps for adding a dropdown?
To add a dropdown list in a cell, simply go to the Data tab and select Data Validation. In the dialog box, select ‘List’ and either type the options or select the range containing the options.
3. How to create Yes/No dropdown in Excel?
To create a Yes/No dropdown in Excel, select the cell and go to the Data tab > Data Validation. In the dialog box, under Allow select List, type “Yes,No” in the ‘Source’ box, and press ‘OK’.
4. How to add Yes as the default option in the dropdown?
In the Data Validation dialog box, go to Source and type Yes and No. Now, simply select ‘Yes’ to make it the default option.
5. How can I make a drop down list with only one option?
In the Data Validation dialog box, go to Source and type one option you want in the dropdown list.
John Michaloudis is a former accountant and finance analyst at General Electric, a Microsoft MVP since 2020, an Amazon #1 bestselling author of 4 Microsoft Excel books and teacher of Microsoft Excel & Office over at his flagship MyExcelOnline Academy Online Course.

