Download our 141 Free Excel Templates and Spreadsheets!
Embracing the Power of PowerPoint for Video Editing
PowerPoint isn’t just for slides and bullet points—it’s an unexpectedly powerful tool for video editing as well. While it may not replace professional video editing software, learning how to edit PowerPoint videos can offer a range of features that enable users to modify videos for presentations directly within the program. This capability simplifies the process of enhancing your narrative with visual and audio cues, ensuring that your message is both received and remembered by your audience. With PowerPoint, you have the means to resize, trim, add bookmarks, and even set fade durations without ever having to leave your presentation.
Table of Contents
Getting Started with Video Editing in PowerPoint
How to Insert a Video into Your PowerPoint Slide
Inserting a video into your PowerPoint slide can significantly boost the impact of your presentation. Here’s a step-by-step guide on how to do it:
STEP 1: Open your PowerPoint presentation and select the slide where you want the video to appear.
STEP 2: Click on the “Insert” tab at the top menu to reveal the insertion options.
STEP 3: Click on the “Media” drop down option, choose “Video” and select “Online Video” if you’re using a video from YouTube or another online source, or “Video on My PC” to upload a file from your computer.
STEP 4: If you’re embedding an online video: a. Search for the video in the “Search YouTube” box or by pasting the URL if you have it. b. Select the video from the search results, and click “Insert.” c. Alternatively, use an embed code by copying the iframe code from the video source and pasting it into the “From a Video Embed Code” box.
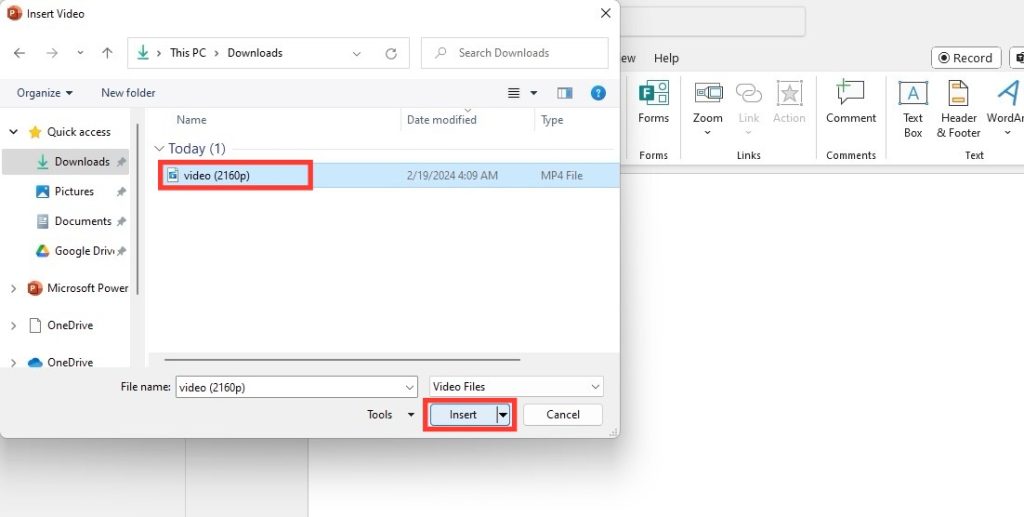
STEP 5: If you’re uploading from your PC: a. Navigate to the file location. b. Select the video you wish to upload and click “Insert.”
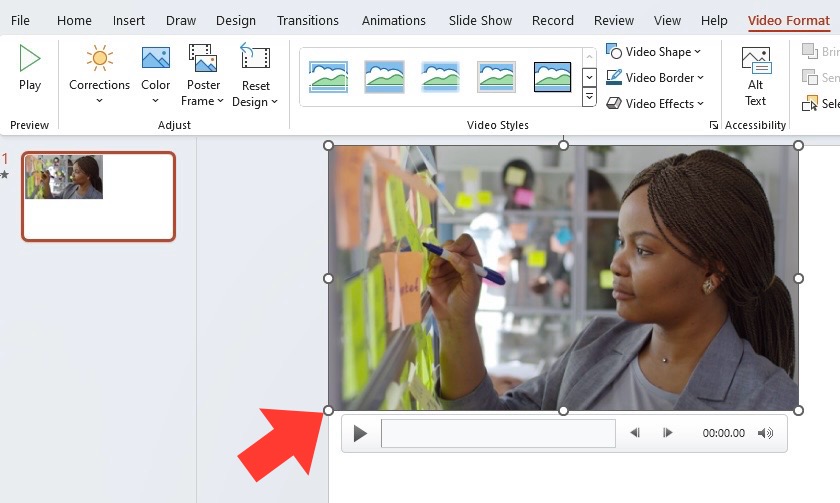
STEP 6: Once the video is inserted, it will appear as a rectangle on your slide. Click and drag to move it or use the corners to resize it according to your needs.
STEP 7: To preview the video, right-click on the video rectangle, choose “Preview,” and then click the play button.
Always make sure you have the necessary Office updates installed for proper video insertion and playback. If the video does not insert correctly or fails to play, these updates might be a requirement you’re missing.
Initial Steps for Trimming and Sectioning Videos
Before diving into advanced editing, mastering the initial steps of trimming and sectioning your video is crucial. These simple edits can significantly enhance the effectiveness of your presentation by focusing your audience’s attention on the most relevant sections of your video content. Here’s how to get started:
STEP 1: Select and insert the video onto your PowerPoint slide as outlined in the previous section.
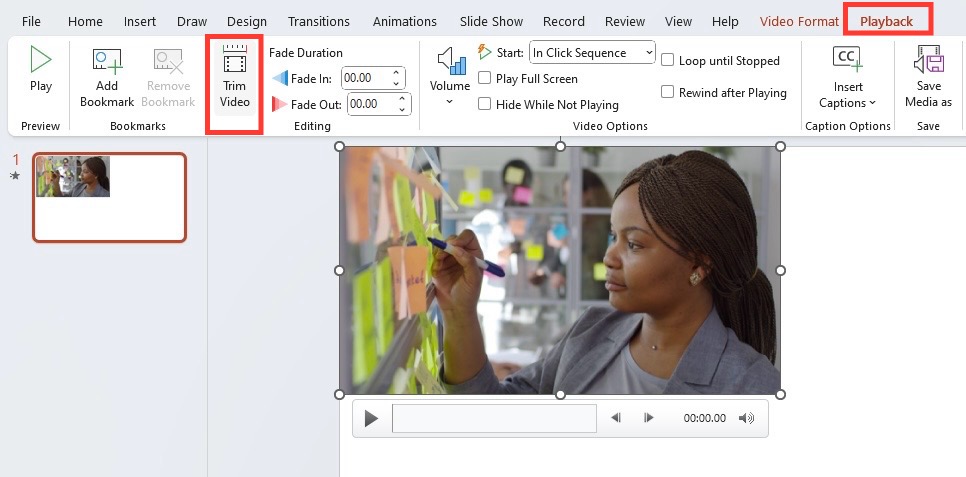
STEP 2: To begin trimming your video, select the video on the slide. This enables the “Video Tools” section on the toolbar ribbon, showing you two tabs: “Format” and “Playback.”
STEP 3: Click on the “Playback” tab; this is where you’ll find the “Trim Video” option.
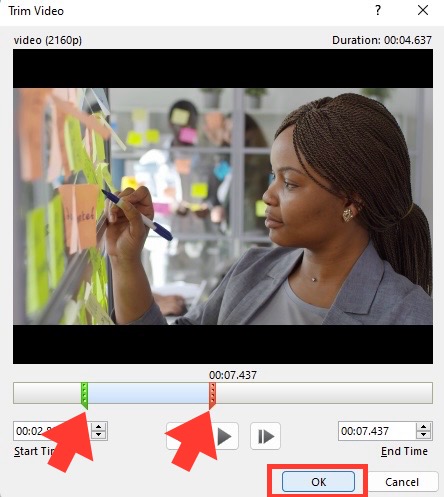
STEP 4: Once you click on “Trim Video,” a dialog box will appear, showcasing a preview of your video along with play controls and two markers: a green start marker and a red end marker.
STEP 5: Click “Play” within the Trim Video box to determine the exact starting and ending points for your clip. Use “Pause” when you reach the desired point.
STEP 6: You can then drag the green marker to trim the beginning of the clip and the red marker to trim the end of the clip. Use the “Next Frame” and “Previous Frame” buttons to fine-tune your selection to the exact frame.
Once you’re satisfied with your trimmed video length, select “OK” to commit the changes.
By following these initial steps, you ensure that only the most significant parts of the video are presented, keeping your audience focused and engaged. These editing capabilities within PowerPoint can drastically reduce the need for external video editing tools for presentation purposes.
Applying Video Effects:
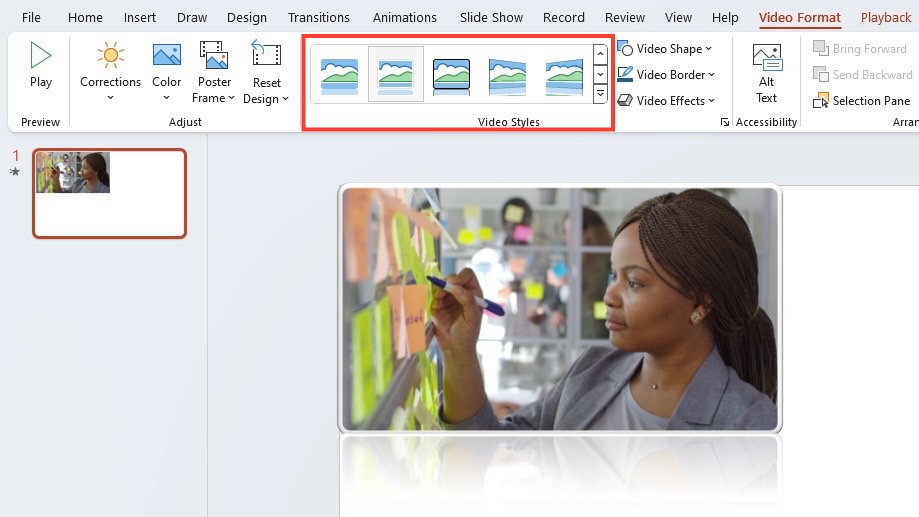
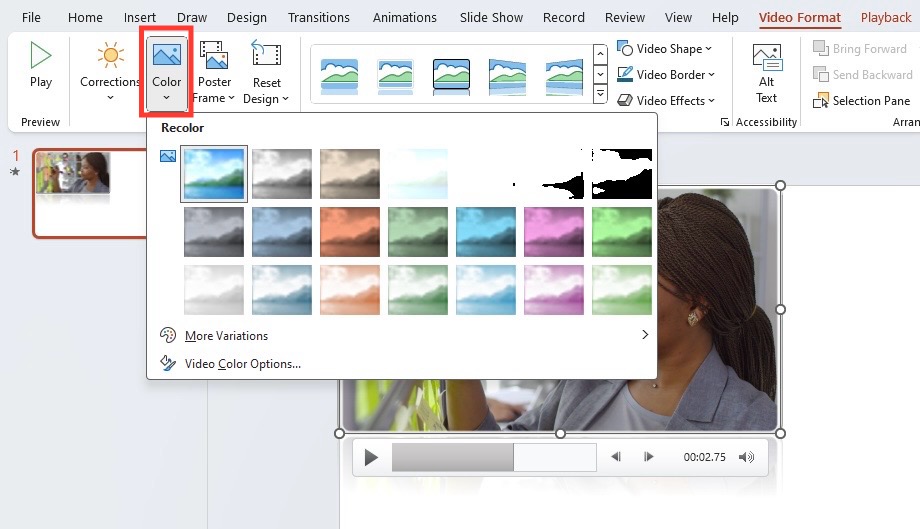
STEP 1: To add a visual effect, select the video and go to the “Video Format” tab in the “Video Tools” section.
STEP 2: In the “Video Styles” group, try different styles to add borders or effects like reflections, bevels, or shadows.
STEP 3: You can also click on “Color” to change the color saturation or tone of the video, or use “Corrections” to adjust the brightness and contrast.
These enhancements not only improve the visual appeal but also structure the content in a way that helps the audience digest information more efficiently. Bookmarks can act as cues for the presenter or triggers for animations, transforming a static video into an interactive multimedia experience.
Technical Insights for Smooth Playback
Ensuring Optimal Video Quality in Your Slides
To ensure that the videos in your PowerPoint slides are of optimal quality and deliver the best possible experience to your audience, follow these guidelines:
- Choose the Right Resolution: Use videos that match or slightly exceed the resolution of the display you will be presenting on. However, be wary of file size and performance impacts, especially when using resolutions higher than 1080p on less capable hardware.
- Maintain Aspect Ratio: PowerPoint slides typically have a 16:9 aspect ratio for widescreen displays. Ensure that your videos adhere to this ratio to prevent them from stretching or having black bars on the sides.
- Understand Compression: PowerPoint may compress videos upon saving the presentation, which can reduce video quality. To mitigate this, consider optimizing videos outside of PowerPoint first and adjust the compression settings within PowerPoint to ensure the highest possible quality.
- Embed Rather Than Link: Whenever possible, embed the video directly into the slide rather than linking it. This prevents issues with lost files or broken links, especially when transferring the presentation between computers.
- Avoid Overloading with Videos: A presentation cluttered with too many video files can become sluggish and may buffer during playback. Be judicious in your use of video materials, and consider the necessity of each clip.
- Optimize for Performance: Before finalizing your presentation, test the videos on the intended hardware. If you encounter any lags or stuttering, you may need to reduce the video’s quality for smoother playback.
- Utilize PowerPoint’s Video Tools: Use the built-in video editing tools to crop, trim, or compress your videos directly within PowerPoint to ensure they are well-suited for your presentation context.
- Prefer Common Formats: Stick to widely supported video formats such as MP4 with H.264 video and AAC audio codecs to avoid compatibility problems across different devices and PowerPoint versions.
- Ensure Audio Quality: Video isn’t just about the picture; high-quality audio is equally important. Check that the sound is clear, at the right volume, and free from background noise or distortion.
- Check the Playback Settings: Set up your videos to play the way you want—automatically or when clicked. Verify thesesettings under the “Video Tools Playback” tab to avoid any awkward fumbling during the actual presentation.
- Use High-Quality Source Material: Always start with the highest quality video that is practical for your purposes. It’s easier to compress a high-quality source down than to try and improve the quality of an already poor source.
- Prepare for Different Scenarios: Be ready for various presentation environments. If presenting online or through video conferencing tools, understand that you may need to adapt your video quality to bandwidth limitations.
- Test on Different Screens: If possible, test your presentation on screens of different sizes and resolutions to ensure that the video maintains quality across various displays.
By following these steps to ensure optimal video quality in your PowerPoint slides, you’ll be better prepared to deliver a professional and engaging presentation that resonates with your audience.
Troubleshooting Common Issues When Embedding Videos
Extending Beyond Basic Edits
Planning your Content:
- Define Your Objectives: Understand the purpose behind incorporating video—be it to explain complex topics, demonstrate procedures, or stir emotional responses.
- Storyboard Your Video: Lay out a storyboard that maps the progression of your video content alongside your slides. This ensures coherence and helps maintain viewers’ engagement.
Designing Visually Engaging Slides:
- Use High-Quality Visuals: Incorporate high-definition images or animations that complement your video content and provide a visual break from text-heavy slides.
- Maintain Consistency: Keep a consistent theme, font, and color palette across slides to provide a professional look and reinforce brand identity.
- Clear Typography: Choose fonts and sizes that are easy to read even on smaller screens, ensuring accessibility for all viewers.
Engaging Viewers:
- Tell a Story: Use videos to tell stories or present case studies. This narrative technique can enhance retention and make learning points clearer.
- Use Annotations: PowerPoint allows you to annotate over videos during a presentation, take advantage of this by adding on-the-fly commentary or highlighting critical elements within the video.
- Provide Context: Before playing a video, introduce the segment to your audience. Give them an idea of what to look for and why the video is important to the presentation.
- Reflective Pauses: After the video, allow time for reflection or discussion. You can ask questions related to the video content to further engage the viewers and deepen their understanding.
Exporting and Sharing Presentations:
- Convert to Video: You can turn your entire PowerPoint presentation, including embedded videos, into a video file. This is particularly useful for eLearning, allowing learners to view the material at their own pace.
- Optimize for Online Platforms: If you plan to share your presentation online, remember to optimize it for the specific platform, whether it’s for a webinar, a learning management system, or social media.
By applying these strategies to your visual presentations and eLearning content, you can create an immersive and impactful learning experience that leverages the power of video within PowerPoint.
Exporting Your Presentation as a Video File
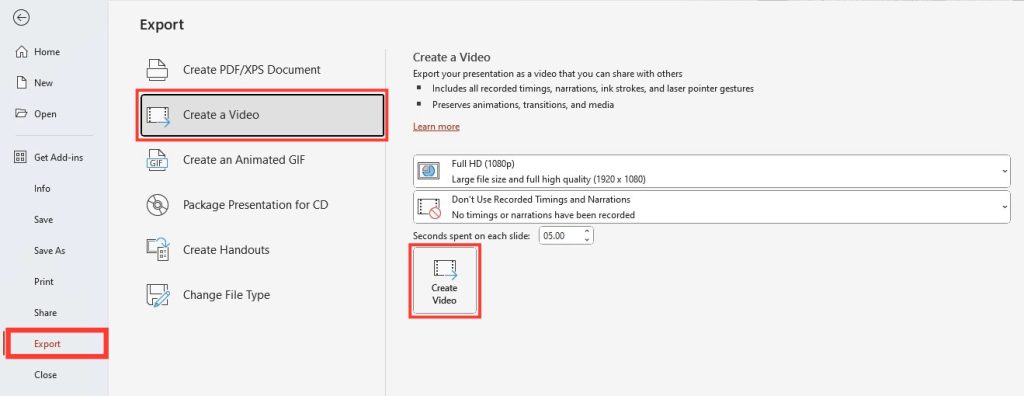
Exporting your PowerPoint presentation as a video file is a valuable technique for sharing your work across various platforms. This process allows you to create a stand-alone video version of your presentation, complete with all the incorporated media and recorded timings. Here’s how to do it:
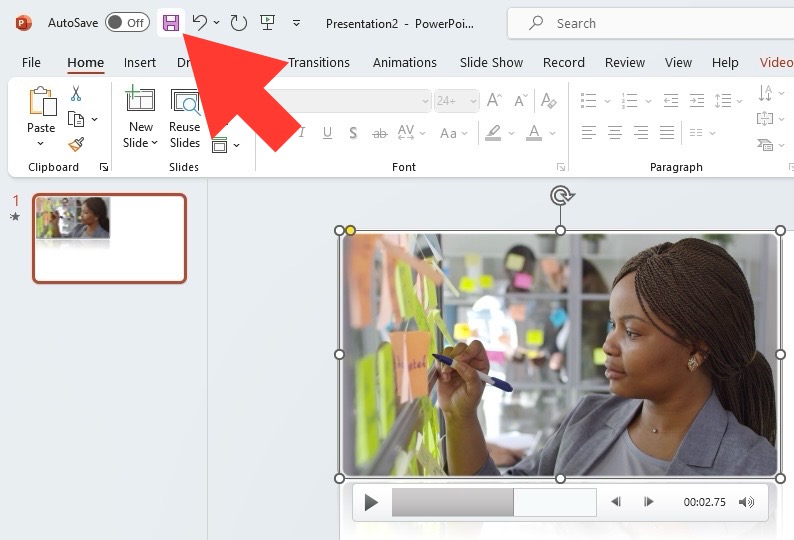
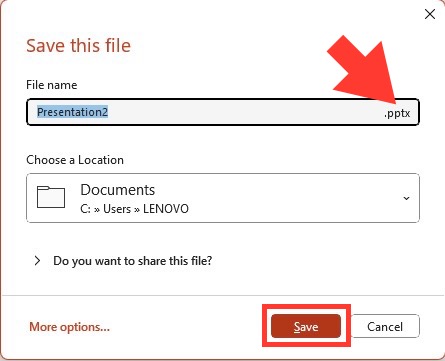
STEP 1: Save Your Presentation: Before starting the export process, save your work in the PowerPoint (.pptx) format to ensure all changes are up-to-date.
STEP 2: Choose the Right Video Quality: Click on “File” > “Export” > “Create a Video”. In the first dropdown under the “Create a Video” section, choose the quality of the video that suits your needs. Ranging from presentation quality (1920×1080) for HD screens to low quality (852×480) for smaller, portable devices, select an option that provides the best balance between quality and file size.
STEP 3: Timing and Narration Settings: In the second drop-down box under “Create a Video”, select whether you want to use recorded timings and narrations or not. If you haven’t recorded any, choose “Don’t Use Recorded Timings and Narrations”, and PowerPoint will default to a set number of seconds on each slide. You can modify this time in the “Seconds to spend on each slide” box.
STEP 4: Click ‘Create Video’: Once your preferences are selected, click the “Create Video” button.
STEP 5: Name and Save Your Video: In the “File name” box, enter a name for your video file, and browse for the folder to save it. Then click “Save”.
STEP 6: Select the File Format: In the “Save as type” dropdown, choose either “MPEG-4 Video” or “Windows Media Video”. These formats are broadly compatible across different video players and devices.
STEP 7: Monitor the Export Process: Depending on the complexity of your presentation and the length of your video, the creation process might take some time. You can track progress at the bottom of the PowerPoint window.
STEP 8: Test Your Video: Once the video is created, play it through to make sure everything looks and sounds as it should.
Tips:
- Exporting long videos can be time-consuming; consider setting the video to be created overnight or at a time when it won’t interrupt your workflow.
- For presentations with a lot of animations or high-resolution media, make sure to have a powerful enough computer to handle the process.
- If the video is intended for online platforms, check if there are specific video specifications recommended by the platform (such as dimensions, file size limits, etc.) and adjust your settings accordingly.
With those steps, you have a video file of your PowerPoint presentation that can be easily shared, uploaded, or played independently of the PowerPoint software, broadening the accessibility of your content.
FAQ: Mastering Video in PowerPoint
What Are the Key Benefits of Embedding Videos in PowerPoint?
Embedding videos directly into PowerPoint slides offers several distinct advantages that can enhance the overall impact and effectiveness of your presentations:
- Seamless Integration: Embedded videos play directly within the PowerPoint interface, providing a smooth and professional experience, without leaving the presentation or relying on external media players.
- Reliability: Since the video file becomes part of the PowerPoint file, you’re not dependent on internet connections for online video streaming, thus avoiding potential buffering or loading issues.
- Ease of Control: You can directly control video playback during your presentation, with options to pause, rewind, or skip to specific sections using PowerPoint’s built-in video tools.
- Consistent Format: Embedding ensures videos appear as intended across different devices and software versions because the videos are part of the PowerPoint file itself.
- Increased Engagement: Videos can capture attention and convey information in a dynamic way, breaking up the monotony of text-heavy slides and engaging viewers on multiple sensory levels.
- Customization Options: PowerPoint allows you to trim videos, add effects, adjust brightness and contrast, or even bookmark specific playback points for easy access.
- Simplified Sharing: When sharing the presentation, there’s no need to worry about separately importing video files, as everything is self-contained within the PowerPoint slide deck.
- Privacy and Security: Embedding keeps videos private, as they don’t need to be hosted on a public platform like YouTube, where they might be visible to unintended audiences.
- Professional Quality: The ability to integrate high-quality video content directly into a presentation can add to the professionalism and perceived value of your work.
These benefits substantiate the practice of embedding videos in PowerPoint as a preferred method for incorporating multimedia content into professional presentations.
Can I Use Videos from Sources Other than YouTube in My Presentation?
Yes, you can use videos from sources other than YouTube in your PowerPoint presentations. While YouTube is a significant and widely used source for video content, other video hosting platforms like Vimeo, Dailymotion, Wistia, and Microsoft Stream provide similar functionalities for video embedding. Here are some points to consider when using videos from these alternatives:
- Vimeo: Known for its high-quality video support, Vimeo is a popular choice for creative professionals. You can embed videos from Vimeo by using the embed code provided by the platform.
- Dailymotion: Offers a variety of content similar to YouTube and provides embedding options that can be utilized in PowerPoint presentations.
- Wistia: Geared more towards business users, Wistia offers robust video hosting and detailed analytics which can be particularly useful for marketing and eLearning purposes.
- Microsoft Stream: If you have a Microsoft 365 business or education subscription, you can embed videos from Microsoft Stream, which is integrated within the Office ecosystem for secure video sharing.
When using videos from these or any other sources, always remember to:
- Check Licensing: Ensure you have the right to use the video content from sources outside of YouTube, especially for commercial or educational use.
- Review Terms of Use: Be aware of the terms of service for each platform, particularly how they allow their content to be used and embedded.
- Test Before Presenting: Embed the video in your presentation well in advance and test to ensure playback compatibility and performance.
- Internet Connection: Keep in mind that for embedded videos from online sources, an active internet connection is typically required for playback unless the platform offers an offline option.
- Quality and Accessibility: Consider the video resolution and accessibility options, such as captions, to make your presentation inclusive for all audience members.
- Backup Plan: Have a backup plan, such as downloading a local copy of the video (when permitted), in case of technical difficulties with streaming during the presentation.
By considering these factors and following platform-specific embedding procedures, you can include a diverse range of video sources in your PowerPoint presentations, enhancing the quality and variety of your content.
How Do I Enhance Audience Engagement Using Video Sections in PowerPoint?
Enhancing audience engagement using video sections in PowerPoint involves strategic placement, purposeful content, and interactive elements that make your presentation stand out. Below are strategies to leverage video sections effectively:
- Strategic Video Placement: Introduce video sections at critical points to provide visual explanation or emphasize a key message. Position videos after a buildup of context to maximize their impact.
- Relevant Content: Select videos that are directly linked to your presentation’s message. Ensure that the content is not only informative but also engaging and of interest to your audience.
- Interactive Segments: Use video sections as a springboard for interaction. Pause for questions, initiate discussions, or follow up with an interactive quiz that reinforces the video content.
- Short and Sweet: Keep video sections concise. Short clips are generally more engaging and are likely to hold the audience’s attention better than lengthy segments.
- Create a Narrative: Use videos to tell a story rather than present stand-alone facts. Stories resonate with audiences, making your presentation more memorable.
- Visually Dynamic: Opt for high-quality videos with clear images and dynamic content. A well-shot and well-edited video can command viewers’ attention in ways that text and static images cannot.
- Bookmarking: Utilize bookmarks in your video sections to jump to specific points for elaboration or discussion. This also makes it easier to manage and navigate longer videos during a presentation.
- Preview and Context: Before showing a video, provide a brief context or introduction to set expectations. After the video, summarize key points and relate them to your message.
- Use Annotations: PowerPoint allows you to draw or highlight on slides during a presentation. You can use this feature to annotate key elements within your video as it plays.
- Seamless Transition: Ensure transitions into and out of video sections are smooth. Use fade-ins and fade-outs where appropriate, and match the transition style to the mood of the video content.
- Polling and Feedback: Encourage audience participation by integrating live polls or feedback sessions immediately following a video section, asking for their thoughts or reactions to the content.
- Accessibility: Include subtitles or captions for your videos,ensuring that those with hearing impairments can also engage with the content fully.
- Reflection Time: Offer a moment for the audience to reflect on the video content. This can be particularly effective after presenting complex information or emotionally charged materials.
- Technical Reliability: Check the technical aspects beforehand to ensure videos play smoothly. Glitches or delays can quickly disengage your audience.
- Consistent Look and Feel: Maintain a consistent design theme throughout your presentation and video sections. This consistency can help keep your audience grounded and focused.
By applying these methods, you’ll be able to create powerful and engaging video sections that enhance audience engagement and contribute to a more impactful PowerPoint presentation.
What Should I Do If a Video Won’t Play During a PowerPoint Presentation?
If you encounter a scenario where a video won’t play during a PowerPoint presentation, you’ll need to quickly troubleshoot the situation. Here are some practical steps to take:
- Check Internet Connection: If the video is an online video, confirm that you have a stable internet connection. Try refreshing the connection or connecting to a different network.
- Verify Video Link: For linked videos, ensure that the link is intact and that the video source is not moved or deleted. Verify that the video is still available at its source.
- Supported Formats: Make sure the video is in a format supported by PowerPoint (such as MP4 with H.264 video codec and AAC audio codec). Convert the video file if necessary.
- Codec Issues: The absence of the correct codec on your computer can prevent video playback. Install the necessary codec or use a media player that provides the required support.
- Slide Show Mode: Ensure you’re in Slide Show mode as some videos may not play in the editing view.
- Compatibility View: If you’re using an older version of PowerPoint, consider upgrading or ensuring the video format is compatible with the version you have.
- Re-embed Video: Try re-embedding or re-inserting the video into the PowerPoint slide. This can sometimes resolve playback issues.
- Check for Updates: Verify if your version of PowerPoint needs any updates, which may contain fixes for video playback issues.
- Test on Different Device: If possible, try running your presentation on a different device to determine if the issue is with the original device’s hardware or software.
- Prepare a Backup: If video playback continues to fail, have a backup plan such as a direct link to the video hosted online, a backup media player ready to play the video outside of PowerPoint, or carry a transcript or summary to deliver the content verbally.
- Use Safe Mode: Open PowerPoint in Safe Mode to disable add-ins that might interfere with video playback.
- Optimize Media Compatibility: Use the ‘Optimize Media Compatibility’ feature found in the Info section of File menu for newer PowerPoint versions, which can help resolve issues with multimedia file formats or codecs.
Alwaysremember to preview and test your slides and embedded videos before the actual presentation to catch and resolve potential issues. By following these troubleshooting steps, you can minimize the disruption caused by video playback problems and maintain the flow of your presentation.
John Michaloudis is a former accountant and finance analyst at General Electric, a Microsoft MVP since 2020, an Amazon #1 bestselling author of 4 Microsoft Excel books and teacher of Microsoft Excel & Office over at his flagship MyExcelOnline Academy Online Course.


